- Capture all android network traffic
- Modify target app
- Setup pcap remote
- Setup wireshark
- Перехват HTTPS-траффика между Android-устройством и внешним сервером
- Теория
- Практика
- Capture Android Mobile Web Traffic With Fiddler
- Prerequisites
- Set up Fiddler
- Set up Android Networking
- Google Chrome Settings
- Set up Android Networking
- Web Browsing
- Install Fiddler Certificate to Android
- Return to Normal Android Networking
Capture all android network traffic
So you are performing a pentest on an android app and you have got into a situation where basic certificate pinning bypass doesn’t work. Or you have been dealing with custom protocol instead of good ol’ HTTP. The goal of this post is to teach you how to capture any network traffic on your android device (no root required).
How does it work you ask? We are going to use a fantastic app, provided by Andrey Egorov(@egorovandreyrm.), pcap remote. It works by creating a VPN connection and capturing all the traffic going through that connection and redirecting it to the wireshark where we can analyze it in real-time.
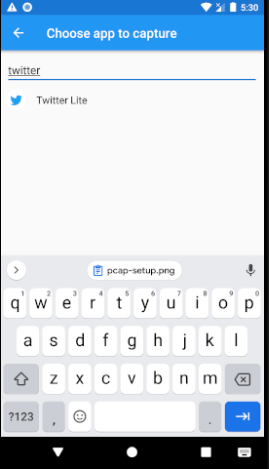
If you are testing on an android version greater than 7.0 you are going to need to tamper with an apk a little, since google changed network security policy and made it “harder” for us to play. Basically what we need to do is to modify the application to accept any self-signed CA so we can intercept and decrypt the traffic. For this example, I’m going to use ‘twitter’ android app. Let me show you.
Modify target app
Use apktool to decompile your apk.
In AndroidManifest.xml edit application tag and add ‘networkSecurityConfig’ parameter. Your target application might already have this value set, in that case you can skip this step.
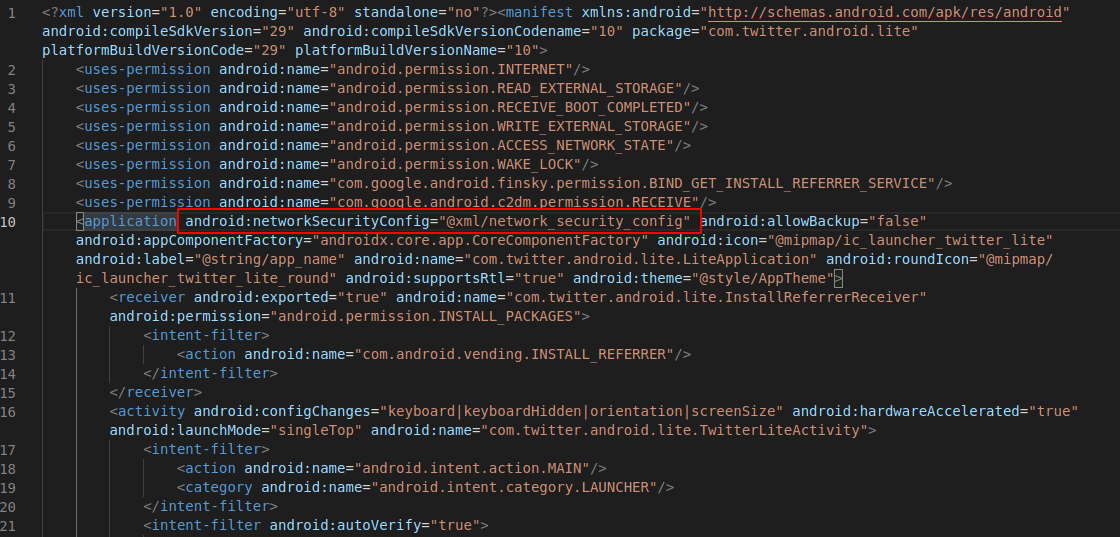
Create/edit network security configuration file. It is stored at location specified in the application tag in AndroidManifest. By default its location is: ‘res/xml/network_security_config.xml’.
Edit it to look like this:
Recompile the apk, sign it and install it on the device.
Setup pcap remote
Now let’s setup pcap remote.
First we are going to install ssl certificate. Tap on 3 dots in top right corner, then settings and then ‘Install’ under ‘SSL Certificate’ category, follow the installation dialogs and set the device password if prompted. 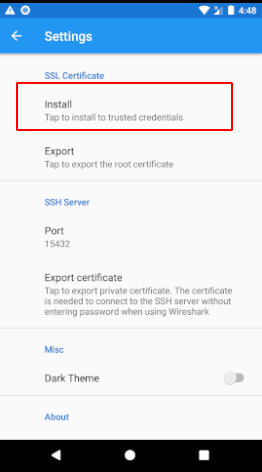
Make sure to select ‘SSH Server’ as capturing mode and toggle ‘Make HTTPS/TLS connections decryptable’ . 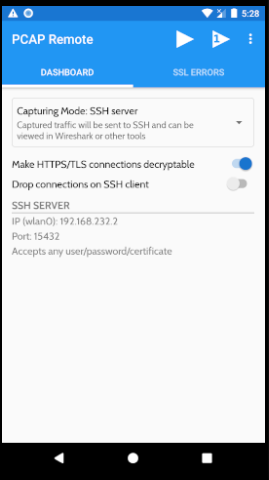
On the top click on the triangle icon with number one in it and select your target application. 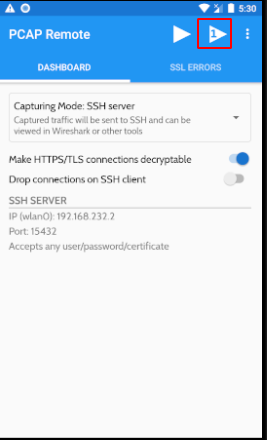
Setup wireshark
Now it’s time to connect wireshark with pcap remote.
NOTE: If you are using android emulator for testing, make sure to portforward the port.
Open wireshark and select ‘SSH remote capture: sshdump’. 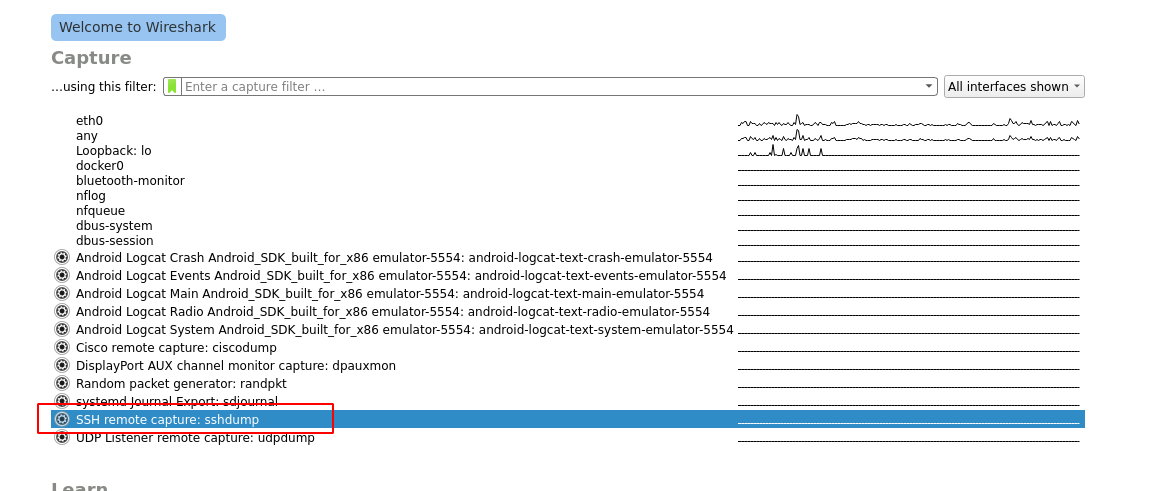
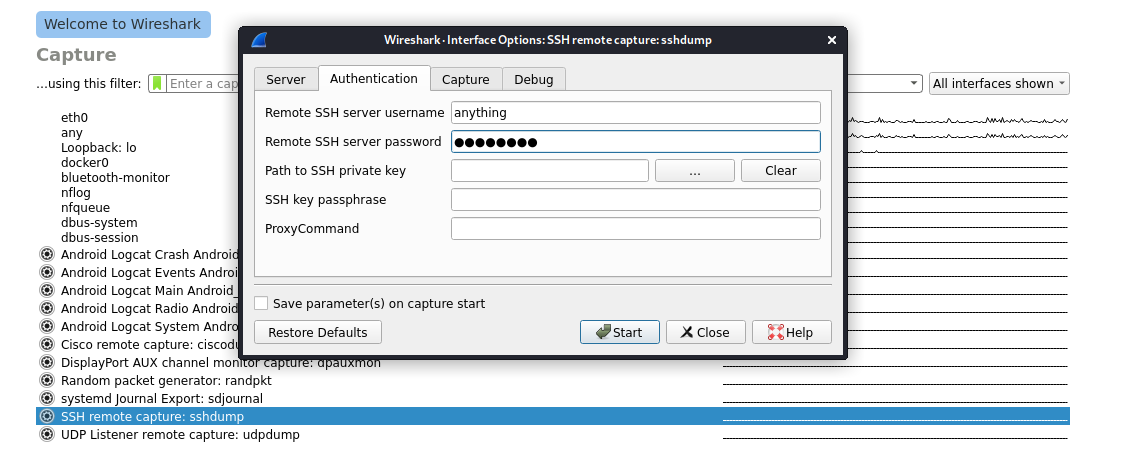
Enter your phone’s IP address (or 127.0.0.1 if you are working with an emulator) and port that pcap remote is running on. Also on the ‘Authentication’ tab enter any ssh username and password and click start. 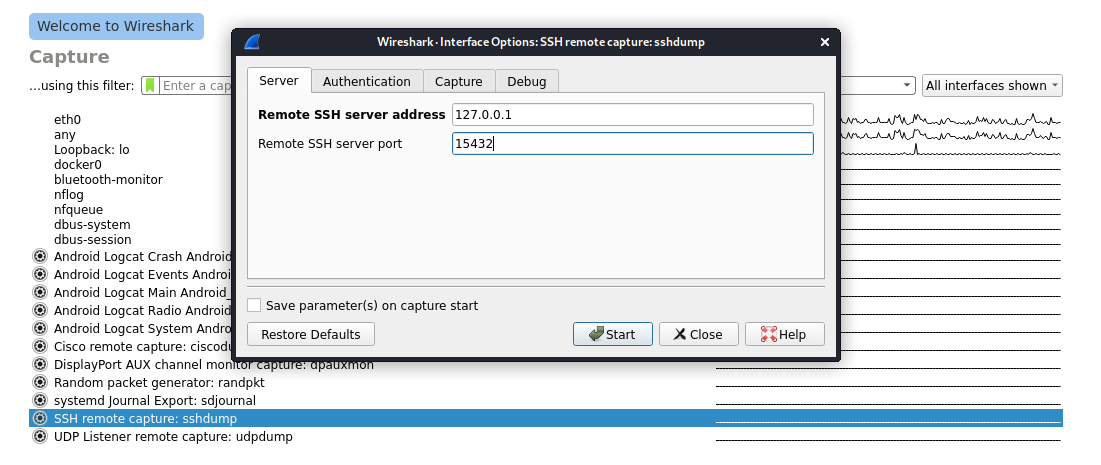
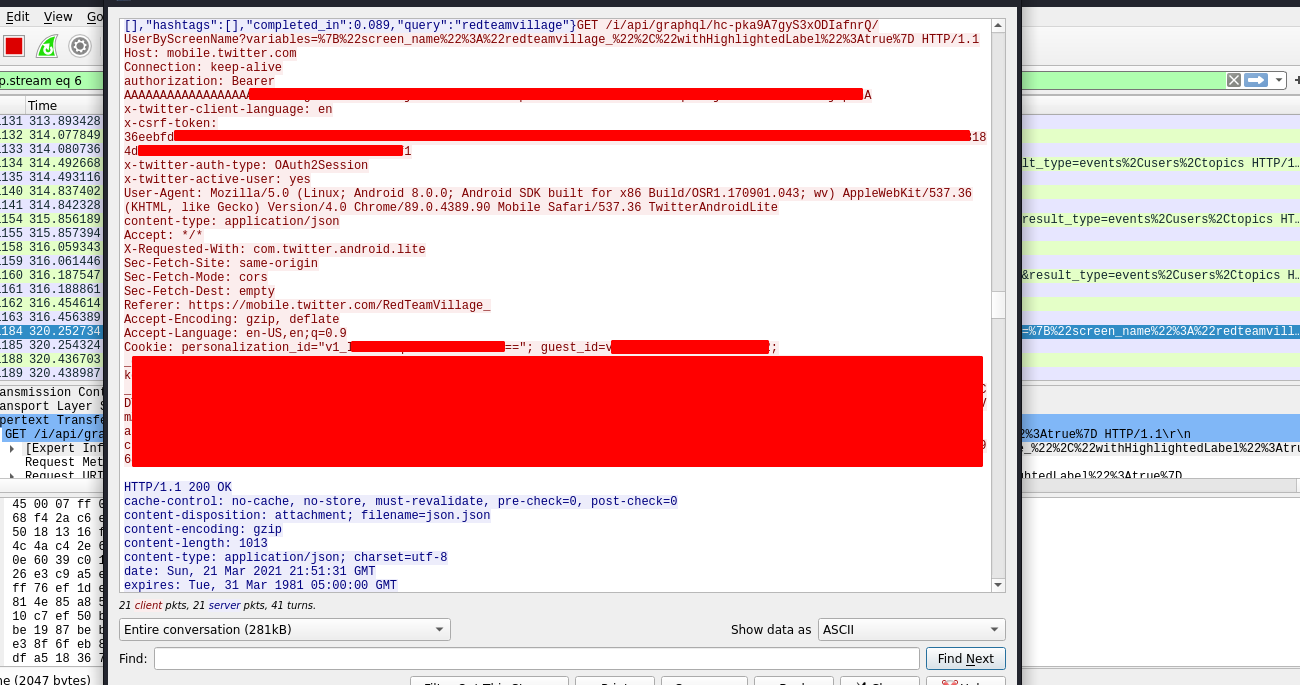
Start your application and analyze decrypted traffic in realtime. 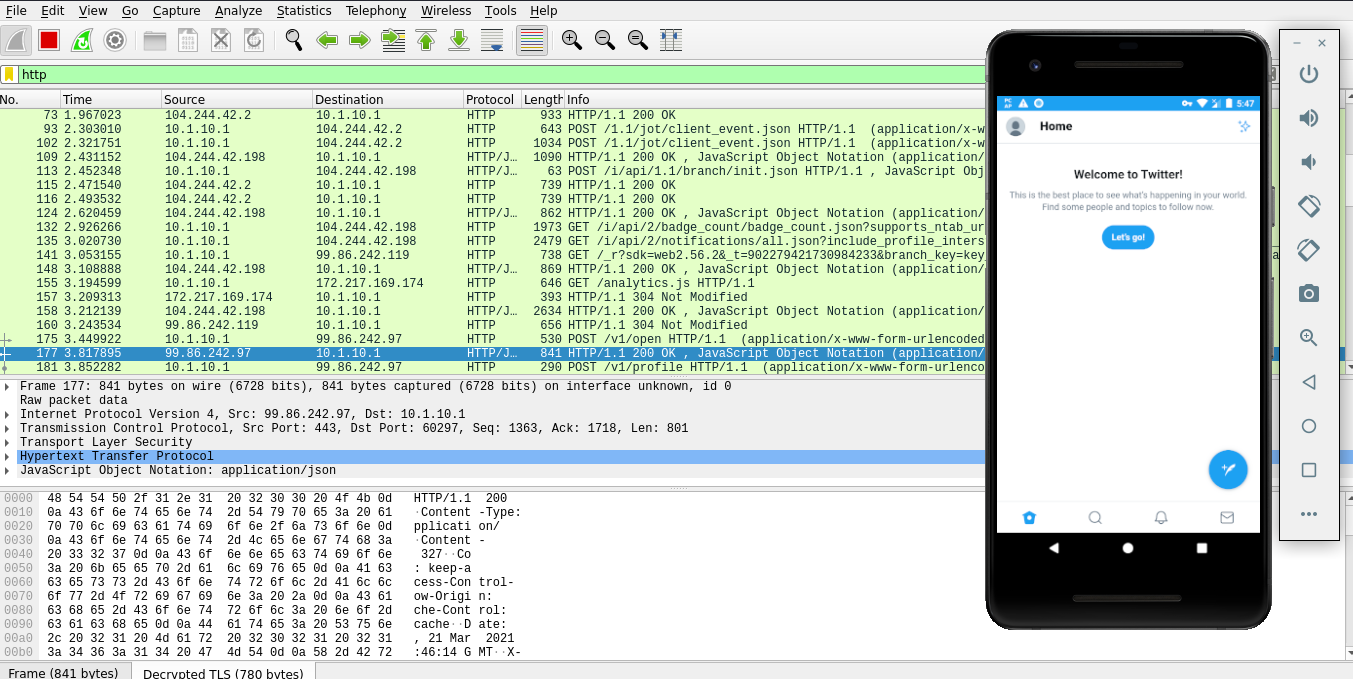
Источник
Перехват HTTPS-траффика между Android-устройством и внешним сервером

Иногда бывает любопытно подсмотреть, что пересылают туда-сюда разные Android-приложения по HTTP и HTTPS протоколам. Иногда даже при разработке собственного ПО удобно видеть весь трафик в реальном времени. Для реализации этих задач давно придумано много хороших программ, таких, к примеру, как Charles или Fiddler2. На самом деле их намного больше, вот только две вышеуказанные дают возможность нормально просматривать не только HTTP, но и HTTPS.
Трудности начинаются тогда, когда речь заходит о перехвате трафика между Андроид-устройством и внешним сервером. В случае незашифрованного (HTTP-протокол) трафика всё весьма тривиально (вот и инструкция есть) — разрешаем Fiddler2 внешние соединения, в Андроиде устанавливаем прокси сервером адрес нашей машины с Fiddler2 — и вуаля, всё работает. А вот на настройку перехвата HTTPS-трафика у меня ушло чуть больше времени.
Теория
Итак, в чём же сложность? В том, что при использовании протокола HTTPS клиент по-умолчанию проверяет, а действительно ли тот сервер, к которому он подключился, является нужным. Для этого используются сертификаты. И вот у настоящего сервера этот сертификат, понятное дело, тоже настоящий и соответствует открытому URL, а вот у нашего прокси — нет. Для решения этой проблемы в десктопных операционных системах в таких случаях есть возможность сгенирировать в Fiddler2 поддельный сертификат, импортировать его в доверенные — и теперь клиент всегда будет верить, что соединение с Fiddler2 вполне безопасно. К сожалению, с мобильным устройством такой легкий финт ушами не прошел.
Во-первых, возможности импортировать внешний сертификат в Андроиде версий младше 4.0 нет. Есть какие-то не внушающие доверия варианты с рутоваными девайсами — но это не наш путь.
Во-вторых, в Андроид даже версии 4.0 импортировать сертификат Fiddler2 не получается. Дело в том, что генерируемый по-умолчанию сертификат не соответствует каким-то там Андроидовским критериям безопасности и не устанавливается. Его нужно генерировать специальным образом.
В-третьих, совсем даже не факт, что все подряд программы сразу поверят поддельному сертификату. Есть нюансы.
Практика
- Берём устройство с Андроидом версии 4.0 или выше. Нет, девайс с 2.3 не подойдет. Да, эмулятор версии 4.0 подойдет.
- Устанавливаем на компьютер последнюю версию Fiddler2.
- Устанавливаем специальные библиотеки генерации Андроид-совместимого сертификата безопасности отсюда.
- Экспортируем из Fiddler2 сертификат безопасности («Tools->Fiddler Options->HTTPS->Export root certificate to Desktop»). Кладём на флешку, в корень (ну или на эмулятор, если вы используете его).
- На Андроиде добавляем сертификат безопасности в доверенные(«Settings > Security > Install from SD card»)

Запускаем Fiddler2, разрешаем в настройках внешние коннекты .
На Андроиде в настройках сети прописываем в качестве прокси адрес нашей десктопной машины с Fiddler2.
Итак, с браузером получилось. К сожалению, не все программы столь доверчивы, как браузер. К примеру, в моей собственной софтине, где я использую Apache HTTP Client, способ не прокатил — плевал апачевский клиент на доверенные сертификаты операционки. В этом случае мне пришлось отключить эту проверку вручную, таким вот образом:
где EasySSLProtocolSocketFactory взят отсюда и разрешает доверие к любым сертификатам.
Не безопасно, только для отладки!
После этого трафик моей программы стал также успешно отображаться в Fiddler2.
Источник
Capture Android Mobile Web Traffic With Fiddler
When doing web development on the desktop, you have the benefit of inspection and debugging tools available in modern browsers like Chrome, Firefox, Safari and Internet Explorer. Inspecting web traffic for page requests and API calls is relatively straightforward. Once you move over to mobile development, you miss a lot of those built-in tools. Luckily there are some good desktop network proxy tools which can make mobile traffic inspection possible again.
In this post I’ll walk through setting up an Android 4.x device with Fiddler running on a Windows PC. Fiddler is a powerful HTTP/HTTPS proxy utility that is pretty easy to set up and use for this type of analysis. And it’s free. (Mac users could use similar steps with the Charles web debugging proxy; it’s not free but does have a free trial and is relatively inexpensive.)
Once we have this set up, some typical use cases include:
- Mobile web development or performance measurement
- Mobile app development or debugging
- Observing other apps on your phone to understand network connections being made or for security analysis
Prerequisites
As prerequisite, you should install Fiddler and be somewhat familiar with how to use it. If you haven’t used it before, check out the features tour on the Fiddler website.
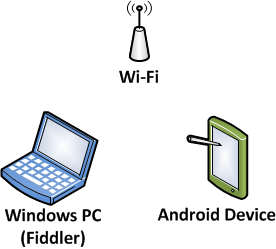
The Android device should be on the same network as the Windows PC. The PC doesn’t have to be on Wi-Fi, as long as they can connect to each other. (If in doubt, trying pinging from the Windows PC to the Android device to verify the local network connection.)
Set up Fiddler
After Fiddler is installed, configure it to allow remote connections and to decrypt HTTPS traffic:
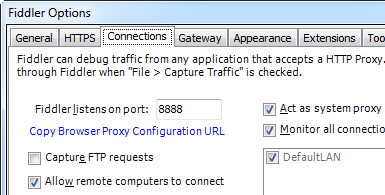
- Click menu Tools | Fiddler Options, then select the Connections tab
- Make note of the “Fiddler listens on” port (normally it’s 8888)
- Make sure the check box for “Allow remote computer to connect” is checked
- Switch to the HTTPS tab
- Make sure the check boxes for “Capture HTTPS Connects” and “Decrypt HTTPS traffic” are both checked
- Restart Fiddler
- Make note of the PC’s IP address
- Close non essential apps on the Windows PC (to minimize web traffic being routed through Fiddler)
Set up Android Networking
Now we’ll set up the Android device to connect to the Fiddler proxy. These instructions should work for most Android phones or tablets on OS 4.0 and newer. (If your device doesn’t work or needs slightly different steps, you can search Google for your-phone-model http proxy.)
- Tap on Settings, then Wi-Fi
- Find the network on which you’re connected (normally the first one listed), then tap and hold
- Choose Modify network from the pop-up
- Scroll down and enable “Show advanced options”
- Change “Proxy settings” to Manual
- Under “Proxy host name” enter the Windows PC IP address from above
- Under “Proxy port” enter the Fiddler port from above (usually 8888)
- Tap Save and wait a moment for the network to reconnect
Google Chrome Settings
Added 2014-06-06: Thanks to Stack Overflow user comfreek who pointed out this issue with Chrome proxy settings.
On newer versions of Google Chrome for Android, there are new settings for Bandwidth Management. When bandwidth management is enabled (which I believe is the default), HTTP traffic will go through Google proxy servers rather than the customer HTTP proxy we are setting up here.
You’ll need to make sure bandwidth management is turned off:
- Launch Google Chrome
- Go to Settings, then under Advanced tap on Bandwidth management
- Turn off Preload webpages and Reduce data usage
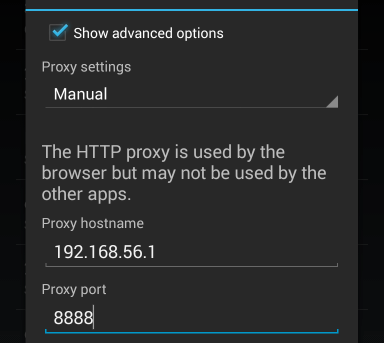
Set up Android Networking
Now we’ll set up the Android device to connect to the Fiddler proxy. These instructions should work for most Android phones or tablets on OS 4.0 and newer. (If your device doesn’t work or needs slightly different steps, you can search Google for your-phone-model http proxy.)
- Tap on Settings, then Wi-Fi
- Find the network on which you’re connected (normally the first one listed), then tap and hold
- Choose Modify network from the pop-up
- Scroll down and enable “Show advanced options”
- Change “Proxy settings” to Manual
- Under “Proxy host name” enter the Windows PC IP address from above
- Under “Proxy port” enter the Fiddler port from above (usually 8888)
- Tap Save and wait a moment for the network to reconnect
Web Browsing
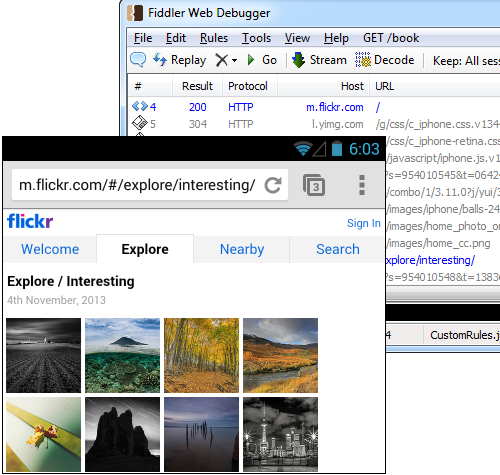
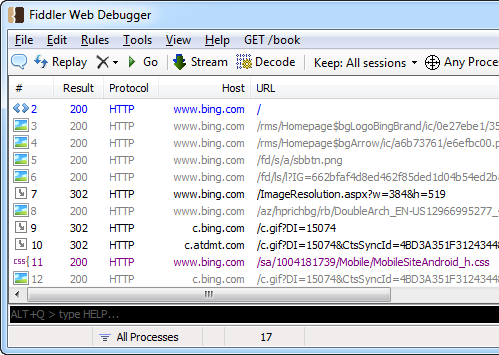
On the Android device, bring up a browser like Chrome and visit a website like http://bing.com. If everything has been set up correctly, you should see the HTTP traffic flowing through Fiddler. You can click and inspect each of the network requests, for example the HTML page, CSS, JavaScript, and images.
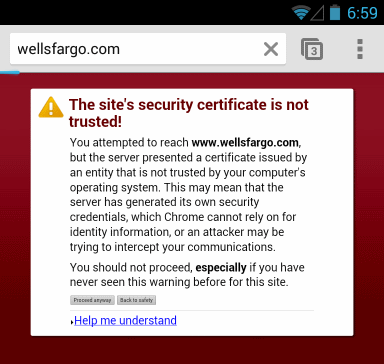
Now let’s try a website that forces HTTPS, for example https://wellsfargo.com. In this case the mobile browser is complaining that it can’t validate the SSL certificate from the server. This is accurate because we’re using Fiddler as a proxy and it’s generating its own SSL certificates for us on the fly. (This is what allows Fiddler to decrypt and inspect these HTTPS connections.) We’ll come back to this in a bit.
Caution: I recommend not choosing the “proceed anyway” option here. Mobile browsers tend to cache that choice for a long team, meaning that you won’t be warned about it again in the future.
Install Fiddler Certificate to Android
As a final step to improve the debugging of secure HTTPS connections, we can install a Fiddler “root” certificate on the Android device. (Note: If your device does not already have a PIN or password, you will need to set one up before installing the certificate.)
- On Android start the Chrome browser
- Navigate to http://ipv4.fiddler:8888/
- Tap on the link for the “Fiddler Root Certificate”
- Name the certificate “Fiddler” and install it (entering your PIN or password if prompted)
With this test certificate installed, you should now be able to visit SSL sites from the Android Chrome browser and not receive any certificate warnings. The network traffic should also be viewable in Fiddler. Good test sites are those which always force secure HTTPS connections, like the Wells Fargo mobile site at https://wellsfargo.com/.
Return to Normal Android Networking
When you’re done with your Android?Fiddler testing, remember to restore your normal Android network settings. Otherwise you may be confused later when none of your apps work 🙂
Источник


