- Displaying Card Flip Animations
- This lesson teaches you to
- Try it out
- Create the Animators
- card_flip_left_in.xml
- card_flip_left_out.xml
- card_flip_right_in.xml
- card_flip_right_out.xml
- Create the Views
- Create the Fragment
- Animate the Card Flip
- How to add card flip animation in the android app
- Choosing the best Layout while designing your android application
- In the previous article we discussed about how constraint layout reduces the nesting of a layout.
- Conclusion
- How to add Card Flip Animation to your Android App
- Marcin Mazepa Android Developer
- Card layouts
- Drive Your Product to Success – Free Guide for Digital Product Owners
- Animation XML
- LET’S TALK ABOUT YOUR APP
- Camera distance
- Card flip animation android
- About
- Displaying Card Flip Animations
- This lesson teaches you to
- Try it out
- Create the Animators
- card_flip_left_in.xml
- card_flip_left_out.xml
- card_flip_right_in.xml
- card_flip_right_out.xml
- Create the Views
- Create the Fragment
- Animate the Card Flip
Displaying Card Flip Animations
This lesson teaches you to
Try it out
This lesson shows you how to do a card flip animation with custom fragment animations. Card flips animate between views of content by showing an animation that emulates a card flipping over.
Here’s what a card flip looks like:
If you want to jump ahead and see a full working example, download and run the sample app and select the Card Flip example. See the following files for the code implementation:
- src/CardFlipActivity.java
- animator/card_flip_right_in.xml
- animator/card_flip_right_out.xml
- animator/card_flip_left_in.xml
- animator/card_flip_left_out.xml
- layout/fragment_card_back.xml
- layout/fragment_card_front.xml
Create the Animators
Create the animations for the card flips. You’ll need two animators for when the front of the card animates out and to the left and in and from the left. You’ll also need two animators for when the back of the card animates in and from the right and out and to the right.
card_flip_left_in.xml
card_flip_left_out.xml
card_flip_right_in.xml
card_flip_right_out.xml
Create the Views
Each side of the «card» is a separate layout that can contain any content you want, such as two screens of text, two images, or any combination of views to flip between. You’ll then use the two layouts in the fragments that you’ll later animate. The following layouts create one side of a card that shows text:
and the other side of the card that displays an ImageView :
Create the Fragment
Create fragment classes for the front and back of the card. These classes return the layouts that you created previously in the onCreateView() method of each fragment. You can then create instances of this fragment in the parent activity where you want to show the card. The following example shows nested fragment classes inside of the parent activity that uses them:
Animate the Card Flip
Now, you’ll need to display the fragments inside of a parent activity. To do this, first create the layout for your activity. The following example creates a FrameLayout that you can add fragments to at runtime:
In the activity code, set the content view to be the layout that you just created. It’s also good idea to show a default fragment when the activity is created, so the following example activity shows you how to display the front of the card by default:
Now that you have the front of the card showing, you can show the back of the card with the flip animation at an appropriate time. Create a method to show the other side of the card that does the following things:
- Sets the custom animations that you created earlier for the fragment transitions.
- Replaces the currently displayed fragment with a new fragment and animates this event with the custom animations that you created.
- Adds the previously displayed fragment to the fragment back stack so when the user presses the Back button, the card flips back over.
Источник
How to add card flip animation in the android app


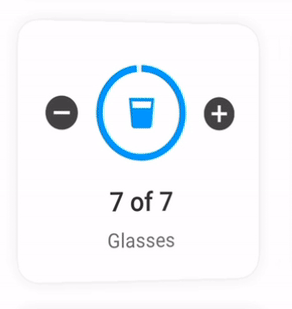
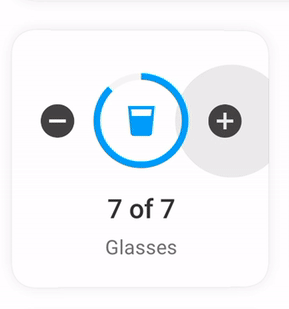
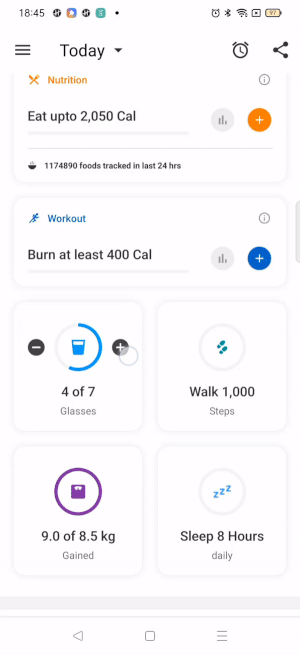
Recently we at HealthifyMe revamped our app dashboard to make it more user engaging. And we tried some really cool animation. One of them is card flip animation. When the user tracks water, sleep, or anything else, we show a gratification screen saying “yay you achieved your goal”, would you like to share that with your friends. So on the dashboard, once user achieved their goal we are flipping progress card to gratification card.
In this article, we will see how to implement that, and what we should not do.
Step 1: Create front and back card designs.
#. Card_gratification.xml — Back design
Here instead of providing any fixed width and height to parent view, I am providing match_parent. SO it can support multiple device sizes. To understand it you can check out my prev article about “Choosing the best layout while designing your app”.
Choosing the best Layout while designing your android application
In the previous article we discussed about how constraint layout reduces the nesting of a layout.
Moving on let’s design front view, which is water progress view.
Step 2: Include both layouts in one xml.
Step 3: Let’s create an animation drawable. Now as we know when we are flipping cards, one layout is making a rotation clockwise and going back as well as the layout which is in the back making anti-clockwise rotation and coming in front as both the thing should happen parallelly.
Let’s see the animation more carefully.
# flip_out.xml : This animation is for the card which is in front and needs to go in back. Rotate in y-axis from 0 to 180 angle. Now, remember when we are pushing in back, we are bringing back layout in front so if the complete duration of animation is 1500 then on half time which is 750, change the alpha property from 1 to 0.
# flip_in.xml : This animation is for the card which is coming in front. Rotate it in the reverse direction on Y-axis.
Step 4: Apply animation on view. Show back view before rotation and hide front view once animation ends.
visibleView — view that you want to bring in front
inVisibleView — View that you want to push back
Now, this flip is going out of the box. To avoid this we need to add camera distance to both views.
Step 5: Add camera distance. view.CameraDistance
Sets the distance along the Z axis from the camera to this view. The camera’s distance affects 3D transformations, for instance, rotations around the X and Y-axis. If the rotationX or rotationY properties are changed and this view is large (more than half the size of the screen), it is recommended to always use a camera distance that’s greater than the height (X-axis rotation) or the width (Y-axis rotation) of this view.
The distance of the camera from the view plane can have an effect on the perspective distortion of the view when it is rotated around the x or y-axis. For example, a large distance will result in a large viewing angle, and there will not be much perspective distortion of the view as it rotates. A short distance may cause much more perspective distortion upon rotation, and can also result in some drawing artifacts if the rotated view ends up partially behind the camera (which is why the recommendation is to use a distance at least as far as the size of the view, if the view is to be rotated.)
Below is the complete code:
Conclusion
Animations can help us improving user experience, as well as too many animations can distract users from performing certain tasks. So always while designing your app understand who your audience is, how best you can tell them to do a particular action.
Источник
How to add Card Flip Animation to your Android App
Read how to make your Android App more delightful
using Card Flip Animation.

Marcin Mazepa Android Developer

For a long time, I’ve tried to implement Card Flip Animation, but every tutorial or source code I’ve found didn’t explain “magic” numbers in XML animation files. O ut of nowhere wild hackathon appeared! 
On our company’s latest hackathon we decided to develop an app for Planning Poker. As you can guess Flip Animation was very important to make our app delightful. I was chosen to create UI and it was a nice opportunity to dive into Flip Animation. In this blog post, I will explain everything I have learned about it.
Card layouts
At first, let’s create a simple layout with a front of a card:
and put it to activity layout.

Drive Your Product to Success – Free Guide for Digital Product Owners
Even the best team can’t deliver a successful product without proper guidance. If you own a digital product, our Ebook will be a perfect resource for mastering the fundamentals of successful product delivery.
Animation XML
After that, create the first animation XML.
This simple animation just rotates the view around Y axis from 0 to 180 degree and it is what we need for first part of our animation. As it is shown below, animation disappears half-way through, but I will explain later how to fix it.

The second part of the animation is just “opposite” to what we’ve just created. So, I changed two values in our XML file
and see what happened:

-180 value causes the view to flip immediately and start rotating it to its natural position. The sign decides about the direction of motion. Feel free to experiment and change values for better understanding a problem and don’t worry about that ugly glitch at animation start because that will be unnoticeable for a user.
To make the whole animation, we need to create two XML files for enter and exit animation and fix disappearing card on half-way through animation. To fix it we just need to change camera distance. Camera distance is the length between animated view and a “virtual” eye. Changing that distance affects the perspective distortion.
LET’S TALK ABOUT YOUR APP
We’re 100% office based team with 7-years’ experience
in mobile & web app development
Camera distance
In our case distance is just to small and Flipping Animation crosses the “virtual line” and disappears. To fix it we just need to increase that distance. The default distance is different on various devices. According to Android documentation, if you want to specify a distance that leads to visually consistent result across various devices use that formula:
Источник
Card flip animation android
![]() The article on how this library was created is now published. You can read it on this link here. →.
The article on how this library was created is now published. You can read it on this link here. →.


![]()
![]()
![]()
![]()
![]()

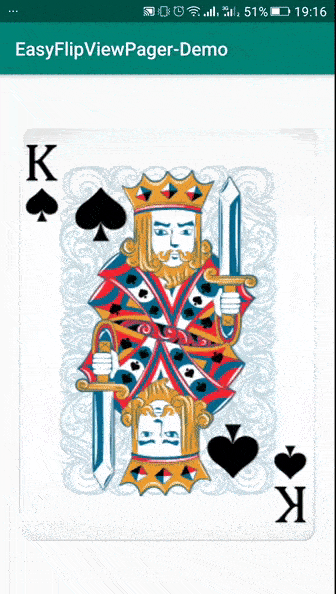

📖 Full Demo Video
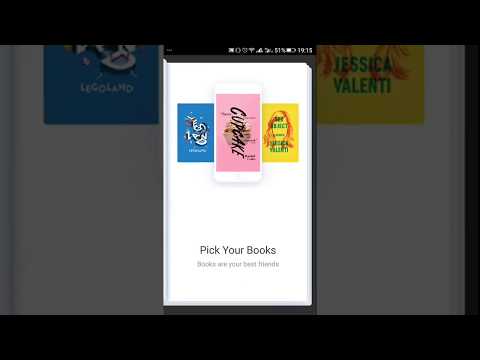
📱 Download Demo on Android
Download the APK file from here on your Android phone and enjoy the Demo App 🙂
- #1 on Github Trending in Kotlin language on 14th December, 2018
- Mentioned in an article about behind-the-scenes of this library on AndroidPub
Since the v1.2.0, all new updates will only support androidx widgets. If you want to use android.support , then use v1.0.0.
Add EasyFlipViewPager in app’s build.gradle file:
Or add EasyFlipViewPager as a new dependency inside your pom.xml
Just create an object of either BookFlipPageTransformer or CardFlipPageTransformer and assign it to your ViewPager object by calling ViewPager#setPageTransformer(true, myTransformerObject) .
Use these new PageTransformer classes for ViewPager2 instance: BookFlipPageTransformer2 or CardFlipPageTransformer2
💳 Card Flip Example
📄 Book Flip Example
Wajahat Karim
👍 How to Contribute
- Fork it
- Create your feature branch (git checkout -b my-new-feature)
- Commit your changes (git commit -am ‘Add some feature’)
- Push to the branch (git push origin my-new-feature)
- Create new Pull Request
About
📖 The library for creating book and card flip animations in ViewPager in Android
Источник
Displaying Card Flip Animations
This lesson teaches you to
Try it out
This lesson shows you how to do a card flip animation with custom fragment animations. Card flips animate between views of content by showing an animation that emulates a card flipping over.
Here’s what a card flip looks like:
If you want to jump ahead and see a full working example, download and run the sample app and select the Card Flip example. See the following files for the code implementation:
- src/CardFlipActivity.java
- animator/card_flip_right_in.xml
- animator/card_flip_right_out.xml
- animator/card_flip_right_in.xml
- animator/card_flip_left_out.xml
- layout/fragment_card_back.xml
- layout/fragment_card_front.xml
Create the Animators
Create the animations for the card flips. You’ll need two animators for when the front of the card animates out and to the left and in and from the left. You’ll also need two animators for when the back of the card animates in and from the right and out and to the right.
card_flip_left_in.xml
card_flip_left_out.xml
card_flip_right_in.xml
card_flip_right_out.xml
Create the Views
Each side of the «card» is a separate layout that can contain any content you want, such as two screens of text, two images, or any combination of views to flip between. You’ll then use the two layouts in the fragments that you’ll later animate. The following layouts create one side of a card that shows text:
and the other side of the card that displays an ImageView :
Create the Fragment
Create fragment classes for the front and back of the card. These classes return the layouts that you created previously in the onCreateView() method of each fragment. You can then create instances of this fragment in the parent activity where you want to show the card. The following example shows nested fragment classes inside of the parent activity that uses them:
Animate the Card Flip
Now, you’ll need to display the fragments inside of a parent activity. To do this, first create the layout for your activity. The following example creates a FrameLayout that you can add fragments to at runtime:
In the activity code, set the content view to be the layout that you just created. It’s also good idea to show a default fragment when the activity is created, so the following example activity shows you how to display the front of the card by default:
Now that you have the front of the card showing, you can show the back of the card with the flip animation at an appropriate time. Create a method to show the other side of the card that does the following things:
- Sets the custom animations that you created earlier for the fragment transitions.
- Replaces the currently displayed fragment with a new fragment and animates this event with the custom animations that you created.
- Adds the previously displayed fragment to the fragment back stack so when the user presses the Back button, the card flips back over.
Источник


