- Как изменить шрифт на Android
- Изменение шрифта на телефонах Samsung и установка своих шрифтов
- Как поменять шрифт на Android телефонах и планшетах других производителей
- iFont
- Дополнительные методы смены шрифта на Android
- How to change fonts for Android
- Some phones already have it built in!
- Changing fonts for Android with apps and launchers
- Apex Launcher
- GO Launcher
- Action Launcher: Pixel Edition
- Smart Launcher 5
- iFont
Как изменить шрифт на Android
 Android предоставляет пользователю широкие возможности кастомизации интерфейса, начиная с простых виджетов и настроек, заканчивая сторонними лаунчерами. Однако, в настройке некоторых аспектов оформления могут возникнуть сложности, например, если вам потребовалось поменять шрифт интерфейса и приложений на Android. Тем не менее, сделать это возможно, а для некоторых моделей телефонов и планшетов — очень просто.
В этой инструкции подробно о том, как изменить шрифт на Android смартфонах и планшетах различными способами, в том числе без root-доступа (в некоторых случаях он может потребоваться). В начале руководства — отдельно по смене шрифтов на Samsung Galaxy, а затем — про все остальные смартфоны (в том числе и Samsung, но с версией Android до 8.0 Oreo). См. также: Как изменить шрифт Windows 10.
Изменение шрифта на телефонах Samsung и установка своих шрифтов
Телефоны Samsung, а также некоторые модели LG и HTC имеют опцию изменения шрифта в настройках.
Для простой смены шрифта на Samsung Galaxy вы можете выполнить следующие шаги
- Зайти в Настройки — Дисплей.
- Выбрать пункт «Шрифт и масштаб экрана».

- В нижней части выбрать какой-либо шрифт, а затем нажать «Готово» для его применения.
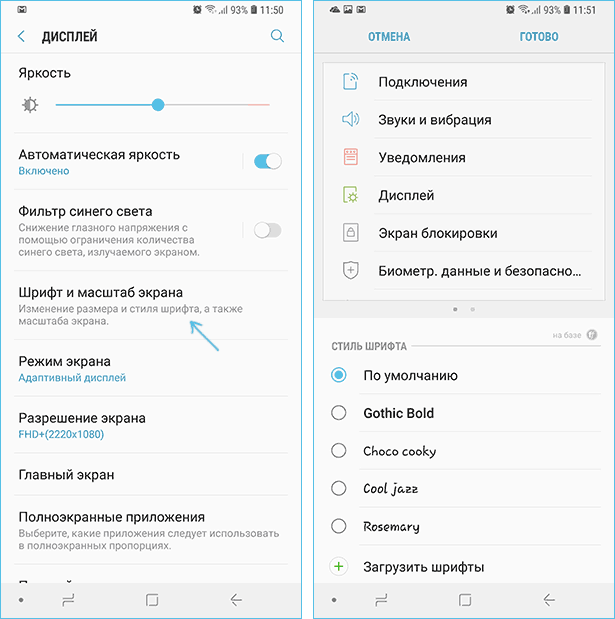
Тут же присутствует пункт «Загрузить шрифты», позволяющий произвести установку дополнительных шрифтов, но: все они (кроме Samsung Sans) платные. Тем не менее, это можно обойти и установить собственные шрифты, в том числе из ttf файлов шрифтов.
Доступно несколько подходов к установке своих шрифтов на телефонах Samsung Galaxy: до версии Android 8.0 Oreo шрифты FlipFont (именно они используются на Samsung) можно было найти в Интернете и скачать в виде APK и они сразу были доступны в настройках, также исправно работали шрифты, устанавливаемые с помощью приложения iFont (будет рассмотрено далее в разделе про «другие телефоны Android»).
Если на вашем смартфоне установлена Android 7 или более старая версия, вы всё еще можете использовать эти способы. Если же у вас новый смартфон с Android 8 или 9, придется искать обходные пути для установки своих шрифтов.
Один из них, самый простой и работающий на настоящий момент времени (тестировалось на Galaxy Note 9) — использование приложения ThemeGalaxy, доступного в Play Маркет: https://play.google.com/store/apps/details?id=project.vivid.themesamgalaxy
Сначала о бесплатном варианте использования этого приложения для смены шрифтов:
- После установки приложения у вас в списке появится две иконки: для запуска Theme Galaxy и отдельная — «Темы». Сначала запустите сам приложение Theme Galaxy, дайте необходимые разрешения, а затем запустите «Темы».
- Выберите вкладку «Шрифты», а в углу вместо «All» выберите «Cyrillic» для того, чтобы отображались только русские шрифты. В списке доступны бесплатные шрифты с Google Fonts.
- Нажмите «Скачать», а после скачивания — «Установить шрифт».
- Перезагрузите ваш телефон (требуется для Samsung с Android Oreo и более новыми системами).
- Шрифт появится в настройках телефона (Настройки — Дисплей — Шрифт и масштаб экрана).

Это же приложение позволяет выполнить установку собственного шрифта TTF (которые в изобилии доступны для скачивания в Интернете), но функция является платной (минимум 99 центов, единоразово). Путь будет следующим:
- Запустите приложение Theme Galaxy, откройте меню (свайп с левого края экрана).
- В меню в разделе «Дополнительно» выберите «Создание вашего шрифта из .ttf». При первой попытке использования функции вас попросят её купить.
- Укажите имя шрифта (как он будет отображаться в списке в настройках), отметьте «Выберите файл .ttf вручную» и укажите место хранения файла шрифта на телефоне (также можно сложить файлы шрифтов в папку themeGalaxy/fonts/custom/ и отметить «Загрузка шрифтов из пользовательских папок».
- Нажмите «Создать». Сразу после создания будет произведена установка шрифта.
- Перезагрузите телефон (только для новых версий Android).
- Шрифт отобразится в настройках и будет доступен для установки в интерфейсе вашего Samsung.


Ещё одно приложение, умеющее устанавливать шрифты на Samsung — AFonts. На Oreo также требует перезагрузки, создание своих шрифтов требует покупки функции, а русские шрифты в каталоге отсутствуют.
Дополнительные методы установки шрифтов на Samsung Galaxy с новыми версиями Android доступны здесь: https://4pda.ru/forum/index.php?showtopic=191055 (см. раздел «Шрифты для Samsung на Android 8.0 Oreo). Также есть способ с использованием Substratum/Andromeda, о чем можно почитать (на английском) здесь.
Как поменять шрифт на Android телефонах и планшетах других производителей
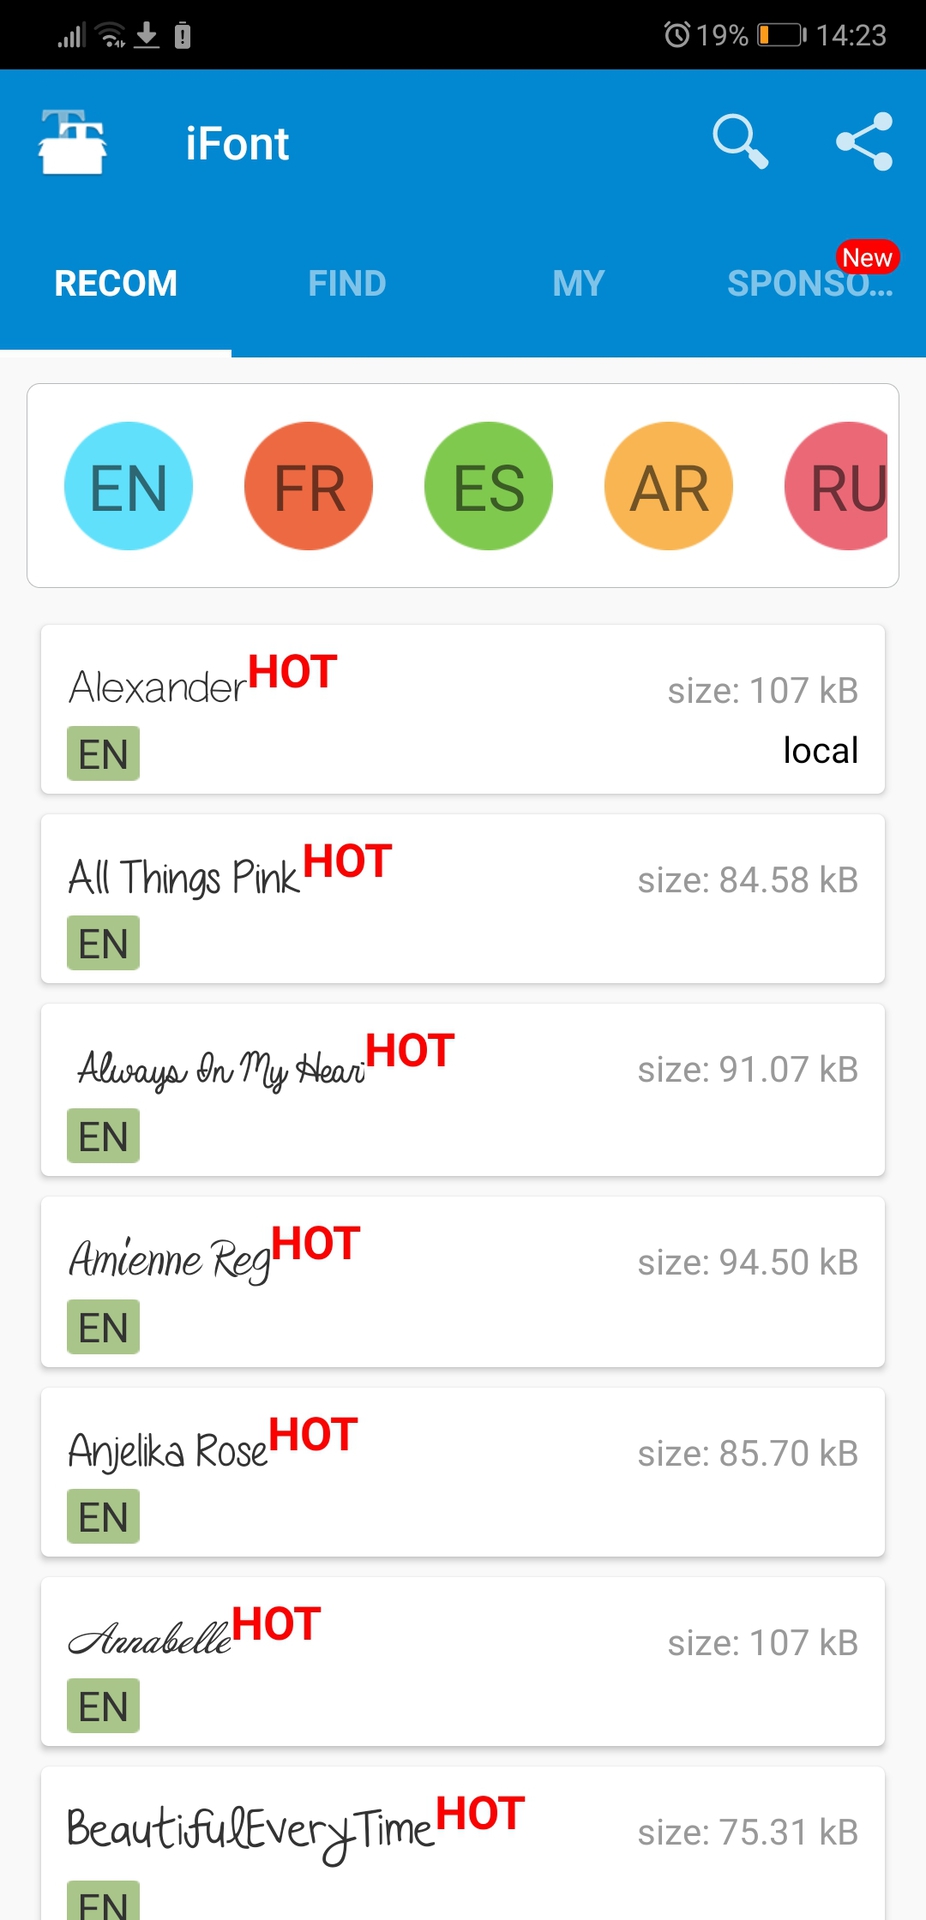
Для большинства смартфонов и планшетов Android для изменения шрифта интерфейса требуется наличие root-доступа. Но не для всех: например, приложение iFont успешно добавляет шрифты на старых Samsung и некоторых других марках телефонов и без рут.
iFont
iFont — бесплатное приложение, доступное в Play Маркет https://play.google.com/store/apps/details?id=com.kapp.ifont позволяющее легко установить свой шрифт (а также скачать имеющиеся бесплатные шрифты) на телефон с root-доступом, а также на отдельные марки телефонов без него (Samsung, Xiaomi, Meizu, Huawei).
В общих чертах использование приложения выглядит следующим образом:
- Устанавливаем и запускаем приложение (предоставляем root-доступ, если требуется), открываем вкладку «Найти», затем — «Все шрифты» — «Русский».
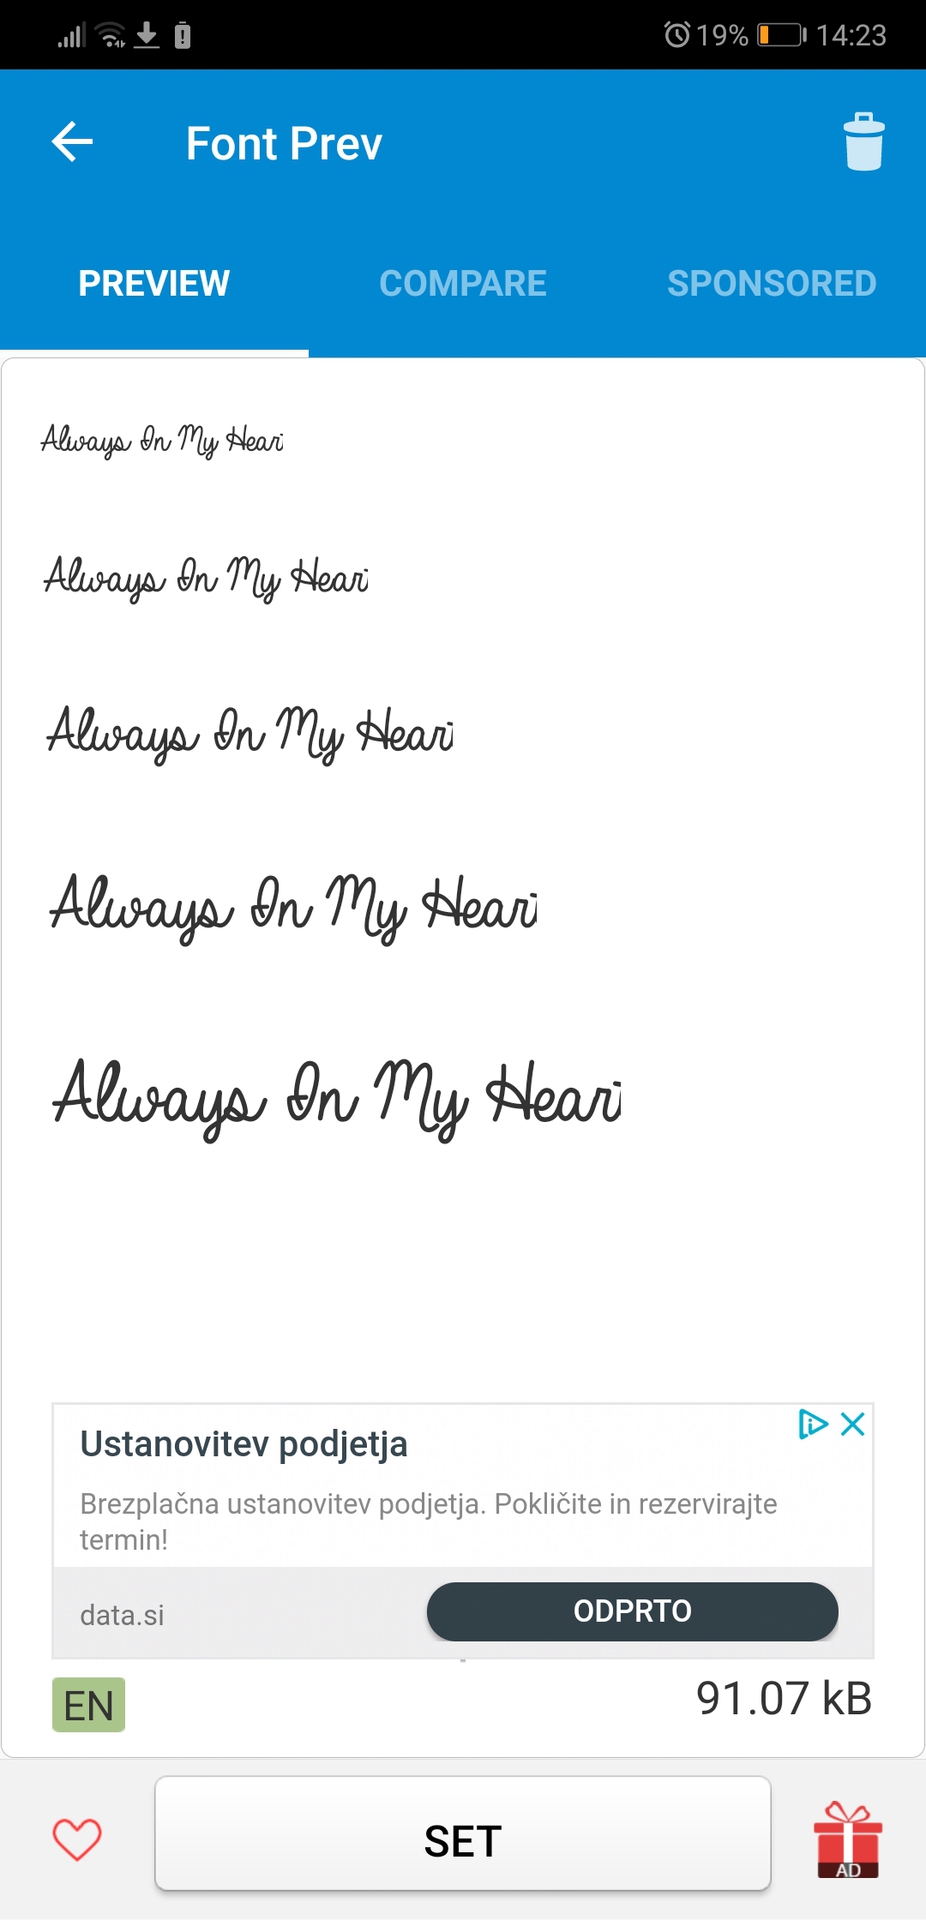
- Выбираем нужный шрифт и нажимаем «Скачать», а после скачивания — «Установить».
- После установки может потребоваться перезагрузка телефона.
- Для установки собственного шрифта скопируйте файлы .ttf в папку «iFont/custom/», на главном экране приложения откройте вкладку «Мой» — «Мои шрифты» и выберите шрифт, который нужно установить.


В моем тесте (телефон Lenovo Moto с root-доступом) всё работало исправно, но с некоторыми багами:
- При попытке установить собственный шрифт ttf открывалось окно с предложением осуществить донат автору приложения. После закрытия и повторного запуска приложения установка происходила успешно.
- Один раз не работала установка своего шрифта .ttf пока не были удалены все установленные шрифты из бесплатного каталога iFont. Удалить шрифты можно на вкладке «Мой», открыв мои загрузки, выбрав шрифт и нажав по «Мусорке» в верхнем правом углу.
При необходимости вернуть стандартный шрифт, откройте приложение iFont, перейдите на вкладку «Мой» и нажмите «Предустановленный шрифт».
Схожее бесплатное приложение — FontFix. В моем тесте оно также работало, но по какой-то причине изменяло шрифты избирательно (не во всех элементах интерфейса).
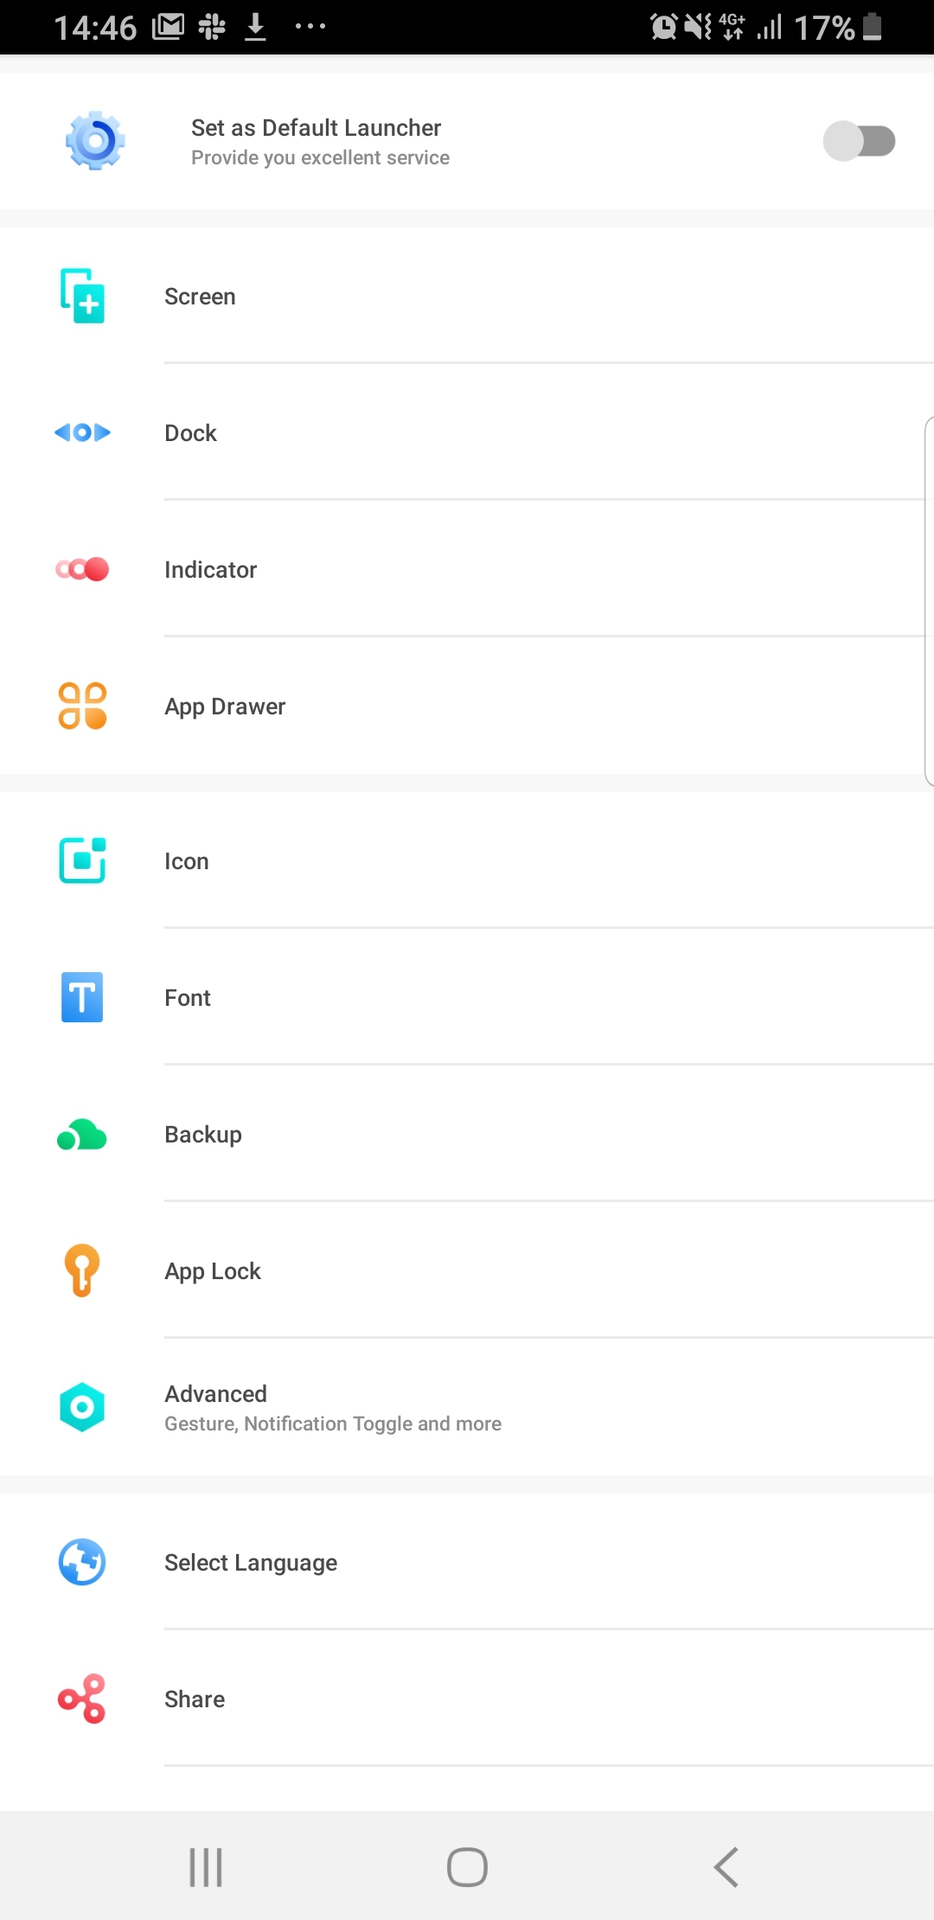
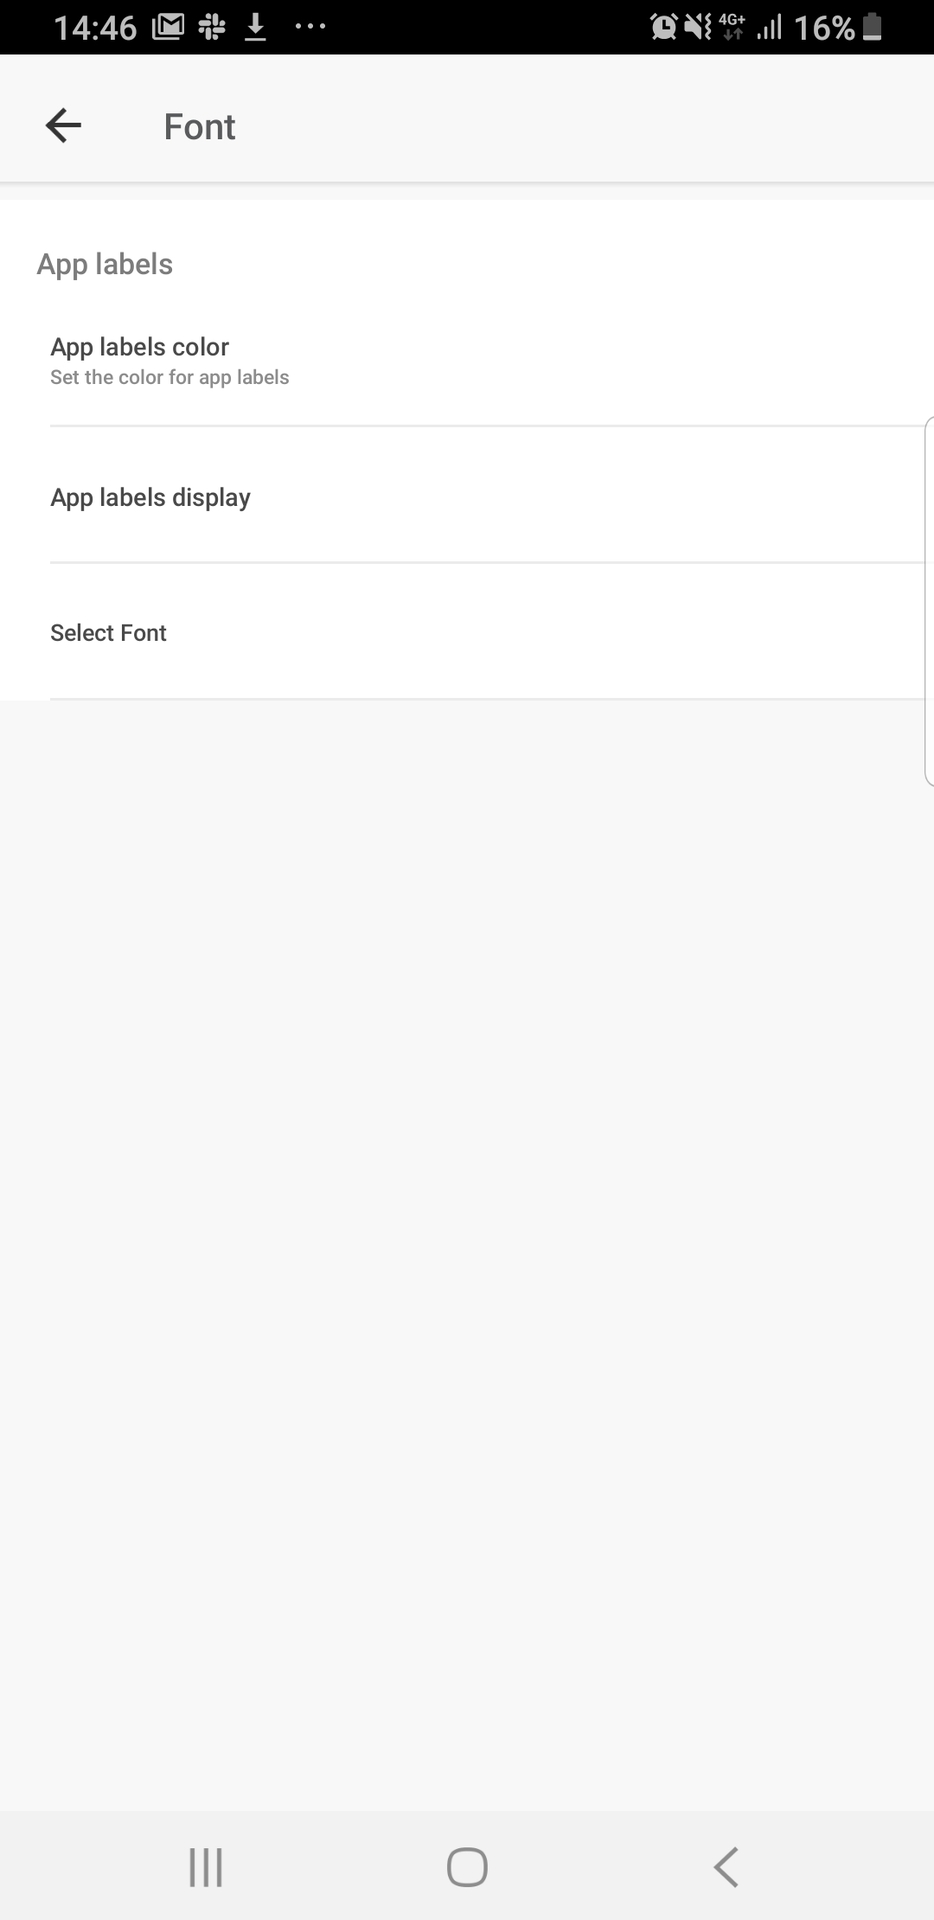
Дополнительные методы смены шрифта на Android
Выше описаны не все варианты изменения шрифтов, а лишь те, которые меняют шрифты во всем интерфейсе, а также сравнительно безопасны для начинающего пользователя. Но есть и дополнительные методы:
- При наличии root-доступа — подмена файлов системных шрифтов Roboto-Regular.ttf, Roboto-Bold.ttf, Roboto-Italic.ttf и Roboto-Bolditalic.ttf из папки system/fonts другими файлами шрифтов с теми же именами.
- При отсутствии необходимости менять шрифты во всём интерфейсе — использование лаунчеров с возможностью настройки шрифтов (например, Apex Launcher, Go Launcher). См. Лучшие лаунчеры для Android.
Если вам известны другие способы смены шрифтов, возможно, применимые на отдельных марках устройств, буду благодарен, если поделитесь ими в комментариях.
Источник
How to change fonts for Android
One of the best things about Android is just how customizable it is. Android phones let you personalize them to your heart’s content in order to improve the experience and express yourself. Changing fonts for Android seems like a logical extension of this philosophy, though it isn’t always as straightforward as you might expect. The good news is that where there is a will, there is a way! Read on to learn how to change fonts for Android!
Some phones already have it built in!
While stock Android (still) lacks the ability to customize your system font, plenty of manufacturers have adapted their software to support this highly requested feature. Companies like Samsung, HTC, and LG all make it easy to change fonts for Android.
The process may change depending on your specific handset, but you can normally find this option in the settings, usually under the “Display” section. From there you can change the actual font, as well as the font size.
For instance, nearly all Samsung Android devices let you change the font style. Samsung has pre-installed a few extra fonts besides the default one, but you can get more online through the Galaxy Store (both free and paid).
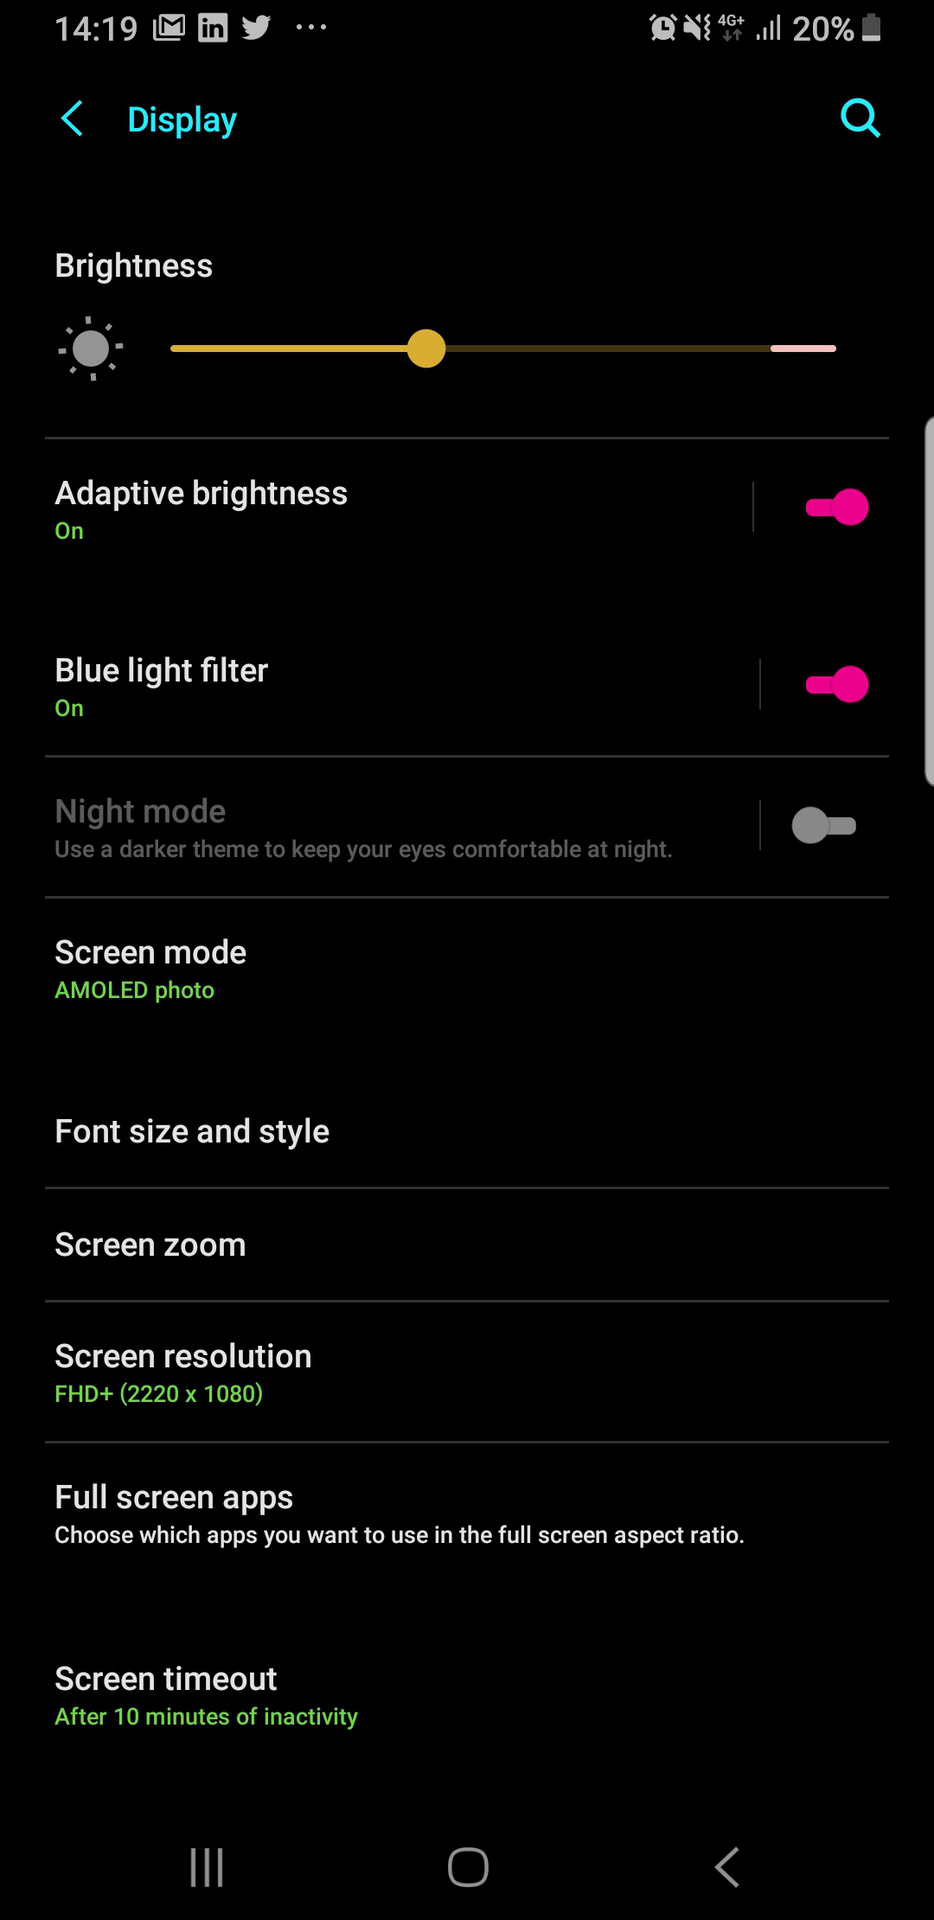
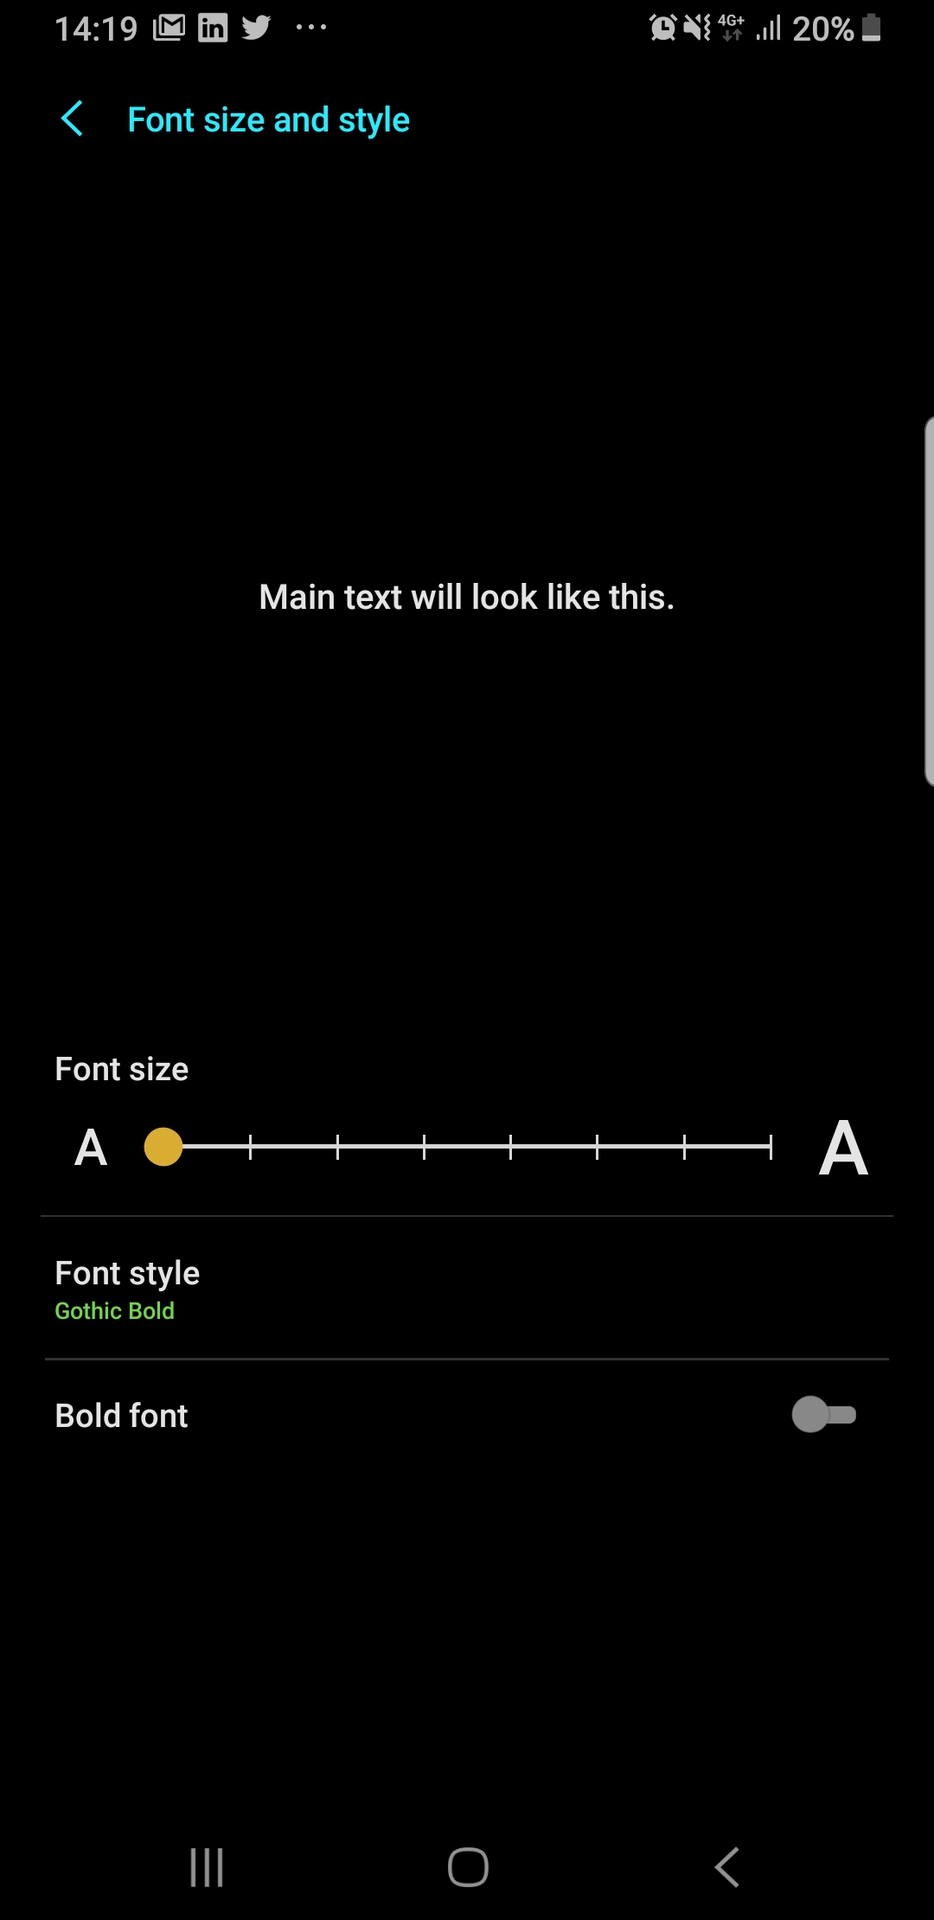
Selecting a font requires a quick trip to Settings > Display > Font size and style. Just tap the name of the font that you want and confirm that you want to set it as a system font. Font replacement is instantaneous; no need for rebooting. The selected font will be displayed throughout your device’s interface such as the time on the status bar, system menus, and even in your text messages.
Changing fonts for Android with apps and launchers
If you can’t change your font system-wide, then a useful trick to change fonts for Android is to install a custom launcher. This will replace your main home screen and will often be able to affect other UI elements across the system as well. By customizing your fonts this way, you’ll change the way your device looks most of the time. Failing that, there are a couple of apps that will let you manually change your fonts for Android. We’ll explore our top picks below.
Apex Launcher
One of the most popular third-party launchers is Apex Launcher. As shown in our video, here’s how to change fonts on your phone’s home screen after you download and install Apex Launcher. Keep in mind that this will only change fonts within the launcher itself and that the app is fairly expensive.
- Go into the settings of Apex Launcher.
- Tap the “Home Screen” selection.
- Tap the “Layout and Style” option.
- Finally, tap the “Label Font” selection and pick which font you want to use for your home screen.
If you want to change the font on your app drawer, there’s another method to do so via Apex Launcher:
- Go into the settings of Apex Launcher.
- Tap the “App Drawer” selection.
- Tap on the “Drawer Layout & Icons” option.
- Finally, scroll down and then tap the “Label Font” selection and pick which font you want to use for your app drawer.
Finally, you can change the font for your phone’s folder in this manner with Apex Launcher:
- Go into the settings of Apex Launcher.
- Tap on the “Folder” selection.
- Finally, scroll down and then tap on the “Label Font” selection and pick which font you want to use for your folder.
GO Launcher

GO Launcher is a launcher aimed specifically at those users who like to customize their phones. That includes changing fonts. To change font styles in GO Launcher, do the following:
- Copy your TTF or OTF font files to your phone.
- Long press anywhere on the home screen and select “GO Settings.”
- Choose Font > Select Font.
- Pick your font, or tap “Scan” to add files stored on your device.
This won’t change the fonts system-wide, but it will change them across the app, which will include most of the menus and apps you’ll interact with regularly.
Action Launcher: Pixel Edition

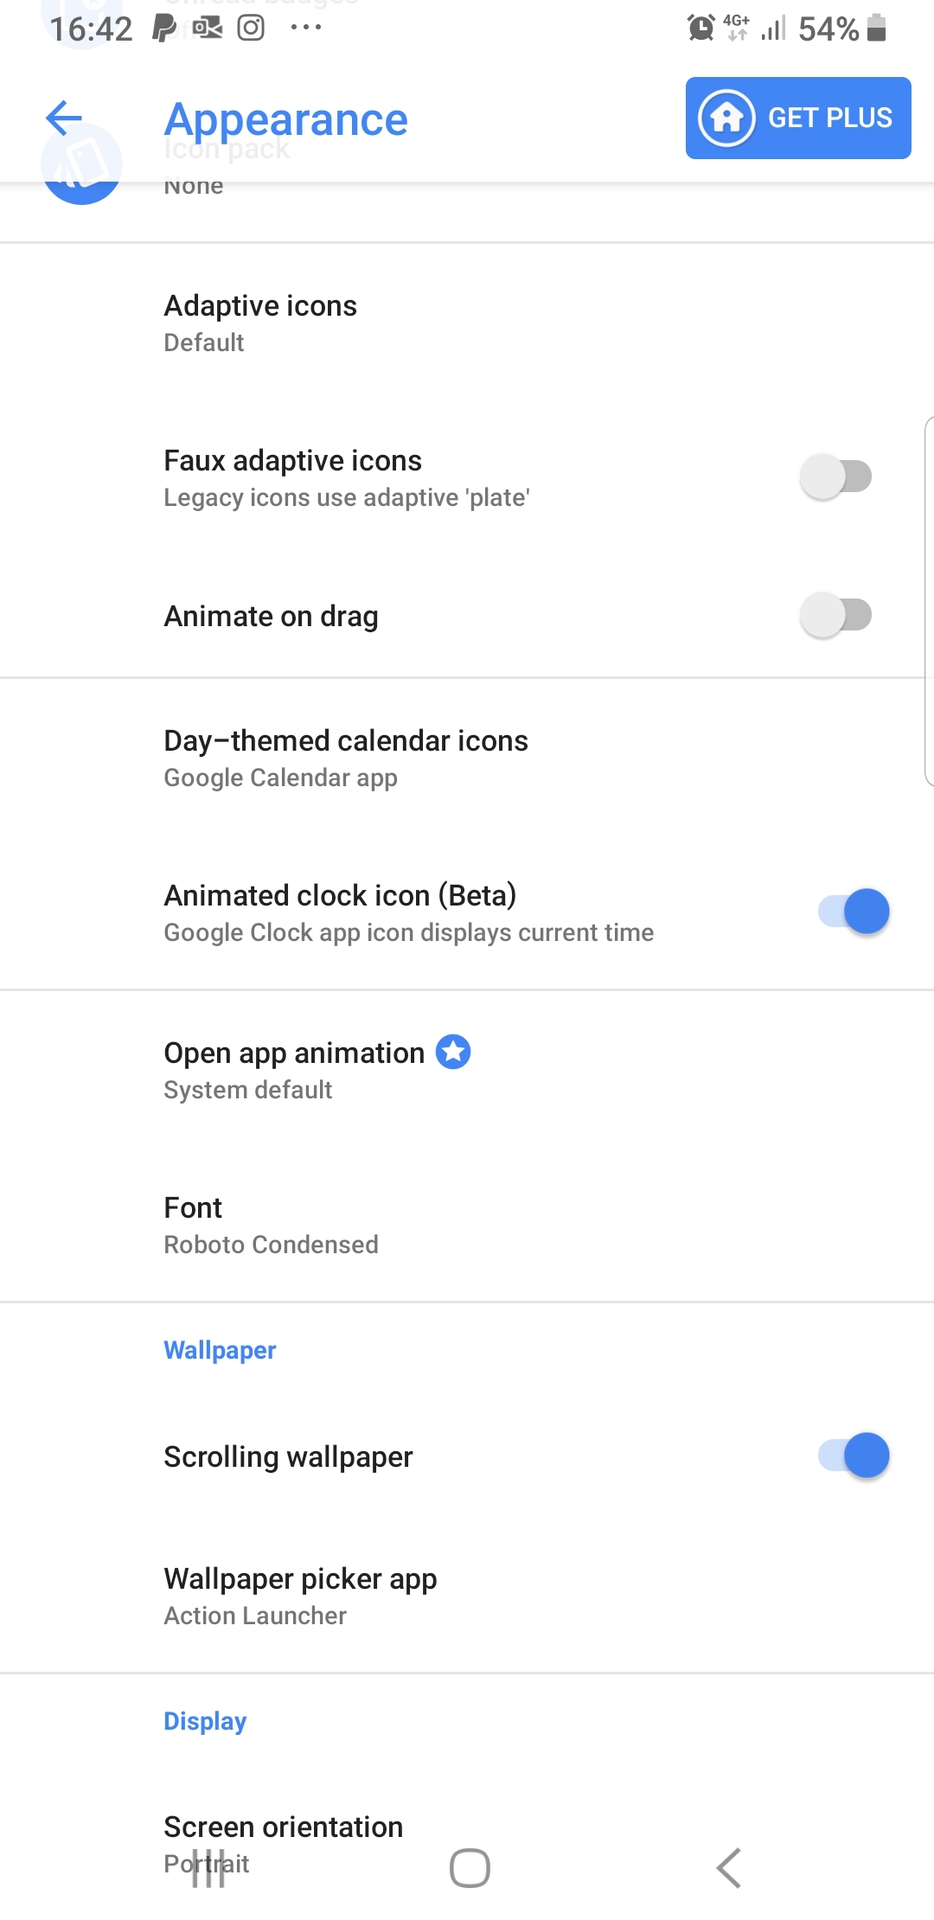

Another powerful launcher when it comes to Android customization is the excellent Action Launcher: Pixel Edition. To change your font using Action Launcher, head into the settings and then choose Appearance > Font. Now choose the font you want. You won’t have a huge selection here, just the system fonts and a few variations, but it’s still better than nothing!
- Go into the settings of Action Launcher.
- Head to Appearance > Font.
- Choose a font you want to use and you’re done.
Smart Launcher 5
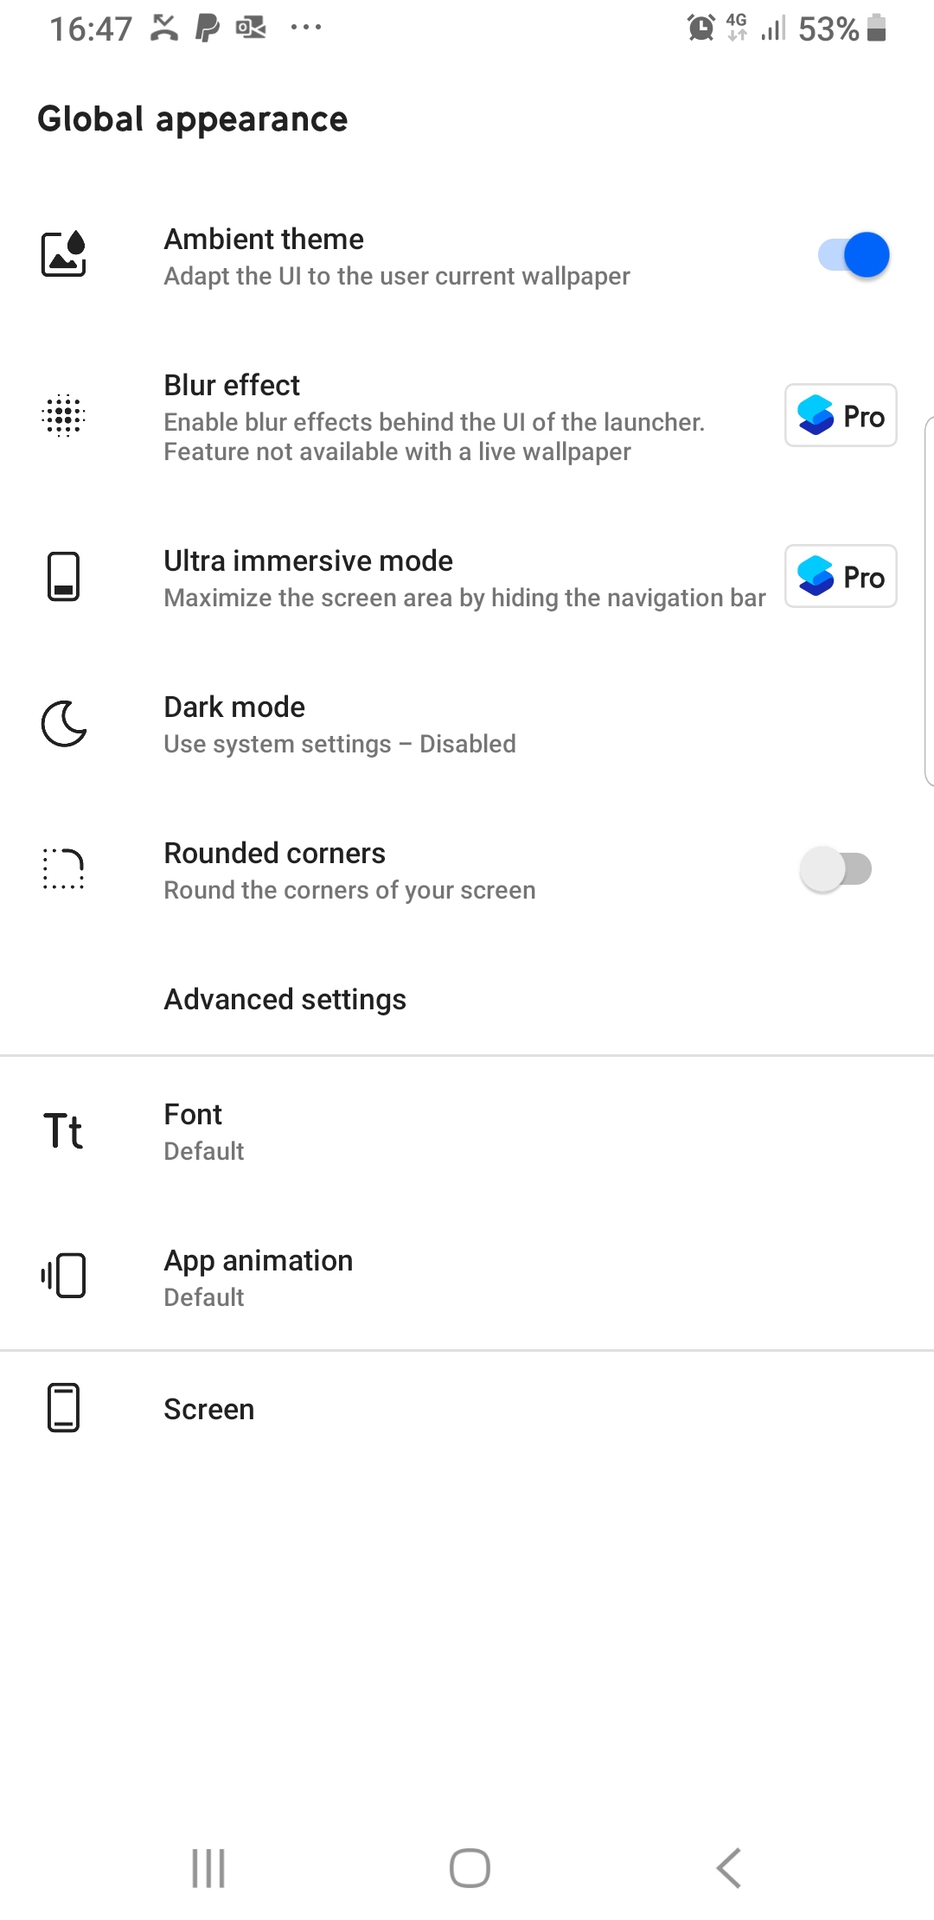
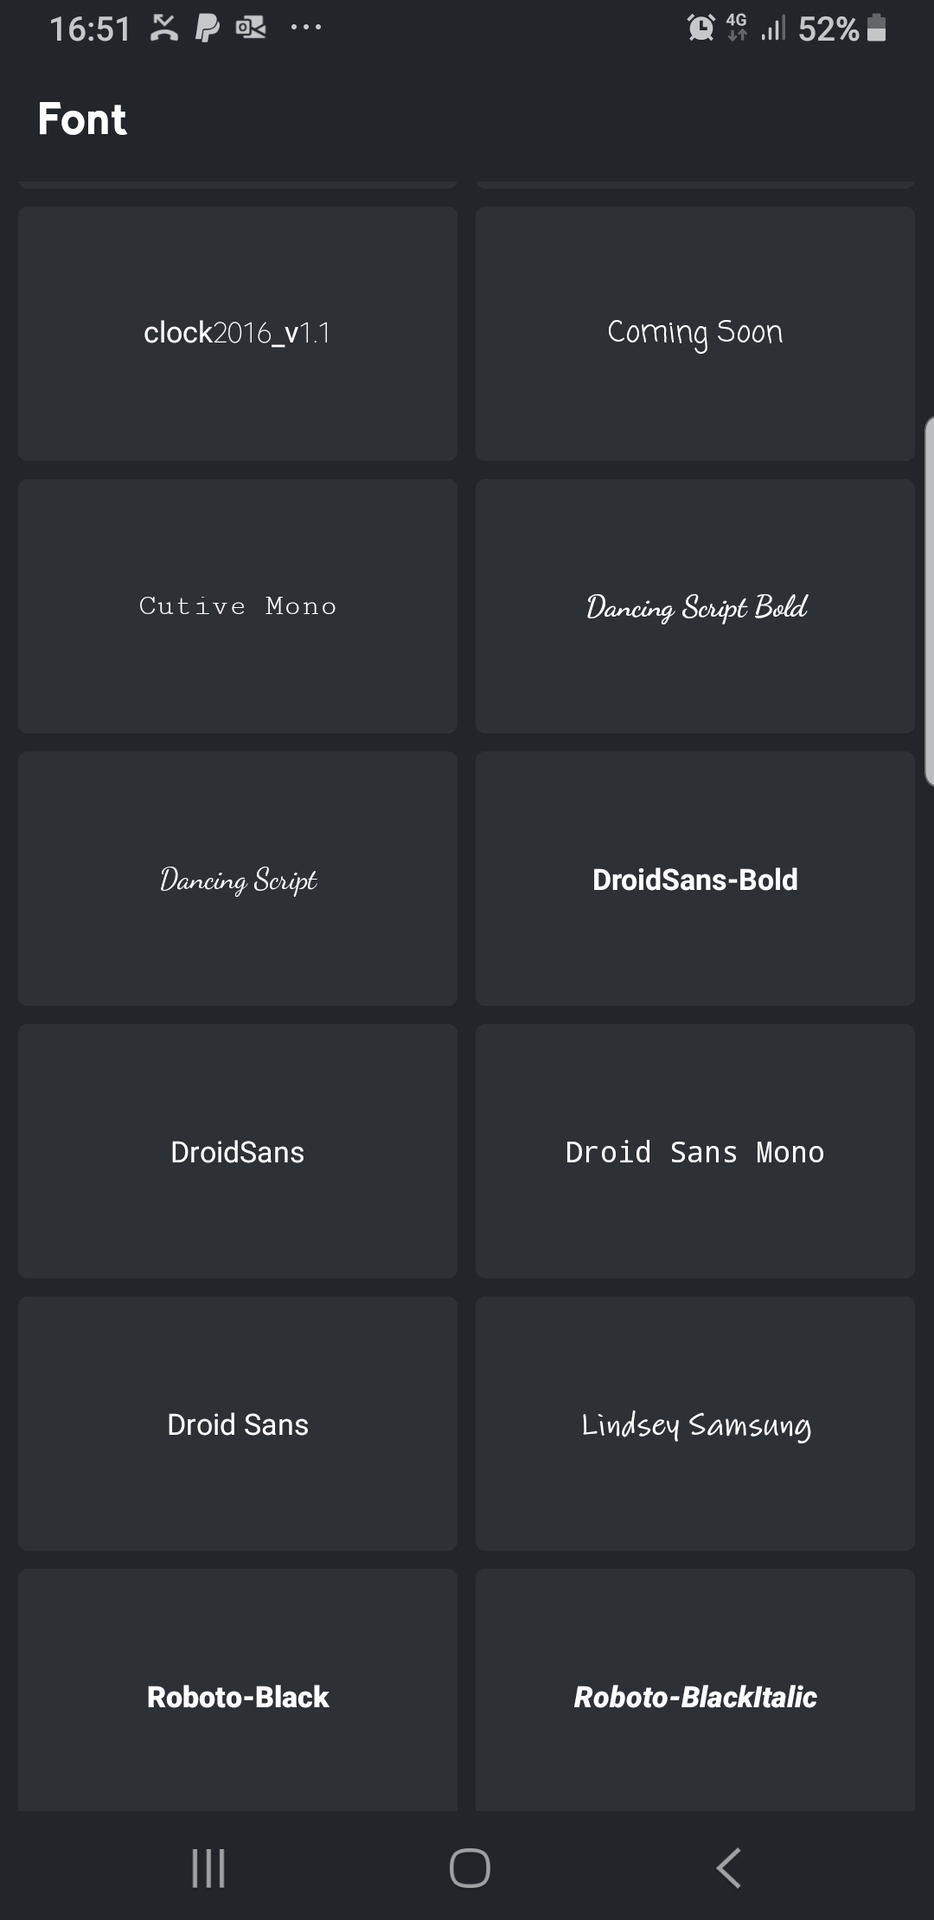
Smart Launcher 5 is another launcher that will let you select new fonts for Android. This time, you’ll head into the settings and then choose Global appearance > Font. There’s a very decent selection of fonts available in Smart Launcher, which is great for those that really want to express themselves. It’s just a shame that once again the change is only going to impact the fonts that are in the app.
- Go into the settings of Smart Launcher 5.
- Head to Global appearance > Font.
- Choose a font you want to use and you’re done.
iFont

iFont is not a launcher, but rather an app specifically used to change fonts for Android. It is completely free and supports many Samsung, Xiaomi Meizu, Huawei, HTC, Sony, and Motorola rooted handsets.
On non-rooted devices, use iFont’s Online tab to browse for available fonts. To use a font on the list, do the following:
- Enable installation of apps from “Unknown Sources.” This option can usually be found in Settings > Security.
- Launch iFont and go to the “RECOM” or “FIND” tabs to find fonts.
- Tap on a font name that you want to install.
- Tap the “Download” button.
- Tap the “Set” button to install the font.
- Go to Settings > Display > Font Size and Style. Your newly installed font should appear on the list.
- Tap on the new font to use it as the system font.
- The font is applied immediately. No reboot needed.
You can also copy TrueType fonts (TTF) from your PC to the /sdcard/ifont/custom directory; the fonts will then appear on the “Custom tab.” But to be able to install and use the fonts, you will need a rooted device.
Unfortunately, the trade-off is that Samsung One UI does not seem to support iFont anymore (at least this writer could not get it to work). You may, therefore, find that newer Samsung devices don’t work. An alternative does exist, however, and it’s called Wings Samsung Fonts.
While many people will be happy sticking with the default fonts for Android, being able to customize them is a great option for those that like to personalize their gadgets. This flexibility is part of the appeal of Android. The good news is that no matter what type of device you own, there should be some way to set your own font. And now you know how to start!
Those who are a bit more tech-savvy can change fonts manually on rooted devices using the Android Debug Bridge (ADB), among other options, but we’re not going to go into detail on how to do it in this post.
What font is splattered all over your Android device’s UI today? Have you ever changed your fonts for Android to something else? Let us know in the comments below!
Источник


