- How to Change Your GPS Location on Android [2021 Guide]
- Part 1: When You Can Change or Fake Your GPS Location?
- Part 2: The Most Common Ways to Change Your GPS Location on Android
- Part 3: Best Alternative Location Changer App To Fake Your GPS Location On Android
- Part 4: Other FAQs about Changing Location on Android
- Request app permissions
- Basic principles
- Workflow for requesting permissions
- Determine whether your app was already granted the permission
- Explain why your app needs the permission
- Request permissions
- Allow the system to manage the permission request code
- Kotlin
- Kotlin
- Manage the permission request code yourself
- Kotlin
- Kotlin
- Handle permission denial
- One-time permissions
- Android auto-resets permissions of unused apps
- Request to become the default handler if necessary
- Grant all runtime permissions for testing purposes
- Additional resources
How to Change Your GPS Location on Android [2021 Guide]
home_icon Created with Sketch.
Home > Change Location > How to Change Your GPS Location on Android [2021 Guide]
![]()
February 16, 2021 (Updated: June 21, 2021)
Today, the majority of Android apps access your smartphone’s GPS signal to offer different services. For instance, Google Maps accesses geolocation to provide real-time navigation whereas social media apps (Instagram & Facebook) use it to show nearby friends.В
Similarly, there are several other situations where changing your smartphone’s GPS location will be helpful. So, in this article, we are going to discuss how to change location on Android phone so that you can hide your real whereabouts and access geo-restricted content without any hassle.
Part 1: When You Can Change or Fake Your GPS Location?
Before moving any further, let’s first discuss what are the different scenarios where you’d want to change your smartphone’s GPS location.
Case 1. Get the latest Android Updates
It’s quite frustrating when a new Android OS update is released in other countries but you still have to wait for another 6-7 weeks to download it on your device. Fortunately, there’s a way to get all the latest updates for your Android device, even if they aren’t released in your country yet. You can simply change your GPS location to a place where the updates are already released and install them without any interruption.
Case 2. Improve Your Online Privacy
For some people, privacy is a major concern these days, considering every app knows their daily movement. Since you don’t know how different apps utilize your geolocation data, it’s always a better option to fake GPS location and hide your current whereabouts.
Case 3. Watch the Latest Movies and TV Shows
Online streaming platforms such as Netflix and Amazon Prime Video usually display content according to the user’s current location. But you can still watch TV Shows and movies that aren’t released in your country by changing your GPS location.
Case 4. You Can Get More Matches on Dating Apps
Dating apps such as Tinder access GPS location and display profiles in a limited radius. But, if you couldn’t find the perfect match, even after swiping through hundreds of profiles, you can expand the search results by changing your current location. This is also a great way to meet new people in a different city before moving there.
Case 5. Boost GPS Signals on Your Real Location
Another situation where you’d want to change your smartphone’s location is when it has a weak GPS signal. There are many scenarios where your device may fail to fetch your current location precisely. In this case, you can manually set your exact location using a geo-spoofing app.
Case 6. Prevent Sharing of Location with Social Media Apps
Social media apps such as Facebook and Instagram also access your GPS location to filter content in your feed and customize the user experience. This is another scenario where you can keep your online privacy intact by changing your current location.В
Part 2: The Most Common Ways to Change Your GPS Location on Android
So, now that you know the benefits of using a spoofed location, let’s take a look at how to change location on Android. The ideal way to set up a fake GPS location is to use a geo-spoofing app. You can find dozens of geo spoofing apps on Google Play Store. All these apps offer the same functionality and have the same features as well. So, you can download any of these apps and you’ll be able to change your GPS location easily.
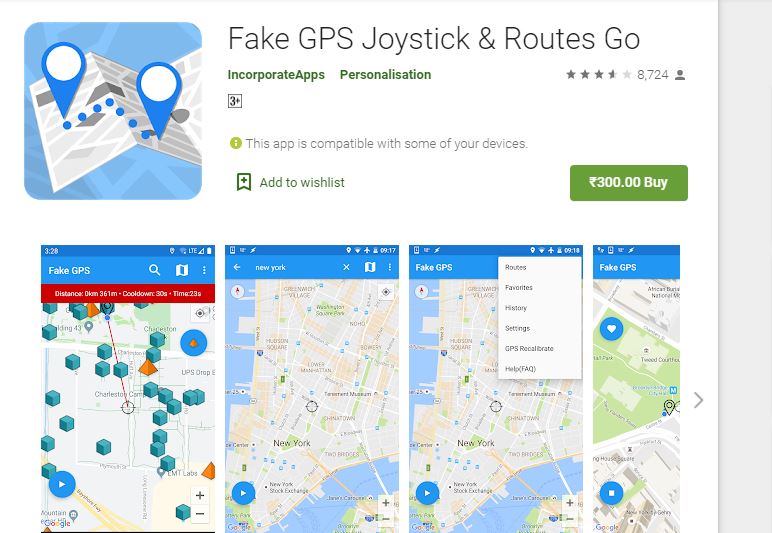
For a quick demonstration, we are going to use Fake GPS Go Joystick. It’s a GPS Joystick app that’ll let you change your current location and virtually control your GPS movement as well.
Step 1 — Go to Google Play Store and search for Fake GPS GO Joystick. Tap the “Install” button to install the app on your smartphone.
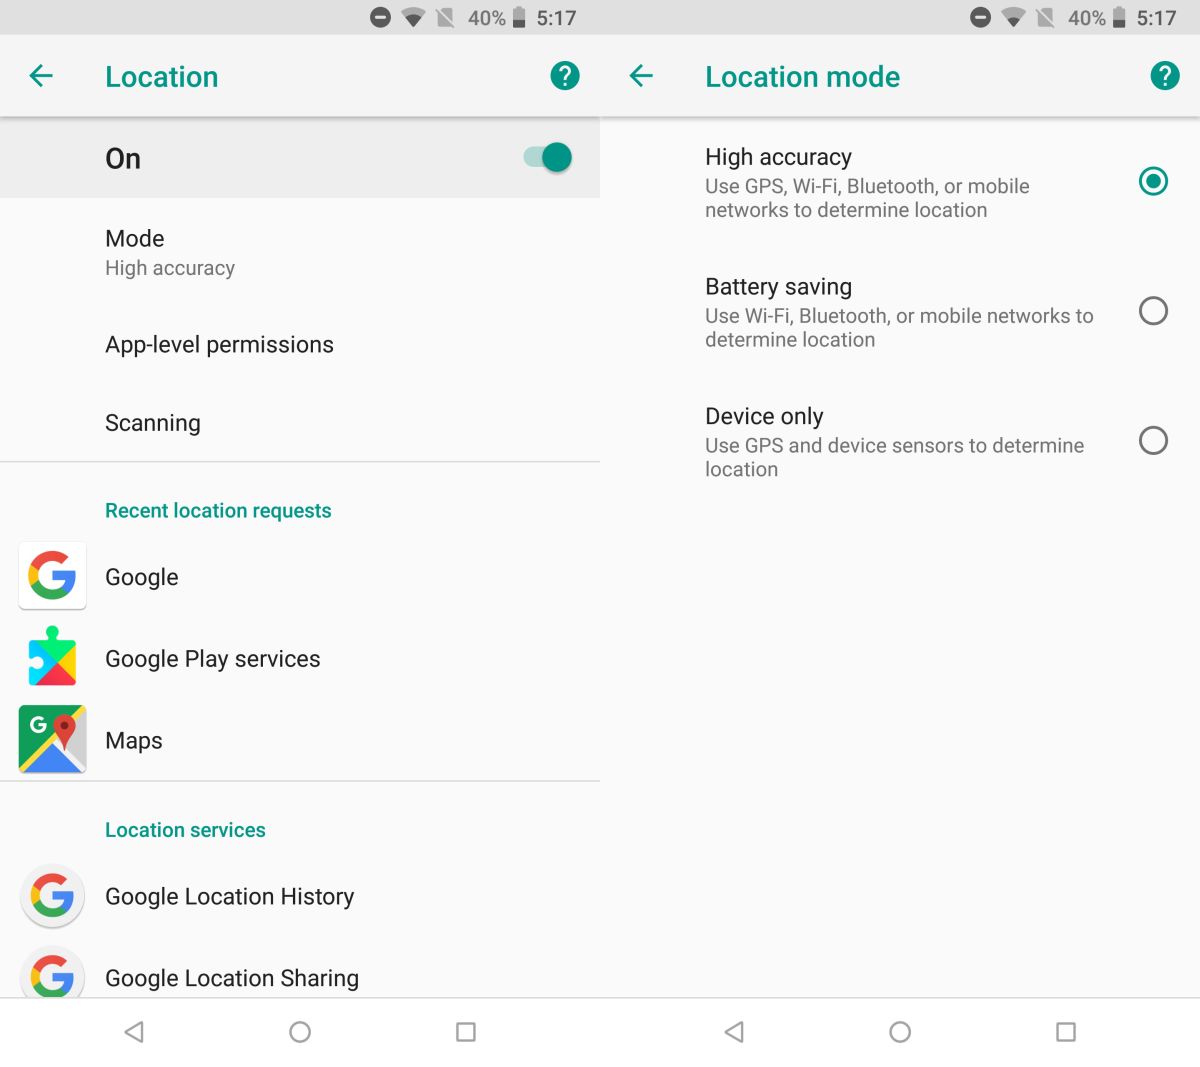
Step 2 — Once the app is installed, open the “Settings” menu and select “Location”. Here make sure to change the “Location Mode” to “GPS Only”.
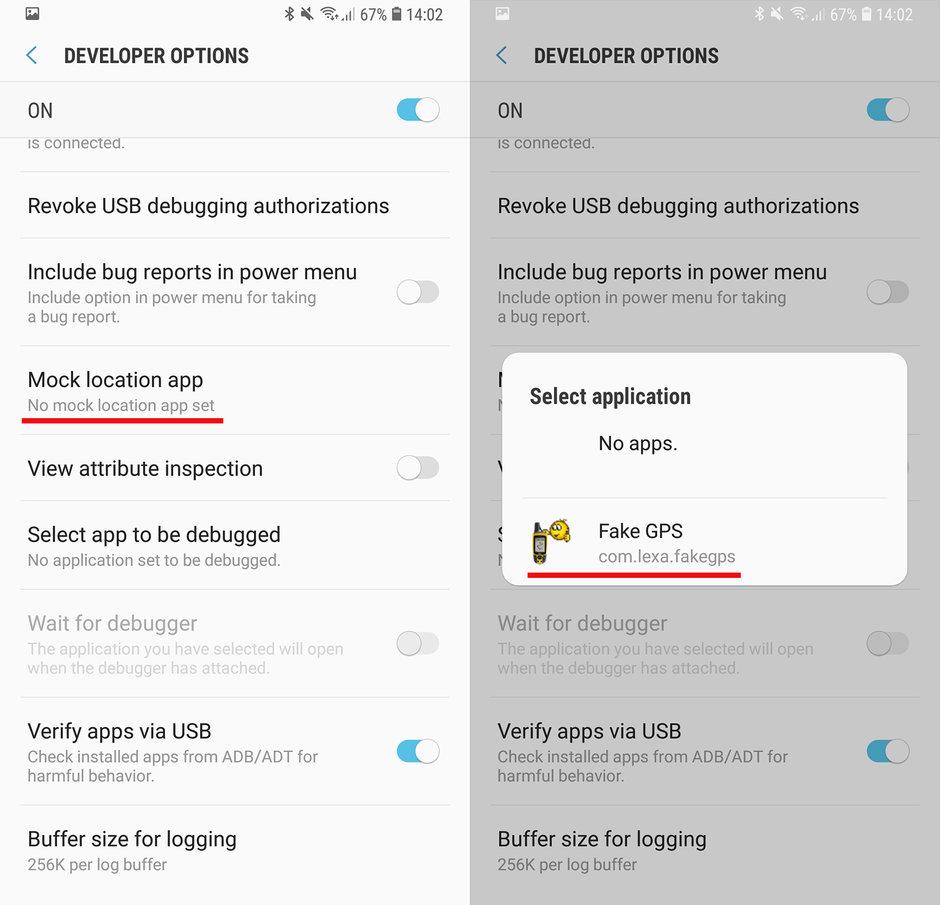
Step 3 — Again, go back to the “Settings Menu” and click “Developer Options”.
Step 4 — Click “Set Mock Location App” and choose “Fake GPS” from the list.
Step 5 — Once you have set the default mock location app, open “GPS GO Joystick” and use the search bar to find a specific location. The pointer will automatically move to the specific location on the map. Finally, click the “Play” button and your device’s location will be changed automatically.
That’s how to change your location on Android using any of the GPS spoofing tools. Now, even though this is a great way to spoof your location, using such geo spoofing apps have a few limitations. For instance, since there are hundreds of such apps, it can become extremely tiring to know which ones are legit. And, secondly if you install a free location spoofing app it’ll only offer limited features. In fact, some of the fake GPS apps on Google Play Store don’t even provide the Joystick feature.
Part 3: Best Alternative Location Changer App To Fake Your GPS Location On Android
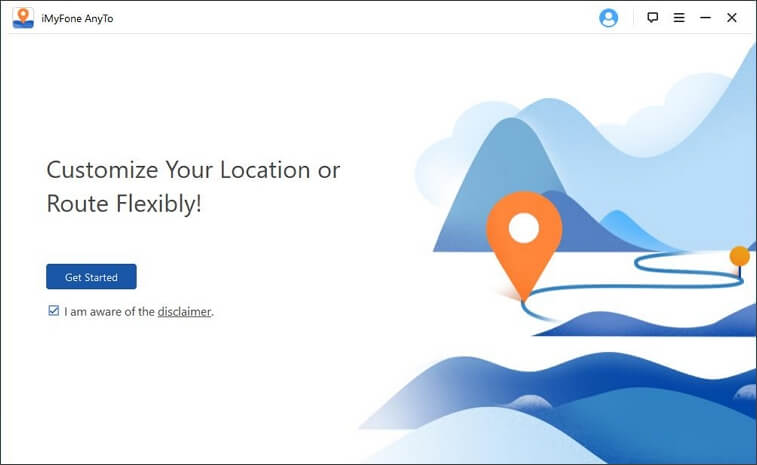
So, is there any alternative to geo-spoofing apps on PC? The answer is Yes! You can use iMyFone AnyTo for Android to change your current GPS location and replace it with a fake one. It’s a fully-functional location spoofing tool that’ll let you change your GPS location to anywhere in the world. Unliked other apps, you won’t have to directly install AnyTo on your smartphone or even set it as your default “Mock Location” app. You can install it on your PC and control your smartphone’s GPS location easily.
Here are some of the key features of AnyTo for Android that make it the best geo spoofing tool for Android users.
- Change Your GPS Location to Anywhere in the World instantly
- Two-Spot and Multi-Spot Modes to virtually control your GPS movement on the map
- Save locations in the “History” tab for future
- Find a specific location using its GPS coordinates
Here’s the step-by-step process on how to change your GPS location on Android using AnyTo for Android.
Step 1 — Download and install “AnyTo For Android” on your PC. Launch the appВ and click “Get Started”.
Step 2 — Connect your device to the computer and wait for the tool to recognize it.
Step 3 — Once the device gets recognized, you’ll see a map on your screen.
Step 4 — Now, choose “Teleport Mode” from the top-right corner and enter a location name in the search bar. You can also find a specific location using its GPS coordinates.
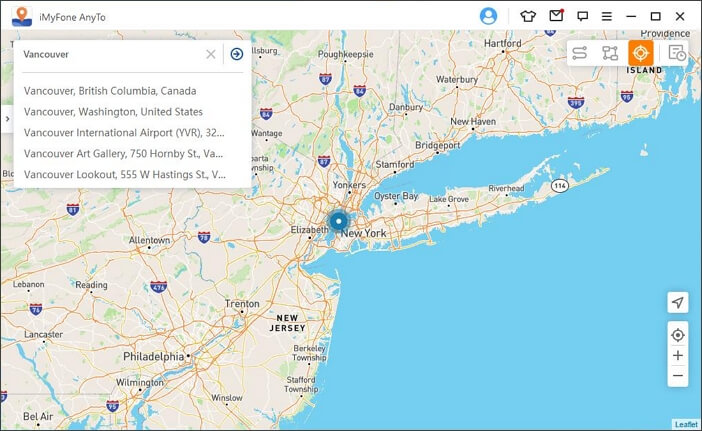
Step 5 — The pointer will move to the selected location automatically. Finally, click “Move” to set it as your current location.
Now, you can use any of the apps on your smartphone and they won’t be able to track your original location at all.
Part 4: Other FAQs about Changing Location on Android
1. Can Fake GPS be Detected?
While it’s not easy to detect if you’re using a fake GPS location or not, it’s always a good strategy to be wise with your approach. For instance, if you are playing Pokemon Go by changing your GPS location, make sure to avoid taking bigger location jumps too frequently. This will trigger the Pokemon GO’s server to detect something is fishy and you might even get your account banned permanently. Also, if you want to avoid getting caught, always ensure to use a professional geo spoofing tool such an AnyTO for Android.
2. Should I Turn Off Location Services on my Android phone?
Ideally, it’s not a wise strategy to disable location services on your Android phone because you won’t be able to use apps such as Google Maps or Tinder. However, if you are concerned about your privacy, you can change your GPS location using a gps spoofing app. This will allow you to hide your original location and use all the geo-services at the same time.
3. Does Airplane Mode Turn Off location?
When you enable Airplane Mode on your device, it’ll only disconnect from network services. As far as location is concerned, Airplane Mode will not turn-off location at all. Instead, if you want to stop third-party apps from tracking your whereabouts, it would be better to use a dedicated location spoofing tool.
Источник
Request app permissions
Every Android app runs in a limited-access sandbox. If your app needs to use resources or information outside of its own sandbox, you can declare a permission and set up a permission request that provides this access. These steps are part of the workflow for using permissions.
If you declare any dangerous permissions, and if your app is installed on a device that runs Android 6.0 (API level 23) or higher, you must request the dangerous permissions at runtime by following the steps in this guide.
If you don’t declare any dangerous permissions, or if your app is installed on a device that runs Android 5.1 (API level 22) or lower, the permissions are automatically granted, and you don’t need to complete any of the remaining steps on this page.
Basic principles
The basic principles for requesting permissions at runtime are as follows:
- Ask for permissions in context, when the user starts to interact with the feature that requires it.
- Don’t block the user. Always provide the option to cancel an educational UI flow related to permissions.
- If the user denies or revokes a permission that a feature needs, gracefully degrade your app so that the user can continue using your app, possibly by disabling the feature that requires the permission.
- Don’t assume any system behavior. For example, don’t assume that permissions appear in the same permission group. A permission group merely helps the system minimize the number of system dialogs that are presented to the user when an app requests closely-related permissions.
Workflow for requesting permissions
Before you declare and request runtime permissions in your app, evaluate whether your app needs to do so. You can fulfill many use cases in your app, such as taking photos, pausing media playback, and displaying relevant ads, without needing to declare any permissions.
If you conclude that your app needs to declare and request runtime permissions, complete these steps:
- In your app’s manifest file, declare the permissions that your app might need to request.
- Design your app’s UX so that specific actions in your app are associated with specific runtime permissions. Users should know which actions might require them to grant permission for your app to access private user data.
- Wait for the user to invoke the task or action in your app that requires access to specific private user data. At that time, your app can request the runtime permission that’s required for accessing that data.
Check whether the user has already granted the runtime permission that your app requires. If so, your app can access the private user data. If not, continue to the next step.
You must check whether you have that permission every time you perform an operation that requires that permission.
Check whether your app should show a rationale to the user, explaining why your app needs the user to grant a particular runtime permission. If the system determines that your app shouldn’t show a rationale, continue to the next step directly, without showing a UI element.
If the system determines that your app should show a rationale, however, present the rationale to the user in a UI element. This rationale should clearly explain what data your app is trying to access, and what benefits the app can provide to the user if they grant the runtime permission. After the user acknowledges the rationale, continue to the next step.
Request the runtime permission that your app requires in order to access the private user data. The system displays a runtime permission prompt, such as the one shown on the permissions overview page.
Check the user’s response, whether they chose to grant or deny the runtime permission.
If the user granted the permission to your app, you can access the private user data. If the user denied the permission instead, gracefully degrade your app experience so that it provides functionality to the user, even without the information that’s protected by that permission.
Figure 1 illustrates the workflow and set of decisions associated with this process:
 Figure 1. Diagram that shows the workflow for declaring and requesting runtime permissions on Android.
Determine whether your app was already granted the permission
To check if the user has already granted your app a particular permission, pass that permission into the ContextCompat.checkSelfPermission() method. This method returns either PERMISSION_GRANTED or PERMISSION_DENIED , depending on whether your app has the permission.
Explain why your app needs the permission
If the ContextCompat.checkSelfPermission() method returns PERMISSION_DENIED , call shouldShowRequestPermissionRationale() . If this method returns true , show an educational UI to the user. In this UI, describe why the feature, which the user wants to enable, needs a particular permission.
Additionally, if your app requests a permission related to location, microphone, or camera, consider explaining why your app needs access to this information.
Request permissions
After the user views an educational UI, or the return value of shouldShowRequestPermissionRationale() indicates that you don’t need to show an educational UI this time, request the permission. Users see a system permission dialog, where they can choose whether to grant a particular permission to your app.
Traditionally, you manage a request code yourself as part of the permission request and include this request code in your permission callback logic. Another option is to use the RequestPermission contract, included in an AndroidX library, where you allow the system to manage the permission request code for you. Because using the RequestPermission contract simplifies your logic, it’s recommended that you use it when possible.
Allow the system to manage the permission request code
To allow the system to manage the request code that’s associated with a permissions request, add dependencies on the following libraries in your module’s build.gradle file:
You can then use one of the following classes:
- To request a single permission, use RequestPermission .
- To request multiple permissions at the same time, use RequestMultiplePermissions .
The following steps show how to use the RequestPermission contract. The process is nearly the same for the RequestMultiplePermissions contract.
In your activity or fragment’s initialization logic, pass in an implementation of ActivityResultCallback into a call to registerForActivityResult() . The ActivityResultCallback defines how your app handles the user’s response to the permission request.
Keep a reference to the return value of registerForActivityResult() , which is of type ActivityResultLauncher .
To display the system permissions dialog when necessary, call the launch() method on the instance of ActivityResultLauncher that you saved in the previous step.
After launch() is called, the system permissions dialog appears. When the user makes a choice, the system asynchronously invokes your implementation of ActivityResultCallback , which you defined in the previous step.
Note: Your app cannot customize the dialog that appears when you call launch() . To provide more information or context to the user, change your app’s UI so that it’s easier for users to understand why a feature in your app needs a particular permission. For example, you might change the text in the button that enables the feature.
Also, the text in the system permission dialog references the permission group associated with the permission that you requested. This permission grouping is designed for system ease-of-use, and your app shouldn’t rely on permissions being within or outside of a specific permission group.
The following code snippet shows how to handle the permissions response:
Kotlin
And this code snippet demonstrates the recommended process of checking for a permission, and requesting a permission from the user when necessary:
Kotlin
Manage the permission request code yourself
As an alternative to allowing the system to manage the permission request code, you can manage the permission request code yourself. To do so, include the request code in a call to requestPermissions() .
Note: Your app cannot customize the dialog that appears when you call requestPermissions() . The text in the system permission dialog references a permission group, but this permission grouping is designed for system ease-of-use. Your app shouldn’t rely on permissions being within or outside of a specific permission group.
The following code snippet demonstrates how to request a permission using a request code:
Kotlin
After the user responds to the system permissions dialog, the system then invokes your app’s implementation of onRequestPermissionsResult() . The system passes in the user response to the permission dialog, as well as the request code that you defined, as shown in the following code snippet:
Kotlin
Handle permission denial
If the user denies a permission request, your app should help users understand the implications of denying the permission. In particular, your app should make users aware of the features that don’t work because of the missing permission. When you do so, keep the following best practices in mind:
Guide the user’s attention. Highlight a specific part of your app’s UI where there’s limited functionality because your app doesn’t have the necessary permission. Several examples of what you could do include the following:
- Show a message where the feature’s results or data would have appeared.
- Display a different button that contains an error icon and color.
Be specific. Don’t display a generic message; instead, mention which features are unavailable because your app doesn’t have the necessary permission.
Don’t block the user interface. In other words, don’t display a full-screen warning message that prevents users from continuing to use your app at all.
At the same time, your app should respect the user’s decision to deny a permission. Starting in Android 11 (API level 30), if the user taps Deny for a specific permission more than once during your app’s lifetime of installation on a device, the user doesn’t see the system permissions dialog if your app requests that permission again. The user’s action implies «don’t ask again.» On previous versions, users would see the system permissions dialog each time your app requested a permission, unless the user had previously selected a «don’t ask again» checkbox or option.
In certain situations, the permission might be denied automatically, without the user taking any action. (Similarly, a permission might be granted automatically as well.) It’s important to not assume anything about automatic behavior. Each time your app needs to access functionality that requires a permission, you should check that your app is still granted that permission.
To provide the best user experience when asking for app permissions, also see App permissions best practices.
One-time permissions
Starting in Android 11 (API level 30), whenever your app requests a permission related to location, microphone, or camera, the user-facing permissions dialog contains an option called Only this time, as shown in Figure 2. If the user selects this option in the dialog, your app is granted a temporary one-time permission.
Your app can then access the related data for a period of time that depends on your app’s behavior and the user’s actions:
- While your app’s activity is visible, your app can access the data.
- If the user sends your app to the background, your app can continue to access the data for a short period of time.
- If you launch a foreground service while the activity is visible, and the user then moves your app to the background, your app can continue to access the data until that foreground service stops.
- If the user revokes the one-time permission, such as in system settings, your app cannot access the data, regardless of whether you launched a foreground service. As with any permission, if the user revokes your app’s one-time permission, your app’s process terminates.
When the user next opens your app and a feature in your app requests access to location, microphone, or camera, the user is prompted for the permission again.
Android auto-resets permissions of unused apps
If your app targets Android 11 (API level 30) or higher and isn’t used for a few months, the system protects user data by automatically resetting the sensitive runtime permissions that the user had granted your app. Learn more in the guide about app hibernation.
Request to become the default handler if necessary
Some apps depend on access to sensitive user information related to call logs and SMS messages. If you want to request the permissions specific to call logs and SMS messages and publish your app to the Play Store, you must prompt the user to set your app as the default handler for a core system function before requesting these runtime permissions.
For more information on default handlers, including guidance on showing a default handler prompt to users, see the guide on permissions used only in default handlers.
Grant all runtime permissions for testing purposes
To grant all runtime permissions automatically when you install an app on an emulator or test device, use the -g option for the adb shell install command, as demonstrated in the following code snippet:
Additional resources
For additional information about permissions, read these articles:
To learn more about requesting permissions, download the following sample apps:
- Android RuntimePermissionsBasic Sample Java | Kotlin
Content and code samples on this page are subject to the licenses described in the Content License. Java is a registered trademark of Oracle and/or its affiliates.
Источник


