What Are Configuration Changes?

Configuration changes can sometimes be hard to understand. This blog post aims to shed some light on them and help you understand them better. One of the most common causes of your app experiencing a configuration change is the user rotating their device. So let’s start by looking at what rotating the device does to your app. Then we’ll continue with an overview of how to handle configuration changes, along with a discussion of their advantages and disadvantages.
How Rotation on Android Works
The way Android handles orientation changes is by destroying and recreating your Activity . This means that your Activity will go through all the lifecycle events associated with being closed. Then it will be restarted and go through its lifecycle events again.
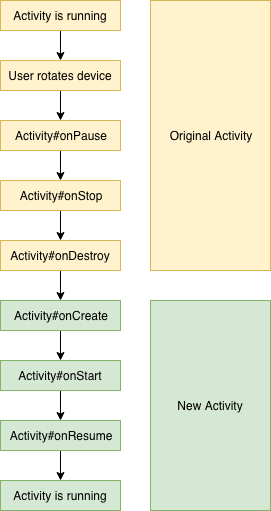
Since your Activity will be recreated, this means any data not persisted will be gone after rotation. This is, of course, far from ideal, so let’s look at one of the simplest solutions for this, which is disabling the behavior entirely.
Handling Configuration Changes
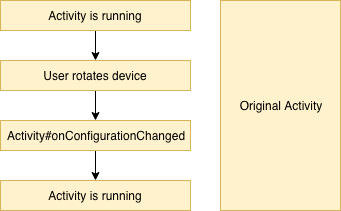
Android provides a way for your application to opt out of being restarted when the orientation changes by defining android:configChanges for your Activity in the manifest. This tells the system that you will be handling the specified configuration changes yourself instead of relying on the system to handle them for you. You can very granularly specify what kind of changes you want to handle, with the most common ones being orientation and screenSize . This will let you handle the user rotating their device, and instead of destroying the Activity and going through the associated lifecycle events, the system will just call onConfigurationChanged() with the new configuration and keep your Activity alive.
Advantages of Handling Configuration Changes
One clear advantage of using android:configChanges , and probably the reason it is used most often, is because it saves you from having to write code to persist your Activity state. Since the Activity isn’t recreated, any data associated with it survives an orientation change. Another advantage is that, especially on slower devices, the experience when rotating the device is far smoother when android:configChanges is used. Now, if all this sounds too good to be true, you’re right, because there are disadvantages as well.
Disadvantages of Handling Configuration Changes
The biggest disadvantage of using android:configChanges is that even when manually handling the configuration changes, you still have to implement onSaveInstanceState() so your app doesn’t lose its state when going into the background. This means that specifying android:configChanges doesn’t actually save you any work, since after correctly implementing onSaveInstanceState() , rotation will also automatically work. In addition, now the automatic resource switching that Android provides no longer works. So if your app requires different resources based on screen size or orientation, it is now on you to update your views in the onConfigurationChanged() method in order to match the new configuration. This can unnecessarily bloat your Activity with code for something Android would have handled for you automatically:
Furthermore, some parts of your application might rely on lifecycle events being triggered when the orientation changes, and as such, don’t work correctly when using android:configChanges . This means that in most cases, using android:configChanges won’t net you any worthwhile benefits, all while causing additional work.
Conclusion
While just specifying android:configChanges in the manifest and forgetting about it can be tempting to quickly get orientation changes to work, it is by no means the correct solution to handle screen rotation. In the end, there is no way of getting around correctly implementing onSaveInstanceState() , since even if you are fine with the drawbacks of android:configChanges , you’ll still need onSaveInstanceState() to correctly work when your app is put into the background.
Источник
Конфигурация приложения в Android: быстрая разработка
 При разработке мобильных приложений зачастую возникает необходимость хранить настройки приложения (выбранную пользователем цветовую тему, пароль доступа к приложению, параметры синхронизации с сервером и т.д.). Поскольку такие задачи возникают довольно часто, в Google позаботились о разработчиках и создали механизм для быстрой и легкой реализации данного функционала. Этот механизм позволяет легко создавать, сохранять, отображать и производить разные манипуляции с настройками приложения. Мало того он позволяет автоматически создавать пользовательский интерфейс. При описании типа параметра настроек — автоматически генерируется часть пользовательского интерфейса в зависимости от типа параметра (boolean — чекбокс, String — поле ввода, . ) без написания кода. Звучит неплохо для быстрой разработки, не так ли?
Первым шагом в реализации механизма настроек приложения является наследования активности экрана вашего приложения от класса PreferenceActivity. Этот класс наследован от класса ListActivity
и позволяет создавать пользовательский интерфейс по описанию в XML файле ресурсов. Мало того, этот класс позволяет автоматически сохранять настройки в SharedPreferences незаметно для вас. SharedPreferences — интерфейс позволяющий обращаться и манипулировать данными настройки приложения вручную с помощью вызова метода getSharedPreferences из вашего Activity (подробнее Android Essentials: Application Preferences). Для того что бы увязать вместе наш класс унаследованный от PreferenceActivity и XML файл описывающий параметры конфигурации используется метод addPreferencesFromResource:
- .
- @Override
- public void onCreate ( Bundle savedInstanceState ) <
- super . onCreate ( savedInstanceState ) ;
- addPreferencesFromResource ( R. xml . preferences ) ;
- >
- .
Теперь необходимо создать файл res/xml/preferences.xml который является описанием нашего списка параметров конфигурации приложения и будет подхвачен нашим PreferenceActivity. Этот XML файл имеет специфический формат позволяющий описывать типы параметров конфигурации. Все типы вытекают из класса Preference который представляет собой базовый блок пользовательского интерфейса и генерирует View которое в последствии отобразится в нужном месте пользовательского интерфейса и будет ассоциироваться с объектом SharedPreferences который можно будет извлекать и сохранять. Рассмотрим часто используемые подклассы, которые используются для описание типов параметров конфигурации:
- CheckBoxPreference: чекбокс, представляет параметры типа boolean.
- RingtonePreference: позволяет выбирать рингтон из доступных на устройстве. URI выбранного файла рингтона будет представлен в виде строки.
- EditTextPreference: строка ввода текста, представляет параметры типа String.
- ListPreference: показывает список возможных значений параметра в виде диалога, представляет параметры типа String.
Также необходимо отметить, что отдельные параметры могут группироваться в категории с помощью класса PreferenceCategory, который группирует объекты Preference и выводит неактивный заголовок группы.
Теперь опишем, что же мы хотим видеть в нашем XML описании. У нас будет две категории. В первой разместим CheckBoxPreference который будет активировать/дезактивировать синхронизацию данных нашего гипотетического приложения и ListPreference в которым будем задавать частоту синхронизации данных. Как вы уже наверняка заметили, между этими двумя параметрами есть зависимость, если первый не выбран, то второй нужно дезактивировать. Это достигается с помощью использования атрибута android:dependency. Во второй категории мы разместим EditTextPreference с помощью которого будем задавать текст приветствия. Представим все это в виде XML:
- version = «1.0» encoding = «utf-8» ?>
- >
- name = «updateInterval» >
- name = «1000» > Every 1 second >
- name = «5000» > Every 5 seconds >
- name = «30000» > Every 30 seconds >
- name = «60000» > Every 1 minute >
- name = «300000» > Every 5 minutes >
- >
- name = «updateIntervalValues» >
- name = «1000» > 1000 >
- name = «5000» > 5000 >
- name = «30000» > 30000 >
- name = «60000» > 60000 >
- name = «300000» > 300000 >
- >
- >
- android:key = «pin»
- android:title = «PIN code»
- android:summary = «If login screen is enabled»
- android:dialogTitle = «PIN code»
- android:dialogMessage = «Provide a PIN»
- android:defaultValue = «»
- android:inputType = «number»
- android:password = «true»
- android:dependency = «runLoginScreen»
- />
- package com.javacodegeeks.android.preferences ;
- import android.content.Intent ;
- import android.os.Bundle ;
- import android.preference.PreferenceActivity ;
- import android.view.Menu ;
- import android.view.MenuItem ;
- public class QuickPrefsActivity extends PreferenceActivity <
- @Override
- public void onCreate ( Bundle savedInstanceState ) <
- super . onCreate ( savedInstanceState ) ;
- addPreferencesFromResource ( R. xml . preferences ) ;
- >
- @Override
- public boolean onCreateOptionsMenu ( Menu menu ) <
- menu. add ( Menu . NONE , 0 , 0 , «Show current settings» ) ;
- return super . onCreateOptionsMenu ( menu ) ;
- >
- @Override
- public boolean onOptionsItemSelected ( MenuItem item ) <
- switch ( item. getItemId ( ) ) <
- case 0 :
- startActivity ( new Intent ( this , ShowSettingsActivity. class ) ) ;
- return true ;
- >
- return false ;
- >
- >
Мы создали опционное меню с одним элементом MenuItem с помощью метода onCreateOptionsMenu. Когда пользователь кликает на элемент меню, мы обрабатываем это событие в методе onOptionsItemSelected и запускаем новую активность используя метод startActivity. (подробнее Using options menus and customized dialogs for user interaction, Launching new activities with intents).
Теперь создадим вторую активность ShowSettingsActivity для отображения параметров конфигурации приложения. Но вначале мы должны описать новую активность в manifest файле AndroidManifest.xml:
- package com.javacodegeeks.android.preferences ;
- import android.app.Activity ;
- import android.content.SharedPreferences ;
- import android.os.Bundle ;
- import android.preference.PreferenceManager ;
- import android.widget.TextView ;
- public class ShowSettingsActivity extends Activity <
- @Override
- protected void onCreate ( Bundle savedInstanceState ) <
- super . onCreate ( savedInstanceState ) ;
- setContentView ( R. layout . show_settings_layout ) ;
- SharedPreferences sharedPrefs = PreferenceManager. getDefaultSharedPreferences ( this ) ;
- StringBuilder builder = new StringBuilder ( ) ;
- builder. append ( «n» + sharedPrefs. getBoolean ( «perform_updates» , false ) ) ;
- builder. append ( «n» + sharedPrefs. getString ( «updates_interval» , «-1» ) ) ;
- builder. append ( «n» + sharedPrefs. getString ( «welcome_message» , «NULL» ) ) ;
- TextView settingsTextView = ( TextView ) findViewById ( R. id . settings_text_view ) ;
- settingsTextView. setText ( builder. toString ( ) ) ;
- >
- >
Здесь мы извлекаем параметры конфигурации приложения в виде класса SharedPreferences с помощью статического метода getDefaultSharedPreferences класса PreferenceManager. Далее, в зависимости от типа данных параметра, мы используем соответствующий метод извлечения данных (например getBoolean или getString). Второй аргумент в методе извлечения данных — значение по умолчанию, на тот случай если параметр с таким именем еще не был задан. В качестве имен параметров мы используем ключи заданные в XML файле preferences.xml. Значения параметров конкатенируются и выводятся в TextView.
Вот описание простого пользовательского интерфейса для второй активности:
- version = «1.0» encoding = «utf-8» ?>
- xmlns:android = «schemas.android.com/apk/res/android»
- android:orientation = «vertical»
- android:layout_width = «fill_parent»
- android:layout_height = «fill_parent»
- >
android:id = «@+id/settings_text_view» android:layout_width = «fill_parent» android:layout_height = «wrap_content» /> >
Давайте запустим приложение, мы увидим список наших параметров:

Кликаем на “Updates Interval” и видим список возможных значений:
Кликаем на “Welcome Message” и видим редактирование текста приветствия:
Посмотрим на заданные параметры. Кликнете на кнопке меню и выберете единственный элемент “Show current settings”. Запуститься вторая активность в которой мы увидим значения наших параметров конфигурации:
Это все. Как видите, это действительно просто. Удачи!
Источник
Handling Configuration Changes
There are various situations such as when the screen orientation is rotated where the Activity can actually be destroyed and removed from memory and then re-created from scratch again. In these situations, the best practice is to prepare for cases where the Activity is re-created by properly saving and restoring the state.
If a user navigates to a different away from the activity, the onPause() and onResume() methods are called. If you need to retain state information in those cases, it’s best to save state through the use of Shared Preferences:
Upon resume, the onResume() gets called:
Note that onSaveInstanceState() is called right before your activity is about to be killed or restarted because of memory pressure or screen orientation. This is different from onPause() which gets called when your activity loses focus (i.e. you transition to another activity). The default implementation of this method automatically saves information about the state of the activity’s view hierarchy, such as the text in an EditText widget or the scroll position of a ListView . For other data to persist, you can put the data in the Bundle provided.
The system will call that method before an Activity is destroyed. Then later the system will call onRestoreInstanceState where we can restore state from the bundle:
Instance state can also be restored in the standard Activity#onCreate method but it is convenient to do it in onRestoreInstanceState which ensures all of the initialization has been done and allows subclasses to decide whether to use the default implementation. Read this stackoverflow post for details.
Note that onSaveInstanceState and onRestoreInstanceState are not guaranteed to be called together. Android invokes onSaveInstanceState() when there’s a chance the activity might be destroyed. However, there are cases where onSaveInstanceState is called but the activity is not destroyed and as a result onRestoreInstanceState is not invoked.
Read more on the Recreating an Activity guide.
Fragments also have a onSaveInstanceState() method which is called when their state needs to be saved:
Then we can pull data out of this saved state in onCreateView :
For the fragment state to be saved properly, we need to be sure that we aren’t unnecessarily recreating the fragment on configuration changes. This means being careful not to reinitialize existing fragments when they already exist. Any fragments being initialized in an Activity need to be looked up by tag after a configuration change:
This requires us to be careful to include a tag for lookup whenever putting a fragment into the activity within a transaction:
With this simple pattern, we can properly re-use fragments and restore their state across configuration changes.
In many cases, we can avoid problems when an Activity is re-created by simply using fragments. If your views and state are within a fragment, we can easily have the fragment be retained when the activity is re-created:
This approach keeps the fragment from being destroyed during the activity lifecycle. They are instead retained inside the Fragment Manager. See the Android official docs for more information.
Now you can check to see if the fragment already exists by tag before creating one and the fragment will retain it’s state across configuration changes. See the Handling Runtime Changes guide for more details.
Often when you rotate the screen, the app will lose the scroll position and other state of any lists on screen. To properly retain this state for ListView , you can store the instance state onPause and restore onViewCreated as shown below:
Check out this blog post and stackoverflow post for more details.
Note that you must load the items back into the adapter first before calling onRestoreInstanceState . In other words, don’t call onRestoreInstanceState on the ListView until after the items are loaded back in from the network or the database.
Often when you rotate the screen, the app will lose the scroll position and other state of any lists on screen. To properly retain this state for RecyclerView , you can store the instance state onPause and restore onViewCreated as shown below:
Check out this blog post and stackoverflow post for more details.
If you want to lock the screen orientation change of any screen (activity) of your android application you just need to set the android:screenOrientation property of an within the AndroidManifest.xml :
Now that activity is forced to always be displayed in «portrait» mode.
If your application doesn’t need to update resources during a specific configuration change and you have a performance limitation that requires you to avoid the activity restart, then you can declare that your activity handles the configuration change itself, which prevents the system from restarting your activity.
However, this technique should be considered a last resort when you must avoid restarts due to a configuration change and is not recommended for most applications. To take this approach, we must add the android:configChanges node to the activity within the AndroidManifest.xml :
Now, when one of these configurations change, the activity does not restart but instead receives a call to onConfigurationChanged() :
See the Handling the Change docs. For more about which configuration changes you can handle in your activity, see the android:configChanges documentation and the Configuration class.
Android’s new Architecture Components helps manage configuration states. All state data related to the UI can be moved to a ViewModel, which will survive rotation changes because they are data tied to the application instead of Activity instance. In this way, you do not need to worry about persisting this configuration data between Activity lifecycles.
First, make sure to add the ViewModel library:
Your ViewModel should extend from the ViewModel class. Move for instance the adapter to be encapsulated within the ViewModel:
Next, create a ViewModel class:
Next, change your references to the adapter to refer to the ViewModel:
Источник


