- About your Apple ID email addresses
- Email addresses you use with your Apple ID
- Apple ID email address
- Change your Apple ID email address
- Reset your Apple ID password
- Get a verification code
- Additional email addresses
- Add an additional email address
- Delete an additional email address
- Rescue email address
- Add or edit a rescue email address
- Delete a rescue email address
- Reset your security questions
- Learn more
- Change your Apple ID
- How to change your Apple ID to a different email address
- If you can’t change your Apple ID
- Add an email account to your iPhone, iPad, or iPod touch
- How to set up your email account automatically
- How to set up your email account manually
- Enter account settings manually
- Do more with Mail
- iOS 14: How to change default email and browser apps
- How to change default iPhone email and browser apps
- Read more 9to5Mac tutorials:
- How can you change email account settings for iPhone and iPad
- How to set a default email account on your iPhone and iPad
- How to switch between email accounts on your iPhone and iPad
- How to disable an email account on your iPhone and iPad
- How to delete an email account on your iPhone and iPad
- Any questions?
About your Apple ID email addresses
Learn how to add, change, or delete the different types of email addresses that you can use with your Apple ID account.
Email addresses you use with your Apple ID
Your Apple ID uses email addresses to sign you in to your account with Apple. With your Apple ID, you can access services like the App Store, Apple Music, iCloud, iMessage, FaceTime, and more. We use your email addresses to send you information about your account, and to help friends and family communicate and share with you.
Apple ID email address
In most cases, your Apple ID is also the primary email address of your Apple ID account.
Additional email addresses
Add extra email addresses to your account to help people find you on Apple services like FaceTime, iMessage, and Find My.
Rescue email address
Most people have a notification email address instead of a rescue email address. Apple uses this to send you important account and security related information. If you don’t use two-factor authentication or two-step verification (learn how to check what security method you use), you have the option to add a rescue email address to your account for more security. You can see it when you sign in to your Apple ID account page.
Before you can use a new or updated Apple ID, we’ll send you a verification email to make sure that the email address belongs to you.

Apple ID email address
When you create an Apple ID, you enter an email address. This email address is your Apple ID and the username that you use to sign in to Apple services like Apple Music and iCloud. It’s also the contact email address for your account. Be sure to check your email address regularly. We’ll send you email notifications to help you manage your account and make the most of your Apple ID.
Change your Apple ID email address
Reset your Apple ID password
If you know your current Apple ID password and want to change it, follow these steps on your iPhone, iPad, iPod touch, or Mac. If you’ve forgotten your Apple ID password and need to reset it, follow these steps.*
Get a verification code
With two-factor authentication, you’ll need a verification code to sign in with your Apple ID on a new device or browser. Learn how to get and use the code on a trusted device, or get a text or phone call.
* If you use two-factor authentication, in some cases you might be able to speed up the account recovery process or reset your password immediately by verifying a six-digit code sent to your primary email address.
Additional email addresses
Many of us have more than one email address that friends and family use to reach us. Add an email address that you commonly use to your Apple ID account, so people can easily find and communicate with you on Apple services like FaceTime, iMessage, Shared Albums, iWork collaboration, and Find My.
Add an additional email address
- Sign in to your Apple ID account page.
- Click Edit in the Account section.
- Under Reachable at, select Add More.
- Enter your additional email address. Make sure you’re not already using it as an Apple ID.
- We’ll send a verification to that address. Didn’t get the email?
- Enter the verification code and click Verify.
Delete an additional email address
- Sign in to your Apple ID account page.
- Click Edit in the Account section.
- To delete one of your additional email addresses, click next to the address.
Rescue email address
Having a rescue email address is optional but recommended if you do not have two-factor authentication or two-step verification. If you ever forget your security questions, you can use your rescue email address to reset them. We also send any account security-related notifications to your rescue email address. If you have two-factor authentication or two-step verification, you have a notification email address instead of a rescue email address and won’t need to remember security questions.
Add or edit a rescue email address
- Sign in to your Apple ID account page.
- Click Edit in the Security section. You might be asked to answer one or more security questions before you continue.
- To add a rescue email address:
- Under Rescue Email, click Add an Email Address, then enter your rescue email address. We send a verification to that address. Didn’t get the email?
- Enter the verification code and click Verify.
- To edit a rescue email address:
- Select Change Email Address under the address you want to edit, then enter the new address. We send a verification to that address. Didn’t get the email?
- Enter the verification code and click Verify.
If you had a rescue email address on file when you upgraded to two-factor authentication or two-step verification, you can also use these steps to edit your notification email address. If you remove the notification email, you won’t be able to add a new one.
Delete a rescue email address
- Sign in to your Apple ID account page.
- Click Edit in the Security section. You might be asked to answer one or more security questions before you continue.
- To delete a rescue email address, click next to the address.
Reset your security questions
If you’ve forgotten the answers to your security questions, follow these steps to verify your identity and reset your security questions. If you set up two-factor authentication or two-step verification, you won’t need to remember any security questions.
Learn more
If you receive suspicious email, learn how to identify fraudulent email.
FaceTime is not available in all countries or regions.
Источник
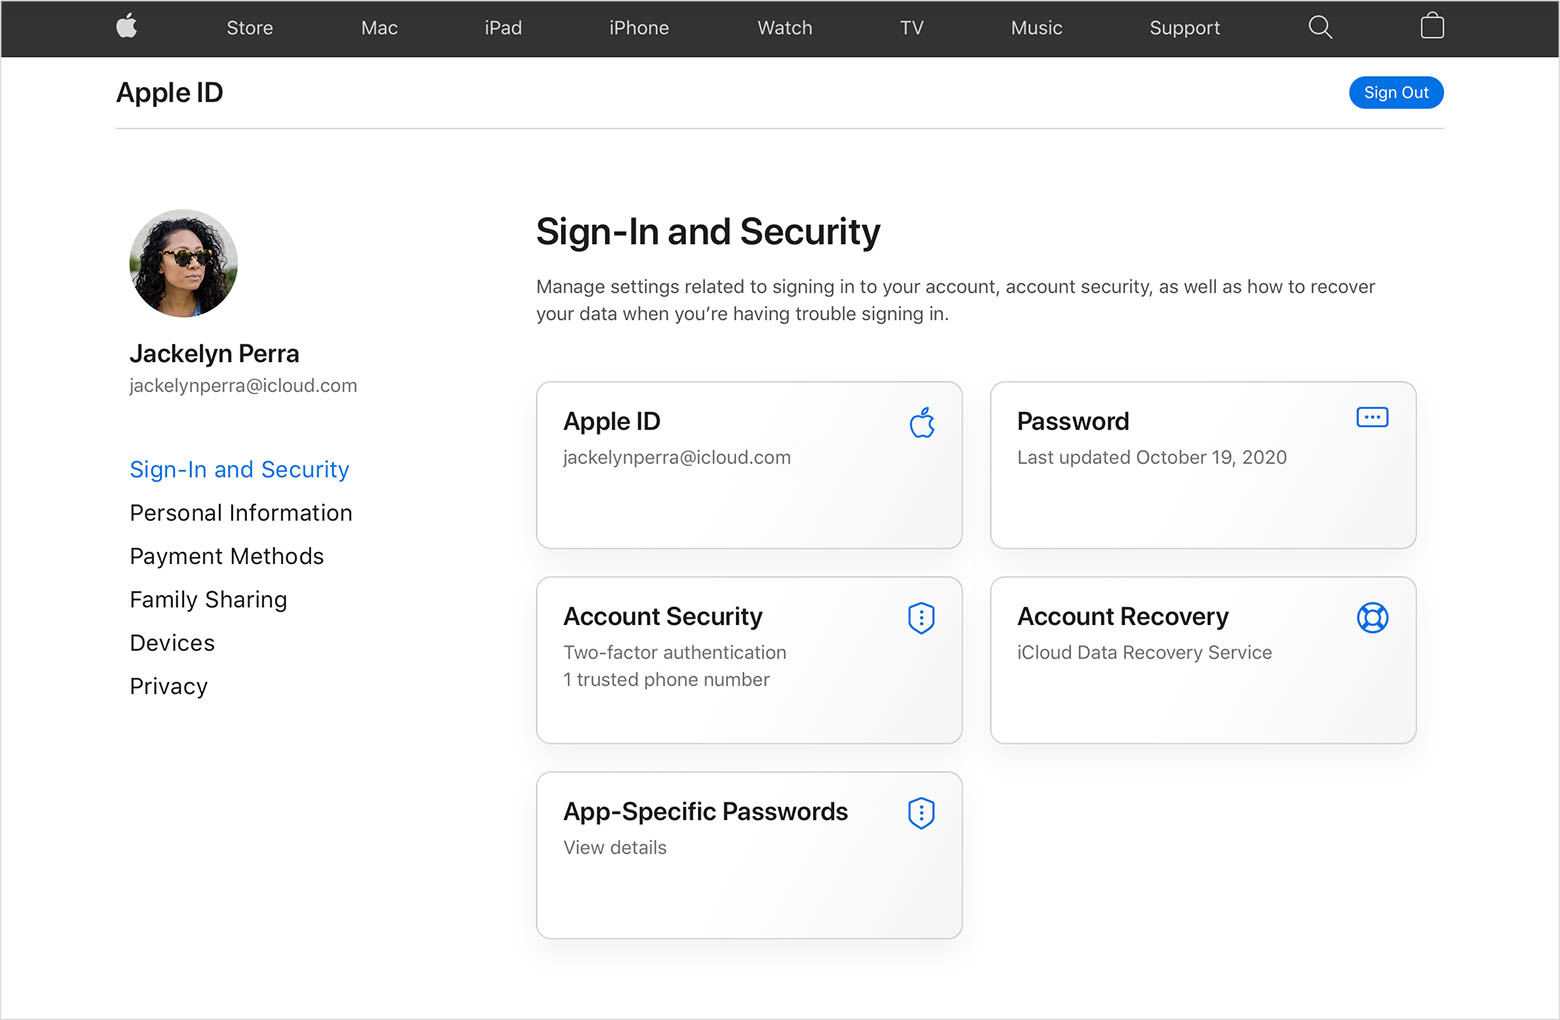
Change your Apple ID
If you no longer use the email address that’s associated with your Apple ID, you can change it. You won’t lose access to your contacts, purchases, or other account information.
How to change your Apple ID to a different email address
- Go to appleid.apple.com and sign in.
- In the Sign-In and Security section, choose Apple ID.

- Enter the email address that you want to use as your Apple ID.
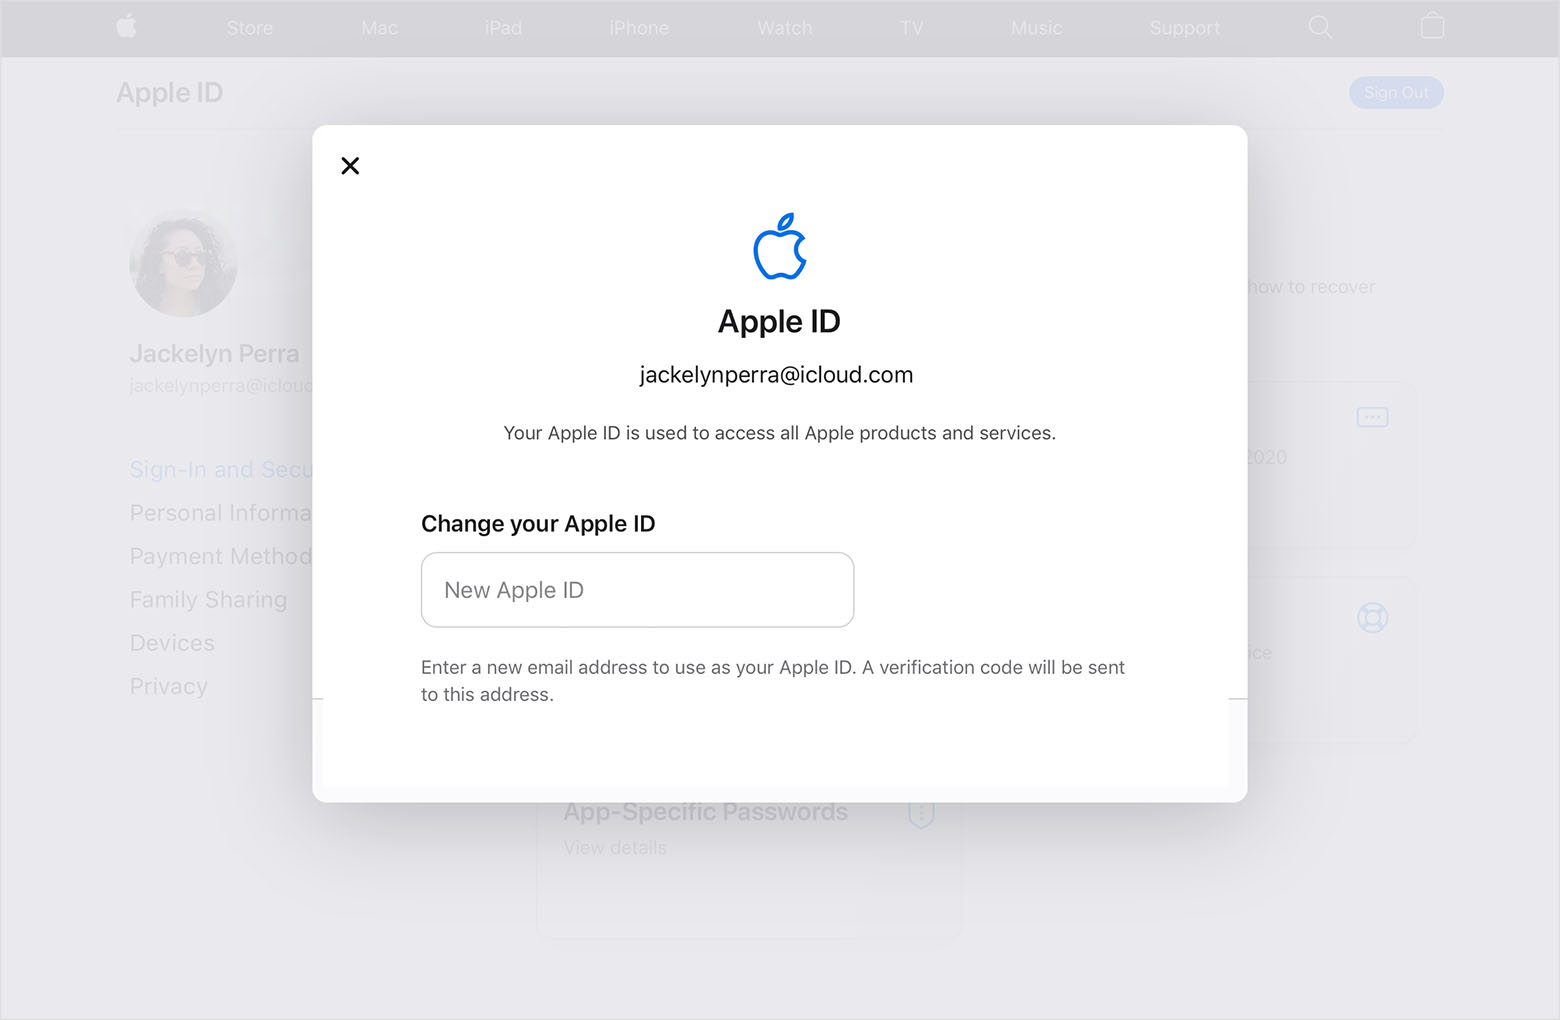
- Choose Change Apple ID.
- If you changed your Apple ID to a third-party email address, check your email for a verification code, then enter the code. Learn what to do if you didn’t get the email.
- If you use services like iCloud or Messages to share with friends and colleagues, sign in to those services with your updated Apple ID.
If you can’t change your Apple ID
If you try to change your Apple ID to an @icloud.com email address that was created within the last 30 days, you will be asked to try again later.
If you see a message that the email address you want to use isn’t available or is already in use, check that you or a family member aren’t already using that email address with a different Apple ID. If a family member is using that email address, remove it from their account then try to use it.
In some countries or regions, you can use your phone number as your Apple ID. But if your Apple ID is an email address, you can’t change it to a phone number.
Источник
Add an email account to your iPhone, iPad, or iPod touch
There are two ways that you can set up an email account in the Mail app on your iOS device — automatically or manually. Learn which option is best for you.
How to set up your email account automatically
If you use an email provider like iCloud, Google, or Yahoo, Mail can automatically set up your email account with just your email address and password. Here’s how:
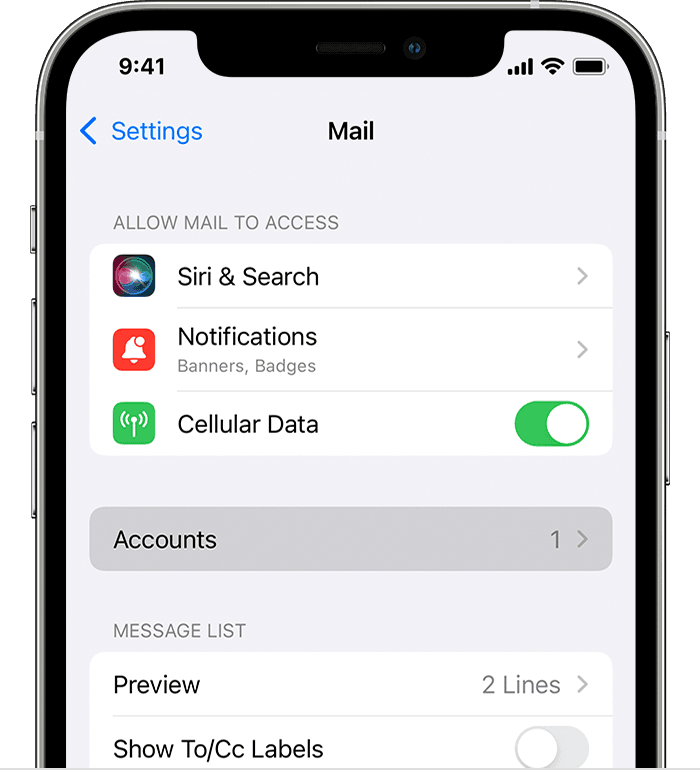
- Go to Settings > Mail, then tap Accounts.
- Tap Add Account, then select your email provider.
- Enter your email address and password.
- If you see Next, tap Next and wait for Mail to verify your account.
- If you see Save, tap Save.
If you don’t see your email provider, tap Other to add your account manually.
How to set up your email account manually
If you need to set up your email account manually, make sure that you know the email settings for your account. If you don’t know them, you can look them up or contact your email provider. Then follow these steps:
- Go to Settings > Mail, then tap Accounts.
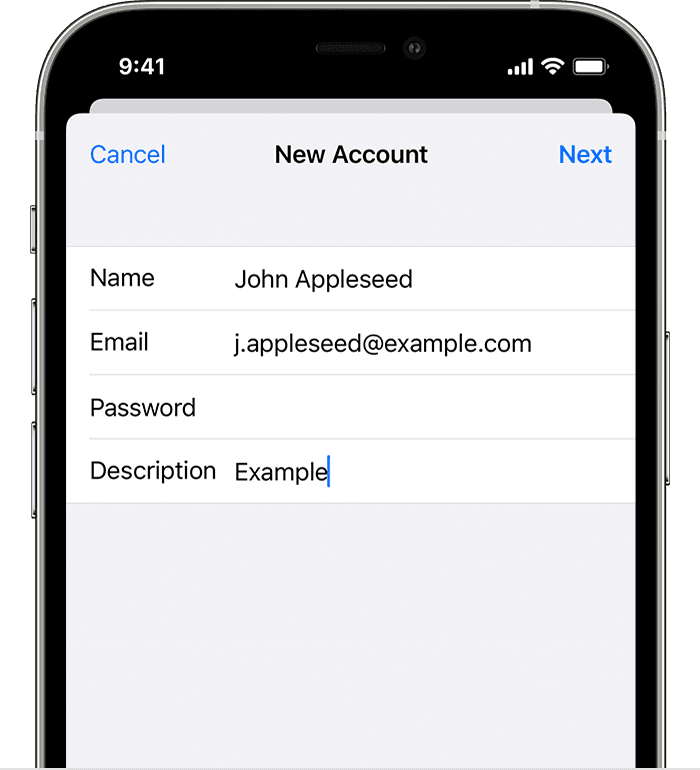
- Tap Add Account, tap Other, then tap Add Mail Account.
- Enter your name, email address, password, and a description for your account.
- Tap Next. Mail will try to find the email settings and finish your account setup. If Mail finds your email settings, tap Done to complete your account setup.
![]()
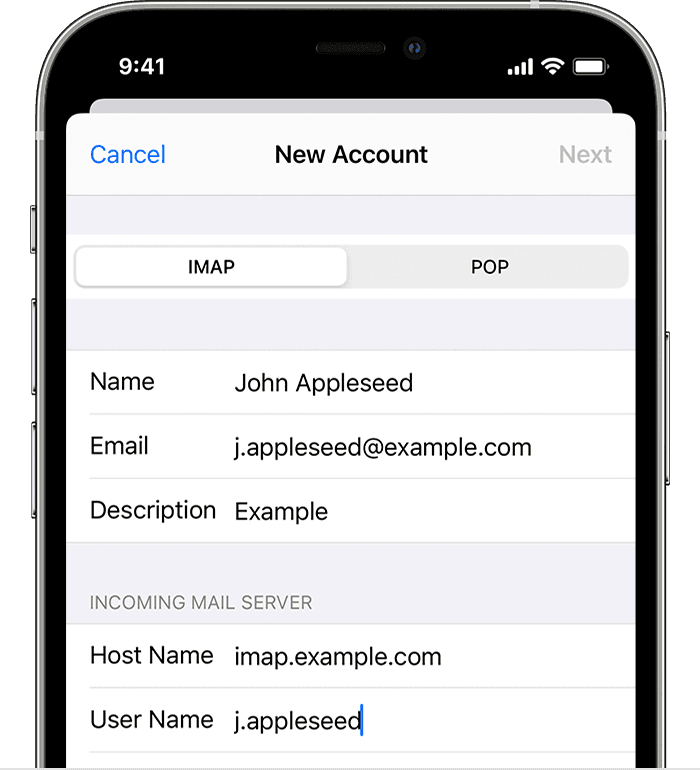
Enter account settings manually
If Mail can’t find your email settings, then you need to enter them manually. Tap Next, then follow these steps:
- Choose IMAP or POP for your new account. If you aren’t sure which one to choose, contact your email provider.
- Enter the information for Incoming Mail Server and Outgoing Mail Server. Then tap Next. If you don’t have this information, try to look it up.
- If your email settings are correct, tap Save to finish. If the email settings are incorrect, you’ll be asked to edit them.
If you still can’t set up your email account or save your email settings, contact your email provider.
Do more with Mail
Information about products not manufactured by Apple, or independent websites not controlled or tested by Apple, is provided without recommendation or endorsement. Apple assumes no responsibility with regard to the selection, performance, or use of third-party websites or products. Apple makes no representations regarding third-party website accuracy or reliability. Contact the vendor for additional information.
Источник
iOS 14: How to change default email and browser apps
— Oct. 21st 2020 12:00 am PT
A notable change with iOS 14 and iPadOS 14 that didn’t see hardly any stage time during the WWDC keynote was that Apple will allow users to change their default email and web browser apps. Let’s take a look at how the option to change default email and browser apps works on iPhone and iPad in iOS 14.
Up until now, Apple hasn’t allowed iPhone and iPad users to change the default account that the built-in Mail app uses, likewise for the default search engine in Safari.
As we noted during the unveiling of iOS 14, Apple quickly breezed over the new ability to change default email and web browser apps. This means tasks throughout the operating system will trigger third-party apps when doing things like composing new email messages and opening links instead of opening the default Mail and Safari apps.
How to change default iPhone email and browser apps
The option to change default email and browser apps requires updates from third-party developers, so the functionality is available on an app by app basis. Most major third-party email and browser apps now support the feature. But some bugs with iOS remain. If you favorite app doesn’t support the feature now, keep an eye out for it to adopt the functionality in the future.
- Open Settingson your iPhone or iPad
- Swipe down to find the third-party app you’d like to set as the default
- Choose Default Browser Appor Default Email App
- Tap the third-party app you’d like to use
Note: there was a bug that reverts the defaults to Safari and Apple’s Mail app after rebooting. That is fixed with iOS 14.0.1. However, a second bug exists with iOS 14.1 and earlier.
Here’s how the process looks with Chrome on iPhone:

Read more 9to5Mac tutorials:
FTC: We use income earning auto affiliate links. More.
Источник
How can you change email account settings for iPhone and iPad
 Source: iMore
Even after you’ve set your email account, there are still some changes you can make to get a handle of the Mail app. The best part is, you don’t need to use a Mac or a MacBook. You can change email acount settings for iPhone or iPad right on your devices. Here’s how!
How to set a default email account on your iPhone and iPad
One of the first things you’ll want to do when you start to change email account settings for iPhone or your iPad is to set an email account as the default one. This can help you with things like sending an email from the right email address. Here’s how you can do it.
- Launch Settings from your Home screen.
- Tap Mail.
- Scroll down and tap Default Account.
Tap the account you would like to use as your default mail account.
 Source: iMore
Even though this change is made in a Contacts menu, your iPhone or iPad will remember which account is the default for sending emails.
How to switch between email accounts on your iPhone and iPad
- Launch the Mail app from your Home screen.
- Tap the Compose button. It looks like a paper and pencil in the bottom right corner of your screen.
- Tap the From field.
Tap the account from the picker that you would like to use.
 Source: iMore
Go ahead and write your message in the Message field. Your email will now be sent from the account you selected.
How to disable an email account on your iPhone and iPad
- Launch Settings from your Home screen.
- Scroll down and tap on Mail.
Tap on Accounts.
Source: iMore
Select the email account you want to disable.
To enable this account again, you will simply toggle Mail back on.
How to delete an email account on your iPhone and iPad
- Launch Settings from your Home screen.
- Scroll down and tap on Mail.
Tap on Accounts.
Source: iMore
Select the email account you want to delete.
Tap Delete from My iPhone.
Source: iMore
Any questions?
Congratulations! You’ve now mastered the basics of how to change email account settings for iPhone and iPad. Do you have any questions? Let us know in the comments below!
Updated October 2020 The post is up to date with the latest version of iOS.
Источник


