- Смена MAC-адреса в Android
- Меняем MAC-адрес в Андроид
- Способ 1: Change My MAC
- Способ 2: Команда в эмуляторе терминала
- Способ 3: Замена вручную в системном файле
- Заключение
- Change mac address android
- How To Change the MAC Address on your Android Device
- Top Reasons to Change Your MAC Address
- Changing the MAC Address using Root Access on Your Device
- Changing the MAC Address without Root Access on the Device
- What Is a MAC Address Anyway?
- What is a MAC address used for?
Смена MAC-адреса в Android

Меняем MAC-адрес в Андроид
Первое, что хотим отметить – большинство представленных ниже методов сработает только на девайсах с Root-доступом. В целом же способов смены озвученных значений существует три — это использование специального приложения, ввод команды в «Терминале» и правка одного из системных файлов.
Внимание! Поскольку при ошибках в процессе смены MAC-адреса возможны проблемы с доступом к интернету, все дальнейшие действия вы совершаете на свой страх и риск! Строго рекомендуется сделать резервную копию системы!
Способ 1: Change My MAC
Команда разработчиков Banana Studio уже довольно давно выпустила и поддерживает приложение для быстрого изменения сетевого идентификатора не только адаптера Wi-Fi, но и других интерфейсов.
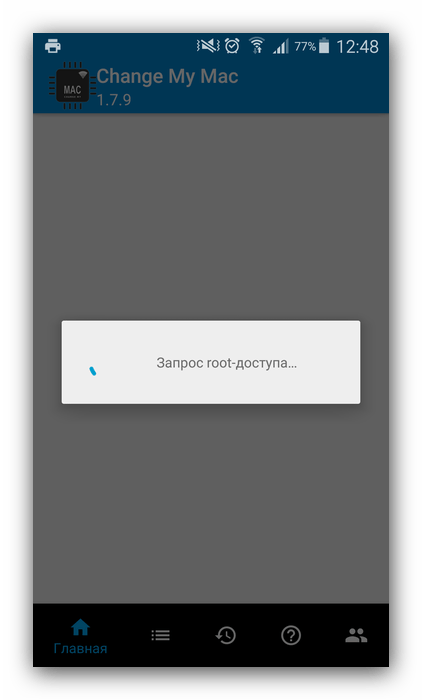
- При первом запуске программа запросит рут-доступ, предоставьте его. Далее будут отображены предупреждения, внимательно с ними ознакомьтесь.
Затем появится основное окно приложения. Опций в нём не слишком много – можно просмотреть оригинальный идентификатор и подключение к текущей сети. Замена адреса происходит в пункте «Новый MAC» – введите адрес вручную (формат XX:XX:XX:XX:XX) или нажмите на кнопку случайной генерации. Для сохранения параметров воспользуйтесь кнопкой с иконкой дискеты.
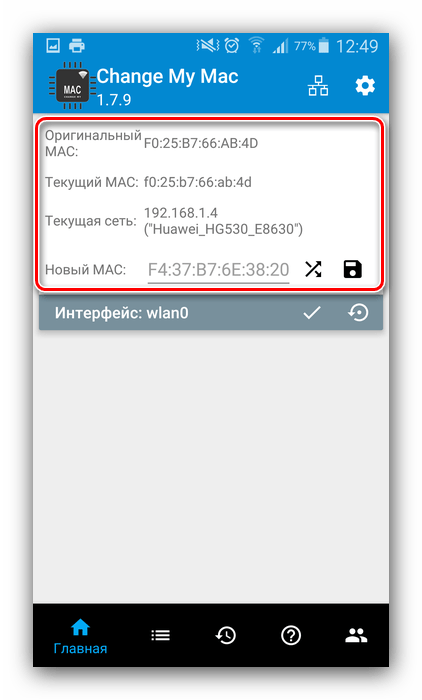
Если всё сделано правильно, идентификатор сменится.
Способ 2: Команда в эмуляторе терминала
Более сложный, но при этом действительно надёжный метод заключается в замене MAC-адреса посредством ввода специальной команды в эмуляторе терминала. Этот вариант, кроме рут-прав, требует также установки фреймворка BusyBox и приложения терминала.
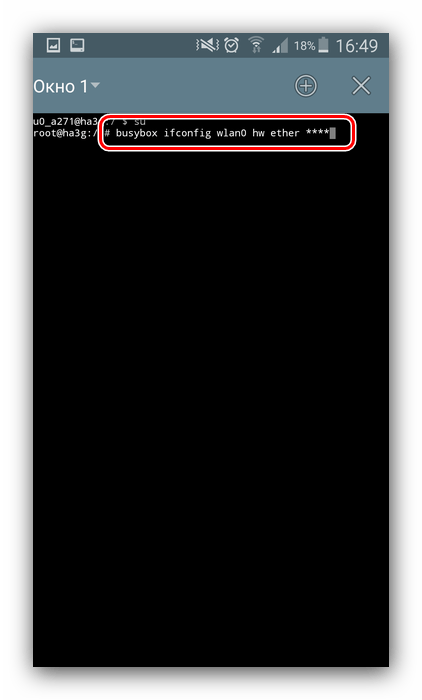
- После установки обоих компонентов откройте Terminal Emulator и введите команду su .

Появится предложение предоставить Root, согласитесь с ним.
Далее введите следующую команду:
busybox ifconfig wlan0 hw ether *новый адрес*
Вместо *новый адрес* впишите желаемый идентификатор по шаблону из шага 2 Способа 1.
Подтвердите ввод и перезагрузите устройство – теперь будет установлен новый MAC-адрес.
Данный метод довольно надёжен, однако и он порой даёт сбои, особенно на устройствах с сильно модифицированными оболочками.
Способ 3: Замена вручную в системном файле
Последний на сегодня вариант замены идентификатора сетевого оборудования заключается в самостоятельном вводе значения в специальном системном файле. Для доступа к нему понадобится файловый менеджер с рут-доступом, например, Root Explorer.
- Запустите приложение, перейдите в нём по адресу /root/sys/class/net/wlan0/ и найдите там файл с именем address. Для устройств с Android 4.3 и ниже адрес и название файла будут другими, а именно /efs/wifi/.mac.cob .
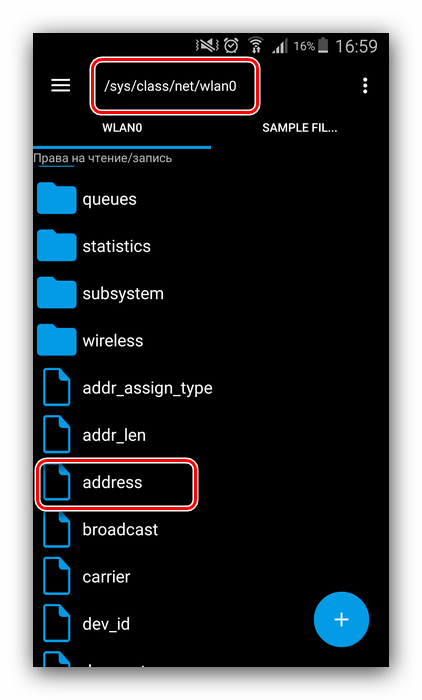
Дважды тапните по требуемому файлу. В следующем меню выберите вариант «Текстовый редактор».

Файл будет готов для редактирования. Как видите, он состоит исключительно из MAC-адреса – его можно удалить и ввести новый.
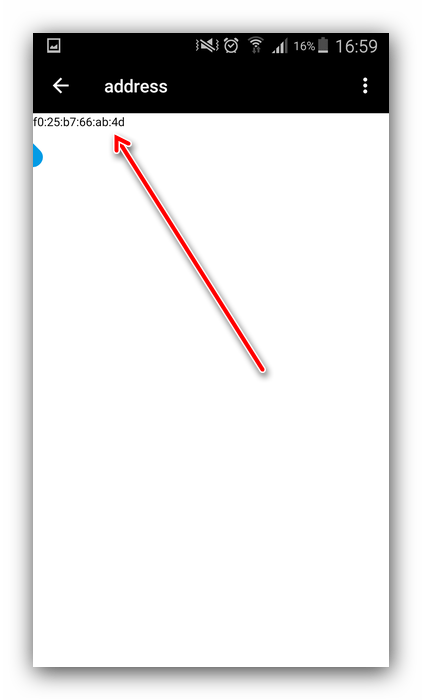
Не забудьте сохранить изменения перед выходом, после чего у беспроводного адаптера вашего телефона будет новый идентификатор.
Заключение
Теперь вам известно, как можно сменить MAC-адрес на устройстве, работающем под управлением Android. Однако злоупотреблять этим не рекомендуется – есть риск программно повредить сетевой адаптер и лишиться возможности выхода в интернет.
Помимо этой статьи, на сайте еще 12476 инструкций.
Добавьте сайт Lumpics.ru в закладки (CTRL+D) и мы точно еще пригодимся вам.
Отблагодарите автора, поделитесь статьей в социальных сетях.
Источник
Change mac address android
Для функционирования программы необходимы права root пользователя.
Краткое описание:
Меняет MAC адрес устройства на любой другой и восстанавливает исходный обратно.
Описание:
Mac Address Changer подменяет MAC адрес устройства на поддельный и возвращает исходный обратно.
Для работы приложения необходим ROOT и Busybox.
Присутствует реклама (у меня появляется после смены MAC), премиум версия через пожертвование разработчику.
Премиум версия позволит вам:
1 Сохранить Mac адрес для использования в будущем, и посмотреть список сохраненных Mac.
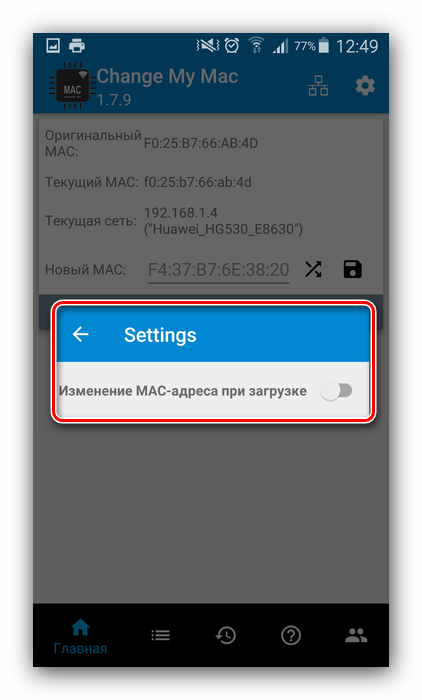
2 Изменить MAC адрес на включении Wi-Fi.
3 Изменить Mac адрес автоматически периодически.
4 Без рекламы.
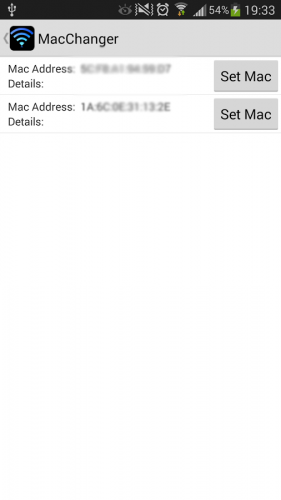
Для смены MAC адреса на поддельный: Genetate MAC (генератор MAC адресов), Simple change (простая замена для отбражения), Hard change (глубокая замена в системные настройки WiFi).
1 Simple change: изменит ваш Mac просто, не отразится в настройках Wi-Fi, вы не можете подключиться к обеспеченным защищенным паролем сетям. Эта функция в основном работает с большинством пользователей.
2 Hard change: теперь вы увидите поддельные МАС-адрес в настройках Wi-Fi, вы можете подключиться к обеспеченным защищенным паролем сетям. Это редко работает со всеми пользователями, это зависит от аппаратного устройства и производительности, а главное от ядра устройства.
Для срабатывания замены MAC может понадобиться небольшая «пляска с бубном», у меня сработало так:
1-Generate, 2-Simple change, 3-Hard change ИЛИ-выйти/зайти снова увидеть что поддельный MAC остался в строке «Fake MAC. » повторить его ручками в строку ввода и еще опять Hard change. Если опять Нет, еще раз Hard change, если опять Нет, повторить Generate и пробовать ещё с другим поддельным MAC адресом, подошедшие варианты адреса желательно сохранить в заметки и использовать еще. В итоге всё срабатывает и фильтрация доступа WiFi по MAC адресам больше не помеха)
Для возврата к исходному МАС адресу: Set real MAC back или выкл/вкл WiFi или перезагрузить устройство.
Требуется Android: 2.3.3 или более поздняя
Русский интерфейс: Нет
Сообщение отредактировал Slav_nsk — 12.12.17, 17:09
Источник
How To Change the MAC Address on your Android Device
Mac addresses identify your devices on a network so that servers, apps, and the internet know where to send packets of data, and some also use it to track your device’s activity. Changing your device’s Mac address is often desired for invisibility purposes (hiding from other users and other devices), obtaining the benefits of other devices, preventing direct hacking, and more. This tutorial shows you how to change the MAC address on your Android device so you get more bandwidth speed, fewer app restrictions, reduced tracking actions, and even the ability to stop direct hacking. There are also some FAQs at the end to explain what a MAC address is, what it is for, and why you would want to change it.

Top Reasons to Change Your MAC Address
Sometimes, you may want your device to bypass access control lists on routers or servers to hide it from other networked devices and users. Other times, you may want your device to appear as another one even though it is not. Another term for this transition is Mac spoofing, which is done for legitimate and illicit purposes alike.
If your ISP or local domain restricts a device’s bandwidth, app use, or priority based on the identified Mac address, changing it to another device’s Mac address fools the ISP. This process allows your spoofed device to gain benefits from the other device. Of course, you’d have to use only one of the two devices that use the same MAC address.
Furthermore, hackers on the same network as your devices do exist, depending on circumstances. The danger occurs in schools, public Wi-Fi, and workplaces alike. Spoofing your Mac address prevents direct hacking because the impersonator cannot access your device directly without the actual address. Just think of this situation as using someone’s social security number. That number gives the perpetrator direct access to credit applications and more by having your actual SSN. In other words, the hacker impersonates you!! Just as the SSN identifies you globally, a Mac address identifies your device in the network.
You might wonder why it is important that people can’t track your online activities with your MAC access. Well, if a hacker has your MAC address, he can impersonate you and commit various crimes using your MAC address or steal from you. You wouldn’t really want any of that, would you?
On most networks, access restrictions are based on the IP address of a device, but when someone has your MAC address, he or she can easily work their way around such IP address security restrictions.
You could go as far as to change the MAC address of your network adapter and make the restriction based on MAC addresses connecting to it if you wish to do so.
Changing the MAC Address using Root Access on Your Device
Switching your Mac address can only be performed on Android devices on which you have root access. First, check for root availability on your Android device. Download the free Root Checker app from Google Play.
Don’t worry, the app is simple, and you basically launch after downloading and then tap on the “Verify root” button. This process shows you the status of root on your device, and you will see if root access is currently enabled.

If the Root Checker app confirmed that your device has root access, then just read on. If not, skip to the next section, where we show you how to change the MAC address on your Android device without having root access.
- Install BusyBox from Google Play.
- Install Terminal Emulator for Android from Google Play.
- Run the terminal emulator app and type “su” (which stands for “super” user), then press “Enter.”

- If the device asks you to allow the app to access root, tap on “Allow.”
- Type “IP link show” and then hit “Enter” again so that you can write down the interface name of your current network. For demonstration purposes here, we will refer to your network interface name as HAL9000.
- Type “busybox ip link HAL9000” (replace HAL9000 with the actual name of your network that you wrote down earlier).
- Your current MAC address will get displayed.
- To change the address, type “busybox config HAL9000 hw ether XX:XX:XX:YY:YY:YY” in the terminal, replacing “XX:XX:XX:YY:YY:YY” with your new MAC address, then press “Enter.”

You now have a new Mac address assigned to your device. Take note that the change is permanent, even after you restart your Android phone.
Changing the MAC Address without Root Access on the Device
- Go to “Settings.”
- Tap on “About Phone.”
- Select “Status.”
- You will see your current MAC address, and we suggest that you write it down, as you’ll need it later when you want to change it.
- Download a free app from Google Play called Terminal Emulator for Android.
- Run the app and type in the command “IP link show” and press “Enter.” After that, you will see the name of your network interface. Again for demonstration purposes, we shall call your network interface name “HAL9000”, but you should type in the actual name of your network interface.
- Type “ip link set HAL9000 XX:XX:XX:YY:YY:YY” and replace “XX:XX:XX:YY:YY:YY” with your new MAC address.
You now have a new Mac address for your device, except this procedure (without root) only lasts until you reboot your phone.
In closing, it’s not difficult to change your Mac address. It just requires a few apps and some commands. However, don’t forget that the “rootless” option is only temporary until you restart your phone. Even if you have root access, there may be times when using the no-root method comes in handy, such as when you are on public Wi-Fi for a few hours or wanting higher internet speeds and port availability on your friend’s Wi-Fi network. Using the rootless option allows your device to automatically return to the previous status later without requiring any manual changes.
What Is a MAC Address Anyway?
MAC (Media Access Control) address is a unique identifier attached to each network interface controller (NIC), whether an ethernet NIC or wireless NIC. If the internet protocol (IP) address changes for a give NIC, the MAC address still remains, identifying the device on the network. So, this means that your network adapter has one, as well as your Android smartphone, phablet, or tablet. The MAC address allows each device that connects to the Internet or a local network to get identified by its unique 12-character code.
What is a MAC address used for?
NIC devices contain unique MAC addresses. IP packets sent on the internet get sent from a MAC address, and those packets get sent to another MAC address. The receiving NIC device checks whether the destined packets match its address. If the address is not the same, the packets get discarded. This process ensures that all devices on the network get the correct IP packets.
Aside from internet and network data transmission processes, MAC addresses get used by internet service providers (ISPs) such as cable companies and mobile providers to control bandwidth and other features on a specific device. MAC addresses are also used to track stolen devices, and many apps require them to interact with the device, such as cloud software. Furthermore, location services utilize your device’s MAC address, such as Google Maps. The bottom line is that MAC addresses are essential to ensure the correct device gets the right data, and the communicating device or app interacts with the correct one.
Источник


