- How To Change API SDK Level In Android Studio
- How to change API SDK level in Android Studio
- Picking your compileSdkVersion, minSdkVersion, and targetSdkVersion
- compileSdkVersion
- minSdkVersion
- targetSdkVersion
- Gradle and SDK versions
- Putting it all together
- Different Ways to Change Android SDK Path in Android Studio
- Why There is a Need to Change Android SDK Path?
- Method 1
- Method 2
- Method 3
How To Change API SDK Level In Android Studio
Basically, API level means the Android version. This defines for which version you are targeting your application and what is going to be the minimum level of android version in your application will run. For setting Minimum level and Maximum level android studio provides two terminologies.
minSdkVersion means minimum Android OS version that will support your app and targetSdkVersion means the version for which you are actually developing your application. Your app will be compatible with all the version of android which are falling between minimum level SDK and target SDK.
How to change API SDK level in Android Studio
For changing the API level in android we have two different Approaches, let’s check both one by one:
Approach 1 To Change SDK API Level in Android Studio:
Step 1: Open your Android Studio, and go to Menu. File >Project Structure.

Step 2: In project Structure window, select app module in the list given on left side.
Step 3: Select the Flavors tab and under this you will have an option for setting “Min Sdk Version” and for setting “Target Sdk Version”.
You can check the name of version too in the drop down list while selecting the API level that makes the selection more clearer for anyone. Because sometimes remembering numbers is bit messy.
Step 4: Select both the versions and Click OK.
Approach 2 To Change API (Android Version) in Android Studio:
That will be pretty straight forward, but you need to stay very alert while making changes here.
Step 1: if you are project is opened in android option then select open Gradle Scripts > build.gradle(Module: app)
if you are in project View then click on your project folder > app > build.gradle
Step 2: Here you have to change minimum and Maximum sdk level as per your requirement. check the below given code:
Step 3: Click on Sync Now and You are ready to go.
Note: If you are choosing the First Approach then you need not to make changes in Gradle. It will automatically update the gradle.
Источник
Picking your compileSdkVersion, minSdkVersion, and targetSdkVersion

Depending on the time of the year, it might only be a few months after you release an app that a new version of Android is announced. What does that mean for your app though — is everything going to break?
You’ll be happy to know that forward compatibility is a strong focus of Android — existing apps built against prior SDKs should not break when the user updates to a new version of Android. This is where compileSdkVersion, minSdkVersion, and targetSdkVersion come in: they control what APIs are available, what the required API level is, and what compatiblity modes are applied, respectively.
compileSdkVersion
compileSdkVersion is your way to tell Gradle what version of the Android SDK to compile your app with. Using the new Android SDK is a requirement to use any of the new APIs added in that level.
It should be emphasized that changing your compileSdkVersion does not change runtime behavior. While new compiler warnings/errors may be present when changing your compileSdkVersion, your compileSdkVersion is not included in your APK: it is purely used at compile time. (You should really fix those warnings though — they were added for a reason!)
Therefore it is strongly recommended that you always compile with the latest SDK. You’ll get all the benefits of new compilation checks on existing code, avoid newly deprecated APIs, and be ready to use new APIs.
Note that if you use the Support Library, compiling with the latest SDK is a requirement for using the latest Support Library releases. For example, to use the 23.1.1 Support Library, you must have a compileSdkVersion of at least 23 (those first numbers need to match!). In general, a new version of the Support Library is released alongside a new platform version, providing compatibility shims to newly added APIs as well as new features.
minSdkVersion
If compileSdkVersion sets the newest APIs available to you, minSdkVersion is the lower bound for your app. The minSdkVersion is one of the signals the Google Play Store uses to determine which of a user’s devices an app can be installed on.
It also plays an important role during development: by default lint runs against your project, warning you when you use any APIs above your minSdkVersion, helping you avoid the runtime issue of attempting to call an API that doesn’t exist. Checking the system version at runtime is a common technique when using APIs only on newer platform versions.
Keep in mind that libraries you use, such as any of the Support Libraries or Google Play services, may have their own minSdkVersion — your app’s minSdkVersion must be at least as high as your dependencies’ minSdkVersion — if you have libraries that require 4, 7, and 9, your minSdkVersion must be at least 9. In rare cases where you want to continue to use a library with a higher minSdkVersion than your app (and deal with all edge cases/ensure the library is only used on newer platform versions), you can use the tools:overrideLibrary marker, but make sure to test thoroughly!
When deciding on a minSdkVersion, you should consider the stats on the Dashboards, which give you a global look on all devices that visited the Google Play Store in the prior 7 days — that’s your potential audience when putting an app on Google Play. It is ultimately a business decision on whether supporting an additional 3% of devices is worth the development and testing time required to ensure the best experience.
Of course, if a new API is key to your entire app, then that makes the minSdkVersion discussion quite a bit easier. Just remember that even 0.7% of 1.4 billion devices is a lot of devices.
targetSdkVersion
The most interesting of the three, however, is targetSdkVersion. targetSdkVersion is the main way Android provides forward compatibility by not applying behavior changes unless the targetSdkVersion is updated. This allows you to use new APIs (as you did update your compileSdkVersion right?) prior to working through the behavior changes.
Much of the behavior changes that targetSdkVersion implies are documented directly in the VERSION_CODES, but all of the gory details are also listed on the each releases’ platform highlights, nicely linked in the API Levels table.
For example, the Android 6.0 changes talk through how targeting API 23 transitions your app to the runtime permissions model and the Android 4.4 behavior changes detail how targeting API 19 or higher changes how alarms set with set() and setRepeating() work.
With some of the behavior changes being very visible to users (the deprecation of the menu button, runtime permissions, etc), updating to target the latest SDK should be a high priority for every app. That doesn’t mean you have to use every new feature introduced nor should you blindly update your targetSdkVersion without testing — please, please test before updating your targetSdkVersion! Your users will thank you.
Gradle and SDK versions
So setting the correct compileSdkVersion, minSdkVersion, and targetSdkVersion is important. As you might imagine in a world with Gradle and Android Studio, these values are integrated into the tools system through inclusion in your module’s build.gradle file (also available through the Project Structure option in Android Studio):
The compileSdkVersion, being a compile time thing (who would have guessed!), is one of the android settings alongside with your build tools version. The other two are slightly differently in that they are declared at the build variant level — the defaultConfig is the base for all build variants and where’d you put default values for these, but you could imagine a more complicated system where specific versions of your app have a different minSdkVersion for example.
minSdkVersion and targetSdkVersion also differ from compileSdkVersion in that they are included in your final APK — if you were to look at the generated AndroidManifest.xml, you’d see a tag such as:
You’ll find if you manually put this in your manifest, it’ll be ignored when you build with Gradle (although other build systems might certainly rely on it being there).
Putting it all together
If you made it through the bolded notes, you’ll notice a relationship between the three values:
This intuitively makes sense — if compileSdkVersion is your ‘maximum’ and minSdkVersion is your ‘minimum’ then your maximum must be at least as high as your minimum and the target must be somewhere in between.
Ideally, the relationship would look more like this in the steady state:
You’ll hit the biggest audience with a low minSdkVersion and look and act the best by targeting and compiling with the latest SDK — a great way to #BuildBetterApps.
Join the discussion on the Google+ post and follow the Android Development Patterns Collection for more!
Источник
Different Ways to Change Android SDK Path in Android Studio
Android SDK is one of the most useful components which is required to develop Android Applications. Android SDK is also referred to as the Android Software Development Kit which provides so many features which are required in Android which are given below:
- A sample source code.
- An Emulator.
- Debugger.
- Required set of libraries.
- Required APIs for Android development with their documentation.
- Tutorials required for Android OS development.
Why There is a Need to Change Android SDK Path?
Android SDK comes itself when we download Android Studio. It downloads when we download our Android Studio. But many times due to some issue in our pc these SDK files may get deleted. And without your Android SDK Android studio is not able to work and we cannot develop any application. Android SDK is the heart of Android studio. We can easily download Android SDK from the android developers’ site, but we have to set the path for this SDK in our Android studio as well to use this SDK.
Now the point that comes here is how we can change the SDK path for our Android application in Android Studio. So in this article, we are going to discuss three different methods to Change Android SDK Path in Android Studio.
Method 1
Step 1: Create a new Project in Android Studio
Navigate to the File > New > New Project and create your new project. The language used for this will not matter as this process will be the same for both java as well as Kotlin.
Step 2: Opening project structure
Navigate to the File > Click on Project structure which is shown in the list and click on the Project structure option. After clicking that option you will get to see the below screen.

Inside the above screen, click on the SDK Location option you will get to see the below screen.
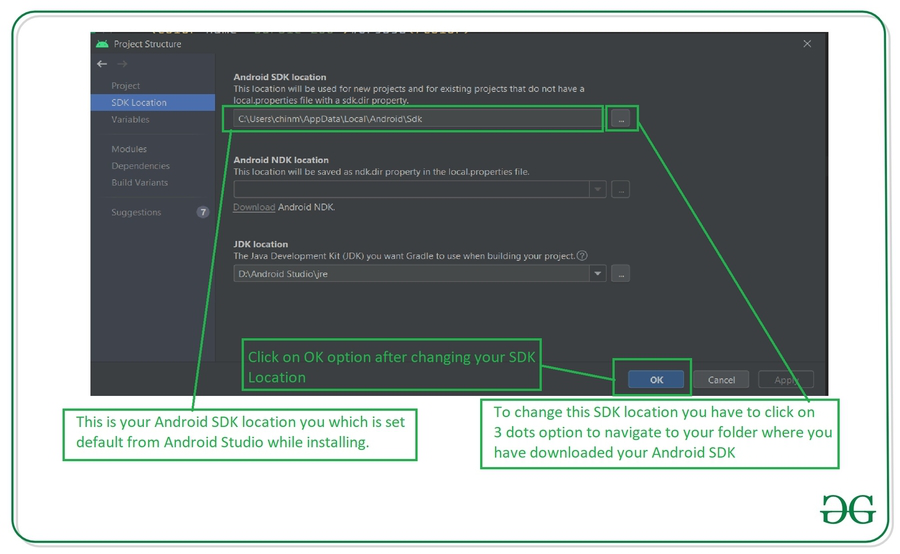
In the above image, you will get to see the current SDK location for your Android Studio. To change this SDK location you have to click on the 3 dots which are being displayed and then select your SDK location folder. After selecting this folder click on the OK option to save your SDK path.
Step 3: Sync your project after adding your SDK path
Now sync your project with Gradle files to check that SDK is working fine. To do this click on File > you will get to see the option as Sync Project With Gradle files option click on that option and sync your project. On successful sync of your project, your SDK location is set perfectly and now you are good to go in developing Android Applications.
Method 2
Step 1: Create a new Project in Android Studio
Navigate to the File > New > New Project and create your new project. The language used for this will not matter as this process will be the same for both java as well as Kotlin.
Step 2: Opening Android Studio Settings
Navigate to the File > Settings option you will get to see below dialog screen. Inside that screen. Click on Appearance and Behavior option > System Settings options and then click on the Android SDK option to get to see the below screen.

Inside this screen, you will get to see your SDK path. You can update your SDK path by clicking on the Edit option. After that select your SDK path, then click on Apply option, and then click on the OK option.
Step 3: Sync your project after adding your SDK path
Now sync your project with Gradle files to check that SDK is working fine. To do this click on File > you will get to see the option as Sync Project With Gradle files option click on that option and sync your project. On successful sync of your project, your SDK location is set perfectly and now you are good to go in developing Android Applications.
Method 3
Step 1: Create a new Project in Android Studio
Navigate to the File > New > New Project and create your new project. The language used for this will not matter as this process will be the same for both java as well as Kotlin.
Step 2: Opening project structure.
Inside your Android Studio in the top right corner, You can get to see the icon below the image for opening the project structure. Click on that option to open your project structure option. You will get to see the below screen. For opening this Project Structure we can also use a shortcut key as:
| Windows | Ctrl+Alt+Shift+S |
| Mac OS | Command + ; (semi-colan) |
| Linux | Ctrl+Alt+Shift+S |

After clicking on this option we simply have to follow Step 1 to update our Android SDK.
Inside the above screen, click on the SDK Location option you will get to see the below screen.
In the above image, you will get to see the current SDK location for your Android Studio. To change this SDK location you have to click on the 3 dots which are being displayed and then select your SDK location folder. After selecting this folder click on the OK option to save your SDK path.
Step 3: Sync your project after adding your SDK path
Now sync your project with Gradle files to check that SDK is working fine. To do this click on File > you will get to see the option as Sync Project With Gradle files option click on that option and sync your project. On successful sync of your project, your SDK location is set perfectly and now you are good to go in developing Android Applications.
Источник


