- Полный список
- Отображение
- Обновление
- Несколько уведомлений
- Удаление
- Обработка нажатия
- How to change your notification settings on Android
- Why should you manage your notifications?
- Temporarily turn off all notifications
- How to set up Do not disturb on Android Marshmallow or newer
- How to manage notifications on Android Lollipop or older
- Limit notifications to certain apps
- How to individually manage app notifications on Android Marshmallow or newer
- How to individually manage app notifications on Android Lollipop or older
- How to Set Different Notifications Sounds for Different Apps on Android Phones
- Mehvish
- Method 1: From Phone Settings
- How to Set Different Notification Tone for Different Gmail Accounts on Android
- How to Change Messages Notification Sound on Android
- Method 2: From App Settings
- Hey Google
- Read Next
- Top 11 Incredible Samsung Galaxy S9/S9+ Tips and Tricks
- How To Fix Your Phone Date Is Inaccurate Error In WhatsApp
- 4 Best Ways to Turn Off Notifications on Android
- How to Send Group Texts from Android and iPhone
- How to Add and Use Sleep Timer on YouTube Music
- Top 9 Ways to Fix Facebook Not Loading Pictures
- How to Block and Unblock Someone on Google Hangouts
- Top 7 Ways to Fix Google Maps Showing Wrong Location on Android and iOS
- Did You Know
Полный список
Notifications — это уведомления, которые пользователь видит в верхней части экрана, когда ему приходит новое письмо, сообщение, обновление и т.п. В ближайшие несколько уроков мы подробно разберем, какие возможности предоставлены разработчикам для показа уведомлений.
В этом уроке рассмотрим основы — отображение/обновление/удаление уведомления и обработка нажатия на него.
Отображение
Код создания простого уведомления выглядит так:
Используем билдер, в котором указываем иконку, заголовок и текст для уведомления. Методом build получаем готовое уведомление.
Далее используем NotificationManager и его метод notify, чтобы показать созданное уведомление. Кроме notification, требуется передать id. Это необходимо, чтобы в дальнейшем мы могли использовать этот id для обновления или удаления уведомления.
Конструктор new NotificationCompat.Builder(Context) будет помечен как Deprecated, если вы используете библиотеку appCompat версии 26 и выше. Так получилось потому, что в Android API 26 появился новый конструктор и рекомендуется использовать его. Пока не обращайте внимание на это. В одном из следующих уроков мы рассмотрим использование правильного конструктора.
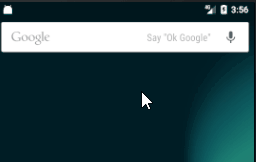
Запустив этот код, мы увидим уведомление
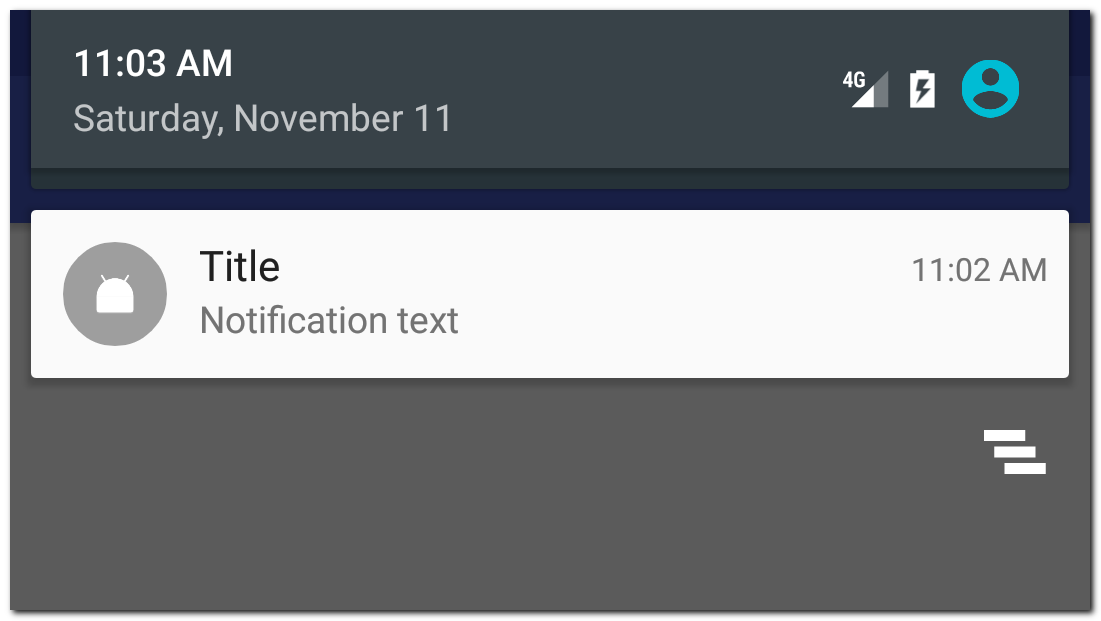
Оно отображает иконку и два текста, которые мы указывали в билдере. Нажатие на него ни к чему не приведет, т.к. мы не реализовали обработчик нажатия. Мы это сделаем чуть позже.
Обновление
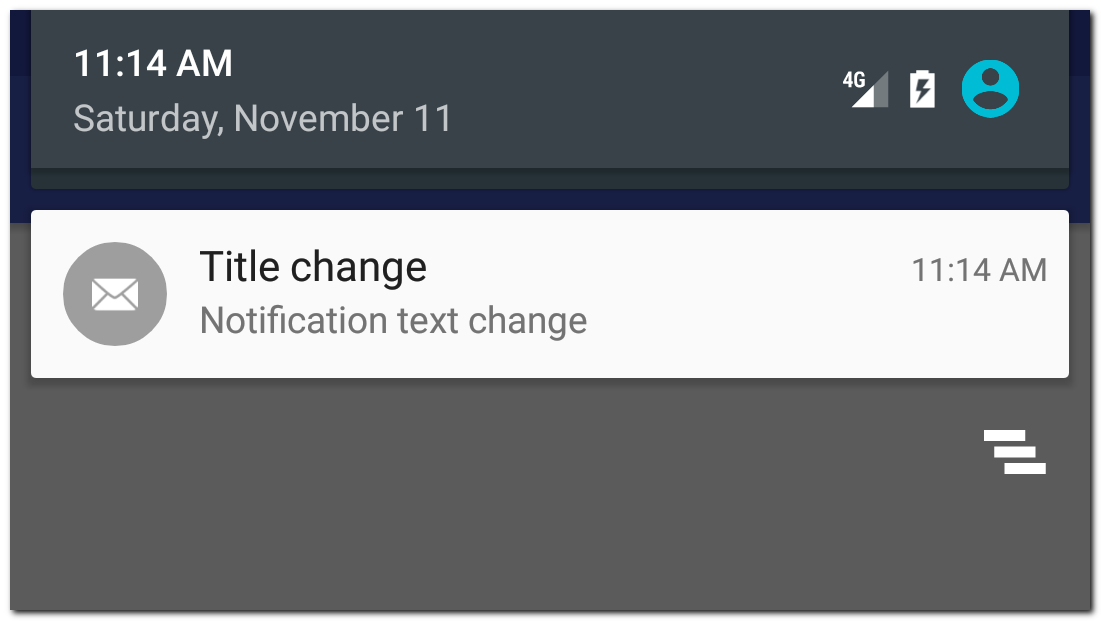
Мы отобразили уведомление и теперь хотим его обновить. Для этого нужно просто снова показать уведомление методом notify и использовать при этом тот же id.
Это будет выглядеть так:
Код полностью аналогичен коду, что мы использовали при отображении уведомления. Только в билдере используем другие тексты и иконку. Самое главное, что в методе notify мы снова используем NotificationManager по этому id найдет уведомление, которое мы отобразили чуть раньше и заменит его новым
Несколько уведомлений
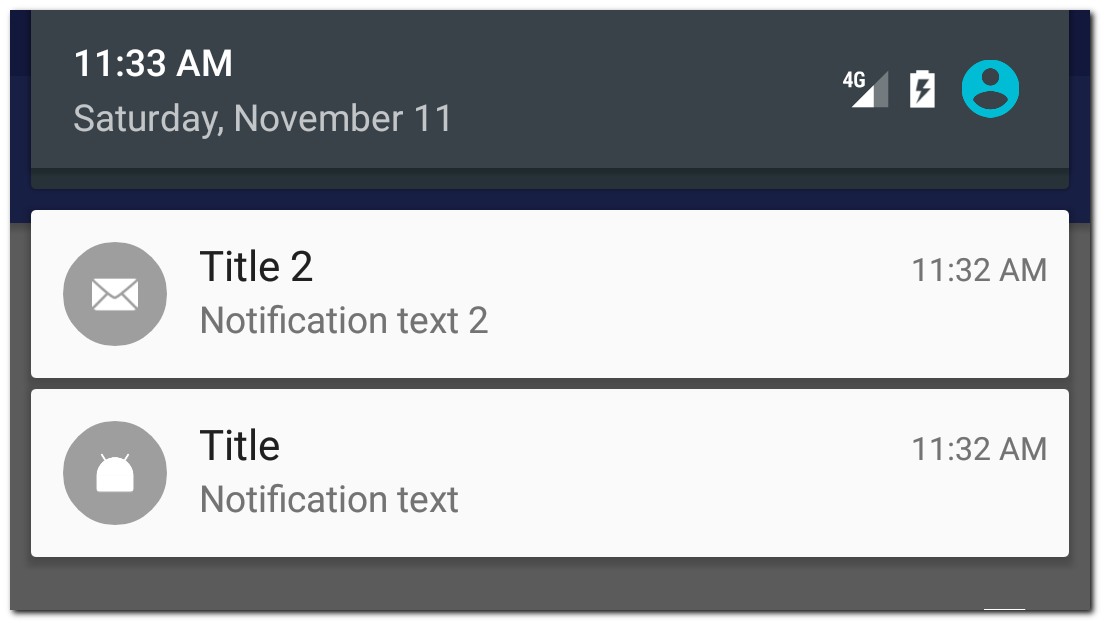
Чтобы показать новое уведомление, а не обновить уже существующее, надо использовать другой id в методе notify.
Мы использовали разные id в методе notify и получили два разных уведомления
Удаление
Чтобы удалить уведомление, используем NotificationManager и его метод cancel с указанием id уведомления.
Либо методом cancelAll можем удалить все уведомления сразу
При удалении уведомления нет необходимости проверять, отображается оно или нет. Если уведомления по каким-то причинам уже нет, то просто ничего не произойдет.
Обработка нажатия
Чтобы выполнить какое-либо действие по нажатию на уведомление, необходимо использовать PendingIntent. PendingIntent — это контейнер для Intent. Этот контейнер может быть использован для последующего запуска вложенного в него Intent.
Мы будем создавать Intent для запуска, например, Activity, упаковывать этот Intent в PendingIntent и передавать PeningIntent в уведомление. По нажатию на уведомление, система достанет из него PedningIntent и использует вложенный в него Intent, чтобы запустить Activity.
Давайте посмотрим, как это выглядит на практике:
Создаем Intent для запуска Activity и упаковываем его в PedningIntent.
Подробно о PedningIntent и его параметрах вы можете почитать в Уроке 119. Там я подробно рассмотрел различные кейсы на примерах с уведомлением и вызовом BroadcastReceiver.
Созданный PendingIntent нам надо будет передать в билдер уведомления. Полный код создания уведомления будет выглядеть так:
Передаем PendingIntent в метод setContentIntent билдера уведомления.
По нажатию на уведомление откроется MainActivity
Обратите внимание, что уведомление не удаляется автоматически после нажатия на него. Чтобы исправить это, можно в билдере уведомления использовать включить параметр autoCancel
Уведомление, созданное с этим флагом будет закрываться после нажатия на него.
Билдер уведомления имеет еще несколько методов, которые могут быть полезны.
setNumber — позволяет добавить число в уведомление

setContentInfo — добавит текст справа
В старых версиях это выглядит так
![]()
В последних версиях он переехал в верхнюю часть уведомления
![]()
setColor — добавит фоновый цвет к иконке

setWhen — можно указать свое время для уведомления (время when). По умолчанию when = времени создания уведомления
setShowWhen — показывать ли время в уведомлении
setUsesChronometer — вместо статичного времени в уведомлении будет отображаться счетчик (00:00), показывающий сколько прошло от времени when. Может быть полезно для уведомления секундомера или звонка.
setOngoing — такое уведомление пользователь не сможет закрыть или смахнуть. Оно будет отображаться поверх обычных уведомлений.
setVibrate, setSound, setLights — настройки вибры, звука и LED индикатора устройства
setPriority — возможность установить приоритет. Доступные значения от -2 (NotificationCompat.PRIORITY_MIN) до 2 (NotificationCompat.PRIORITY_MAX). Поведение может отличаться на разных версиях Android, но общий смысл одинаков — чем выше приоритет, тем выше вероятность того, что пользователь увидит ваше уведомление.
setTimeoutAfter — возможность установить таймаут (в мсек), после которого уведомление само удалится. Добавлен в API 26.
setLargeIcon — возможность задать свою картинку в качестве иконки уведомления.
Иконка из setSmallIcon будет видна в статусбаре, когда панель уведомлений не раскрыта.
А само уведомление будет выглядеть так:

setProgress — возможность отобразить прогрессбар в уведомлении
У метода три параметра:
max — максимальное значение прогрессбара. Укажите 0, если надо скрыть прогрессбар.
progress — текущее значение прогрессбара. Может быть от 0 до max.
indeterminate — если true, то будет показан «бесконечный» прогрессбар
Сначала отображаем бесконечный прогрессбар и текст Preparing. Т.е. делаем вид, что идет подготовка к выполнению операции.
Затем в отдельном потоке имитируем выполнение операции. Каждые 300 мсек увеличиваем значение progress и обновляем уведомление, чтобы прогрессбар показал текущий прогресс. А также в тексте показываем значение прогресса и максимума.
После выполнения операции скрываем прогрессбар и показываем текст Completed.
Повторюсь, очень рекомендую прочесть и понять Урок 119. В нем я подробно рассматриваю, почему PendingIntent последнего уведомления заменяет PendingIntent предыдущих уведомлений, и как этого можно избежать, используя, например, requestCode.
Присоединяйтесь к нам в Telegram:
— в канале StartAndroid публикуются ссылки на новые статьи с сайта startandroid.ru и интересные материалы с хабра, medium.com и т.п.
— в чатах решаем возникающие вопросы и проблемы по различным темам: Android, Kotlin, RxJava, Dagger, Тестирование
— ну и если просто хочется поговорить с коллегами по разработке, то есть чат Флудильня
— новый чат Performance для обсуждения проблем производительности и для ваших пожеланий по содержанию курса по этой теме
Источник
How to change your notification settings on Android

Smartphones are great for being connected to the rest of the world whenever you need to be, but it can get a bit much when you are constantly bombarded with notifications. These notifications are generally quite useful but it can be a bit overwhelming when it doesn’t seem to ever stop. Luckily, Android has a solution. Read on to find out how to manage your notifications in Android.
Why should you manage your notifications?
With the ever-increasing number of apps we have on our smartphones, it’s becoming pretty much a requirement to manage your app notifications. Between Facebook, WhatsApp, text messages, Snapchat and maybe some news apps too, you can end up receiving notifications every few minutes. And you’ll quickly realize that the majority of these aren’t really that useful to you. So managing these notifications will not only bring you peace of mind, but it’ll stop you looking at your phone every two minutes to see what’s it’s alerting you about now.
Whether you are using Android Marshmellow or newer, or Android Lollipop or older, we’ve got you covered.
Temporarily turn off all notifications
Like Apple’s iOS, since Android Marshmallow 6.0 Android offers a «Do not disturb» option, whereby the smartphone won’t ring or vibrate and can even switch off all forms of interruption. You can turn off all notifications on your phone or only authorize specific ones, like your wake-up alarm or calls from certain people.
Notifications will still arrive on your phone but you won’t be disturbed by then as your phone will remain silent and the screen stays off.
How to set up Do not disturb on Android Marshmallow or newer
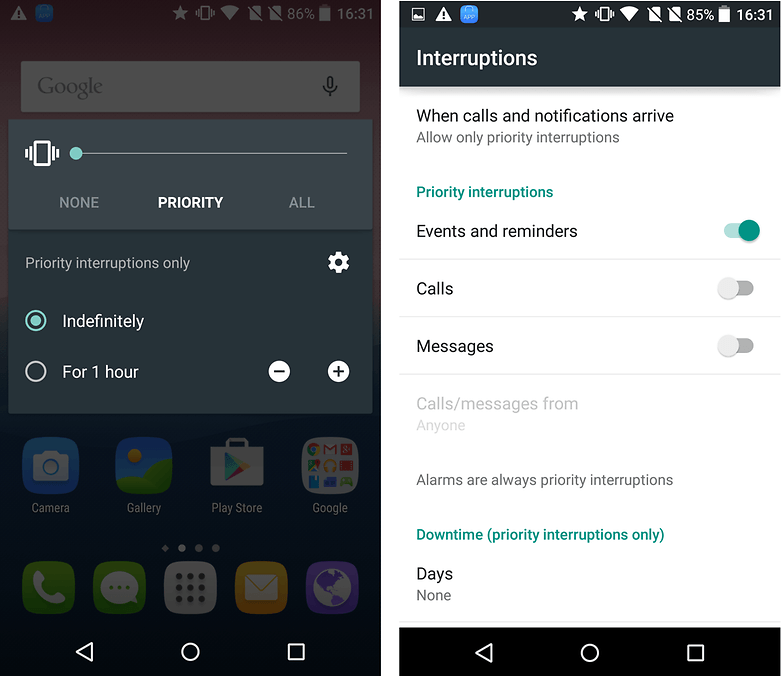
Go to your smartphone settings and select Sound & notification then Do not disturb to enter the settings for this mode. You can then modify these to suit your needs (alarms, reminders, events, etc.).
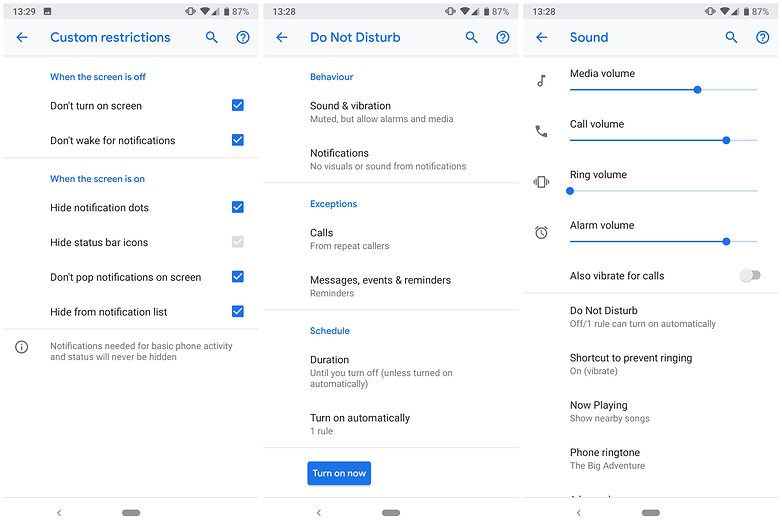 Android Pie has made it easier for you to manage your notifications. / © NextPit
To activate this mode, drag the menu down twice from the top and press the Do not disturb icon. Once in the options, you can select the time frame as well as Total silence, Alarms only or Priority only.
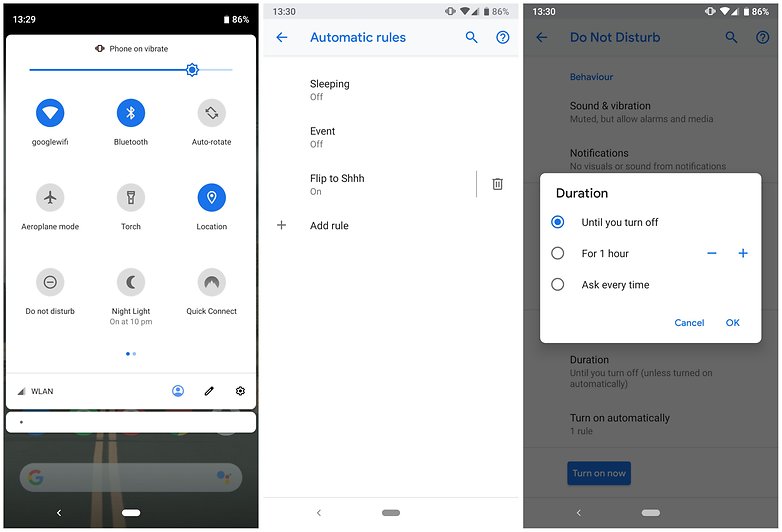 Pull the notifications bar down twice to access the Do not disturb settings. / © NextPit
You can also set Do not disturb mode to automatically switch on at a defined regular time. In the settings, select a time slot when you want the mode to switch itself on.
How to manage notifications on Android Lollipop or older
If your device runs Android Lollipop or an older Android version, you can also deactivate any interruptions. To do this, press the volume rocket up or down until a menu appears.
There are then two different ways to deactivate notifications:
- Priority: you’ll only be notified of priority notifications like alarms. You can decide yourself which ones are a priority. It’s worth mentioning that when you limit the notifications you receive to priority ones only, you won’t hear any other notification. Go to Settings -> Sound & notification -> Interruption then select the types of notifications you wish to set as priority.
 You can customize your app notification preferences. / © NextPit
- None: all notifications are switched off. When you select this option, you won’t receive ANY notifications.
 With Android Lollipop, you can opt to have zero notifications. / © NextPit
Limit notifications to certain apps
Some people prefer to manage their notifications by deciding what notifications each individual app is permitted. Lollipop allows you a decent amount of control and Marshmallow takes it a step further by allowing you to refuse authorizations. Notification management is in Settings -> Sound & notification. In App notifications, you can access the settings for each app individually. This is perfect if you wish to stop that one app that’s causing your phone to go off every two seconds.
You can also hide the contents of a notification when your device is locked.
How to individually manage app notifications on Android Marshmallow or newer
How to individually manage app notifications on Android Lollipop or older
Do you have other ways to manage your app notifications on your smartphone? We’d love to hear about it so we can update our article. Let us know in the comments below.
Источник
How to Set Different Notifications Sounds for Different Apps on Android Phones
Mehvish
14 Oct 2020
With so many apps installed on our phones, a barrage of notifications is bound to confuse us. It’s difficult to figure out which app sent what notification and whether it’s important. To make my life easy, I use different notification tones for each app. Wish for the same? Find out how to keep different notification sounds for different apps on Android phones and tablets.

Using separate notification sounds different from the default tone comes handy in various situations. Like when you are cooking, driving, or performing similar activities, and you cannot or don’t want to touch the phone.
Let’s see how to change the default tone and keep a separate notification tone for Android apps.
Method 1: From Phone Settings
Android 8.0 Oreo changed the way with notifications channels that allow setting app notifications for apps individually. That said, the setting to change the default app tone is buried deep inside the settings.
Here are the steps to help you in changing the default notification sound of any Android app.
Step 1: Open Settings on your phone and go to Apps & notifications, Installed Apps, or Manage apps depending on the option available.
Step 2: Under All apps, tap on the app whose notification tone you want to change. Let’s go with WhatsApp as an example. Tap on WhatsApp.

Step 3: Tap on Notifications under WhatsApp. If you are on earlier Android version, you will get the Default sound or Sound option. Tap on it to change the tone.

However, on phones running Android 8.0 Oreo and above, you will see various notification channels or categories. For instance, you will see categories like Group notifications and Message notifications under WhatsApp notifications. You will notice that notification categories usually have a toggle and a straight bar before them.
Note: Inside Android Settings, wherever you see a straight bar next to the setting name, it means tapping on the setting name (and not the toggle) will reveal more settings.

So, tap on the Message Notifications text to reveal more settings.

Then tap on Advanced followed by Sound. Assign a different notification tone for WhatsApp messages from individual contacts. You can customize other settings related to notifications on this screen as well.


Also on Guiding Tech

2 Best Ways to Change Default Ringtone App on Android
Similarly, you can set a different tone for WhatsApp group messages by tapping on the Group notifications category channel. For other apps, you will see categories based on the app. Tap on the notification category to reveal the Sound setting to change the default notification tone.
Note: If an app doesn’t support notification categories, you will see the Advanced option directly under Notifications. Tap on Advanced followed by Sound to change the default tone. In some cases, you will directly see the Sound option under Notifications.
Use the same steps to change the default tone for other apps. Let’s take another example of the Gmail app.
How to Set Different Notification Tone for Different Gmail Accounts on Android
Some users add multiple Gmail accounts to their phones for a variety of reasons. Those accounts could be professional or personal. Keeping a separate email notification sound for each account will help in differentiating the importance of the email.
Step 1: Open Settings and go to Apps or Installed apps.
Step 2: Tap on Gmail under All apps.

Step 3: Tap on Notifications. You will be greeted by various notification channels categorized by your Gmail account. Tap on the Email or Mail text under your Gmail account whose notification tone you want to change.


Tip: Did you notice the straight bar next to the Email option? Remember to tap the text before the straight bar to open more customization settings such as Sound.
Step 4: Tap on Advanced under the Notification category to reveal more options. Tap on Sound. Choose a tone that you want to use. Check other Gmail notification settings that you should customize.

How to Change Messages Notification Sound on Android
To change the text tone, go to Settings > Apps. Tap on the Messages app, followed by Notifications. Depending on different manufacturers, you will see different notification categories. Tap on Incoming messages or General depending on the option available. Then, tap on Advanced followed by Sound. Change the tone.

On dual SIM handsets, you will see the SIM 1 and SIM 2 notification categories under Notifications. Tap on the required SIM and go to Advanced > Sound to change the notification tone.
Note: In a nutshell, to change the notification tone of any app, go to Settings > Apps > (app name) > Notifications > (notification category) > Sound (or Advanced > Sound).
Also on Guiding Tech
# ringtone
Method 2: From App Settings
Some Android apps offer a built-in setting to change the default notification tones. So you can customize the notification tone inside the app as well. You can even customize notification tones for individual contacts if your app allows that.
Let’s say you want to change the ringtone on your phone. For that, open your default Phone app. Tap on the three-dot icon at the top. Select Settings.


Tap on Sounds & vibration or something similar such as Call alerts/Ringtones. Tap on Ringtone and choose a new ringtone.


Tip: To set a different ringtone for each contact, open the Contacts app, and edit your contact. You will see the Ringtone field. Tap on that and choose a new ringtone for that contact. Repeat steps for other contacts. Find out how to set different message tones for different contacts on Android.
Similarly, if you want to customize the WhatsApp notification tone, open WhatsApp Settings from the app. Go to Notifications. Here you shall see the notification options for individual and group messages. Tap on Notification tone to change the sound.


Inside some apps, when you tap on the Notification setting, it will take you to the Notification screen that you would see if you went through phone Settings > Apps > (app name) > Notifications. In such cases, tap on the notification category, as shown in method 1 above, to change the default tone.
Pro Tip: If the above methods do not suit you, install the NotifiCon app to customize notifications on Android phones.
Also on Guiding Tech

How to Sync and Dismiss Notifications Across Multiple Android Devices
Hey Google
Even though Google is trying to simplify things, they are actually making some settings hard to find. One needs to dive deep into the settings to change the default notification sound. Hope things improve in the future.
Next up: Wondering what is Do not disturb mode on Android phones and how it differs from silent or Airplane mode? Find the answer from the next link.
Last updated on 24 Oct, 2020
The above article may contain affiliate links which help support Guiding Tech. However, it does not affect our editorial integrity. The content remains unbiased and authentic.
Read Next

Top 11 Incredible Samsung Galaxy S9/S9+ Tips and Tricks
Agreed that the features of the # Samsung Galaxy S9 and S9+ are more than impressive. Here are 11 cool tips and tricks to rock it even further. Check it out!

How To Fix Your Phone Date Is Inaccurate Error In WhatsApp
Is # WhatsApp showing your inaccurate date error on your Phone? Check out these # troubleshooting fixes to resolve the inaccurate date error on # WhatsApp.

4 Best Ways to Turn Off Notifications on Android
Is your phone buzzing because of the # notifications too often? There are different ways to turn off notifications on # Android.

How to Send Group Texts from Android and iPhone
Here’s how to send group # text messages to your family, friends, or offlice colleagues using your # Android and # iPhone.

How to Add and Use Sleep Timer on YouTube Music
Do you miss the sleep # timer functionality on YouTube # Music? if yes, here’s how to add and use sleep # timer on # YouTube Music for both # Android and # iOS.

Top 9 Ways to Fix Facebook Not Loading Pictures
Is # Facebook not loading pictures for you? Let’s troubleshoot the issue on # Android and iPhone.

How to Block and Unblock Someone on Google Hangouts

Top 7 Ways to Fix Google Maps Showing Wrong Location on Android and iOS
# Google Maps showing wrong # location? Check out these # troubleshooting solutions to improve Google # Maps location accuracy on # Android and iPhone.
Did You Know
Twitter’s logo is named Larry after Larry Bird, the iconic basketball player.
Источник


