- Урок 26. Navigation. Параметры навигации
- destination Fragment
- Attributes
- Arguments
- Actions
- Deep links
- destination Activity
- Attributes
- Arguments
- Deep links
- Action
- Атрибуты
- Transitions
- Argument Default Values
- Pop Behaviour
- Launch Options
- NavOptions
- Android navigation component. Простые вещи, которые приходится делать самому
- Переключение между пунктами меню
- Открытие новой Activity
- Передача параметров в startDestination
- NavigationUI
- Summary
- Public methods
- Public methods
- navigateUp
- navigateUp
- onNavDestinationSelected
- onNavDestinationSelected
- setupActionBarWithNavController
- setupActionBarWithNavController
- setupWithNavController
- setupWithNavController
- setupWithNavController
- setupWithNavController
- setupWithNavController
- setupWithNavController
- setupWithNavController
- setupWithNavController
Урок 26. Navigation. Параметры навигации
В этом уроке разбираемся, как задавать параметры при навигации.
Полный список уроков курса:
В графе у нас есть три основных объекта, у которых мы можем задавать параметры: это destination Fragment, destination Activity и action.
Рассмотрим каждый из них подробно.
destination Fragment
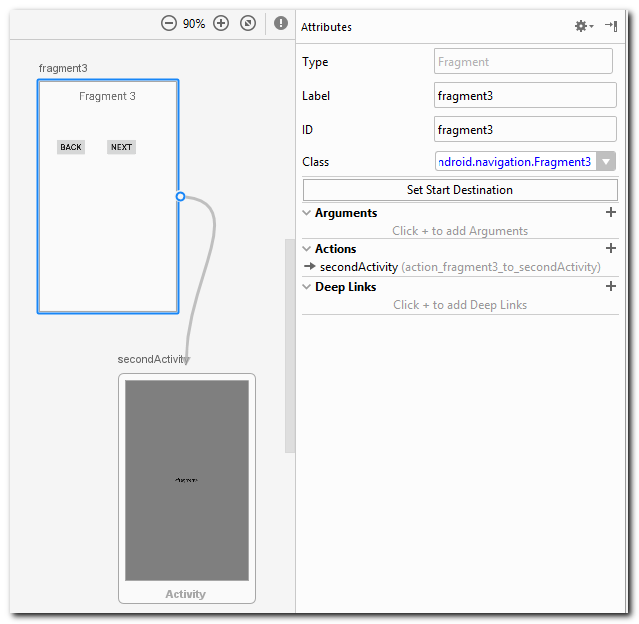
Attributes
Type — это тип destination, в данном случае Fragment.
Label — текстовое описание. Его можно получить в коде.
Также оно будет использовано в случае интеграции с Navigation Drawer. Об этом будет следующий урок.
В качестве значения вы можете указать строковый ресурс, например: @string/fragment3_label
ID — уже знакомый нам атрибут, используется в методе navigate для навигации к этому destination. ID генерируется автоматически, но всегда можно ввести свое более осмысленное значение.
Class — класс фрагмента.
Set Start Destination — этой кнопкой можно destination сделать стартовым. Он будет отображаться первым при запуске.
Arguments
Возможность задать аргументы с значениями по умолчанию. Это мы подробно рассмотрели в прошлом уроке.
Actions
Список action, выходящих из этого destination. На скриншоте выше только один action, который ведет в SecondActivity. Но их может быть несколько.
Deep links
Об этом поговорим в отдельном уроке.
destination Activity
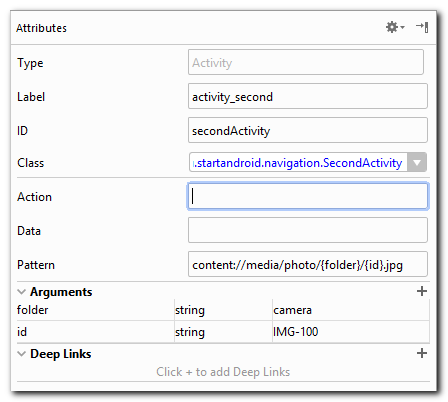
Attributes
Type, Label, ID, Class — аналогичны атрибутам destination Fragment.
Action и Data — соответствуют стандартным полям action и data в Intent классе. Заполняете их здесь и в Activity достаете из getIntent().getAction() и getIntent().getData().
Pattern — это примерно то же, что и Data, но с параметрами. Т.е. вы здесь задаете свой Uri и в нем указываете имена параметров в фигурных скобках.
На скриншоте выше я указал Uri: content://media/photo/
У него два параметра folder и id. От нас потребуется при вызове Activity передать значения для этих параметров через Bundle.
Параметры должны быть строковые.
В результате в Activity метод getIntent().getData() вернет нам: content://media/photo/camera/100.jpg
Arguments
Аналогичны аргументам destination Fragment.
Deep links
Об этом поговорим в отдельном уроке.
Обратите внимание, что нет списка Actions. Потому что граф действует только в пределах своего Activity. Переход в другое Activity — это уход из этого графа и дальнейшие перемещения будут определяться уже другим графом.
И нет кнопки Set Start Destination. Выходная из графа точка не может быть стартовой.
Action
Напомню, что action — это возможность указать дополнительные параметры при вызове destination. Рассмотрим эти параметры.
Пример: action из Fragment2 в Fragment3
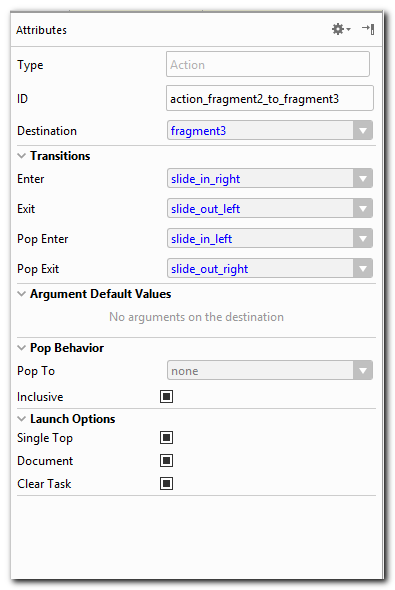
Атрибуты
C Type и ID все понятно.
Destination — показывает, куда ведет action. Т.е. какой destination будет открыт, если вызвать метод NavController.navigate с ID этого action.
Transitions
Возможность задать анимацию перехода между destination.
Этот action ведет с Fragment2 на Fragment3. Соответственно:
Enter — анимация для появления Fragment3
Exit — анимация для исчезания Fragment2.
А когда возвращаемся с Fragment3 на Fragment2, то
Pop Enter — анимация появления Fragment2
Pop Exit — анимация исчезанияFragment3
Под капотом эти анимации просто передаются в FragmentTransaction:

Argument Default Values
Аргументы берутся из destination, в который ведет action. Здесь можно задать им значения по умолчанию.
Pop Behaviour
Допустим у нас есть три destination.

Мы поочередно их открываем в Activity: fragment1 > fragment2 > fragment3.
По каким то причинам нам надо, чтобы при возврате назад из fragment3 мы сразу попадали в fragment1 (минуя fragment2). Для этого мы создаем action, который ведет из fragment2 в fragment3 и укажем ему Pop To = fragment1. Теперь при вызове этого action система сбросит backStack до указанного в Pop To фрагмента.
В результате при возврате из Fragment3 попадаем в Fragment1.

Если включен чекбокс Inclusive, то destination, указанный в Pop To также будет закрыт и мы попадем на destination, который был перед ним.
Launch Options
Эти параметры зависят от того, куда ведет action: в Activity или в фрагмент.
Рассмотрим сначала для случая, когда action ведет в Activity.
Single Top — добавляет в Intent вызова Activity флаг Intent.FLAG_ACTIVITY_SINGLE_TOP
Document — добавляет в Intent вызова Activity флаг Intent.FLAG_ACTIVITY_NEW_DOCUMENT
Clear Task — cбрасывает стэк текущего графа до стартового destination. Добавляет в Intent вызова Activity флаг Intent.FLAG_ACTIVITY_CLEAR_TASK. Не очень понятный режим. Возможно еще просто не доведен до ума.
Если же action ведет в фрагмент:
Single Top — если текущий фрагмент тот же, что и вызываемый, то вызов будет проигнорирован.
Document — похоже, что никак не используется.
Clear Task — стэк текущего графа очищается до стартового фрагмента. Транзакция перехода в новый фрагмент не добавляется в backStack. Соответственно, вызываемый фрагмент заменяет текущий и становится единственным.
NavOptions
Все выше рассмотренные параметры можно задавать программно в объекте NavOptions и далее передавать этот объект в метод navigate.
Источник
Android navigation component. Простые вещи, которые приходится делать самому
Всем привет! Хочу рассказать об особенностях в работе Navigation Architecture Component, из-за которых у меня сложилось неоднозначное впечатление о библиотеке.
Эта статья не пошаговая инструкция, в ней опущены детали реализации, чтобы сосредоточить внимание на ключевых моментах. В интернете есть немало одинаковых примеров использования (есть и переводы) — они помогут познакомиться с библиотекой. Так же перед чтением предлагаю изучить документацию.

Сразу скажу, библиотеку безусловно считаю полезной и не исключаю возможности неверного использования, но, пожалуй, я перепробовал всё прежде чем писать эту статью.
Итак, вот сценарии, при реализации которых ожидания по функционалу не совпали с реальностью в реализации:
- переключение между пунктами меню в navigation drawer
- открытие новой Activity со своим графом навигации
- передача параметров в startDestination
Переключение между пунктами меню
Это одна из тех функций, которые повлияли на решение использовать Navigation Component.
Нужно всего лишь сделать одинаковыми id пунктов меню
и id экранов (destination в графе навигации)
затем нужно связать меню с контроллером навигации:
Навигация в меню заработала — ну разве не чудо?!
Обратите внимание на «гамбургер» (иконка меню), при переключении между пунктами меню он меняет своё состояние на кнопку «назад». Такое поведение показалось непривычным (привычное — как в приложении play market) и, какое-то время, я пытался разобраться, что же сделал не так?
Всё так! Перечитав документацию по принципам навигации (а именно: пункты два и три), понял, что «гамбургер» показывается только для startDestination, вернее так: кнопка «назад» показывается для всех, кроме startDestination. Ситуацию можно поменять применив различные уловки в подписке (addOnNavigatedListener()) на изменение destination, но их даже описывать не стоит. Работает так, нужно смириться.
Открытие новой Activity
Activity может выступать в качестве navigation host и, в то же время, в графе навигации может выступать в роли одного из destination. Открытие Activity без вложенного графа навигации работает как ожидается, то есть вызов:
осуществит переход (как в случае с фрагментами) и откроет запрошенную Activity.
Гораздо интереснее рассмотреть случай, когда целевая Activity сама выступает в роли navigation host, то есть вариант 2 из документации:
В качестве примера давайте рассмотрим Activity для добавления заметки. В ней будет основной фрагмент с полями ввода EditFragment, он в графе навигации будет startDestination. Давайте положим, что при редактировании нам нужно прикрепить фото, для этого будем переходить к PhotoFragment для получения снимка с камеры. Граф навигации будет выглядеть так:
EditActivity мало отличается от MainActivity. Основное отличие в том, что на EditActivity нет меню:
Activity открывается, навигация внутри неё работает:
Опять обратим внимание на кнопку навигации в toolbar — на стартовом EditFragment нет кнопки «Назад к parent Activity» (а хотелось бы). С точки зрения документации, тут всё законно: новый граф навигации, новое значение startDestination, на startDestination не показывается кнопка «Назад», конец.
Для тех, кому хочется вернуть привычное поведение c parent activity, сохранив при этом функционал переключения между фрагментами, могу предложить такой костыль подход:
Подписка нужна для того, чтобы для NavigationUI.ActionBarOnNavigatedListener все destination не являлись startDestination. Таким образом NavigationUI.ActionBarOnNavigatedListener не будет скрывать кнопку навигации (за деталями стоит обратиться к исходникам). Добавим к этому обработку onSupportNavigateUp() штатным образом на startDestination и получим то, что хотелось.
Стоит сказать, что решение это далеко от идеала хотя бы потому, что это неочевидное вмешательство в поведение библиотеки. Полагаю, могут возникнуть проблемы в случае использования deep links (ещё не проверял).
Передача параметров в startDestination
В Navigation Component есть механизм передачи параметров от одного destination другому. Есть даже инструмент для обеспечения безопасности типов за счёт кодогенерации (неплохо).
Сейчас мы разберём случай, из-за которого я не смог поставить твёрдую пятёрку этому функционалу.
Вернёмся к EditActivity, достаточно привычный сценарий, когда одна Activity используется для создания и редактирования объектов. При открытии объекта для редактирования в Activity нужно передать, например, id объекта — давайте сделаем это штатным образом:
Я добавил параметр непосредственно в корневой элемент графа (navigation), но можно добавить в целевой фрагмент. От этого изменится только способ получения параметра.
Я добавил add и edit action’s в одни из фрагментов, так они будут доступны только из него.
В этом примере ImportFragmentDirections — автоматически сгенерированый safe-args класс.
Вы, наверняка, обратили внимание на особенности получения параметров в EditFragment. Так работает, потому что edit action (из пункта 1) передаёт аргументы в EditActivity, а она, в свою очередь, почему-то жадничает не передаёт её в граф (например, вызовом navController.graph.setDefaultArguments()). Эту особенность можно обойти, если вручную подготовить navigation controller. Один из способов описан на StackOwerflow.
Пожалуй, наибольшая сложность возникнет при одновременном использовании в качестве startDestination и обычного destination. То есть, при переходе и передаче параметров в startDestination из любого другого destination этого графа, фрагменту придётся самостоятельно определять, откуда извлекать параметры: из arguments или из intent.extras. Это нужно иметь ввиду при проектировании переходов с передачей параметров.
Резюмируя, хочу отметить, что сам не перестал использовать библиотеку и, несмотря на перечисленные недостатки особенности, считаю её достаточно полезной, чтобы рекомендовать к использованию. Очень надеюсь, что в следующих релизах изменится ситуация по крайней мере с передачей параметров в startDestination.
Источник
NavigationUI
Class which hooks up elements typically in the ‘chrome’ of your application such as global navigation patterns like a navigation drawer or bottom nav bar with your NavController .
Summary
Public methods
Handles the Up button by delegating its behavior to the given NavController.
Handles the Up button by delegating its behavior to the given NavController.
Attempt to navigate to the NavDestination associated with the given MenuItem.
Attempt to navigate to the NavDestination associated with the given MenuItem.
Sets up the ActionBar returned by AppCompatActivity.getSupportActionBar for use with a NavController .
Sets up the ActionBar returned by AppCompatActivity.getSupportActionBar for use with a NavController .
Sets up a Toolbar for use with a NavController .
Sets up a Toolbar for use with a NavController .
Public methods
navigateUp
Handles the Up button by delegating its behavior to the given NavController. This should generally be called from AppCompatActivity.onSupportNavigateUp .
If you do not have a Openable layout, you should call NavController.navigateUp directly.
The NavController that hosts your content.
The Openable layout that should be opened if you are on the topmost level of the app.
True if the NavController was able to navigate up.
navigateUp
Handles the Up button by delegating its behavior to the given NavController. This is an alternative to using NavController.navigateUp directly when the given AppBarConfiguration needs to be considered when determining what should happen when the Up button is pressed.
In cases where no Up action is available, the AppBarConfiguration.fallbackOnNavigateUpListener will be called to provide additional control.
The NavController that hosts your content.
Additional configuration options for determining what should happen when the Up button is pressed.
True if the NavController was able to navigate up.
onNavDestinationSelected
Attempt to navigate to the NavDestination associated with the given MenuItem. This MenuItem should have been added via one of the helper methods in this class.
Importantly, it assumes the menu item id matches a valid action id or destination id to be navigated to.
By default, the back stack will be popped back to the navigation graph’s start destination. Menu items that have android:menuCategory=»secondary» will not pop the back stack.
The selected MenuItem.
The NavController that hosts the destination.
True if the NavController was able to navigate to the destination associated with the given MenuItem.
onNavDestinationSelected
Attempt to navigate to the NavDestination associated with the given MenuItem. This MenuItem should have been added via one of the helper methods in this class.
Importantly, it assumes the menu item id matches a valid action id or destination id to be navigated to.
By default, the back stack will be popped back to the navigation graph’s start destination. Menu items that have android:menuCategory=»secondary» will not pop the back stack.
The selected MenuItem.
The NavController that hosts the destination.
Whether the NavController should save the back stack state. This must always be false : leave this parameter off entirely to use the non-experimental version of this API, which saves the state by default.
True if the NavController was able to navigate to the destination associated with the given MenuItem.
setupActionBarWithNavController
Sets up the ActionBar returned by AppCompatActivity.getSupportActionBar for use with a NavController .
By calling this method, the title in the action bar will automatically be updated when the destination changes (assuming there is a valid label ).
The start destination of your navigation graph is considered the only top level destination. On the start destination of your navigation graph, the ActionBar will show the drawer icon if the given Openable layout is non null. On all other destinations, the ActionBar will show the Up button. Call navigateUp to handle the Up button.
Destinations that implement androidx.navigation.FloatingWindow will be ignored.
The activity hosting the action bar that should be kept in sync with changes to the NavController.
The NavController whose navigation actions will be reflected in the title of the action bar.
The Openable layout that should be toggled from the home button
setupActionBarWithNavController
Sets up the ActionBar returned by AppCompatActivity.getSupportActionBar for use with a NavController .
By calling this method, the title in the action bar will automatically be updated when the destination changes (assuming there is a valid label ).
The AppBarConfiguration you provide controls how the Navigation button is displayed. Call navigateUp to handle the Up button.
Destinations that implement androidx.navigation.FloatingWindow will be ignored.
The activity hosting the action bar that should be kept in sync with changes to the NavController.
The NavController whose navigation actions will be reflected in the title of the action bar.
Additional configuration options for customizing the behavior of the ActionBar
setupWithNavController
Sets up a Toolbar for use with a NavController .
By calling this method, the title in the Toolbar will automatically be updated when the destination changes (assuming there is a valid label ).
The start destination of your navigation graph is considered the only top level destination. On the start destination of your navigation graph, the Toolbar will show the drawer icon if the given Openable layout is non null. On all other destinations, the Toolbar will show the Up button. This method will call navigateUp when the Navigation button is clicked.
Destinations that implement androidx.navigation.FloatingWindow will be ignored.
The Toolbar that should be kept in sync with changes to the NavController.
The NavController whose navigation actions will be reflected in the title of the Toolbar.
The Openable layout that should be toggled from the Navigation button
setupWithNavController
Sets up a Toolbar for use with a NavController .
By calling this method, the title in the Toolbar will automatically be updated when the destination changes (assuming there is a valid label ).
The AppBarConfiguration you provide controls how the Navigation button is displayed and what action is triggered when the Navigation button is tapped. This method will call navigateUp when the Navigation button is clicked.
Destinations that implement androidx.navigation.FloatingWindow will be ignored.
The Toolbar that should be kept in sync with changes to the NavController.
The NavController whose navigation actions will be reflected in the title of the Toolbar.
Additional configuration options for customizing the behavior of the Toolbar
setupWithNavController
By calling this method, the title in the CollapsingToolbarLayout will automatically be updated when the destination changes (assuming there is a valid label ).
The start destination of your navigation graph is considered the only top level destination. On the start destination of your navigation graph, the Toolbar will show the drawer icon if the given Openable layout is non null. On all other destinations, the Toolbar will show the Up button. This method will call navigateUp when the Navigation button is clicked.
Destinations that implement androidx.navigation.FloatingWindow will be ignored.
| Parameters | |||||||||||||||
|---|---|---|---|---|---|---|---|---|---|---|---|---|---|---|---|
| CollapsingToolbarLayout collapsingToolbarLayout | |||||||||||||||
| Parameters | ||||||||||||
|---|---|---|---|---|---|---|---|---|---|---|---|---|
| CollapsingToolbarLayout collapsingToolbarLayout | ||||||||||||
| Parameters | |||||||||
|---|---|---|---|---|---|---|---|---|---|
| NavigationView navigationView | |||||||||
| Parameters | ||||||
|---|---|---|---|---|---|---|
| NavigationView navigationView | ||||||
| Parameters | |||
|---|---|---|---|
| NavigationBarView navigationBarView | |||
| Parameters | |
|---|---|
| NavigationBarView navigationBarView | |


