- How to Change the Whole App Language in Android Programmatically?
- Example
- Step by Step Implementation
- Переключение языка в Android-приложении
- О чем пойдет речь, а о чем не пойдет?
- Что мы хотим сделать?
- Архитектурное решение
- Форматирование чисел, денежных сумм и процентов
- Представление языков и валют
- Особенности форматирования числовых значений
- Числа
- Валюты
- Проценты
- DecimalFormat
- В итоге
- Как проще тестировать? (бонус)
- Change the language android
- Changing App language in Android
- Points to keep in mind:
How to Change the Whole App Language in Android Programmatically?
Android 7.0(API level 24) provides support for multilingual users, allowing the users to select multiple locales in the setting. A Locale object represents a specific geographical, political, or cultural region. Operations that required these Locale to perform a task are called locale-sensitive and uses the Locale to tailor information for the user. For example, displaying a number is a locale-sensitive operation so, the number should be formatted according to the conventions of the user’s native region, culture, or country.
Example
In this example, we are going to create a simple application in which the user has the option to select his desired language-English or Hindi. This will change the language of the whole application. A sample GIF is given below to get an idea about what we are going to do in this article. Note that we are going to implement this project using the Java language.
Step by Step Implementation
Step 1: Create A New Project
To create a new project in Android Studio please refer to How to Create/Start a New Project in Android Studio. Note that select Java as the programming language.
Step 2: Create Resource Files
In this step, we are required to create a string resource file for the Hindi language. Go to app > res > values > right-click > New > Value Resource File and name it as strings. Now, we have to choose qualifiers as Locale from the available list and select the language as Hindi from the drop-down list. Below is the picture of the steps to be performed.
Источник
Переключение языка в Android-приложении

Есть простой способ реализовать переключение языка в Single-Activity приложении. Стек экранов при этом подходе не сбрасывается, пользователь остается там, где переключил язык. Когда пользователь переходит на предыдущие экраны, они сразу отображаются переведенными. А результат локализации чисел, денежных сумм и процентов может удивить дизайнеров.

О чем пойдет речь, а о чем не пойдет?
Далее не будет ничего о:
- Теории, которая лежит в основе форматированного вывода строк, и деталях реализации библиотек, которые этим занимаются. То есть того, что помогло бы вам написать свою библиотеку.
- Ресурсах строковых, векторных и прочих. О том, какие квалификаторы ресурсов использовать, какие картинки на арабском должны отображаться справа налево, а какие нет, и других тонкостях.
- Процессе централизованного перевода ресурсов для всех платформ. Как его организовать, чтобы всем жилось хорошо, даже iOS-никам.
А пойдет речь о:
- Практике. Рассмотрим задачу, ее ограничения и решение с диаграммами, примерами и фрагментами кода.
- API SDK, которое было использовано для этого решения.
- Особенностях форматирования числовых значений для разных региональных стандартов, о которых стоит знать дизайнерам.
Что мы хотим сделать?
Пусть в нашем приложении есть экран с настройками, и мы хотим добавить в него пару новых пунктов, один из которых позволил бы переключать язык приложения, а другой изменять валюту, в которой отображаются денежные суммы. Приведем примеры того, как это может выглядеть.
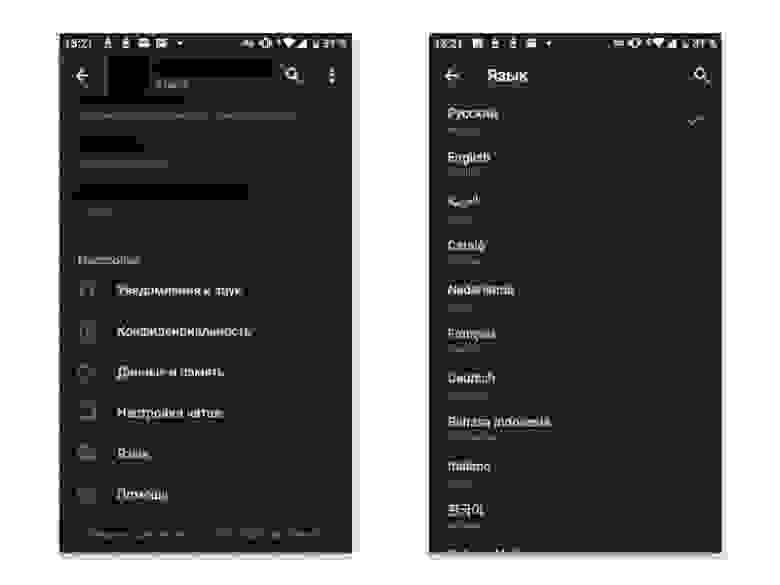

Кроме перевода текста и отображения верстки справа налево, эти настройки должны влиять на формат отображения числовых значений. Необходимо, чтобы все отображалось согласно выбранной локали.

Архитектурное решение
Представим, что наше приложение написано в соответствии с Single-Activity подходом. Тогда механизм переключения языка может быть реализован следующим образом.
SettingsInteractor является источником текущего значения языка. Он позволяет подписаться на это значение, получить его синхронно и подписаться только на обновления. В случае необходимости можно ввести дополнительную абстракцию над SettingsInteractor по принципу разделения интерфейса. На диаграмме несущественные детали опущены.
AppActivity при создании заменяет контекст на новый, чтобы приложение использовало ресурсы для выбранного языка.
AppPresenter в свою очередь подписывается на обновления языка и уведомляет View об изменениях.
AppActivity при получении уведомления о смене языка пересоздается.
AppActivity является единственной в приложении. Все остальные экраны реализованы фрагментами. Поэтому при пересоздании активити стек экранов сохраняется системой. При возврате на предыдущие экраны они будут переинициализированы и отображаться переведенными. Пользователь останется на списке выбора языка и увидит результат своего выбора мгновенно.
Форматирование чисел, денежных сумм и процентов
Кроме замены контекста необходимо форматировать данные – числа, денежные суммы, проценты. Пусть эту задачу каждая View делегирует отдельному компоненту, назовем его UiLocalizer .
Для преобразования числа в строку UiLocalizer использует соответствующие инстансы NumberFormat .
Обратите внимание, что валюту необходимо устанавливать отдельно.
Если вы экономите такты CPU и биты памяти, а переключение валюты и языка – основная и часто используемая функция вашего приложения, то здесь, конечно, необходим кэш.
Представление языков и валют
Экземпляры класса Locale создаются по языковому тегу, который состоит из двухбуквенного кода языка и двухбуквенного кода региона. А экземпляры класса Currency – по трехбуквенному ISO коду. В этом виде язык и валюта должны сериализовываться для сохранения на диск или передачи по сети, и тогда будет хорошо. Приведем примеры.
Особенности форматирования числовых значений
Результат форматирования чисел в соответствии с региональными стандартами может разойтись с ожидаемым. Символ валюты или ее трехбуквенный код на разных языках будет выводиться по-разному. Знак минуса у отрицательных денежных значений будет появляться в неожиданных местах, а кое-где вместо него будут выводиться скобки. Знак процента может оказаться не совсем тем знаком, к которому мы привыкли.
Дело в том, что с точки зрения региональных шаблонов итоговая строка состоит из префикса и суффикса для положительных и отрицательных чисел, разделителя тысячных и десятичного разделителя, а они разные для разных локалей.
Числа
| Language | Negative Prefix | Negative Suffix | Positive Prefix | Positive Suffix | Grouping Separator | Decimal Separator |
|---|---|---|---|---|---|---|
| ru-RU | «-« | » « | «,» | |||
| en-US | «-« | «,» | «.» | |||
| iw-IL | «-« | «,» | «.» | |||
| ar-AE | «-« | «٬» | «٫» | |||
| fr-FR | «-« | » « | «,» | |||
| de-DE | «-« | «.» | «,» | |||
| de-CH | «-« | «‘» | «.» | |||
| da-DK | «-« | «.» | «,» |
Валюты
| Language | Negative Prefix | Negative Suffix | Positive Prefix | Positive Suffix | Grouping Separator | Decimal Separator |
|---|---|---|---|---|---|---|
| ru-RU | «-« | » ₽» | » ₽» | » « | «,» | |
| en-US | «-$» | «$» | «,» | «.» | ||
| iw-IL | «-« | » ₪» | » ₪» | «,» | «.» | |
| ar-AE | «-« | » د.إ.» | » د.إ.» | «٬» | «٫» | |
| fr-FR | «-« | » €» | » €» | » « | «,» | |
| de-DE | «-« | » €» | » €» | «.» | «,» | |
| de-CH | «CHF-« | «CHF « | «‘» | «.» | ||
| da-DK | «-« | » kr.» | » kr.» | «.» | «,» |
Проценты
| Language | Negative Prefix | Negative Suffix | Positive Prefix | Positive Suffix | Grouping Separator | Decimal Separator |
|---|---|---|---|---|---|---|
| ru-RU | «-« | «%» | «%» | » « | «,» | |
| en-US | «-« | «%» | «%» | «,» | «.» | |
| iw-IL | «-« | «%» | «%» | «,» | «.» | |
| ar-AE | «-« | » ٪» | » ٪» | «٬» | «٫» | |
| fr-FR | «-« | » %» | » %» | » « | «,» | |
| de-DE | «-« | » %» | » %» | «.» | «,» | |
| de-CH | «-« | «%» | «%» | «‘» | «.» | |
| da-DK | «-« | » %» | » %» | «.» | «,» |
Более того, результаты форматирования для Android SDK и JDK могут быть разными. При этом все варианты правильные, каждый из них используется в определенных контекстах.
DecimalFormat
Когда мы создаем NumberFormat для форматирования тех или иных значений, мы получаем объекты класса DecimalFormat , которые просто сконфигурированы разными шаблонами. Приведя объект к типу DecimalFormat и используя его интерфейс, можно изменить части шаблона, чтобы все сломать. Но лучше поклоняться данности.
Также можно написать тест, чтобы насладиться разнообразием. Не для всех локалей одна и та же валюта выводится символом.
В итоге
Общая схема решения выглядит следующим образом.
Жизненный цикл AppActivity является жизненным циклом всего приложения. Поэтому достаточно пересоздать ее, чтобы перезапустить все приложение и применить выбранный язык. А поскольку активити одна, подписку на изменение языка достаточно держать в одном месте – в AppPresenter .
Как мы увидели, региональные форматы вывода чисел нетривиальны. Не стоит жестко задавать единый шаблон на все случаи жизни. Лучше доверить форматирование SDK и договориться, что числа будут выводиться по стандарту, а не как нарисовано на макетах.
Как проще тестировать? (бонус)
Для экономии времени можно воспользоваться следующим флагом.
Выбрать необходимую псевдолокаль в настройках телефона.

И наблюдать, как едет верстка из-за длинного текста, а некоторые элементы UI упорно не хотят отображаться справа налево.

Более подробную информацию можно прочитать в документации.
Стоит отметить, что псевдолокали не будут работать, если вы подменяете контекст, как в решении выше. Вы ведь подменяете контекст. Поэтому необходимо добавить en-XA и ar-XB в список выбора языка внутри приложения.
На этом все. Хорошей вам локализации и хорошего настроения!
Источник
Change the language android
Change Language Programmatically in Android

This is a helper library to change the language programmatically in Android.
Android by default uses the locale of the device to select the appropriate language dependent resources. And most of the time this behaviour is enough for common applications.
However, there are cases where you would want to change the language of your app and the UI of the app. As a result, LocaleHelper has emerged.
Download
Features
- Changes language on-the-fly
- Persists the changes in Preferences automatically
- Detects changes when activity loads from backstack
- Detects Right-To-Left (RTL) languages and updates layout direction
- Supports DayNight themes
- Small footprint (
50 methods), easy to use
Demo
Setup
(Option 1) Using base classes
- Extend your base activity class
LocaleAwareCompatActivity provides a helper method called updateLocale
(Option 2) Using delegates
This option requires you to do extra steps if you don’t want to extend from base classes.
- On your custom Application class override methods below. For more details check: LocaleAwareApplication
- On your base activity class override methods below. For more details check: LocaleAwareCompatActivity
Usage
If you’re using the base classes, just call updateLocale(newLocale) . It will then update the locale and restart the activity.
In java.util.Locale class most of the common Locales and their variants are defined. However, it doesn’t contain all the Locales so com.zeugmasolutions.Locales provides the missing ones for easy access.
To change the locale you can call setLocale on the delegate
The delegate will set the new locale and recreate the activity.
Источник
Changing App language in Android
In your app, you can add as many languages as you want. By languages, I mean the language of the text that we see in any mobile application. For example, if you have English, French, and Hindi users, then you can have language support for all these languages. Like «Hello» in English will become «Bonjour» in French and «नमस्ते» in Hindi.
But how can we change the language? That’s the topic for this blog. In this blog, we will learn how to change the App locale in Android with ease.
By default, you have English as your default language for the whole app and the text corresponding to the English language will be there in our strings.xml file. So, similarly, for other languages, you need to add their strings.xml file.
So, basically Android loads the resources related to language based on the system locale setting. For example, if the language of your Android phone is English, then strings.xml of English will be loaded by Android. We do not have to do anything extra here.
But, many times, we want our users to change the language of our App only by selecting the preferred language and not by changing the language of our Android phone. So, let’s see how to add this.
First of all, create a project in Android Studio. Here, we will be having 2 activities:
- MainActivity: This will contain one welcome TextView and two Buttons, one for opening the next activity in the English language and the other for opening the next activity in the Hindi language.
- LanguageActivity: This will simply contain a TextView displaying some message. The message will be shown in English if the language of the app is English and the message will be shown in Hindi if the language of the app is Hindi.
So, let’s start with the MainActivity. The following is the code for the activity_main.xml file:
Here, we have 1 TextView and 2 Buttons.
Similarly, you can add one TextView in your LanguageActivity. The following is the XML code for the same:
And finally, here is the strings.xml file:
So, we are done with our prerequisite part. Now, we are ready to add a new language to our app. Follow the below steps to do so:
- Right Click on res > New > Android Resource File
- Put the file name as strings.xml
- Select the option of Locale

- Select the locale for Hindi with code «hi»

- Click on Ok and now, you will be having two values directory i.e. the default one with the name values and the other with name values-hi . The default one will contain the strings.xml file for the default language(in our case, English) and the values-hi will contain the strings.xml file for the Hindi language.
Now, you need to put all the values of all the strings that we defined in our default strings.xml file for our new Hindi strings.xml file.
But there are certain cases where we want to keep the text of the default language. For example, the name of the App should be the same for all languages. In our case, we just need to translate the message that is shown on the LanguageActivity and not all texts like AppName, WelcomeMessage, etc.
So, for that, we need to set translatable to false in our default strings.xml file(the English one). For example:
Similarly, you can set translatable = «false» for other string values as well. Now, for the other strings that you want to translate, you can simply add their values in the strings.xml file of the Hindi language. For example, the code of strings.xml (hi) will be:
In this way, you are telling the Android app to use the string value according to the locale of the App.
Now, our final task is to change the locale or simply the language of the app when we click on the button. For this, add the below function in your MainActivity.kt file:
In the above code, pass the context and the language code and then start the LanguageActivity . For example:
Now, when you open the LangaugeActivity, then you can see the changes in the language.
Points to keep in mind:
- Whenever an activity is loaded then the corresponding string.xml file is loaded at that time only. For example, if the current locale of your app is English and on button click, you changed it to Hindi. Then no change on that particular activity will be observed because the string file of that activity is already loaded. But if you move to some other activity and then come back to the first activity, then you will see the language changes. If you want to see instant changes, then you need to refresh the activity after the change of the locale.
- In some Android Versions, you might not see the locale change if you are opening some WebView in your app. Always take care of the case when you load the WebView for the very first time. One possible option is to set again the locale after loading the WebView.
- You need to handle the case of orientation change of your activity. The locale will be reset in this case as well, so handle this as well.
- It is recommended by Android to not change the locale at runtime. So, you can avoid this if the use-case of language is not that much important in your app.
This is how you can change the locale of your App. That’s it for this blog. Hope you enjoyed this blog.
Источник


