- How to change the screen color on your iPhone in a few different ways
- Check out the products mentioned in this article:
- iPhone Xs (From $999 at Best Buy)
- How to invert the colors on an iPhone
- How to dim the white point on an iPhone
- How to change color filters and tint on an iPhone
- Rotate the screen on your iPhone or iPod touch
- Rotate the screen on an iPhone without a Home button
- Rotate the screen on an iPhone or iPod touch with a Home button
- Still need help?
- Change the background of a clip in iMovie
- Record video in front of a green or blue screen
- Use the green-screen effect in iMovie on iPhone, iPad, or iPod touch
- Adjust the green screen effect on iPhone, iPad, or iPod touch
- Use the green-screen effect in iMovie on Mac
- Adjust the green screen effect on Mac
- How to keep your iPhone screen on for a longer time, or set it to ‘never’ turn off
- Check out the products mentioned in this article:
- iPhone Xs (From $999.99 at Best Buy)
- How to keep your iPhone screen on
- Adjust the brightness and color temperature on your iPhone, iPad, or iPod touch
- Adjust brightness in Control Center
- Adjust brightness and color temperature in Settings
- About brightness levels
- Learn more
How to change the screen color on your iPhone in a few different ways
Apple has always made the iPhone’s display user friendly.
Depending upon your specific sight needs, you can invert the colors on the phone – making it easier to read the screen if you have low vision or sensitivity to certain bright colors – dim the white point, or apply color filters and tint the screen to accommodate color blindness.
Check out the products mentioned in this article:
iPhone Xs (From $999 at Best Buy)
How to invert the colors on an iPhone
If you have light or color sensitivity, you can invert the colors on your iPhone’s display to reduce eye strain.
Apple includes two kinds of color inversion: Classic and Smart Invert.
Classic Invert inverts all colors, regardless of context, while Smart Invert doesn’t affect images and video, so you can continue to see media the way it was intended, while the rest of the phone’s interface adapts to your color preferences.
1. Start the Settings app.
2. Tap «General,» and then tap «Accessibility.»
3. On the Accessibility page, tap «Display Accommodations.»
4. Tap «Invert Colors.»
5. On the Invert Colors page, choose Classic or Smart Invert by swiping the appropriate button to the right.
How to dim the white point on an iPhone
If the bright colors on your iPhone are too bright and bother your eyes, you don’t need to dim the screen with the brightness slider, which makes everything uniformly darker and potentially harder to see.
Instead, you can dim just the white point, which affects only the brightest colors on the screen.
1. Start the Settings app.
2. Tap «General,» and then tap «Accessibility.»
3. On the Accessibility page, tap «Display Accommodations.»
4. Turn on «Reduce White Point» by swiping the button to the right.
5. Use the slider to choose the white point that best suits your vision.
How to change color filters and tint on an iPhone
You can adjust the colors on your iPhone to adapt to color blindness and light sensitivity.
1. Start the Settings app.
2. Tap «General,» and then tap «Accessibility.»
3. On the Accessibility page, tap «Display Accommodations.»
4. Tap «Color Filters.»
5. Turn on «Color Filters» by swiping the button to the right.
6. Choose the color filter best suited to your sight needs. There are several options:
- Users with protanopia should tap the «Red/Green Filter.»
- Users with deuteranopia should tap the «Green/Red Filter.»
- Users with tritanopia should tap the «Blue Yellow Filter.»
- Users with specific light or color sensitivities should tap «Color Tint.»
7. After making the choice, you can use the «Intensity» slider at the bottom of the screen to customize the color effect.
Источник
Rotate the screen on your iPhone or iPod touch
The screen on your iPhone and iPod touch can rotate so that you can see apps — like Safari and Messages — in portrait or landscape mode. Learn how to rotate the screen on your iPhone or iPod touch, or get help if the feature doesn’t work.
Some apps don’t support rotation, so your screen might not rotate even if Portrait Orientation Lock isn’t turned on.
Rotate the screen on an iPhone without a Home button
- Swipe down from the top-right corner of your screen to open Control Center.
- Tap the Portrait Orientation Lock button to make sure that it’s off.
- Turn your iPhone sideways.
If the screen still doesn’t rotate, try a different app — like Safari or Messages — which are known to work in landscape mode.
Rotate the screen on an iPhone or iPod touch with a Home button
- Swipe up from the bottom edge of your screen to open Contol Center.
- Tap the Portrait Orientation Lock button to make sure that it’s off.
- Turn your iPhone or iPod touch sideways.
If the screen still won’t rotate, try another app — like Safari or Messages — which are known to work in landscape mode.
Still need help?
Contact Apple Support about your iPhone or iPod touch.
Источник
Change the background of a clip in iMovie
In iMovie on iPhone, iPad, iPod touch, or Mac use the green-screen effect to change the background of your video.
With the green-screen effect in iMovie, you can superimpose a video clip over a background video clip, photo, or other image. First, record your subject in front of a green or blue screen. Next, add that clip above the background clip in the iMovie timeline. Then, use the green-screen effect in iMovie so the background clip is visible behind your subject.
Record video in front of a green or blue screen
Record video with your iPhone, iPad, iPod touch, or another camera in front of a green or blue screen. If the subject of your video is green or is wearing green, record in front of a blue background. If the subject of your video is blue or is wearing blue, record in front of a green background.
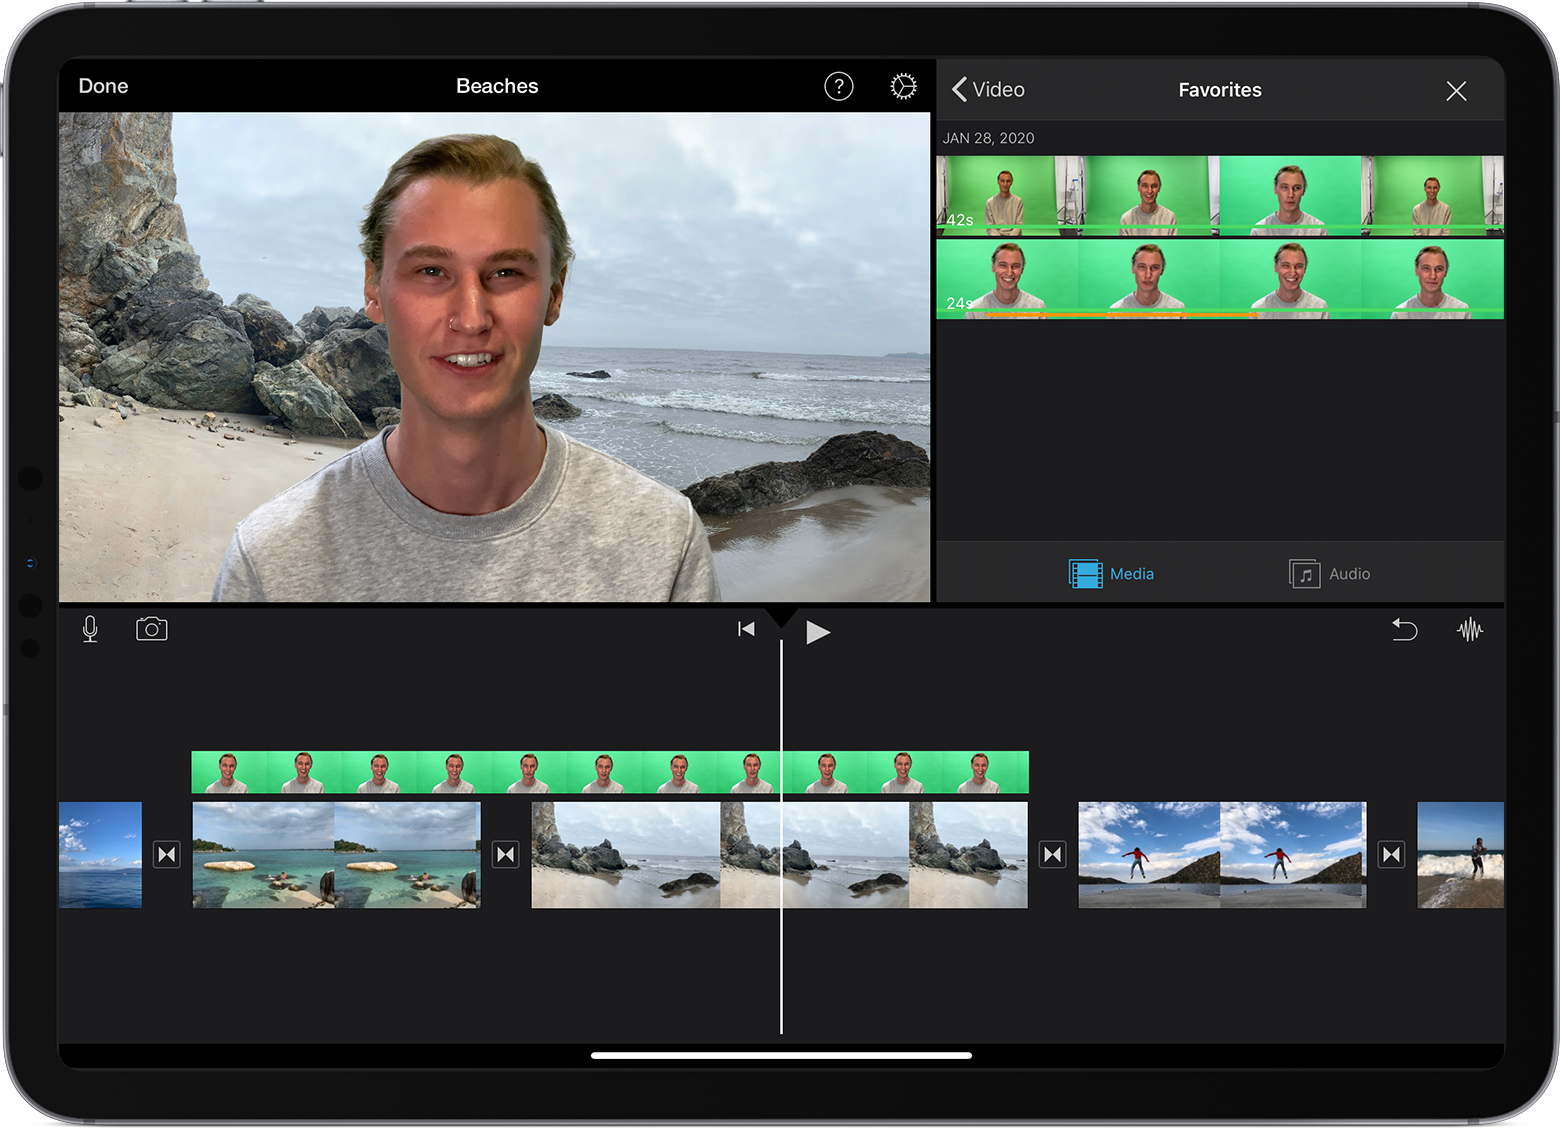
Use the green-screen effect in iMovie on iPhone, iPad, or iPod touch
- With your project open, add the background video clip or still image to the timeline.
- Scroll the timeline so that the playhead (the white vertical line) appears over the background clip.
- Tap the Add Media button , tap a category from the list, then tap the green-screen clip to select it.
- Tap the More button , then tap Green/Blue Screen. The green-screen clip is added to the timeline above the background clip.
- In the viewer, tap Auto to automatically remove the green or blue from the clip. Or tap the color in the clip in the viewer to remove that color.
- Trim and move the background video clip to match the length of your green-screen clip. Because the clips are connected, the two clips move together when you rearrange clips in the timeline.

Adjust the green screen effect on iPhone, iPad, or iPod touch
After you’ve added the green-screen effect, you can make adjustments. Tap the green-screen clip you want to adjust in the timeline, then use any of the green-screen controls to make adjustments:
- To change the amount of green or blue removed from a green-screen clip, tap the Adjust button, then drag the Strength slider left or right.
- To crop parts of a green-screen clip, tap the Mask button, then drag the corners.
Use the green-screen effect in iMovie on Mac
- With your project open, add the background video clip or still image to the timeline.
- Add the green-screen clip above the background clip in the timeline.
- Trim and move the background video clip to match the length of your green-screen clip. Because the clips are connected, the two clips move together when you rearrange clips in the timeline.
- If the video overlay controls aren’t shown, click the Video Overlay Settings button above the viewer, then choose Green/Blue Screen from the pop-up menu.
In the viewer, iMovie removes the green or blue from the green-screen clip to reveal the background clip behind your subject. Because the clips are connected, the two clips move together if you rearrange clips in the timeline.
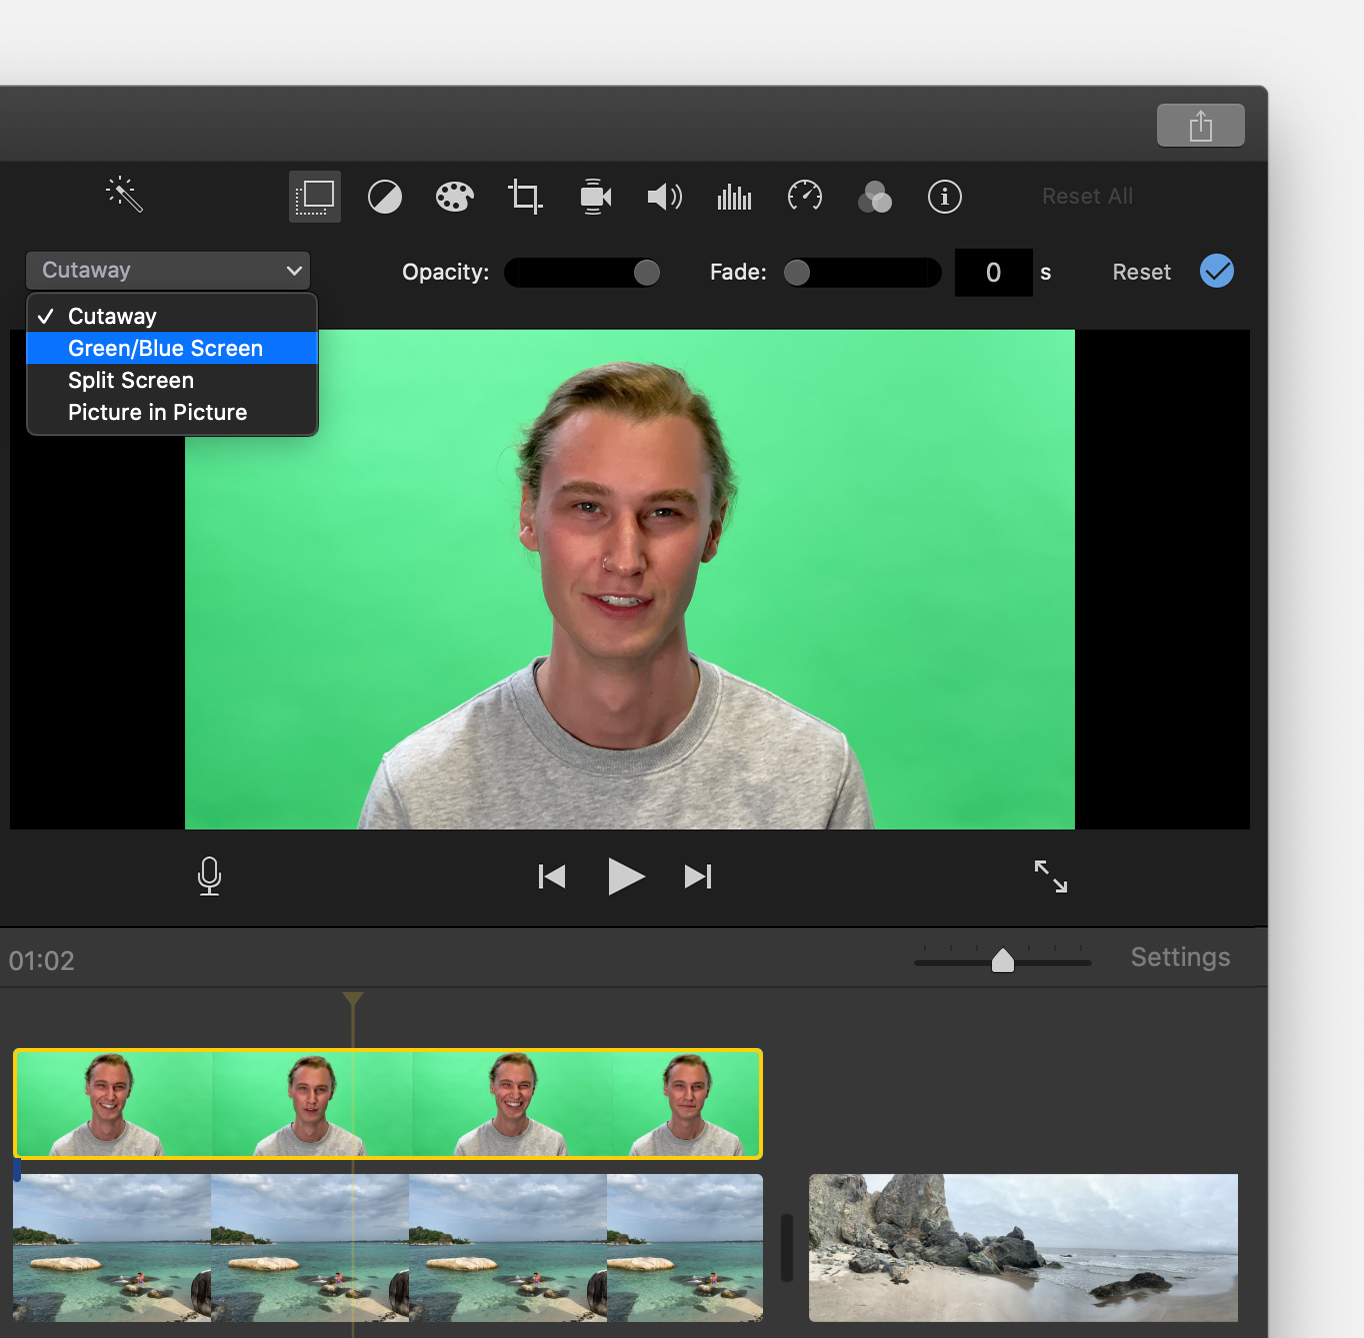
The color that iMovie removes is based on the dominant color in the frame at the position of the playhead when you choose Green/Blue Screen from the pop-up menu. If the frame below the playhead isn’t representative of the rest of the clip, reposition the playhead and reapply the effect.
Adjust the green screen effect on Mac
After you’ve added the green-screen affect, you can make adjustments. Select the green-screen clip in the timeline, click the Video Overlay Settings button , then use any of the green-screen controls to make adjustments.
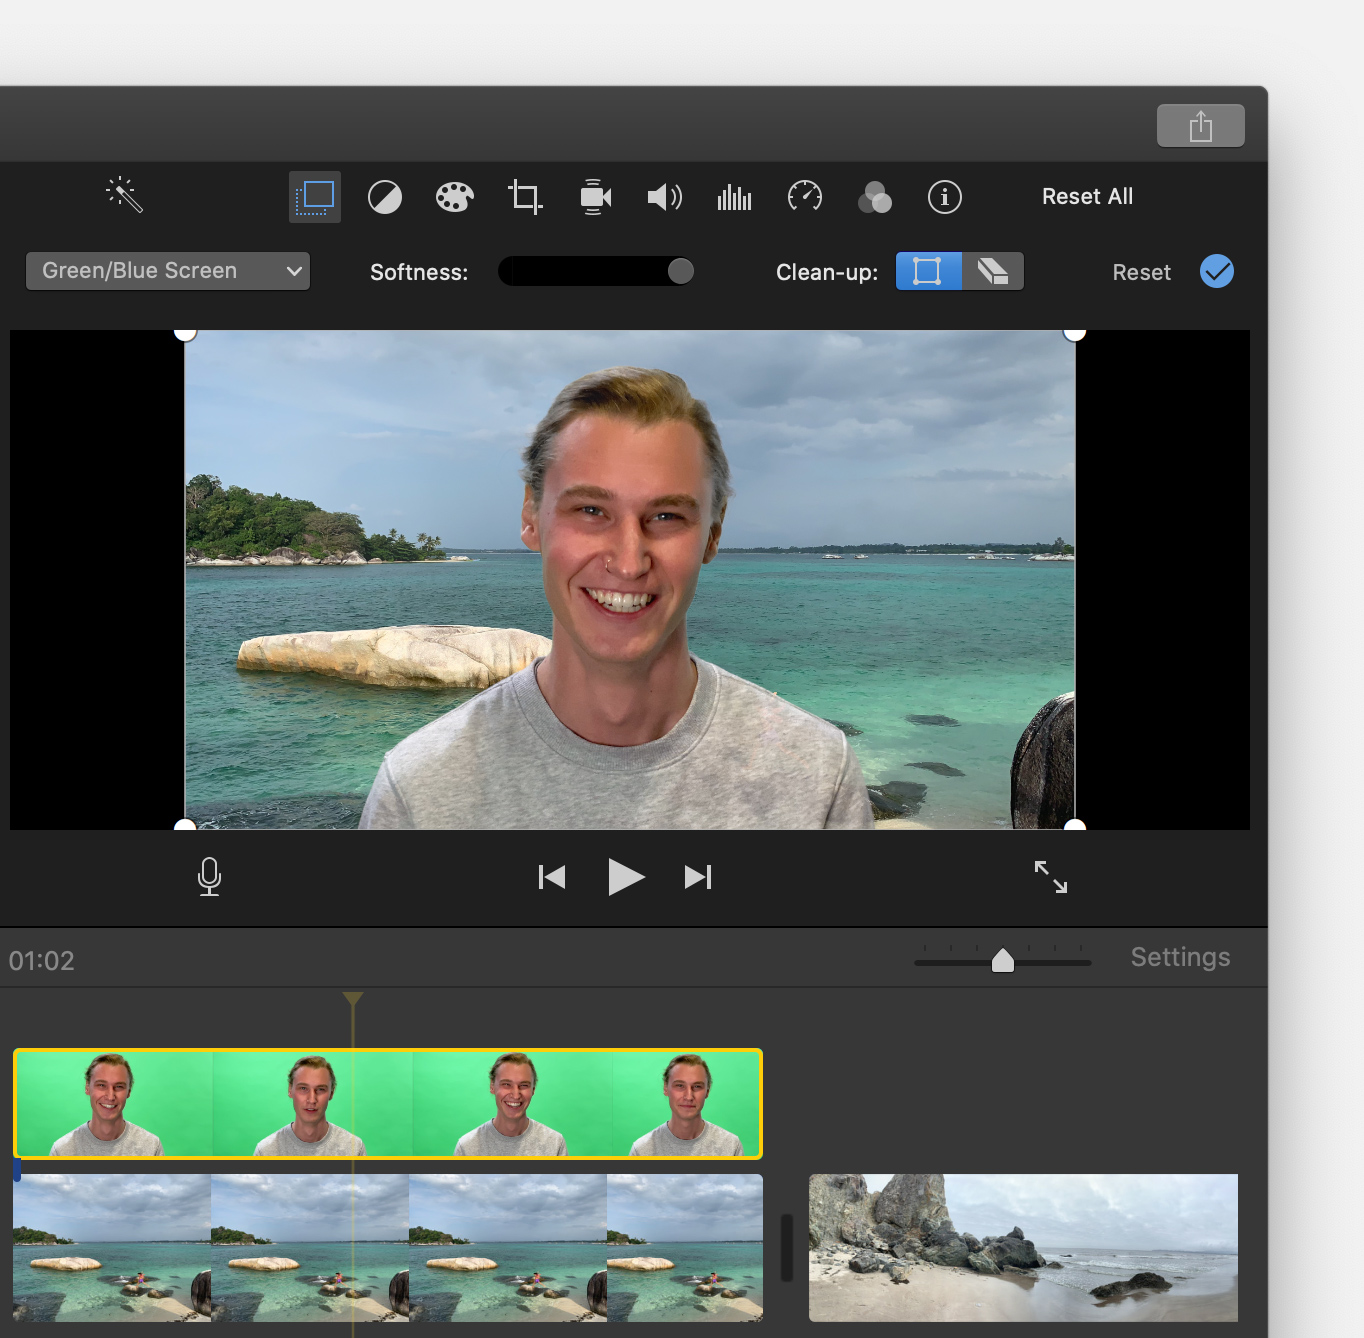
- To adjust the transition between the green-screen clip, drag the Softness control.
- To isolate areas of the green-screen clip, click the Crop button , then drag the corners of the frame in the viewer.
- To mask parts of the green-screen clip, click the Clean-Up button , then drag across the clip in the viewer.
Источник
How to keep your iPhone screen on for a longer time, or set it to ‘never’ turn off
When you first get a new iPhone, the default setting for screen Auto-Lock will turn off your screen after 30 seconds of inactivity.
This can be super annoying, especially if you’re letting someone else use your phone, and they have to keep handing it back to you to unlock.
If you’re actively using your iPhone, the screen will stay on. However, certain functions like running a timer don’t count as activity in iPhone world — the screen will still black out, so you can’t see how much time is left unless you adjust your screen settings.
Fortunately, you can adjust your settings to keep your iPhone screen on for much longer. Here’s how.
Check out the products mentioned in this article:
iPhone Xs (From $999.99 at Best Buy)
How to keep your iPhone screen on
You can change the Auto-Lock setting that turns your screen off with a few clicks.
1. Open Settings.
2. Tap «Display & Brightness.»
3. Tap «Auto-Lock.»
4. Choose the amount of time you want your screen to stay on after you last touch your iPhone. Your options are 30 Seconds, anywhere from one to five minutes, and Never. If you choose Never, your screen will stay unlocked and awake all the time, unless you manually turn it off using the button on the side of your phone.
If for some reason the «Never» option isn’t showing up, it might be because your iPhone is managed by your organization, school, or another administrator. In these cases, you’ll need to contact that administrator for more information.
If you set your iPhone screen to stay on all the time for a short-term reason, remember to change it back to Auto-Lock when you’re done. Leaving your phone on the «Never» setting is a good way to kill your battery quickly, and give anyone who picks up your phone access to your apps.
The reason Apple includes Auto-Lock on its iPhones and other devices is to extend battery life, and keep your data secure. If you set your screen to stay on all the time, make sure you keep an eye on your phone, and charge it up regularly. Consider bringing a portable battery pack when you’re out.
As an alternative to «Never,» set your phone for the longest time before Auto-Lock (five minutes). This will save you much of the annoyance of constantly unlocking your phone while still preserving your battery.
Источник
Adjust the brightness and color temperature on your iPhone, iPad, or iPod touch
Learn how to adjust display brightness and color temperature on your iPhone, iPad, or iPod touch.
Adjust brightness in Control Center
You can quickly adjust brightness in Control Center on your iPhone or iPad:
- On an iPhone X or later, or an iPad with iOS 12 or iPadOS, swipe down from the top-right corner of your display. On an iPhone 8 or earlier, or on an iPod touch, swipe up from the bottom edge of your display.
- Drag the brightness bar up or down to adjust the brightness.

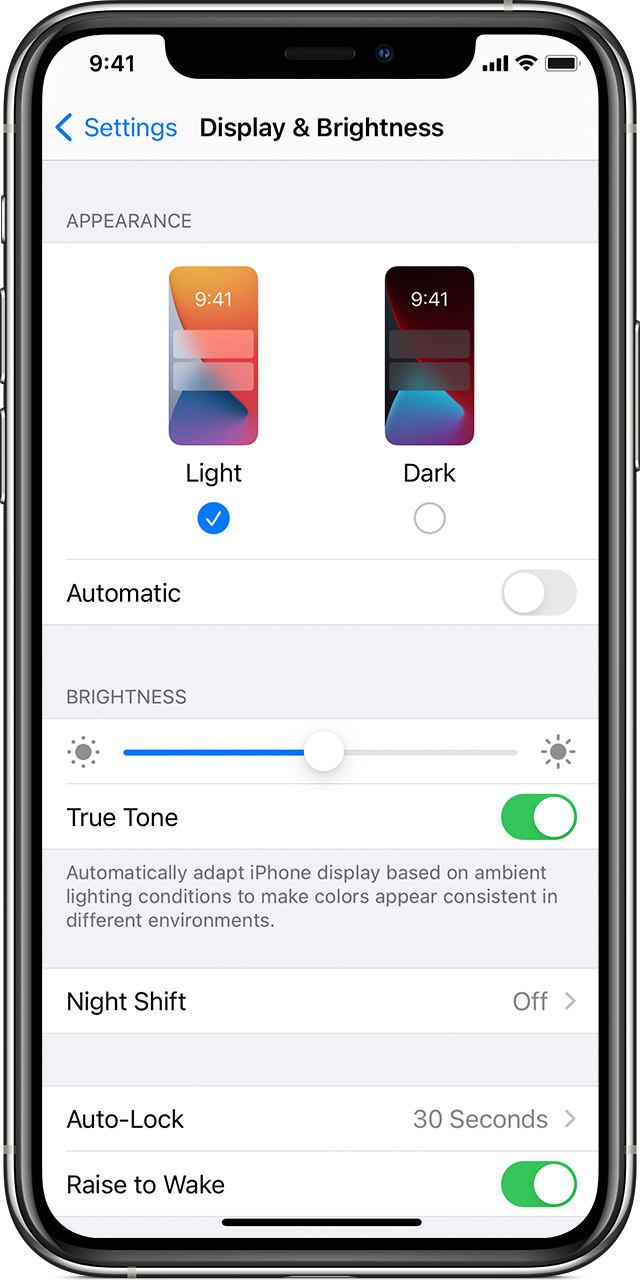
Adjust brightness and color temperature in Settings
- Go to Settings > Display & Brightness.
- Drag the slider to the right or left to adjust the brightness.
From here, you can turn on Dark Mode, which is designed to make the screen easier on your eyes. Dark Mode uses a dark color scheme that works system wide, including with the apps that come with your device and with many third-party apps.
True Tone,* which is on by default, uses advanced sensors to adjust the color and intensity of your display to match the ambient light, so that images appear more natural.
If you turn off True Tone, the display keeps color and intensity constant, regardless of changes in the ambient light.
You can also turn on Night Shift, which adjusts the colors of your display to the warmer end of the spectrum—making the display easier on your eyes. To adjust the color temperature to be warmer or colder, go to Settings > Display & Brightness > Night Shift and use the color-temperature slider.
Some display accessibility settings, including Invert Colors, Grayscale, and Increase Contrast, might turn off True Tone.
About brightness levels
iOS devices use an ambient light sensor to adjust brightness levels based on the light conditions around you. The sensor lowers brightness in dark locations and raises brightness in light locations. The auto-brightness feature is on by default.
When auto-brightness is on, you’ll notice that the brightness slider on your device moves according to changing light conditions.
You can turn auto-brightness on or off in Settings > Accessibility > Display & Text Size. To reset the auto-brightness settings, turn off auto-brightness and then turn it back on.
iPod touch doesn’t support the auto-brightness feature.
Learn more
- Brightness can affect battery life. To maximize battery life, let auto-brightness adjust your display or dim your screen.
- Use Night Shift to adjust the colors of your display.
- Learn what to do if your display won’t turn on or if you have other screen issues.
* You can use True Tone with these devices: iPhone 8 and later, iPad Pro 12.9-inch (3rd generation), iPad Pro 11-inch, iPad Pro 12.9-inch (2nd generation), iPad Pro 10.5-inch, iPad Pro (9.7-inch), iPad Air (3rd generation), and iPad mini (5th generation).
Источник


