- Использование Google FireBase для создания простого чата на Android
- Создание базового шаблона Firebase
- Главный Экран
- MainActivityPresenter:
- Экран регистрации
- Interactor:
- Экран входа в систему
- Что происходит, когда пользователь нажимает Вход в систему?
- Экран чата
- Adapter
- Presenter:
- Interactor:
- Как это работает, шаг за шагом.
- Вывод:
- How to Create an Android Chat App Using Firebase
- Prerequisites
- 1. Create an Android Studio Project
- 2. Add Dependencies
- 3. Define Layouts
- 4. Handle User Authentication
- Step 1: Handle User Sign-In
- Step 2: Handle User Sign-Out
- 5. Create a Model
- 6. Post a Chat Message
- 7. Display the Chat Messages
- Make an Android Chat App With CodeCanyon Templates
- 1. FireApp Chat: Android Chatting App With Groups
- 2. YooHoo: Android Chatting App With Voice and Video Calls
- 3. Plax: Android Chat App With Voice and Video Calls
- Find Even More Android App Templates and Resources
- Conclusion
Использование Google FireBase для создания простого чата на Android
Создание базового шаблона Firebase
Я не буду вдаваться в подробности создании учетной записи в Firebase, а также о «5-минутном быстром запуске», я просто пойду прямо в реализацию.
Сначала мы рассмотрим, какие каталоги нам нужны в нашем шаблоне Firebase, например — Firebase создает пользователей в отдельной базе данных, а при создании хранимой информации — это электронное письмо, пароль (который вы не можете наблюдать напрямую) и уникальный UID (случайно сгенерированный ключ, который придерживается пользователем в течение всего его жизненного цикла), поэтому, если мы хотим сохранить имя пользователя, у нас не получилось бы. Вот почему нам нужен «Users» в качестве каталога в нашем шаблоне, который будет содержать имя пользователя и, возможно, аватар, чтобы мы могли хранить определенную конкретную информацию.
У нас также может быть каталог с именем curentUsers, который будет содержать всех пользователей, которые в настоящее время вошли в наше приложение для чата. Нам определенно нужна папка «Сообщения» для хранения наших сообщений.
Итак, наши три каталога — это Users, currentUsers, Messages…
Ссылки на них выглядят следующим образом:
«https: // / currentUsers /»
«https: // / Users /»
«https: // / messages /»
Это ссылки на каталоги, которые мы используем, когда хотим добавлять / извлекать данные, и в основном все, что нам понадобится для работы системы пользователей и сообщений.
Перейдем к реальному разговору с Android. Если вы импортировали зависимость Firebase в Gradle, у вас должны быть доступны все функции клиента Firebase… В нашем чат-приложении будет четыре экрана:
- Главный экран для выбора параметра входа (Вход или Регистрация) и отображение количества зарегистрированных пользователей
- Вход для аутентификации пользователя
- Экран регистрации, в котором мы создаем новый экран « Users — Chat» (который может отображать фрагмент чата или фрагмент ListOfUsers)
Главный Экран
Здесь мы ищем ту точку входа, которую хочет пользователь (зарегистрировать или войти в систему), и отобразим количество текущих пользователей в TextView.
MainActivityPresenter:
Что здесь происходит? В взаимодействии у нас есть ссылка Firebase, чей конструктор-параметр является ссылкой (каталог currentUsers), и мы добавляем слушателя к ссылке, которая отправляет один запрос в каталог Firebase currentUsers и получает DataSnapshot — специальную функцию Firebase… Снимок по существу представляет собой список всех объектов данных в указанном каталоге, поэтому, если мы делаем dataSnapshot.getChildrenCount (), мы просто получаем количество объектов, находящихся в данный момент в каталоге, что равно числу пользователей онлайн! Мы показываем его в TextView, и пользователь видит, сколько его сверстников в сети. Довольно простой, но мощный, поскольку мы используем этот принцип запросов данных во всех аспектах общения с нашей Firebase.
Экран регистрации
Мы видели код для главного экрана в предыдущем разделе, но вот как он выглядит. Кроме того, нажав Register, мы пройдем через трехэтапный процесс, сначала выберем Username, которое, если оно отобразится, отображает ошибку, в противном случае мы перейдем к фрагменту Emoji, в котором мы выберем наш собственный «аватар», затем перейдем к учетной записи подробный экран, в котором мы завершаем нашу регистрацию, если не отправлено электронное письмо, и в этом случае мы также получаем ошибку, так что вот экраны:
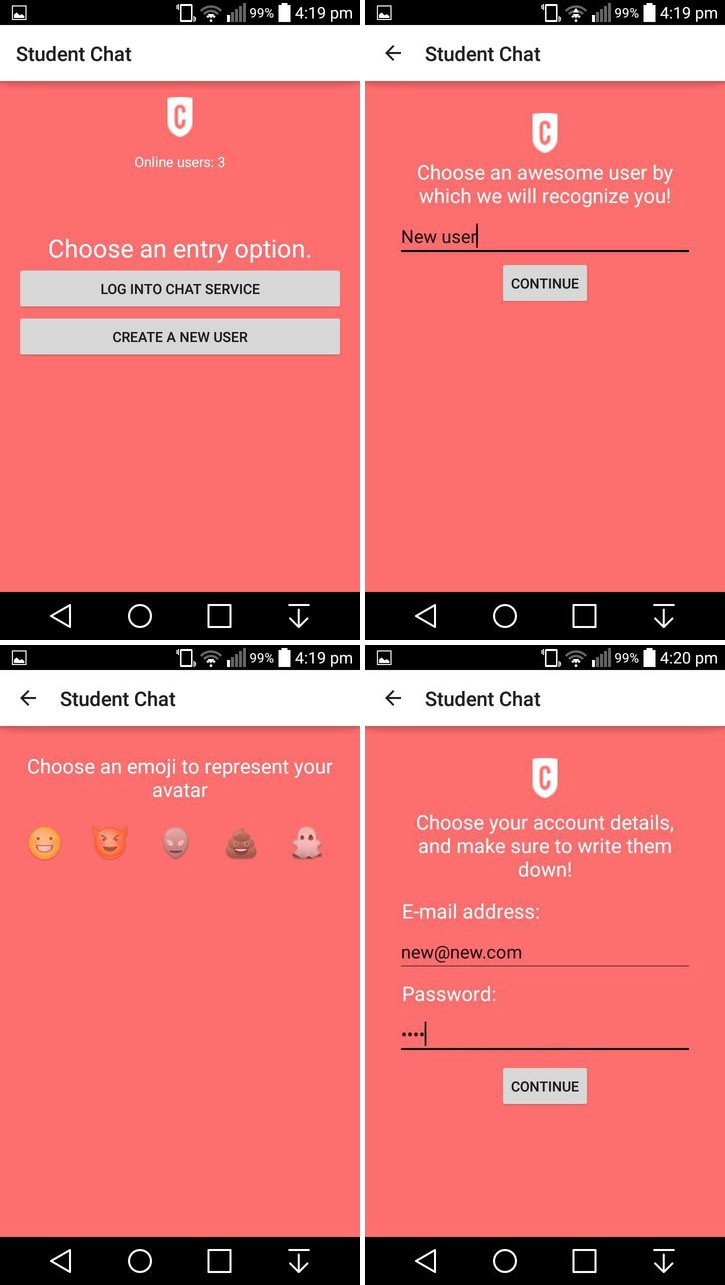
У нас есть несколько простых EditTexts, один для Username, один для E-mail и один для Password’a. Сетка из emoji на выбор (в настоящее время одна строка добавит больше) и индикатор выполнения для отображения анимацию вращения во время проверки подлинности. Кнопка «Регистр» принимает значения, объединенные в «Фрагменты», и отправляет их в презентатор:
Interactor:
Здесь у нас есть несколько новых возможностей:
— .createUser (), .push () и методы .setValue ()
— пользовательский UID
.createUser () — создает пользователей! В отдельной базе данных, поэтому, когда мы создаем пользователя, нам также нужно создать его объект в каталоге / Users (чтобы посмотреть его).
Это делается нажатием «Pushing». Указанный .push () «толкает» глубже в каталог, создавая подкаталог со случайным сгенерированным ключом для его имени, но до этого мы присоединяем UID к ссылке, поэтому мы можем сравните каталоги с UID пользователей. UID является случайным образом генерируемым ключом и, используя его как имя подкаталога (и параметр в объекте User), мы можем позже определить, какое имя пользователя соответствует определенному UID, и получить имя пользователя после входа в систему или даже удалить Child of currentUsers (выводит пользователя из системы).
Метод .setValue () добавляет объект (или объекты) в каталог, поэтому мы можем просто хранить любые данные, которые мы хотим.
Экран входа в систему
Интерфейс экрана входа в систему довольно прост: два EditTexts (адрес электронной почты и пароль) и кнопка входа в систему, а также панель индикаторов выполнения, чтобы немного оживить процесс.
Что происходит, когда пользователь нажимает Вход в систему?
Эта часть сложна, мы знаем, что наши пользователи находятся в отдельной базе данных, поэтому, когда мы регистрируем пользователя, как нам узнать, по какому имени пользователя он или она идет?
Вот вся цель каталога / Users, как упоминалось ранее. Также, назвав его после пользовательского UID, мы можем просто искать каталог с соответствующим UID (если, например, мы хотим экстраполировать определенные части информации от конкретного пользователя). Также, если мы назовем объекты UID, мы можем ввести объект с указанным UID и удалить его в onTestroy () активности чата — очень простой способ регистрации пользователя.
Он получает электронное письмо и пароль, показывает полосу прокрутки до тех пор, пока запрос не будет завершен, и вызовет методы «Вид», учитывая результат:
- Успешный вход в систему отправляет имя пользователя пользователя, а UID — в намерение, в котором запускается вход в систему ChatActivity — Failed предупреждает пользователя с помощью Toast.
Если аутентификация пользователя прошла успешно, мы получаем имя пользователя для указанного юзера и отправляем ее на экран чата, но до этого мы добавляем пользователя в каталог / currentUsers, чтобы мы могли просто видеть, кто вошел в систему. Получен AuthData по умолчанию и служит для отображения некоторых конкретных данных Firebase о пользователе (например, UID, специальный ключ, сгенерированный аутентификацией ..)
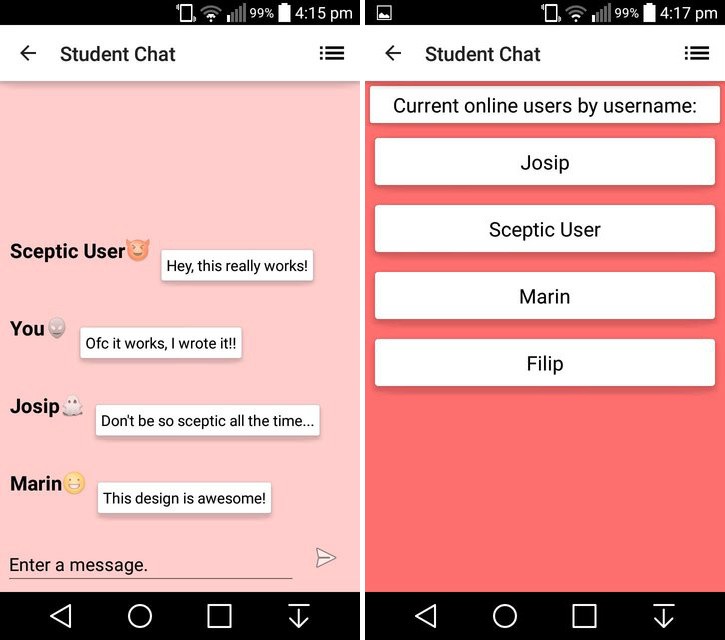
Экран чата
В ChatActivity используются 2 фрагмента, один для службы обмена сообщениями, и один для отображения списка активных пользователей. Нажав на значок меню меню один раз, мы заменим фрагмент сообщений фрагментом списка, и, щелкнув его еще раз, мы выставим BackStack (и вернемся!).
Проблема здесь в том, что мы получаем все наши данные от Firebase, то есть мы не можем реализовать Firebase в наших представлениях, но адаптеры ListView / RecyclerView также являются компонентами Android View, так как мы здесь продолжаем?
Ответ еще раз — MVP (+ Interactors)! Хорошая архитектура отражает себя в компонентах, которые она реализована, что означает, что мы также можем написать наши адаптеры в MVP, являющиеся компонентом «Вид», в которых есть презентатор, который отправляет новые значения в элементы ListView (и запрашивает указанные значения из Interactor), Поскольку значения генерируются Interactor, который имеет ссылку на Firebase — мы можем отделить Android от Java — от Backend.
Adapter
Это очень просто, у нас есть метод, который раздувает наш ViewHolder, который заполняет упомянутый держатель, метод запроса сообщений от Firebase и тот, который добавляет сообщение в ArrayList, если есть новое сообщение для отображения.
Presenter:
Interactor:
Адаптеру требуется новое сообщение, оно сообщает Presenter’у запрашивать сообщения, но это не работа Presenter’а, поэтому он сообщает Interactor запросить их у Firebase, сделав это, мы имеем чистую структуру и поток данных, полностью независимый, поэтому изменив представление, нам не нужно все менять, мы просто настраиваем POJO данных, докладчикам и интеракторам не нужно менять то, что они делают, запросы остаются неизменными! Поэтому, если мы переключим количество данных, просто добавьте больше полей в POJO, если мы хотим отобразить их по-другому, просто измените представление (добавив больше виджетов).
Запрос просто означает запрос, .orderByValue () означает, что мы получаем объекты (значения) там, .limitToLast (100) означает, что мы всегда получаем последние 100 сообщений. Хотя если чат активен некоторое время, все сообщения (даже после 100) будут отображаться до тех пор, пока фрагмент сообщения не будет уничтожен / перезапущен.
Также в нашем onDestroy ChatActivity мы отправляем UID интерактору (через Present’атора), чтобы удалить пользователя из currentUsers (выйдите из него).
Как это работает, шаг за шагом.
Библиотека Firebase для Android очень хорошо построена, документация немного сложна для понимания, но основные принципы легко получить, если вы копаете и пытаетесь объединить вещи.
— Ссылка на Firebase — это просто ссылка на каталог, в который вы хотите внести изменения, запросы или просто добавить новые данные .
Слушатели дают нам «Rx-like» функции, они постоянно наблюдают за добавлением новых пользователей (каждый объект в каталог является дочерним), и мы можем работать с их данными.
DataSnapshot — это список текущих значений в одном каталоге.
AuthData похожа на Bundle всех данных для определенного пользователя / запроса, UID, уникальный ключ…
- Firebase использует разбор Джексона, поэтому вашим POJO нужны пустые конструкторы, а для генерации — сеттеры
- вам действительно не нужны специальные клиенты REST, так как функция DataSnapshot может выполнять весь синтаксический анализ данных с помощью .getValue (POJO.class)
- В реальном времени… Все запросы и нажатия на Firebase чрезвычайно быстрые, поскольку все данные отформатированы как объекты JSON.
Прежде чем использовать какие-либо ссылки на вашу Firebase, вы должны вызвать Firebase.setAndroidContext (this) в каждом методе onCreate ()
Вывод:
Firebase — чрезвычайно мощный инструмент для простых баз данных Backend, он очень быстр и прост в использовании на небольших проектах, но может использоваться даже для более сложных приложений, подобных этому чат-приложению.
Это кросс-платформа, поэтому вы можете создавать приложения Firebase для Android, iOS и JS с полной поддержкой (JS поддерживает Angular, React и Node, я считаю) и использовать один шаблон Firebase на всех трех основных платформах.
Источник
How to Create an Android Chat App Using Firebase
With Firebase, creating real-time social applications is a walk in the park. And the best thing about it: you don’t have to write a single line of server-side code.
In this tutorial, I’ll show you how to leverage FirebaseUI to create a group chat app you can share with your friends. It’s going to be a very simple Firebase chat app example with just one chat room, which is open to all users.
As you might have guessed, the app for Android chat will depend on Firebase Auth to manage user registration and sign-in. It will also use Firebase’s real-time database to store the group chat messages.
Prerequisites
To be able to follow this step-by-step Android chat app tutorial, you’ll need the following:
- The latest version of Android Studio
- A Firebase account
Do you need instructions on how to set up a Firebase account and get ready for Firebase development in Android Studio? See my tutorial Get Started With Firebase for Android here on Envato Tuts+.


Now that you’re set up, you’re ready to learn how to create a chat application in Android using Android Studio. Let’s get started!
1. Create an Android Studio Project
Fire up Android Studio and create a new project with an empty activity called MainActivity for the Firebase chat app example.


To configure the project to use the Firebase platform, open the Firebase Assistant window by clicking on Tools > Firebase.
While using the Firebase platform, it’s usually a good idea to add Firebase Analytics to the project. Therefore, inside the Firebase Assistant window, go to the Analytics section and press Log an Analytics event.


Next, press the Connect to Firebase button and make sure that the Create new Firebase project option is selected. Once the connection is established, press the Add Analytics to your app button.


At this point, the Android Studio project is integrated with Firebase Analytics and ready to use with all other Firebase services.
2. Add Dependencies
We’ll be using two libraries in this Android chat app code project: FirebaseUI and the Android design support library. Therefore, open the build.gradle file of the app module and add the following compile dependencies to it:
Press the Sync Now button to update the project.
3. Define Layouts
The activity_main.xml file, which is already bound to MainActivity , defines the contents of the home screen of the app. In other words, it will represent the chat room.
Like most other group chat apps available today, our Firebase chat room Android app will have the following UI elements:
- a list that displays all the group chat messages in chronological order
- an input field where the user can type in a new message
- a button the user can press to post the message
Therefore, activity_main.xml must have a ListView , an EditText , and a FloatingActionButton . After placing them all inside a RelativeLayout widget, your layout XML should look like this:
Note that I’ve placed the EditText widget inside a TextInputLayout widget. Doing so adds a floating label to the EditText , which is important if you want to adhere to the guidelines of material design.
Now that the layout of the home screen is ready, we can move on to creating a layout for the chat messages, which will be items inside the ListView . Start by creating a new layout XML file called message.xml, whose root element is RelativeLayout .
The layout must have TextView widgets to display the chat message’s text, the time it was sent, and its author. You’re free to place them in any order. Here’s the layout I’ll be using:
4. Handle User Authentication
Allowing users to anonymously post messages to the chat room would be a very bad idea. It could lead to spam, security issues, and a less than ideal chatting experience for the users. Therefore, let us now configure our Firebase chat app example such that only registered users can read and post messages.
Start by going to the Auth section of the Firebase Console and enabling Email/Password as a sign-in provider.


Feel free to enable OAuth 2.0 sign-in providers as well. However, FirebaseUI v0.6.0 seamlessly supports only Google Sign-In and Facebook Login.
Step 1: Handle User Sign-In
As soon as the app for Android chat starts, it must check if the user is signed in. If so, the app should go ahead and display the contents of the chat room. Otherwise, it must redirect the user to either a sign-in screen or a sign-up screen. With FirebaseUI, creating those screens takes a lot less code than you might imagine.
Inside the onCreate() method of MainActivity , check if the user is already signed in. To do this, check if the current FirebaseUser object is not null . If it’s null , you must create and configure an Intent object that opens a sign-in activity. To do so, use the SignInIntentBuilder class. Once the intent is ready, you must launch the sign-in activity using the startActivityForResult() method.
Note that the sign-in activity also allows new users to sign up. Therefore, you don’t have to write any extra code to handle user registration.
Add the following code to the onCreate() method:
As you can see in the above code, if the user is already signed in, we first display a Toast welcoming the user, and then call a method named displayChatMessages. For now, just create a stub for it. We’ll be adding code to it later.
Once the user has signed in, MainActivity will receive a result in the form of an Intent . To handle it, you must override the onActivityResult() method.
If the result’s code is RESULT_OK , it means the user has signed in successfully. If so, you must call the displayChatMessages() method again. Otherwise, call finish() to close the app.
At this point, you can run the app and take a look at the sign-in and sign-up screens.


Step 2: Handle User Sign-Out
By default, FirebaseUI uses Smart Lock for Passwords. Therefore, once the users sign in, they’ll stay signed in even if the app is restarted. To allow the users to sign out, we’ll now add a sign-out option to the overflow menu of MainActivity .
Create a new menu resource file called main_menu.xml and add a single item to it, whose title attribute is set to Sign out. The contents of the file should look like this:
To instantiate the menu resource inside MainActivity , override the onCreateOptionsMenu() method. Then call the inflate() method of the MenuInflater object.
Next, override the onOptionsItemSelected() method to handle click events on the menu item. Inside the method, you can call the signOut() method of the AuthUI class to sign the user out. Because the sign-out operation is executed asynchronously, we’ll also add an OnCompleteListener to it.
Once the user has signed out, the app should close automatically. That’s the reason why you see a call to the finish() method in the code above.
5. Create a Model
In order to store the chat messages in the Firebase real-time database, you must create a model for them. The layout of the chat message, which we created earlier in this tutorial, has three views. To be able to populate those views, the model too must have at least three fields.
Create a new Java class called ChatMessage.java and add three member variables to it: messageText , messageUser , and messageTime . Also, add a constructor to initialize those variables.
To make the model compatible with FirebaseUI, you must also add a default constructor to it, along with getters and setters for all the member variables.
At this point, the ChatMessage class should look like this:
6. Post a Chat Message
Now that the model is ready, we can easily add new chat messages to the Firebase real-time database.
To post a new message, the user will press the FloatingActionButton . Therefore, you must add an OnClickListener to it.
Inside the listener, you must first get a DatabaseReference object using the getReference() method of the FirebaseDatabase class. You can then call the push() and setValue() methods to add new instances of the ChatMessage class to the real-time database.
The ChatMessage instances must, of course, be initialized using the contents of the EditText and the display name of the currently signed-in user.
Accordingly, add the following code to the onCreate() method:
Data in the Firebase real-time database is always stored as key-value pairs. However, if you observe the code above, you’ll see that we’re calling setValue() without specifying any key. That’s allowed only because the call to the setValue() method is preceded by a call to the push() method, which automatically generates a new key.
7. Display the Chat Messages
FirebaseUI has a very handy class called FirebaseListAdapter. It dramatically reduces the effort required to populate a ListView using data present in the Firebase real-time database. We’ll be using it now to fetch and display all the ChatMessage objects that are present in the database.
Add a FirebaseListAdapter object as a new member variable of the MainActivity class.
Inside the displayChatMessages() method, initialize the adapter using its constructor. It expects the following arguments:
- a reference to the Activity
- the class of the object you’re interested in
- the layout of the list items
- a DatabaseReference object
FirebaseListAdapter is an abstract class and has an abstract populateView() method, which must be overridden.
As its name suggests, populateView() is used to populate the views of each list item. If you’re familiar with the ArrayAdapter class, you can think of populateView() as an alternative to the getView() method.
Inside the method, you must first use findViewById() to get references to each TextView that’s present in the message.xml layout file. You can then call their setText() methods and populate them using the getters of the ChatMessage class.
At this point, the contents of the displayChatMessages() method should like this:
The group chat app is ready. Run it and post new messages to see them pop up immediately in the ListView . If you share the app with your friends, you should be able to see their messages too as soon as they post them. As you can see, this simple chat app using Firebase works well and is easy to use.
Make an Android Chat App With CodeCanyon Templates
Creating a full Firebase chat app from scratch can be a time-consuming process. Thankfully, you can find well-made Android chat app code templates that will save you hours of work. Here are just a few options that you can find on CodeCanyon, part of Envato Market.
1. FireApp Chat: Android Chatting App With Groups
FireApp Chat is an Android chat app code template for anyone looking to create a platform that’s filled with features. This template not only supports chat, but voice and video calls as well. Users get real-time updates about typing, recording, sent messages, and more. It’s a great option for a chat app using Firebase.


2. YooHoo: Android Chatting App With Voice and Video Calls
With video calling, group chatting, and extensive media sharing, YooHoo is a Firebase chat app worth buying. The real-time functionality makes it a smooth experience for users. YooHoo also supports more than 30 languages, letting you create an inclusive experience for all.


3. Plax: Android Chat App With Voice and Video Calls
Plax is an Android chat app using Firebase with a familiar, modern design. It includes useful features like:
- full dark mode
- in-app notifications
- media attachments
- SMS user verification
- powerful admin panel
You can easily manage users and app statistics from Firebase. Overall, this Android code is designed for a complete chat application experience for you and your users.


Find Even More Android App Templates and Resources
If you’re looking at making more than a chat app in Android, you’ll want to have the best tutorials and articles in your corner. That’s where Envato Tuts+ has you covered! Keep improving your coding skills and develop all types of projects with these cool templates and guides.


Conclusion
In this tutorial, you learned how to use Firebase and FirebaseUI to create a very simple group chat application. You also saw how easy it is to work with the classes available in FirebaseUI to quickly create new screens and implement complex functionality.
To learn more about Firebase and FirebaseUI, do refer to the official documentation. Or check out some of our other Firebase tutorials here on Envato Tuts+!
Источник


