- Current Location Android Kotlin With Latitude Longitude Programmatically
- Download Source Code For Current Location Android Kotlin Example
- Step 1. New Project
- Step 2. Updating build.gradle(Module:app)
- Step 3. Interfaces
- Step 4. Required instances
- Step 5. Updating onCreate()
- Step 6. Overriding methods
- Step 7. Adding permissions
- vishnuharidas / GpsTracker.kt
- Check gps enabled android kotlin
- Получить местоположение Android Kotlin
- 6 ответов
Current Location Android Kotlin With Latitude Longitude Programmatically
It is necessary to find C urrent Location Android Kotlin latitude longitude programmatically when you are developing location-based applications.
For example, when finding restaurants near by you, you need your current location, latitude and longitude.
In C urrent Location Android Kotlin example tutorial, you will learn to get current latitude and longitude of Android device.
We will use Google’s FusedLocationAPI for getting current location latitude longitude.
Following is the output of C urrent Location Android Kotlin example tutorial programmatically:
Download Source Code For Current Location Android Kotlin Example
Step 1. New Project
Create a new project in Android Studio. Select your first activity as empty activity.
Step 2. Updating build.gradle(Module:app)
In build.gradle(Module:app) file add this:
Above lines will add necessary classes for integrating various google services like GPS, push notification , google map etc.
Step 3. Interfaces
Implement required interfaces
Step 4. Required instances
Step 5. Updating onCreate()
Put following in onCreate() function:
Step 6. Overriding methods
Override necessary methods.
Step 7. Adding permissions
Last but not least, put required permissions in AndroidManifest.xml:
If you are targeting marshmallow and after versions (targetSdkVersion >=23) then you have to check for run-time permissions.
Now full source code:
AndroidManifest.xml
build.gradle(Module:app)
Step 7. Full Source code for MainActivity.
activity_main.xml
MainActivity.kt
In above class, there is a method
This method is used to check whether location service is on or off in your phone. If off, then it will pop up one dialog, which will take the user to settings to enable location service.
After following all the steps, you should be able get current location in terms of latitude and longitude with kotlin source code.
Источник
vishnuharidas / GpsTracker.kt
This file contains bidirectional Unicode text that may be interpreted or compiled differently than what appears below. To review, open the file in an editor that reveals hidden Unicode characters. Learn more about bidirectional Unicode characters
| import android.annotation.SuppressLint |
| import android.app.Notification |
| import android.app.NotificationChannel |
| import android.app.NotificationManager |
| import android.app.Service |
| import android.content.BroadcastReceiver |
| import android.content.Context |
| import android.content.Intent |
| import android.content.IntentFilter |
| import android.graphics.Color |
| import android.location.Location |
| import android.os.Build |
| import android.os.IBinder |
| import android.util.Log |
| import androidx.annotation.RequiresApi |
| import androidx.core.app.NotificationCompat |
| import com.google.android.gms.location.* |
| /* |
| * start: startService(GpsTrackerService.getIntent(this@Your_Activity_Name)) |
| * stop: GpsTrackerService.stopTracking(this@Your_Activity_Name) |
| * |
| * To count distance, keep a singleton and add the calculated distance into it. For example, |
| * DistanceTracker.totalDistance += calculatedDistance |
| */ |
| object DistanceTracker < |
| var totalDistance : Long = 0L |
| > |
| class GpsTrackerService : Service () < |
| private var startId = 0 |
| private lateinit var locationCallback : LocationCallback |
| private lateinit var fusedClient : FusedLocationProviderClient |
| private var lastLocation : Location ? = null |
| private val actionReceiver = object : BroadcastReceiver () < |
| override fun onReceive ( context : Context ? , intent : Intent ? ) < |
| when (intent?.extras?.getString( ACTION_NAME )) < |
| ACTION_STOP_TRACKING -> stopTrackingService() |
| > |
| > |
| > |
| companion object < |
| private const val GPS_ACTION = » GPS_ACTION « |
| private const val ACTION_NAME = » ACTION_NAME « |
| const val ACTION_START_TRACKING = » ACTION_START_TRACKING « |
| const val ACTION_STOP_TRACKING = » ACTION_STOP_TRACKING « |
| fun getIntent ( context : Context ) = Intent (context, GpsTrackerService :: class .java) |
| fun stopTracking ( context : Context ) = |
| context.sendBroadcast( Intent ( GPS_ACTION ). apply < putExtra( ACTION_NAME , ACTION_STOP_TRACKING ) >) |
| > |
| override fun onBind ( intent : Intent ? ): IBinder ? < |
| TODO ( » not implemented » ) |
| > |
| override fun onStartCommand ( intent : Intent ? , flags : Int , startId : Int ): Int < |
| DistanceTracker .totalDistance = 0L |
| this .startId = startId |
| startForeground(startId, getNotification()) |
| startLocationTracking() |
| registerReceiver(actionReceiver, IntentFilter ( GPS_ACTION )) |
| return super .onStartCommand(intent, flags, startId) |
| > |
| override fun onDestroy () < |
| kotlin.runCatching |
| super .onDestroy() |
| > |
| private fun stopTrackingService () < |
| stopForeground( true ) |
| stopLocationTracking() |
| stopSelf(startId) |
| > |
| // Do the permissions stuff before starting this service. |
| @SuppressLint( » MissingPermission » ) |
| private fun startLocationTracking () < |
| val locationRequest = LocationRequest (). apply < |
| priority = LocationRequest . PRIORITY_HIGH_ACCURACY |
| interval = 5000 |
| smallestDisplacement = 10.0F |
| > |
| locationCallback = object : LocationCallback () < |
| override fun onLocationResult ( result : LocationResult ? ) < |
| result?. let < |
| if (lastLocation == null ) < |
| lastLocation = it.lastLocation |
| return @let |
| > |
| it.lastLocation?. let |
| val distanceInMeters = its_last.distanceTo(lastLocation) |
| DistanceTracker .totalDistance + = distanceInMeters.toLong() |
| if ( BuildConfig . DEBUG ) < |
| Log .d( » TRACKER » , » Completed: $ |
| > |
| > |
| lastLocation = it.lastLocation |
| > |
| super .onLocationResult(result) |
| > |
| > |
| fusedClient = LocationServices .getFusedLocationProviderClient( this ) |
| fusedClient.requestLocationUpdates(locationRequest, locationCallback, null ) |
| > |
| private fun stopLocationTracking () < |
| fusedClient.removeLocationUpdates(locationCallback) |
| > |
| private fun getNotification (): Notification ? < |
| val channelId = if ( Build . VERSION . SDK_INT >= Build . VERSION_CODES . O ) < |
| createNotificationChannel( » gps_tracker » , » GPS Tracker » ) |
| > else < |
| // If earlier version channel ID is not used |
| // https://developer.android.com/reference/android/support/v4/app/NotificationCompat.Builder.html#NotificationCompat.Builder(android.content.Context) |
| » « |
| > |
| val b = NotificationCompat . Builder ( this , channelId) |
| b.setOngoing( true ) |
| .setContentTitle( » Currently tracking GPS location. » ) |
| .setSmallIcon( R .mipmap.ic_launcher) |
| return b.build() |
| > |
| @RequiresApi( Build . VERSION_CODES . O ) |
| private fun createNotificationChannel ( channelId : String , channelName : String ): String < |
| val chan = NotificationChannel (channelId, channelName, NotificationManager . IMPORTANCE_NONE ) |
| chan.lightColor = Color . BLUE |
| chan.lockscreenVisibility = Notification . VISIBILITY_PUBLIC |
| val service = getSystemService( Context . NOTIFICATION_SERVICE ) as NotificationManager |
| service.createNotificationChannel(chan) |
| return channelId |
| > |
| > |
You can’t perform that action at this time.
You signed in with another tab or window. Reload to refresh your session. You signed out in another tab or window. Reload to refresh your session.
Источник
Check gps enabled android kotlin

GPS location tracker works with the help of Google Play services, which facilitates adding location awareness to an application with automated location tracking, geofencing, and activity recognition that returns a location object. The location object represents a geographic location which consists of latitude, longitude, timestamp, and other information.
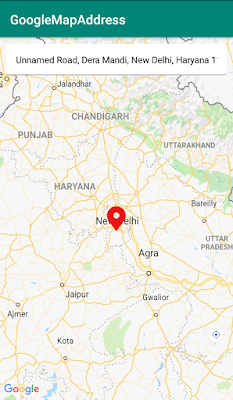
In this post, we’ll show you how can use GPS location to get the address of a place. The sample app we will build first get latitude and longitude of your location and display address. When you move the camera of google map. It will display the address of another location that is the center of google map. The final output of example will look like below:

So, let’s start the development of this sample with the help of following steps.
Creating a new Project
1. Create a new project in Android Studio from File ⇒ New Project and select Basic Activity from templates. I have given my package name as com.devlibs.googlemapaddress.
2. Open app/build.gradle and add the following dependencies.
here, we using easypermissions to handle run time google map permission.
3. The next step is to add the permissions in the Android Manifest to request user’s locations. We will use the location permission later when we request for your location. For that, you need to add ACCESS_FINE_LOCATION and ACCESS_COARSE_LOCATION permission. Here, you can see complete required changes in mainfest.xml.
4. Now create an intent service FetchAddressIntentService.kt to get the address by passing latitude and longitude of a location. As you can see above, we have added it in the application manifest.xml file. The definition of this file has explained in the file with the help of yellow color.
as you see above, the deliverResultToReceiver method returning an address of latitude and longitude.
5. Here, we have the main code snippet of this project. We have created GPSTrackerPresenter.kt file. It is a util class that tracks your location on given param. You can set minimum time and distance. The minimum duration and distance is a type of filter to avoid your location callback functions from being called too frequent.
- Minimum time of 1000 milliseconds means, after getting a location, you are going to get next location from the LocationManager roughly after 1000 milliseconds .
- The minimum distance of 1-meter means, after getting a location, you are getting next location after you have moved roughly 1-meter.
These two filters are combined inside the LocationManager in the way you are going to get a location after “one of the” two conditions are filled.
For example:- If you are standing up and not moving, the new location is obtained after 1 second even though you’ve not moved 1 meter yet. On the other hand, if you are running fast, you are getting a new location after you’ve moved 1 meter even though you’ve moved 1 meter within 0.5 seconds.
Here, we have a complete GPS location tracker class that we have defined inside the class with the help of yellow color.
6. Now, we are going to create a user interface to display the location that will be returned by the API. Once you get location, we’ll start our service to get the address as shown above. Open the layout file of your main activity (activity_main.xml) and add the below code to achieve the layout.
7. Now open MainAcitivty.kt file and write google map initialization code and handle GPS location object to get an address. As shown above.
Finally, merge all code and run the application. If our user does not grant permission to access fine location or coarse location, our app will request this permission and enabled their location services for our app.
If you have followed the article carefully, you can see the app running very smoothly as shown in the above. But if you face any problem.
Источник
Получить местоположение Android Kotlin
Я недавно добавил функцию определения местоположения. Когда я пытаюсь показать долготу и широту, он возвращает ноль.
Это мой класс LocationListener:
И это моя функция GetUserLocation:
И это моя функция, чтобы вернуть мою долготу и широту:
6 ответов
Когда GetUserLocation возвращается, locationManager выходит из области видимости и, по-видимому, уничтожается, препятствуя вызову onLocationChanged и предоставляя обновления.
Кроме того, вы определили mylocation внутри GetUserLocation , так что это также выходит за рамки и дополнительно убивает любой шанс или ваше получение обновления.
Вы не показали, где и как объявляется внешний mylocation (за пределами GetUserLocation ), но как бы он ни объявлялся, он скрывается тем, что внутри GetUserLocation . Так что вы не получаете много.
Вот пример того, как вы можете это сделать. (Переменная thetext определена в макете XML и доступна с помощью расширений Kotlin.)
Я прочитал много ответов, но вопрос — получить только последнее известное местоположение. С приемником он постоянно отправляет широту и долготу, у меня есть решение для этого в kotlin .. Дайте разрешения
В 2019 году лучшее официальное решение в Котлине
Google API Client / FusedLocationApi устарели, а Location Manager вообще бесполезен. Поэтому Google предпочитает объединенный провайдер определения местоположения, используя API определения местоположения сервисов Google Play «FusedLocationProviderClient» используется для определения местоположения и его лучшего способа экономии заряда аккумулятора и точности
Вот пример кода в kotlin для получения последнего известного местоположения / одноразового местоположения (эквивалент текущего местоположения)
Если ваше приложение может постоянно отслеживать местоположение, вы должны получать обновления получения местоположения .
Проверьте образец для этого в kotlin
Убедитесь, что вы позаботились о разрешении Mainfaist и разрешении времени выполнения для местоположения
И для Gradle добавить это
Для более подробной информации следуйте этим официальным документам
Получить местоположение с адресом в Android Kotlin
Добавьте эту строку в зависимости
Добавьте это в AndroidManifest
Скопируйте этот код ниже в свой класс
Запустите свой код и проверьте журнал, Happy Coding
Я знаю, что уже поздно, но теперь Google упростил использование. На сайте разработчика написано, что вам нужно создать клиента:
Тогда на создание получим провайдера:
И, наконец, чтобы узнать ваше последнее местоположение, просто позвоните:
* Протестировано с этой реализацией для определения местоположения (настройка в файле приложения вашего приложения)
Для получения дополнительной информации, проверьте эту ссылку:
Я хотел бы помочь кому-то, кто пытается получить местоположение с нуля. Вот ссылка: Получить текущее местоположение Kotlin
Код сначала проверит, включено или выключено местоположение в устройстве, а затем выберет широту и долготу и будет постоянно обновлять его.
Источник


