- Check In, Check Out
- Скачать Check In, Check Out APK для Android — бесплатно — Последняя версия
- Последняя версия
- приложение Check In, Check Out
- How to check your app usage stats an Android device to figure out which apps you spend the most battery, data, and time on
- How to check your app usage on an Android
- Battery life
- Internet and data
- Screen time
- Check In, Check Out
- Скачать Check In, Check Out APK для Android — бесплатно — Последняя версия
- Последняя версия
- приложение Check In, Check Out
- Азбука самостоятельного путешественника
- Пополняем словарный запас — «отельный» словарь для чайников
- Бюджетное жильё — правда или вымысел?
- Ищем номер по карману? Онлайн-поисковики в помощь
- Top questions about check out, check in, and versions
Check In, Check Out
Скачать Check In, Check Out APK для Android — бесплатно — Последняя версия

Последняя версия
| Имя | In-Out APK |
| Версия | 1.2 (10) |
| Обновлено | 16 сент. 2020 г. |
| Разработчик | Imperial College London |
| ID | org.checking.app |
| Количество установок | 10+ |
| Категория | Приложения, Инструменты |
приложение Check In, Check Out
Информирует вас, если пользователи, посещавшие ту же компанию, сообщили о тестировании.
This app has been created by a small team of researchers from Imperial College London on a voluntary basis.
The “Check In Check Out” app is designed for everyday users/customers, and functions with its counterpart app: “Check in Check Out – Business”, which will be downloaded by businesses/venues. As you (Or any “Check in Check Out” user), enter a new business, simply put your phone near the business’ device and tap “Check in”, on the home screen. As you leave, you do the same, and tap “Check out”.
This app will receive a random numerical identifier from the business app when checked in and is stored locally on your device. During the “Check in” and “Check out” process, absolutely no information from your device is being sent to the business app/device, meaning the business/venue cannot track who you are, or determine what other businesses/venues you have been to.
This app can then anonymously inform you, whether anyone who has checked into the same business/venue as you, over the last 14 days has reported a positive test. Additionally, you can report a positive test on the “Check In Check Out” app. This will alert every business you checked into, AND other users who have checked into the same business/venue during overlapping times.
This app is private by design, meaning it is not possible to compromise any of your personal information, as we do not collect any. This app will never use GPS data.
Источник
How to check your app usage stats an Android device to figure out which apps you spend the most battery, data, and time on
Your Android device probably has a lot of apps, and each of these apps uses resources like battery power and wireless data.
You have a few simple tools for tracking these kinds of app usage stats, which you can use to decide if you need to uninstall apps that are hogging your phone’s resources.
Various Android devices sometimes label the Settings options differently, so your phone’s Settings might not perfectly match these instructions, but they should be very similar and not difficult to find.
How to check your app usage on an Android
Battery life
Every app uses some amount of battery power. This will let you see what apps are battery hogs.
1. Start the Settings app and tap «Battery.»
2. Tap «Battery Usage.»
3. Make sure you’re on the App tab. You can scroll through the list of apps on your phone and see what percentage of the total battery each of your apps is currently using.
Internet and data
This is useful if you’re using a limited mobile data plan.
1. Start the Settings app and tap «Network & Internet.»
2. Tap «Data Usage.»
3. On the Data usage page, tap «View Details.»
4. You should now be able to scroll through a list of all the apps on your phone, and see how much data each one is using. You can change the time period using the date control at the top of the page and see more details about data usage by tapping on a specific app.
Screen time
This lets you see what your favorite apps are, and how much time you’re spending with them.
1. Start the Settings app and tap «Digital Wellbeing and parental controls.»
2. Tap «Show your data» in the Your Digital Wellbeing tools section at the top of the page.
3. You can see your current app usage statistics front-and-center on the screen. To see a weekly report of your screen time in apps, tap the graph icon at the top right of the screen.
Источник
Check In, Check Out
Скачать Check In, Check Out APK для Android — бесплатно — Последняя версия
Последняя версия
| Имя | In-Out APK |
| Версия | 1.2 (10) |
| Обновлено | 16 сент. 2020 г. |
| Разработчик | Imperial College London |
| ID | org.checking.app |
| Количество установок | 10+ |
| Категория | Приложения, Инструменты |
приложение Check In, Check Out
Информирует вас, если пользователи, посещавшие ту же компанию, сообщили о тестировании.
This app has been created by a small team of researchers from Imperial College London on a voluntary basis.
The “Check In Check Out” app is designed for everyday users/customers, and functions with its counterpart app: “Check in Check Out – Business”, which will be downloaded by businesses/venues. As you (Or any “Check in Check Out” user), enter a new business, simply put your phone near the business’ device and tap “Check in”, on the home screen. As you leave, you do the same, and tap “Check out”.
This app will receive a random numerical identifier from the business app when checked in and is stored locally on your device. During the “Check in” and “Check out” process, absolutely no information from your device is being sent to the business app/device, meaning the business/venue cannot track who you are, or determine what other businesses/venues you have been to.
This app can then anonymously inform you, whether anyone who has checked into the same business/venue as you, over the last 14 days has reported a positive test. Additionally, you can report a positive test on the “Check In Check Out” app. This will alert every business you checked into, AND other users who have checked into the same business/venue during overlapping times.
This app is private by design, meaning it is not possible to compromise any of your personal information, as we do not collect any. This app will never use GPS data.
Источник
Азбука самостоятельного путешественника

Как выбрать хорошее жильё, при этом не потратить на него большую часть зарплаты? В этой статье я расскажу про ключевые особенности для того, чтобы вы поняли «отельную кухню». Также разберемся — как выбрать жильё за границей, если вы планируете путешествие без помощи турагентств.
Пополняем словарный запас — «отельный» словарь для чайников
Необязательно скачивать Duolinguo (да и любые другие языковые обучалки) , пытаясь в спешке подучить иностранный язык перед отъездом. Лучше потратьте время на сборы, а в свободную минутку просмотрите эти слова, которые пригодятся каждому, кто собирается за границу.
Стойка reception в отеле, где происходит check-in и check-out
- Check-in[Чек-ин]. Обозначает заселение в отель, а точнее — процесс регистрации у стойки. Для успешного чек-ина по путёвке вам нужно предъявить паспорт или просто назвать свою фамилию. Если бронировали номер сами, то попросят не только документы, а еще ваучер на заселение.
- Check-out[Чек-аут]. Термин обозначает выселение из отеля. Учтите, что стандартное время чек-аута — 12:00, вне зависимости от того, когда приедет ваш транспорт до аэропорта.
- Reception[Ресепшен] — стойка регистрации в холле отеля (иногда так называют администрацию). Чек-ин и чек-аут проходят именно здесь.
- All inclusive[Ол инклюзив]. Буквально переводится как «всё включено». Значит, что проживание в отеле включает в себя множество других услуг — доступ к бассейну, бару и отельным зонам развлечения, а также питание. Обычно туристам, которые купили пакет Ол инклюзив, крепят специальные браслеты.
- Buffet[баффет]. Система питания, известная нам как шведский стол. Подразумевает, что блюда и напитки подают на столы, а каждый турист подходит с тарелкой и берёт то, что понравилось. Подходить к шведскому столу можно неограниченное количество раз.
- Hostel[хостел]. Менее комфортная гостиница, в которой бронируют не номер, а спальное место в комнате. Кухня в таком отеле — одна на всех. Если не выкупите всю комнату, то есть вероятность, что придётся жить с незнакомцами. Хостел — отличный вариант, если вы путешествуете сами, без семьи.
- Apartment[апартмент]. Схоже с нашими апартаментами. Обозначает номер, приближенный к квартирной планировке. Главное отличие от обычного номера — наличие собственной кухни.
- Lux[люкс]. Еще одно знакомое слово. Все знают, что люкс «круче» обычного номера, но чем? Во-первых, площадь такого номера обычно более 35 кв.м. Во-вторых, люкс включает два жилых помещения — спальню и гостиную. Вот и всё.
- Single[сингл] — номер для одного человека. Одна комната, одна односпальная кровать — всё просто.
- Twin[твин] — однокомнатный номер для двух человек с двумя одноместными кроватями.
- Double[дабл] — однокомнатный номер для пары (т.е. с одной двуспальной кроватью).
- Расчётный час — это время, до которого в отеле можно жить в последний день. По нему рассчитывают количество дней и стоимость проживания. После окончания расчетного часа начинается следующий день проживания.
Бюджетное жильё — правда или вымысел?
Когда вы едете в тур через турагентство, то вопросы с жильём отпадают — в стоимость путёвки входит и проживание в отеле. А вот просмотрев цены на бронь номеров отдельно от путёвки, возникает вопрос — неужели за границей всё жильё такое дорогое? Нет, есть бюджетный выход — хостел.
Если вам принципиальны эмоции и опыт, а не личное пространство, то проживание в хостеле станет лучшим выбором. Цена значительно ниже любого из классических отелей, ведь жить вам придется с соседями. Стандартная комната в хостеле предлагает спальные места для 6-12 человек, но существуют и специальные предложения — комнаты на 3-4 человека. Такую комнату можно выкупить полностью, если вы путешествуете небольшой компаний — и дешевле номера в отеле, и никаких «сомнительных» соседей.
Ищем номер по карману? Онлайн-поисковики в помощь
Номера в отелях тоже можно найти по приятным ценам — в этом деле вам помогут мета-поисковые системы, которые ищут оптимальные отели, и сервисы бронирования.
Мета-поисковик направлен только на поиск подходящего жилья исходя из тех данных, которые вы указываете в фильтре. Через такой сервис нельзя забронировать номер, но можно просмотреть доступные варианты и сравнить цены на разных сайтах. Например, RoomGuru.
Через сервисы бронирования можно и искать подходящие номера, и сразу же их бронировать. Цены в разных сервисах отличаются, поэтому лучше сначала «промониторить» варианты через мета-поисковики.
Самые популярные системы брони жилья:
AirBnb нацелен не на поиск отелей, а именно на их бронь.
Плюсов использования этого сервиса море:
- дарит бонусные 20$ на первое бронирование,
- арендовать квартиру и даже дом можно значительно дешевле отельного номера,
- хозяева открыты к общению и предоставляют очень много фото жилья, а о достоверности информации и удовлетворении клиентов можно судить по наличию хороших отзывов.
Из минусов:
- наверное, только отсутствие ежедневной смены белья и уборки,
- некоторые хозяева просят небольшой залог на случай порчи имущества.
Букинг — это масштабный сервис по брони квартир и отельных номеров, который предлагает более 1 миллиона вариантов. Букинг является международным брендом, кроме того сайт предлагает юзерам простой и удобный интерфейс.
Главные плюсы:
Как я стала волонтером и поехала бесплатно в крымский хостел
- надёжность,
- гарантия,
- прозрачный расчёт стоимости аренды жилья.
Не думаю, что к минусам можно отнести необходимость бронировать жильё как можно раньше. Однако, если хотите найти лучшее сочетание цена-качество, то и обращаться к Букингу нужно за несколько месяцев до отпуска.
Агода подойдет для брони квартир, домов, хостелов и номеров в отеле. Один из самых больших сервисов, направленных на бронирование жилья.
Преимущества:
- есть возможность оплатить бронь с помощью банковской карты прямо на сайте Агода;
- бонусные системы, позволяющие накопить баллы и потратить их во время следующего использования сервиса.
Недостатки:
- не самый удобный интерфейс (мало фильтров),
- геолокация отеля не всегда указана правильно,
- забронировать жильё без предоплаты возможно только на SpecialRates.
Как видите, такие системы — настоящая находка для туриста, который ищет все возможные способы совмещения комфорта с приятной ценой.
Надеюсь, статья была полезной. Удачной дороги.
Источник
Top questions about check out, check in, and versions
No, checking out a file only changes the condition of the file to allow only you to edit the file.
If you check a file out and don’t save it back, your changes will not be saved. If you want to keep changes, always save the file.
How you save the file depends on the editor or tool you’re using. If you edit a text file online, you need to explicitly click Save. However, if you edit in a Microsoft 365 app, such as in Word or Excel, you can close the document and it will automatically save.
If you check a file out, save it, and then discard the check out, your changes will not be saved back to the library.
By default, anyone with edit permission in a document library can change a file. However, you can set the library to require someone to check the file out first before changing it.
You need to be the document library owner or site administrator or have comparable permissions to do this setting.
Open the library you want to require check out.
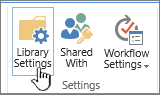
In SharePoint, click Settings  and then click Library Settings.

In SharePoint 2013 and SharePoint 2016, select Page, and then Library Settings.
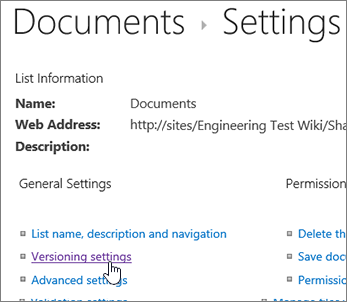
In the Settings page, select Versioning settings.
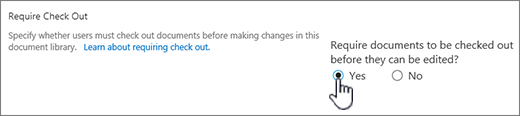
In the Versioning Settings page, scroll down and click Yes for Require documents to be checked out before they can be edited.
By default, a document library lets members with edit permission modify and edit files without checking them out. To prevent this, enable check out required in the library. You need to be the document library owner or site administrator or have comparable permissions to do this setting.
Open the library you want to require check out.
In SharePoint, click Settings and then click Library Settings.
In SharePoint 2013 and SharePoint 2016, select Page, and then Library Settings.
In the Settings page, select Versioning Settings.
In the Versioning Settings page, scroll down and click Yes for Require documents to be checked out before they can be edited.
A quick way to see who has a column checked out is to hover over the Checked Out icon  to see a tip that tells you who has the file checked out.
You can also add the Checked Out By column to the default view of the library. This way, everyone can easily see who has a document checked out. To learn how to add a Checked Out By column in SharePoint, see Create a column in a list or library.
Versioning is a way to create a history of changes to a document that requires a controlled publishing cycle of major versions, or major and minor versions.
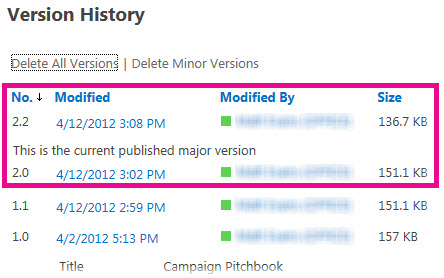
Turn on versioning
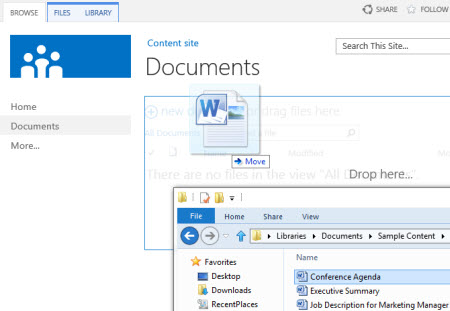
Using drag and drop
The most common way to upload files is by dragging them from a computer or network folder to the document library. First, open the library on your site. Then find the documents on your computer that you want to upload, select them, and drag them to the space in your library where it says, drag files here.
If you don’t see the option to drag and drop files, install the latest version of your browser software or Microsoft Office. This feature requires a minimum of Office 2013, or the latest version of Microsoft Edge, Internet Explorer, Firefox, or Chrome.
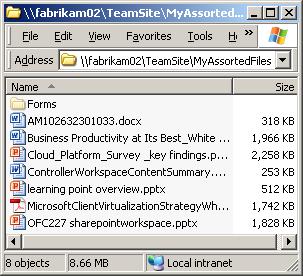
Using the Open with Explorer command
This command opens Windows Explorer on your computer, but it displays the folder structure on the server computer that underlies the site. From time to time, you might need to copy or move many documents in a library to another library.
Note: Open with Explorer in SharePoint 2013 and SharePoint 2016, or View in File Explorer with SharePoint only work in Internet Explorer 10 or 11. It is not supported by Microsoft Edge, Google Chrome, or Mozilla FireFox.
For example, you might want to move all documents created over a year ago in one library to another library to archive the information. Or, you might want to copy documents from a library that you own from one site to another library in a subsite as you change workgroups.
You can also manipulate the files in the folder, such as copying, renaming, deleting, and so on.
Using the new document command
In the Create a new file callout, click UPLOAD EXISTING FILE. In the dialog box that appears, click Browse to upload individual files.
The advantage to this approach is that it works no matter what browser or browser version you currently have.
Related tips about check out, check in, and versions
Whichever way you upload, keep in mind the following about check out, check in, and versions when they are enabled:
If you are uploading a file to a library that requires files to be checked out, the file is initially checked out to you. You still need to check the file in before other people can view and edit it.
If the library is configured to track versions of files, you typically add the uploaded file as a new version, which then becomes part of the version history of the file.
If the library requires you to add values to one or more library columns, such as a department name or project number, you must still edit the values and check in the document before the upload operation is completed.
For SharePoint 2013 and SharePoint 2016, see Upload files or create files in a library
Источник


