- Android check internet connection
- Create Android Project
- Add ACCESS_NETWORK_STATE permission in Manifest
- Write a ConnectivityProvider interface
- Extend ConnectivityProvider interface
- Write a actual implementation of ConnectivityProvider
- Let’s create a NetWorkManger class
- Implementing Internet Connectivity Checker in Android Apps
- Enough talk!
- Back to our business
- That’s it!
- How to Check for Internet Connection in Android using Kotlin
- Adding required dependencies
- Creating the NetworkMonitorUtil file
- Using NetworkMonitorUtil
- Monitor Network Requests and Responses on Android Studio
- Check network available android
- Android Detect Internet Connection Using Broadcast Receiver
- Checking Network Connection
- Example
- Video Demo
Android check internet connection
In this blog, I’ll show how to check internet connection in android programmatically. While we are developing a professional app, you may need to check internet available or not. For example, while you are calling APIs you may need to check internet connection several times in an app. In this example, we’ll learn how we can check internet connections any place and anywhere.
I’m going to create a demo application, This app will automatically detect the internet changes using an internet connection listener. For the demonstration, I’ll create a sample app that app will capable of continuously check internet connection with android. So let started.
Create Android Project
Let move to Android Studio, and create a fresh project with some default template. We are going to use java 1.8 stuff in our project so lets set java version in app build.gradle file
Add ACCESS_NETWORK_STATE permission in Manifest
For detecting network permission we required some permission so let open the AndroidManifest and add below permission.
Write a ConnectivityProvider interface
I’m going to write complete solution for check internet connection for pre and post LOLLIPOP devices solution in a single interface. Please have a look
Extend ConnectivityProvider interface
Now create a abstract class named ConnectivityProviderBaseImpl which extends ConnectivityProvider interface, like below
Write a actual implementation of ConnectivityProvider
Let’s create a NetWorkManger class
In this class we have one live data object which hold the internet state, It can be accessible threw out the application.
Источник
Implementing Internet Connectivity Checker in Android Apps

Dec 31, 2020 · 4 min read
W orking on an Android chat app? social media app? or any other internet-based app that you want to check if there is an internet connection in order to continue a process or even notify the user about their network state? This guide comes to the rescue!
You may say: “ Hey! There is already an API which gets this job done.”
Yes, there is! Well, although Android SD K provides API that you can use to get network state of user’s device like ConnectivityManager, it does not actually check whether there is an active internet connection. Concretely, try establishing a hotspot from mobile device “A” but do not turn on mobile data or WiFi, then connect mobile device “B” to that hotspot of “A”.
Using device “B”, when you try to search, say, on Google this won’t work as there is no internet connection although you are connected to a network. ConnectivityManager APIs work the same. They just tell whether you are connected to a network or not — regardless of having an active internet connection or not.
So, the bottom line is:
“How do we check if there is an active internet connection?”
Basically, we can ping or connect to any server to see whether this ping or connection is successful or not.
If you have your own back-end server, you may prefer to try to connect your app to the server to make sure that the device has an internet connection and your server is not down at the same time.
We can also connect to Google’s servers as they are unlikely to be down (or for a long time).
To optimize our class implementation (we’ll call it NetworkConnectivity), it’s good to check a device’s network connection using ConnectivityManager so that if WiFi or mobile data is turned off or even WiFi is turned on but there is no network the device is connected to, we don’t have to make requests to any servers.
Enough talk!
First of all, add internet and network state permissions in your app manifest:
Now, create a function to check network availability using ConnectivityManager:
Here we used getAllNetworkInfo() to return an array of objects of all networks and then we check whether any of them is connected.
But this method is deprecated since API 23. For later APIs, we used getAllNetworks() which is added in API 21. But yea, getNetworkInfo() is also deprecated since API 29 🙂
Back to our business
To ping Google’s server, basically, we can do that with a few lines of code:
This approach works synchronously so that you just wait for the response to tell whether you have a connection or not and it takes no time. However, in some mobile devices for specific brands, the framework does not allow performing this process in Runtime, so you can not eventually rely on it.
Instead, we can make a normal HTTP connection request to the server.
Start by creating a method called checkInternetConnection which checks first if WiFi or mobile data are connected to any network by using the above method. Then it starts establishing an HTTP URL connection:
ConnectivityCallback is an inner interface having an abstract function which we’ll use to communicate with our UI classes when the server’s response comes back.
In the above checkInternetConnection function we used: “ http://clients3.google.com/generate_204” instead of Google’s normal URL “ http://www.google.com” since the first is a bit more efficient so that we don’t have to grab the whole web page.
For a successful request, the response code must be equals to 204 and no content is returned back.
We used “ setRequestProperty()” to set headers (some information the server needs to know) for the request for the server. Also, we specified the connection timeout to be one second which is a reasonable time.
But wait! Android framework does not allow network operations on the main thread so we need to use the above code on another thread. Consequently, we’ll have to post the result on the main thread again. You can use whatever is convenience for you to perform both of these operations. I would use a singleton AppExecutors class which provides executor threads for both of our cases.
postCallback() is a helper method that posts our result to the interface on the main thread.
That’s it!
To check internet connectivity in an activity:
In recent devices, Android may produce a security exception due to using HTTP URL connection. To fix this, add android:usesCleartextTraffic=”true” in your app manifest within application tag or use HTTPS instead of HTTP connections. So, pay attention to exception handling in your checkInternetConnection method.
Источник
How to Check for Internet Connection in Android using Kotlin
In this tutorial, I’m going to show you how to check the internet connection in your Android app without using any 3rd party library.
Adding required dependencies
Go to your app-level build.gradle file and add the following dependency:
The Local Broadcast Manager will help us to track the changes of internet connection (e.g, from Wi-Fi to cellular, or from Wi-Fi to no connection)
Next, go to the AndroidManifest.xml and add the following permission:

Creating the NetworkMonitorUtil file
Create a new Kotlin file, and give it the name NetworkMonitorUtil.
Then, paste the following code inside:
Because some methods are deprecated in newer versions of Android we’re going to use two different ways to check the internet connection:
For devices with Android 9 (Pie) and above we use NetworkCallback, which has methods to detect when the network is available or not and what type is (Wifi, Cellular e.t.c).
And for devices with Android 8 (Oreo) and below, we use the method CONNECTIVITY_ACTION combine with LocalBroadcastManager to run the code whenever the network state changes.
Using NetworkMonitorUtil
To use the NetworkMonitorUtil, first, you have to initialize it and register the LocalBroadcastManager/NetworkCallback in the onResume() method:
To get the state of the internet connection, use result:
Note: If you have to do changes in the UI, your code needs to be inside a runOnUiThread
And to stop monitoring, unregister the LocalBroadcastManager/NetworkCallback in the onStop() method:
If you have any questions, please feel free to leave a comment below
Источник
Monitor Network Requests and Responses on Android Studio

Dec 21, 2017 · 4 min read
Android Studio 3.0 has an improved Android Profiler. One nice addition in the profiler tool is that the network inspector added to Network section. Using that now we can see the network traffic originating from app in debug and see the responses as well. Those who were using Charles Proxy or similar tool will easily realise how convenient it is. We can get rid of one tool* and no more annoying HTTP proxy configuring and removing configuration after usage.
But there are few cat c hes. First thing is it will work only if you are using HttpURLConnection or OkHttp for network calls in your app. If you are using some other libraries for network request, probably you’ll get the following message on Network profiler
“Network Profiling Data Unavailable: There is no information for the network traffic you’ve selected.”
Second issue that you may face is that you might not be able to see the network request and response in all of your devices / emulators. You’ll need a device with API 26(Android 8.0) or above. Which is a serious issue for most of the developers. Android 8.0 is the latest release, and there are only very few actual devices running that. Many flagships are still awaiting Oreo update. Simulators are here to help. But how many of us really use AVDs? I personally don’t like it. They are still very slow(Definitely improved a lot in last few years)
Now let’s see how we can actually see the request-response in Android Studio and what are the things available in that
You’ll be familiar with the following Android Profiler window which sits normally at the bottom of Android Studio. And you’ll be using it once in a while or daily.

It have different profiler outputs like CPU, Memory, Network etc. Click on that network output which shows a blue and kind of orange spikes. It will expand to something like this.

The blue and orange spikes indicate received and send data respectively. So if you have a series of calls going on these spikes will be continuous. To see data that has been transferred between app and server. Select a particular region in the spike area. You can do this by dragging from start to end of the range. You’ll see something like this after selecting the area.
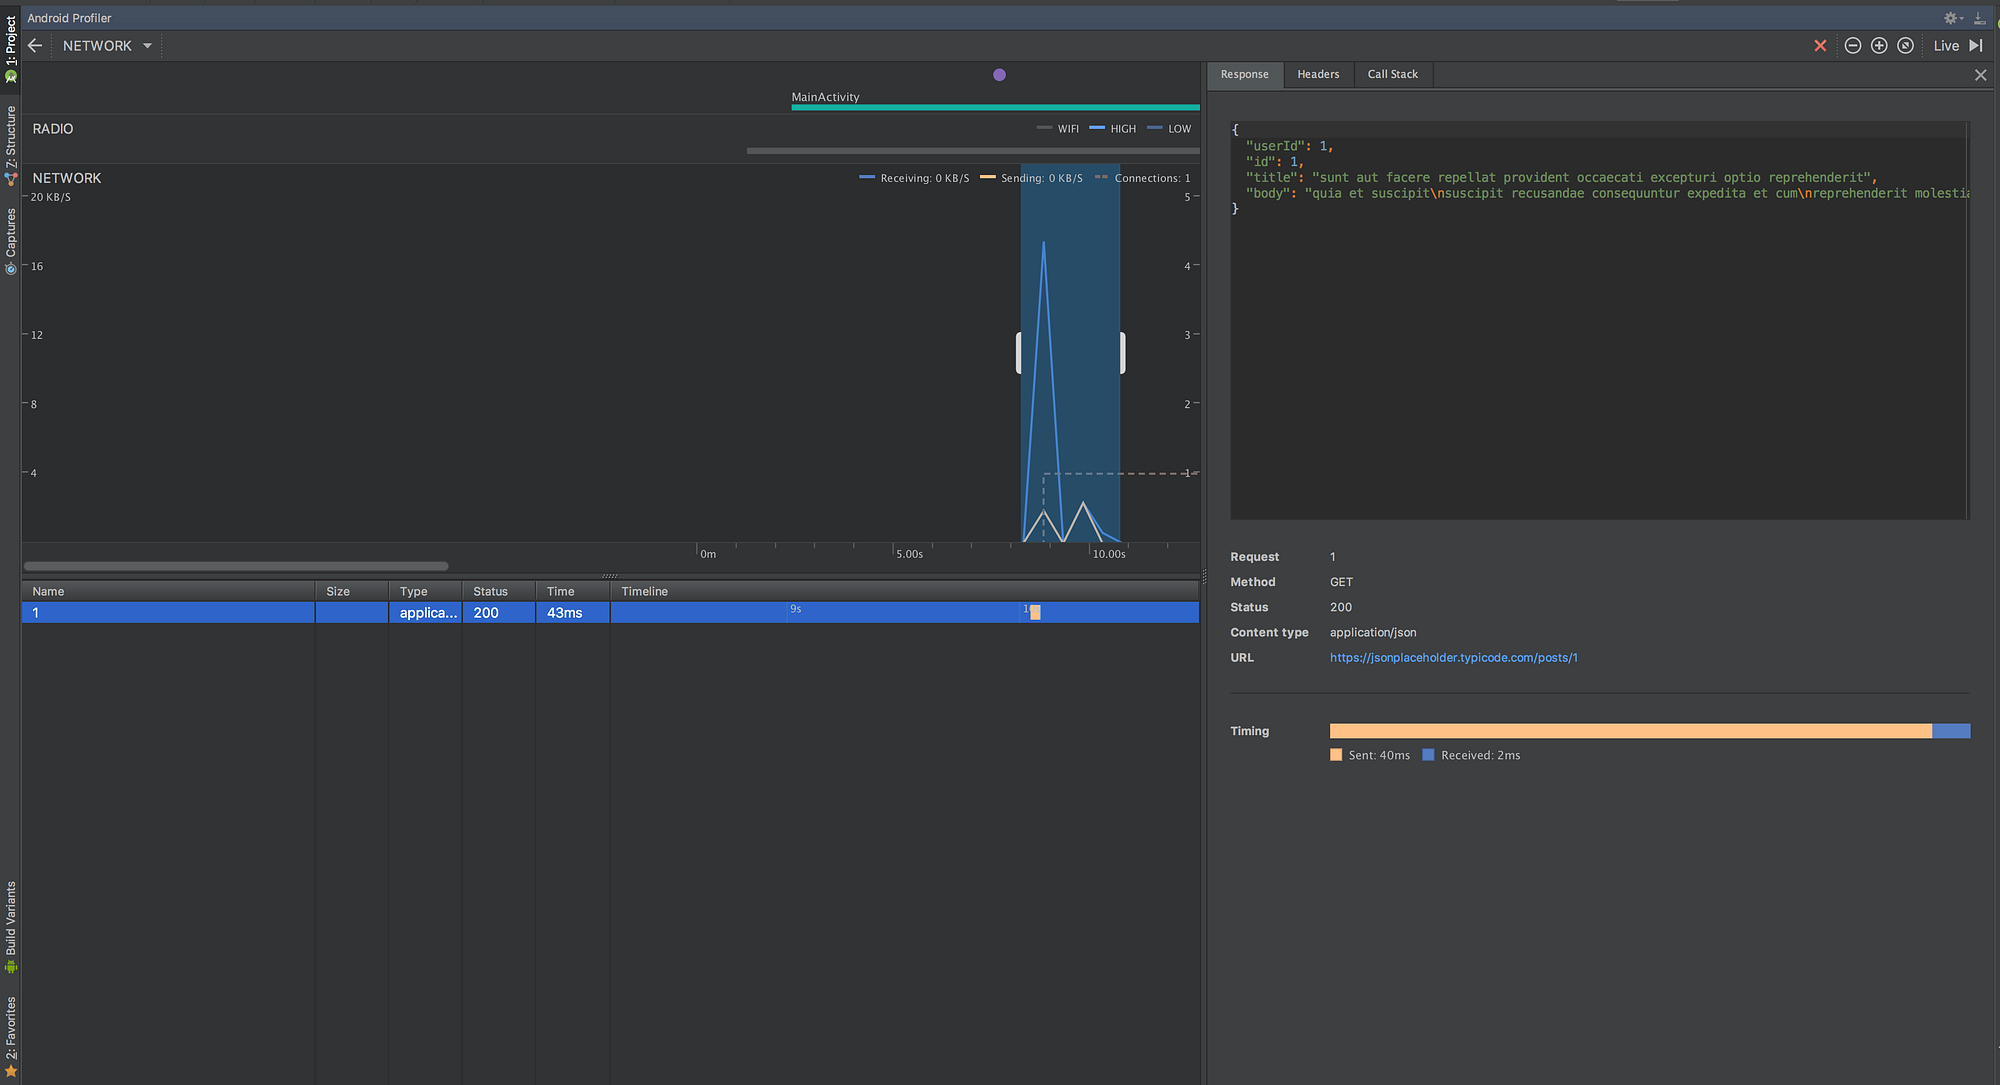
Here you can see a table below the spikes, thats the place where it lists the api calls happened between the selected range. On the right side the request response data, header etc can be inspected. In the above example name of the api is shown as one, because I have used a dummy api for this and the api was something like /posts/1.
I have tried to look into the network traffic generated from a webview. Profiler gave the default unavailable error message. I haven’t checked whether there are any tweaks to make it work. But my best guess is that it wont’t be showing data transfer originated from webviews. I will be updating that also when I have confirmation on that.
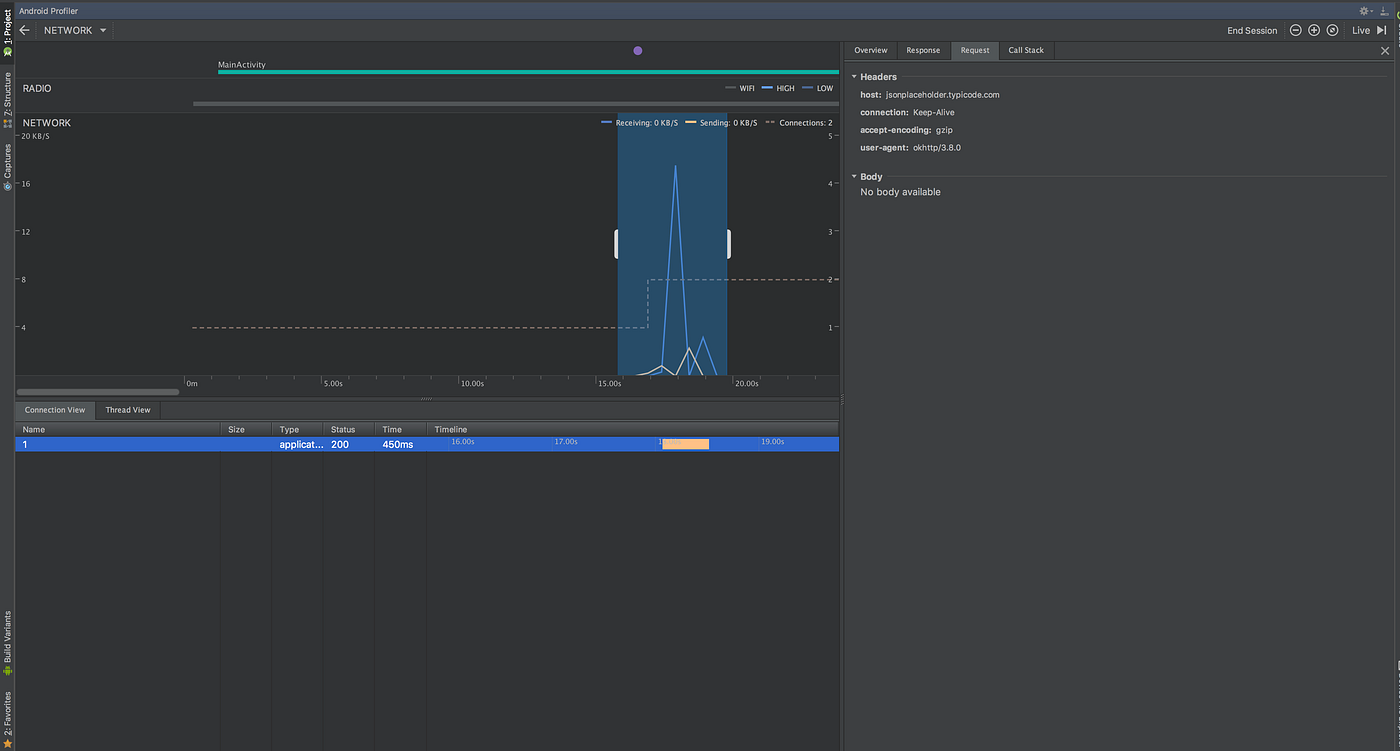
When Android Studio 3 was released the network monitor had the options only to view network responses and response headers. But no way to see the request params. But it is now available in the canary channel. Following is the screenshot of the above api response monitor example in Android Studio Canary 8 with request param option
So you might be wondering will it work only for API calls, or work with other web resources as well. I have tried monitoring the request and responses of image loading through some of the famous image loading libraries like Picasso, Glide, Fresco etch. Read more about it here.
Источник
Check network available android
Android Detect Internet Connection Using Broadcast Receiver
Android lets your application connect to the internet or any other local network and allows you to perform network operations.
A device can have various types of network connections. If your app needs internet connection to make HTTP Requests and or you need internet connection in your whole app then it is better to check internet connectivity status before making any HTTP Requests to avoid http exceptions.
Checking Network Connection
Before you perform any network operations, you must first check that are you connected to that network or internet. For this android provides ConnectivityManager class. You need to instantiate an object of this class by calling getSystemService() method. Its syntax is given below −
Once you instantiate the object of ConnectivityManager class, you can use getAllNetworkInfo() or getActiveNetworkInfo() method to get the information of all or active networks respectively. First method returns an array of NetworkInfo and second method return active network info. So you have to receive it like this –
The last thing you need to do is to check Connected State of the network. Its syntax is given below −
Apart from this connected states, there are other states a network can achieve. They are listed below:
- Connecting.
- Disconnected.
- Disconnecting.
- Suspended.
- Unknown.
Now, since we are using Broadcast Receiver to detect the internet connection then we should know about Broadcast Receiver.
Broadcast Receivers simply respond to broadcast messages from other applications or from the system itself. These messages are sometime called events or intents. For example, applications can also initiate broadcasts to let other applications know that some data has been downloaded to the device and is available for them to use, so this is broadcast receiver who will intercept this communication and will initiate appropriate action.
Example
In this tutorial, we are going to learn how to detect Internet connection in whole app using Broadcast Receiver.
Video Demo
1. Create a new project in Eclipse by navigating to File ⇒ New Android ⇒ Application Project and fill required details. By default my activity is MainActivity.java.
2. After creating first step the second thing we have to do is adding certain permissions to Manifest file for accessing Network State.
Источник


