- Установка Android SDK не находит JDK
- Installing the Android SDK
- Install Android Development Tools
- Before You Begin
- Background
- What Do You Need?
- Install and Set Up Android Studio
- Install an Android SDK Platform Package
- Create and Start an Android Virtual Device
- Install the Java SE Development Kit 8
- Create Environment Variables
Установка Android SDK не находит JDK
Я пытаюсь установить Android SDK на свою систему Windows 7 x64. jdk-6u23-windows-x64.exe , но установка Android SDK не будет продолжена, поскольку не найдена установка JDK.
Это известная проблема? И есть ли решение?

Нажмите « Назад», когда вы получите уведомление, а затем « Далее» . На этот раз он найдет JDK.
- ОС: Windows 8.1
- Файл JDK: jdk-8u11-windows-x64.exe
- Файл ADT: installer_r23.0.2-windows.exe
Установите x64 JDK и сначала попробуйте опцию back-next, а затем попробуйте установить JAVA_HOME как указано в сообщении об ошибке, но если это не сработает для вас, попробуйте следующее:
Сделайте так, как говорится, установите JAVA_HOME в переменные среды, но на пути используйте косые черты вместо обратных косых черт.
Шутки в сторону.
Для меня это не удалось, когда JAVA_HOME был C:\Program Files\Java\jdk1.6.0_31 но отлично работал, когда он был C:/Program Files/Java/jdk1.6.0_31 – загнал меня в орехи!
Если этого недостаточно, добавьте также начало Path переменной окружения% JAVA_HOME%;
Обновленные значения в переменных среды системы:
- JAVA_HOME=C:/Program Files/Java/jdk1.8.0_11
- JRE_HOME=C:/Program Files/Java/jre8
- Path=%JAVA_HOME%;C.
Я нашел решение, и это красиво глупо. Я обнаружил, что Android SDK не может обнаружить JDK .
Нажмите кнопку « Назад» на экране ошибки SDK, в котором сообщается, что EXE не смог обнаружить JDK. Затем нажмите « Далее» .
Кто бы мог подумать, что это произойдет?
Кажется, что он не работает без 32-битного JDK. Просто установите его и будьте счастливы …
Вместо этого я загрузил архив .zip и запустил SDK Manager.exe , и он работал как шарм. В противном случае у вас была такая же проблема с .exe.
Предупреждение. Как отметил комментатор, не пытайтесь это сделать на Windows 7! Я тестировал его с 64-разрядной Windows XP.
Поскольку опубликованное решение НЕ работает для всех (включая меня, меня и меня), я хочу оставить примечание для тех, кто ищет другой способ (без взлома реестра и т. Д.), Чтобы решить эту проблему в 64-битной системе Windows. Просто добавьте PATH (заглавные буквы!) В свою среду Переменные и установите значение для вашего JDK-Path.
Я добавил JDK к существующему «Пути», который не работал, например, не с JAVA_HOME или «Back» -Solution. Добавив его в «PATH», наконец, сделал трюк.
Надеюсь, это может помочь кому-то.
Все, что вам нужно, это следующие две записи реестра. Кажется, что тот, кто отправил другой материал в реестре, просто скопировал все ключи из HKEY_LOCAL_MACHINE\SOFTWARE\JavaSoft в HKEY_LOCAL_MACHINE\SOFTWARE\Wow6432Node\JavaSoft , что, очевидно, не является идеальным решением, потому что большинство ключей не нужны.
Не все эти решения работали для меня. Я исправил его, временно изменив имя файла C:\Windows\System32\java.exe на java_.exe
Ни одно из решений здесь не работало для 64-битной версии.
Постановка пути JDK до перехода c: \ windows \ system32 \ в переменную среды решает эту проблему. В противном случае 32-разрядный файл java.exe будет найден до 64-разрядной версии JDK.
После прочтения нескольких сообщений в блогах, похоже, это еще проще, нажав BACK, когда установщик говорит, что не может найти JDK, а затем просто нажмите « СЛЕДУЮЩИЙ» еще раз, и волшебным образом он найдет JDK. Никакой реестр не возится или не перезагружается и т. Д.
Добавление переменной среды JAVA_HOME (в разделе « Системные переменные» ) сделало трюк для меня. Нажатие кнопок «Назад» и «Следующий» не работает.
Windows 7 Professional x64, JDK 1.7.0_04 (64 бит, у меня нет установленной версии x86)
Я думаю, что установщик пытается найти JDK в конкретной версии (1.6?), И если он не сможет его найти, проверяет JAVA_HOME, который не был установлен в моем случае. У меня есть другой компьютер (такая же система, но с JDK 1.6 x64), и он работал без переменной JAVA_HOME.
Вам не нужно устанавливать 32-разрядную версию JDK 🙂
Источник
Installing the Android SDK
Android Studio provides everything you need to start developing apps for Android, including the Android Studio IDE and the Android SDK tools.
If you didn’t download Android Studio, go download Android Studio now, or switch to the stand-alone SDK Tools install instructions.
Before you set up Android Studio, be sure you have installed JDK 6 or higher (the JRE alone is not sufficient)—JDK 7 is required when developing for Android 5.0 and higher. To check if you have JDK installed (and which version), open a terminal and type javac -version . If the JDK is not available or the version is lower than 6, go download JDK.
To set up Android Studio on Windows:
- Launch the .exe file you just downloaded.
- Follow the setup wizard to install Android Studio and any necessary SDK tools.
On some Windows systems, the launcher script does not find where Java is installed. If you encounter this problem, you need to set an environment variable indicating the correct location.
Select Start menu > Computer > System Properties > Advanced System Properties. Then open Advanced tab > Environment Variables and add a new system variable JAVA_HOME that points to your JDK folder, for example C:\Program Files\Java\jdk1.7.0_21 .
The individual tools and other SDK packages are saved outside the Android Studio application directory. If you need to access the tools directly, use a terminal to navigate to the location where they are installed. For example:
To set up Android Studio on Mac OSX:
- Unzip the downloaded zip file, android-studio-ide- -mac.zip .
- Drag and drop Android Studio into the Applications folder.
- Open Android Studio and follow the setup wizard to install any necessary SDK tools.
Depending on your security settings, when you attempt to open Android Studio, you might see a warning that says the package is damaged and should be moved to the trash. If this happens, go to System Preferences > Security & Privacy and under Allow applications downloaded from, select Anywhere. Then open Android Studio again.
The individual tools and other SDK packages are saved outside the Android Studio application directory. If you need access the tools directly, use a terminal to navigate into the location where they are installed. For example:
To set up Android Studio on Linux:
- Unpack the downloaded Tar file, android-studio-ide- -linux.zip , into an appropriate location for your applications.
- To launch Android Studio, navigate to the android-studio/bin/ directory in a terminal and execute studio.sh .
You may want to add android-studio/bin/ to your PATH environmental variable so that you can start Android Studio from any directory.
If the SDK is not already installed, follow the setup wizard to install the SDK and any necessary SDK tools.
Note: You may also need to install the ia32-libs, lib32ncurses5-dev, and lib32stdc++6 packages. These packages are required to support 32-bit apps on a 64-bit machine.
Android Studio is now ready and loaded with the Android developer tools, but there are still a couple packages you should add to make your Android SDK complete.
The stand-alone SDK Tools package does not include a complete Android development environment. It includes only the core SDK tools, which you can access from a command line or with a plugin for your favorite IDE (if available).
If you didn’t download the SDK tools, go download the SDK now, or switch to the Android Studio install instructions.
To get started on Windows:
Your download package is an executable file that starts an installer. The installer checks your machine for required tools, such as the proper Java SE Development Kit (JDK) and installs it if necessary. The installer then saves the Android SDK Tools to a specified the location outside of the Android Studio directories.
- Double-click the executable ( .exe file) to start the install.
- Make a note of the name and location where you save the SDK on your system—you will need to refer to the SDK directory later when using the SDK tools from the command line.
- Once the installation completes, the installer starts the Android SDK Manager.
To get started on Mac OSX:
Unpack the ZIP file you’ve downloaded. By default, it’s unpacked into a directory named android-sdk-mac_x86 . Move it to an appropriate location on your machine, such as a «Development» directory in your home directory.
Make a note of the name and location of the SDK directory on your system—you will need to refer to the SDK directory later when using the SDK tools from the command line.
To get started on Linux:
Unpack the .zip file you’ve downloaded. The SDK files are download separately to a user-specified directory.
Make a note of the name and location of the SDK directory on your system—you will need to refer to the SDK directory later when using the SDK tools from the command line.
Troubleshooting Ubuntu
- If you need help installing and configuring Java on your development machine, you might find these resources helpful:
- https://help.ubuntu.com/community/Java
- https://help.ubuntu.com/community/JavaInstallation
- Here are the steps to install Java:
-
If you are running a 64-bit distribution on your development machine, you need to install additional packages first. For Ubuntu 13.10 (Saucy Salamander) and above, install the libncurses5:i386 , libstdc++6:i386 , and zlib1g:i386 packages using apt-get :
For earlier versions of Ubuntu, install the ia32-libs package using apt-get :
The Android SDK tools are now ready to begin developing apps, but there are still a couple packages you should add to make your Android SDK complete.
Then, select which SDK bundle you want to install:
Источник
 Install Android Development ToolsBefore You Begin
This 15-minute tutorial shows you how to install Android Studio, which includes the Android SDK, and create an Android Virtual Device (AVD) on which you install an Oracle JavaScript Extension Toolkit (Oracle JET) hybrid mobile application during a later tutorial. The time to complete doesn’t include processing time as a result of your activities.
Background
The Oracle JET command-line interface invokes the Android SDK that you install with Android Studio to build an Android application package (APK) file from the source files of your hybrid mobile application. This APK file is installed on an AVD to enable you to test the hybrid mobile application.
What Do You Need?
- A computer that meets the system requirements to install Android Studio. See System requirements at https://developer.android.com/studio/
Install and Set Up Android StudioDepending on the operating system of your computer, the Android Studio installation wizard prompts you with dialogs where you choose between standard or custom install types. Choose the options recommended by the Android Studio installation wizard as these options include the components that you require to create and install a hybrid mobile application on an AVD. They also include an Android emulator and an emulator accelerator appropriate for your computer, be that Windows, Mac, or Linux.
- Go to the Download page for Android Studio on the Android Developer’s website at https://developer.android.com/studio/ and click DOWNLOAD ANDROID STUDIO.
- Review and accept the terms and conditions in the Download Android Studio dialog that appears and click DOWNLOAD ANDROID STUDIO FOR PLATFORM where PLATFORM refers to the operating system of your machine, such as Windows, Mac, or Linux.
- Go to the Install Android Studio guide at https://developer.android.com/studio/install and follow the instructions for your operating system to install and start Android Studio.
- If you run Android Studio behind a firewall or secure network, an Android Studio First Run dialog appears which displays a button (Setup Proxy) that you click to enter the proxy server settings for your environment. This allows Android Studio to complete the download of the components for a standard install.
- In the Welcome to Android Studio dialog, select Start a new Android Studio project, and then, in the Create New Project wizard, accept the default options to progress to the final screen in the wizard and click Finish.
This enables the Android Studio toolbar with the options that you need to create an AVD. It also downloads and configures the Gradle build tool that the Android SDK invokes to build the APK file when you complete the creation of your Oracle JET hybrid mobile application.
If you run Android Studio behind a firewall or secure network, a Proxy Settings dialog appears that enables you to configure proxy settings for the Gradle build tool that Android Studio downloads and configures. Provide the proxy settings for your environment to ensure that the Gradle build tool functions correctly.
Install an Android SDK Platform Package- In the Android Studio toolbar, click the SDK Manager icon () to open the Android SDK page in the Default Settings dialog.
- In the SDK Platforms tab, select Android 8.0 (Oreo) with an API Level value of 26, and click Apply. Description of the illustration sdkmgrdialog.png
- Click OK in the confirmation dialog that appears and accept the license agreement to proceed with the installation.
- Once the installation completes, click Finish and then click OK to close the Default Settings dialog.
Create and Start an Android Virtual Device- In the Android Studio toolbar, click the AVD Manager icon ( ) and click Create Virtual Device in the Android Virtual Device Manager dialog that opens.
- In the Phone category of the Choose a device definition page of the Virtual Device Configuration dialog, select Nexus 5X and click Next.
- In the Recommended tab of the Select a system image page, click Download for the Oreo entry with an API Level of 26. Description of the illustration downloadoreo.png The SDK Quickfix Installation wizard opens.
- Accept the license agreement to proceed with the download of the system image for Android 8.0 with API Level 26. Once the installation completes, click Finish and then click Next in the Select a system page.
- In the Verify Configuration page, review and accept the default settings such as the AVD Name value of Nexus 5X API 26, then click Finish.
- In the Android Virtual Device Manager dialog, click the Launch this AVD in the emulator icon () under the Actions column for the newly-created Nexus 5X API 26 AVD.
The Android emulator starts and loads the Nexus 5X API 26 AVD. A toolbar appears to the right of the AVD that provides UI controls to interact with the AVD.
Description of the illustration sdkmgrdialog.png
Install the Java SE Development Kit 8- Go to the Java SE Development Kit 8 Downloads page at http://www.oracle.com/technetwork/java/javase/downloads/jdk8-downloads-2133151.html, accept the license agreement, and download the Java SE Development Kit installation file for your platform.
- Follow the JDK installation instructions for your platform at https://docs.oracle.com/javase/8/docs/technotes/guides/install/toc.html.
Create Environment VariablesTo function correctly, the Apache Cordova command-line interface that the Oracle JET command-line interface communicates with requires that you configure environment variables. These environment variables reference the installation location of the Android SDK that is installed by Android Studio and the Java SE Development Kit 8.
- For Windows.
- Open the Environment Variables dialog from the System Properties dialog by navigating Control Panel >System and Security >System >Advanced System Settings >Environment Variables.
- Click New in the Environment Variables dialog and set the values of the variables to the location of the JDK and Android SDK locations, as shown in the following image. You can obtain the Android SDK location from the Android SDK page of the Default Settings dialog that you access in Android Studio by clicking Tools >SDK Manager. Description of the illustration envvar.png
- For Mac and Linux-type systems, the settings depend upon your default shell. For example, on a Mac system using the Bash shell, add the following lines in
Источник
-
 Install Android Development Tools
 Before You Begin
 Install and Set Up Android Studio
 Install an Android SDK Platform Package
 ) to open the Android SDK page in the Default Settings dialog.
 Description of the illustration sdkmgrdialog.png
 Create and Start an Android Virtual Device
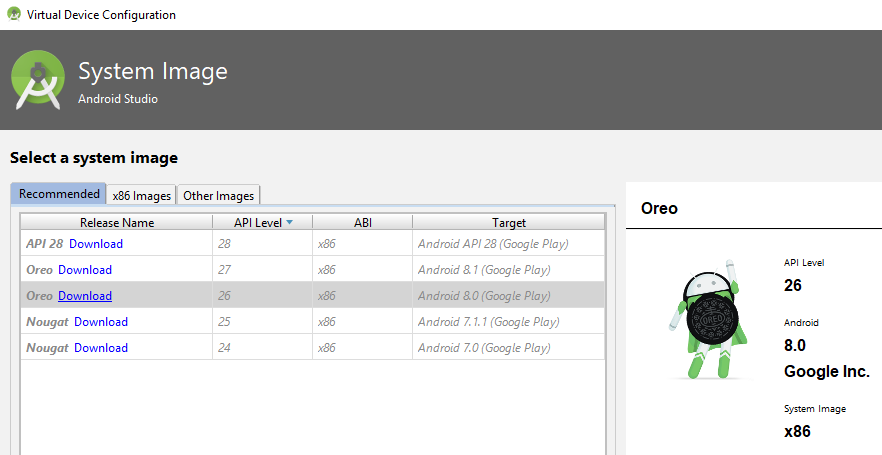 Description of the illustration downloadoreo.png The SDK Quickfix Installation wizard opens.
 ) under the Actions column for the newly-created Nexus 5X API 26 AVD.
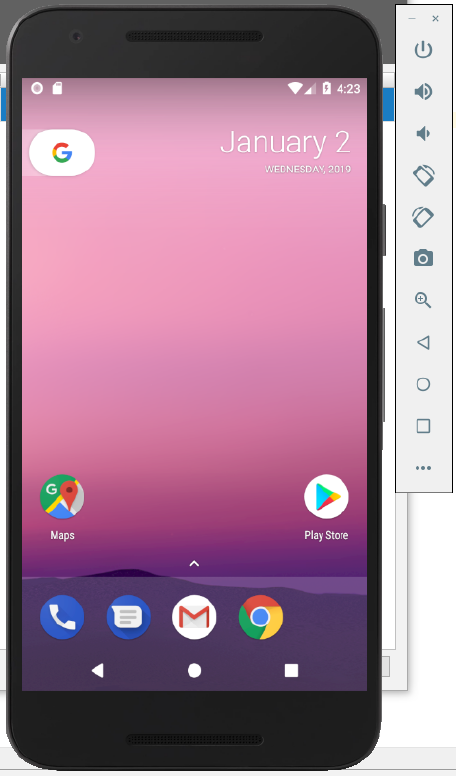 Description of the illustration sdkmgrdialog.png
  Install the Java SE Development Kit 8
 Create Environment Variables
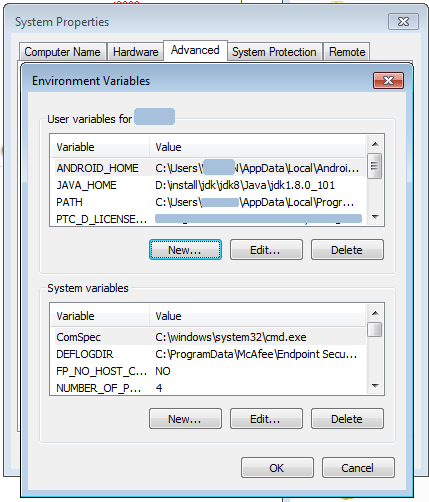 Description of the illustration envvar.png


