- Chips: Material Components for Android
- Setup
- Introduction
- Entry (Input) Chips
- Filter Chips
- Choice Chips
- ActionChips
- Finally
- Atomic Spin
- Atomic Object’s blog on everything we find fascinating.
- Creating Material Design Chips in an Android App
- Adding Chips in XML
- Adding Chips Programmatically
- Handling Clicks
- Styling Chips
- Other Resources
- Android Chips — Material Component For Android
- Setup Material Chips in your Android Studio
- Usage
- Types Of Material Chip
- 1. Entry (Input) Chips
- 2.Filter Chip
- 3.Choice Chip
- 4.Action Chip (Default)
- Hands-on with Material Components for Android: Chips
- Part 5 of a series covering practical usage of Material Components for Android
- Setting up a Material Components theme for Android
- Attribute by attribute
- Basic usage 🏁
- Choosing a style 🤔
- Applying attributes 🎛️
- Chip icon
- Close icon
- Checked icon
- Listening for clicks, closes and checks 👂
- Grouping Chips 👨👩👧👦
- Advanced usage with ChipDrawable 🤓
- Theming 🎨
- Color
- Typography
- Shape
- More resources 📚
Chips: Material Components for Android

One of the cool widgets that you can use with the Material Design Components library is Chip. A Chip is a component that can represent input, filter, choice or action of a user. This post will be on the implementation of different chip types and various attributes of chips.
Setup
To use Chips, your project needs to have material components dependency.
Also set your app theme such that it inherits one of MaterialComponents themes.
Introduction
The basic XML declaration of chip is as follows.
It can also be defined dynamically as follows.
There are four types of chips: Entry (Input) Chips, Filter Chips, Choice Chips and Action Chips. Chips are generally used with ChipGroup which is to hold a number of chips. Below is the XML code for a ChipGroup holding 3 filter chips.
To dynamically add chips to a ChipGroup, a simple line of code is enough.
Entry (Input) Chips
These chips are used for inputs such as e-mail inputs. It can be declared in XML as:
Or it can be declared dynamically:
Below demo is implemented by adding chips dynamically to a ChipGroup. Note that we set a CloseIconClickListener to chip and thus whenever user clicks on the close icon, the chip is removed from the ChipGroup.
Filter Chips
Filter chips are used as filters for content. Filter chips are checkable, with an optional chip icon and an optional close icon by default. They are generally used within a ChipGroup.

Choice Chips
Choice chips are to select an option among a choice set. They are checkable by default and chip icon is optional.

ActionChips
Action chips are used for primary user actions. They are not checkable and can have an optional chip icon.

Finally
The source code of the demo project can be found on Github. Feel free to share ideas, make comments and ask questions.
Источник
Atomic Spin
Atomic Object’s blog on everything we find fascinating.
Creating Material Design Chips in an Android App
Material Design was introduced by Google in 2014 as a visual language to create a universal design and style guide for applications. Along with Material Design, new widgets and controls were added to match the new styling.
One of these elements is the chip. Chips function like buttons that can either be checked or toggled. They can be used as filters, choices, or entries and wired up to trigger actions.

If an app already uses the updated Material Design theme, chips will use the updated Material Design styling by default. If an app doesn’t use the Material Design theme, the style can be directly applied to the widget.
Adding Chips in XML
The easiest way to add chips to an Android app is to simply drop them into a linear layout in XML. By default, they are set up to trigger an action when clicked or tapped.
In the XML, chips can also be added to a chip group. Chip groups allow you to control multiple chips’ layouts and multiple-exclusion scope, similar to a radio group. This means that only one chip in a chip group can be selected at a time. If different functionality is required, such as being able to select multiple chips, chip groups will not work.
Adding Chips Programmatically
If dynamic functionality is needed, chips can be added to a view or layout programmatically. You can also create and add to chip groups in this way.
Handling Clicks
There are three ways to register a callback on a chip.
The most basic handles what happens when a chip is clicked or tapped.
Chips can also handle being checked. This provides a Boolean of the checked state to the callback.
Chip groups can use the OnCheckedChangeListener to set one callback for all chips in a chip group. This provides the ID of the chip that was selected.
Finally, chips provide a close button that can have its own click listener.
Styling Chips
Material Design still allows developers to style chips to match their application. These styles can be declared in the styles.xml file. You can set background colors using a color state list with checked and unchecked states.
In XML, styling chips works the same as any other view in the layout. Simply add the style tag to the chip element.
Adding styles to chips programmatically is a more involved process. It requires the addition of a resource attribute file that points at the desired style.
This attribute will then be referenced from the app’s base theme in the styles folder to create a link between the resource attribute and the style.
When creating the chip, this attribute will be passed in as a parameter.
Other Resources
More information on how to use and implement chips in an Android app can be found on the Material Design website.
Источник
Android Chips — Material Component For Android

Android Chips is one the component in Material Design library. A Material Chip is a component that can represent input, filter, choice or action of a user.
A Material Chip represents a complex entity in a small block, such as a contact. It is a rounded button that consists of a label, an optional chip icon, and an optional close icon. A chip can either be clicked or toggled if it is checkable.
Chips may be placed in a , which can be configured to lay out its chips in a single horizontal line or reflowed across multiple lines. If a chip group contains checkable chips, it can also control the multiple-exclusion scope for its set of chips so that checking one chip unchecks all other chips in the group. — Material.io
This is my sample app using Android chips,
Setup Material Chips in your Android Studio
To use Chips, your project needs to have material components dependency.
Also, set your app theme such that it inherits one of Material Components themes.
Usage
The Chip widget provides a complete implementation of Material Design’s chip component. Example code of how to include the widget in your layout:
Types Of Material Chip
There are four types of chips: Entry (Input) Chips, Filter Chips, Choice Chips, and Action Chips. Chips are generally used with ChipGroup which is to hold a number of chips.
1. Entry (Input) Chips
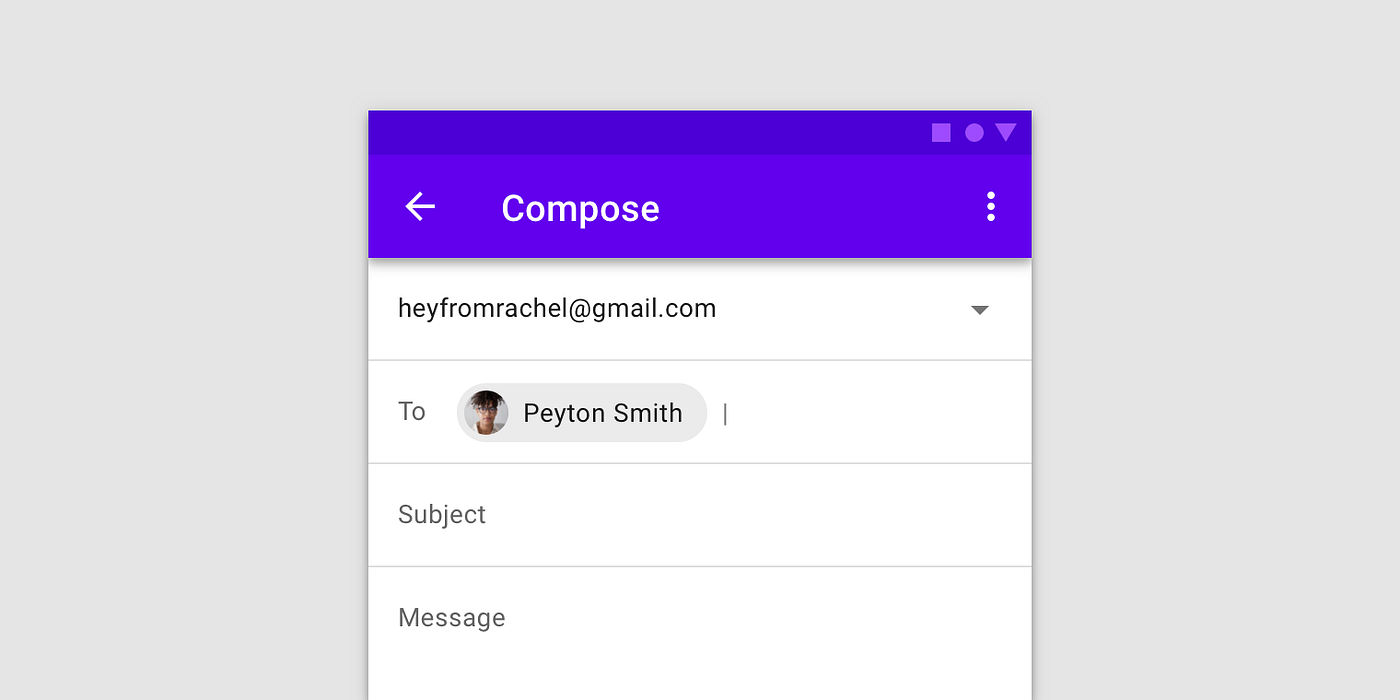
Entry chip used to display captured user input in a non editable format. It’s a very nice way to showcase the user input.
One of the most obvious usages of Android Entry chip is shown in the Gmail app. Particularly the email input experience- when an email is entered by the user, it is showcased as an entry chip, sort of a pill-shaped layout.
Now according to the material design, this element should be an Android Chip with style as ‘Entry’. This chip can also have a close icon along with a chip icon. Generally, this type of chip is contained in a ChipGroup.
ChipGoup class is similar to the RadioGroup class, as it is used to hold multiple chips. It has the properties to display all the chips in a single line.
Adding text to Entry Chip programmatically.
2.Filter Chip
Filter chips would start acting as a radio button. This means in a way only one selection can be made at a time. This functionality is achieved by adding all the filter chips in a ChipGroup and setting the property app:singleSelection=”true” of Chip Group.
Click Listener for the Filter Chip group,
3.Choice Chip
The choice chip allows the user to select only one of the available options just like the filter chips. But with one difference, it does not have a check icon on it.
Instead according to material design guidelines, it displays the selection with a change of color, when it is selected. If you wish you can use a chipIcon with this chip.
defining the choice chip in XML.
handling ChoiceChip selection on chipgroup.
4.Action Chip (Default)
It’s a single actionable chip, in short, its an alternative to the button widget. If you have to perform an action, based on users tap, this is the chip that you should use. Generally, this type of chip is placed after the content of the page and is used as a clickable, just like a button.
Implemention click listener for the ActionChips.
Источник
Hands-on with Material Components for Android: Chips
Part 5 of a series covering practical usage of Material Components for Android

This post will be covering the features and API of Chip components. To find out how to handle initial setup of Material Components for Android (including the Gradle dependency and creating an app theme), please see my original post:
Setting up a Material Components theme for Android
Attribute by attribute
Chips are compact components that display discrete information. Given the simplicity of their makeup and small size, they are flexible enough to be used for entering information, filtering content, selection and triggering actions. Chips should be grouped accordingly and are rarely used as standalone elements.
From a design perspective, there are four main types of chips which can be used in different scenarios:
- Input chips: Represent discrete information (an entity, attribute, etc.) as input to a field. Characterized by the close icon which is used to remove them from a group.

- Choice chips: Represent a single choice selection in a group of two or more chips. Characterized by the different checked/unchecked colors, toggled via a tap.

- Filter chips: Represent a multiple choice filter in a group of two or more chips. Characterized by the checked icon, toggled via a tap.

- Action chips: Simply used to trigger a given action. Contains standard icon and text label.

Basic usage 🏁
A Chip can be included in your layout like so:
Choosing a style 🤔
As discussed in the intro section above, a variety of chip types exist. These types map to styles that you can apply to a Chip . The full list of styles and their attributes can be found on GitHub. These style variants inherit from Widget.MaterialComponents.Chip , each with an optional style suffix:
- Input chip: *.Entry (standalone default)
- Choice chip: *.Choice
- Filter chip: *.Filter
- Action chip: *.Action (default)
Applying attributes 🎛️
A number of attributes exist to customize the appearance and behavior of Chip s. The defaults for these attributes vary depending on the style of Chip used. A large amount of attributes exist and not all of them are listed here (eg. Icon padding). Some attributes are purposefully left out and have been reserved for the “Theming” section below. The full list of attributes can be found on GitHub.

Chip icon
- chipIcon : An icon Drawable that is displayed at the start of the Chip .
- chipIconVisible : Whether or not the chip icon is visible.
- chipIconSize : The size of the icon.
Close icon
- closeIcon : A clickable close icon Drawable that is displayed at the end of the Chip .
- closeIconVisible : Whether or not the close icon is visible.
- closeIconSize : The size of the close icon.
Checked icon
- checkedIcon : A check icon Drawable that is displayed at the start of the Chip and is toggled via tapping the Chip .
- checkedIconVisible : Whether or not the checked icon is visible.
- android:checkable : Whether or not checkable tapping is enabled.
Listening for clicks, closes and checks 👂
Chip s have a few UI elements that can respond to clicks. If the android:checkable attribute is enabled, clicks on the chip itself will toggle the checked/unchecked state. All of these events can be observed with callbacks.
Listening for a click on the Chip itself is done like so:
We can also listen for a click on the Chip close icon:
Finally, we can listen for checked/unchecked state changes:
Grouping Chips 👨👩👧👦
As mentioned above in the intro section, Chip s are most commonly used in groups. Strictly speaking, any ViewGroup can be used to achieve this (eg. a RecyclerView ). That being said, the ChipGroup class exists to conveniently handle certain multi- Chip layout and behavior patterns. Specifically, this includes reflowing Chip s across multiple lines and handling single selection.

Chip s can be grouped with a ChipGroup like so:
If a single horizontal line of Chip s is preferable over multi-line reflow, you would implement this like so:

The spacing between grouped Chip s (which defaults to 8dp) can be adjusted with the chipSpacing , chipSpacingHorizontal and chipSpacingVertical attributes:

The singleSelection attribute can be set to true on a ChipGroup in order to toggle single-select and multi-select behavior of child Chip s.
The selectionRequired attribute can be set to true on a ChipGroup to prevent all child Chip s from being deselected (i.e. At least one option should be chosen).
Lastly, a number of APIs exist for programmatically setting, getting and listening for changes to child Chip checked/unchecked state:
Advanced usage with ChipDrawable 🤓
In certain cases, you may wish to use a standalone chip where a Drawable is required instead of a View . For this, we can use the ChipDrawable class.
Firstly, an XML representation of the chip needs to be added to your res/xml folder, as a separate file, using the tag:
All of the non-interactive styleable attributes from the Chip View are supported. A ChipDrawable can then be inflated from this resource like so:
As an example, consider an editable e-mail address field that converts addresses to chips as they are typed and validated. We can combine ChipDrawable with spans to add a chip to an EditText :

Theming 🎨
Chips can be themed in terms of the three Material Theming subsystems: color, typography and shape. We have already shown which styles to use in the “Choosing a style” section above. When implementing global custom Chip , ChipDrawable and ChipGroup styles, reference them in your app theme with the chipStyle , chipStandaloneStyle and chipGroupStyle attributes respectively.
Color
The color of the Chip background can be customized with the chipBackgroundColor attribute. This requires a ColorStateList , meaning a for checked/enabled/disabled states is required. It defaults to colorPrimary (checked)/ colorOnSurface (unchecked) for choice chips and colorOnSurface for all other types, with different opacities per state.
The color of the text label can be customized with the android:textColor attribute. This too requires a ColorStateList . It defaults to colorPrimary (checked)/ colorOnSurface (unchecked) for choice chips and colorOnSurface for all other types, with different opacities per state.
The color of the Chip icons can be customized with the chipIconTint and closeIconTint attributes. There is no attribute for the checked icon, so the tint should be embedded in the resource. These too require ColorStateList s. The default for chipIconTint is no tint while closeIconTint defaults to colorOnSurface .
Chips can have an optional border stroke and the chipStrokeColor attribute can be used for this. This defaults to colorOnSurface . Seeing as the chipStrokeWidth attribute defaults to 0dp, this stroke is not visible by default.
Lastly, the color of the chip touch ripple can be customized with the rippleColor attribute. It too accepts a ColorStateList and defaults to colorPrimary (pressed)/ colorOnSurface (focused) for choice chips and colorOnSurface for all other types, with different opacities per state.

Typography
At the time of writing, the latest release of Material Components for Android is 1.2.0-alpha06 and global type theming attributes (eg. fontFamily ) do not affect Chip . You can star the issue for this on the issue tracker.
To achieve this, we need to specify a custom text appearance style for chips:
We could apply this directly to a chip or in an individual chip style by referencing it with the android:textAppearance attribute.

Shape
The shape of a chip background can be customized with the shapeAppearance attribute. This defaults to shapeAppearanceSmallComponent .

More resources 📚
- The source code for the Playground app used in this article can be found on GitHub.
- Chips Design Documentation
- Chips API Documentation
I hope this post has provided some insight into Chips and how they can be used in your Android app(s). If you have any questions, thoughts or suggestions then I’d love to hear from you!
Источник


