- Использование жестов Multi-Touch на компьютере Mac
- Жесты трекпада
- Жесты мыши
- iOS mobile scroll in Web + React
- Getting to business
- Level 1: prevent background scroll in almost every browser
- Level 2: enable iOS momentum scroll in nested containers
- Level 3: prevent background scroll in iOS mobile
- Level 4: enable momentum scroll without scrolling the background
- Level 5: complex layout scroll management: SafariScrollProvider
- Level 6: iOS Safari restricted browser area
- Key takeaway
- Что такое scroll apple
Использование жестов Multi-Touch на компьютере Mac
С помощью трекпада Multi-Touch или мыши Magic Mouse можно выполнять полезные действия нажатием, смахиванием, сведением или разведением одного или нескольких пальцев.
Жесты трекпада
Для получения дополнительных сведений об этих жестах перейдите в меню Apple () > «Системные настройки» и щелкните «Трекпад». Здесь можно отключить какой-либо жест, изменить тип жеста и узнать, какие жесты поддерживаются компьютером Mac.
Для поддержки жестов трекпада требуется Magic Trackpad или встроенный трекпад Multi-Touch. Если ваш трекпад поддерживает Force Touch, также можно использоватьнажатие с усилием и тактильный отклик.

Щелчок нажатием
Нажмите одним пальцем, чтобы щелкнуть.
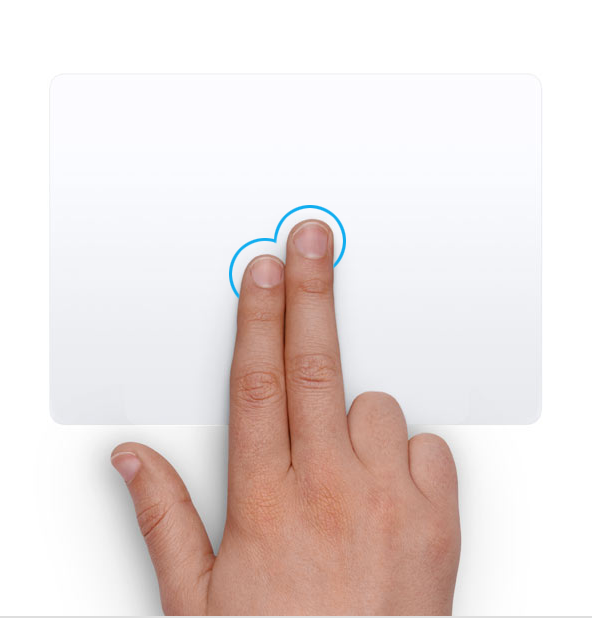
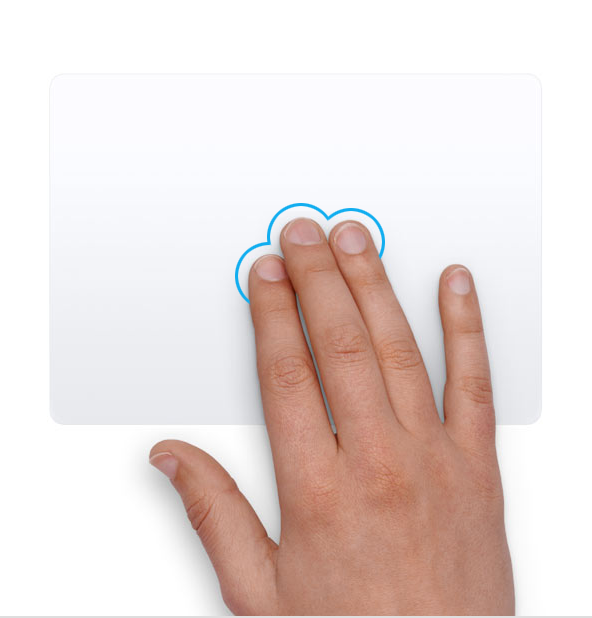
Вторичный щелчок (щелчок правой кнопкой мыши)
Щелкните или нажмите двумя пальцами.
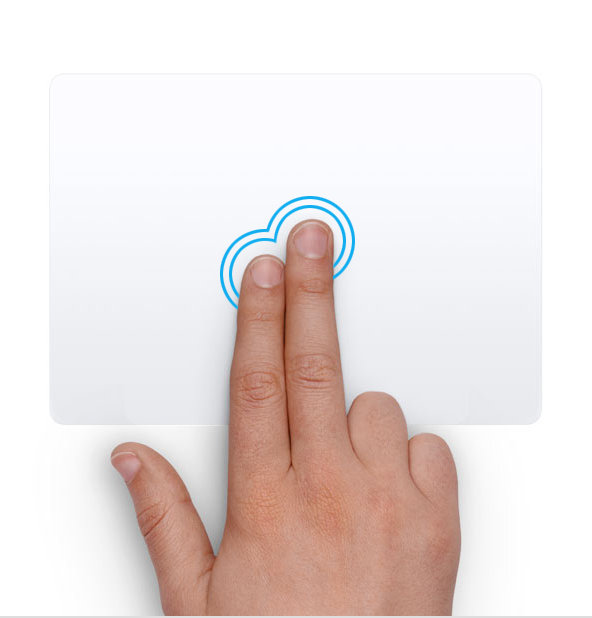
Смарт-масштабирование
Для увеличения и уменьшения масштаба веб-страницы или документа PDF используйте двойное нажатие двумя пальцами.
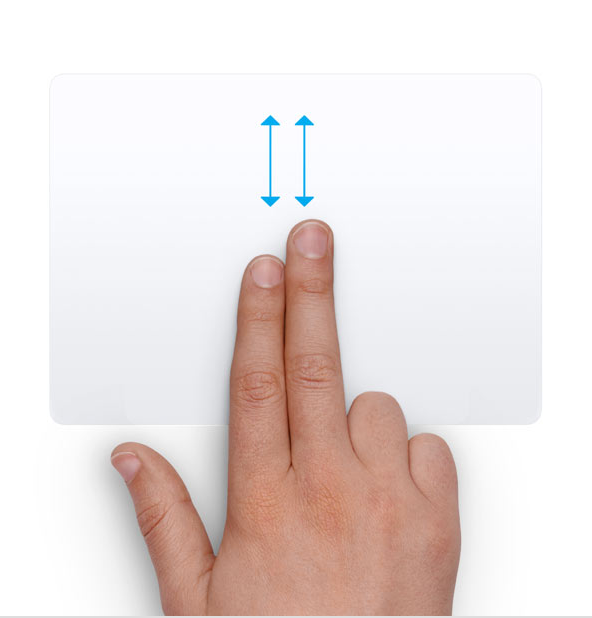
Прокрутка
Для прокрутки экрана проведите двумя пальцами вверх или вниз. 1
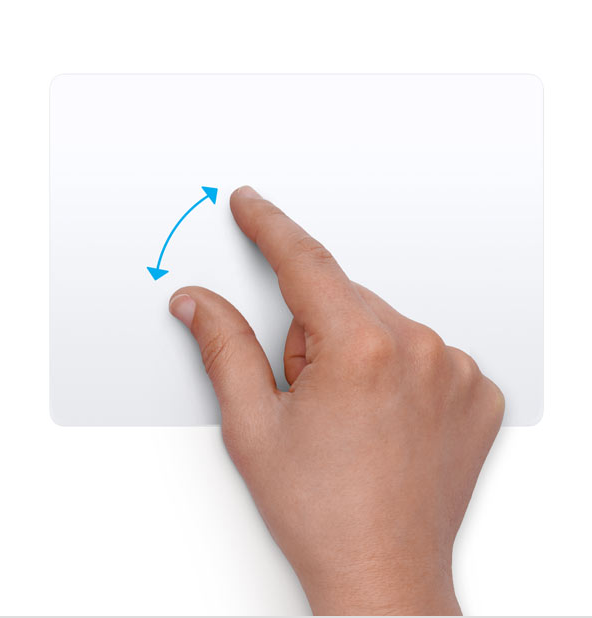
Масштабирование изображения
Чтобы увеличить и уменьшить масштаб, разведите или сведите два пальца.
Поворот
Чтобы повернуть фотографию или другой объект, поверните два пальца в нужном направлении друг относительно друга.

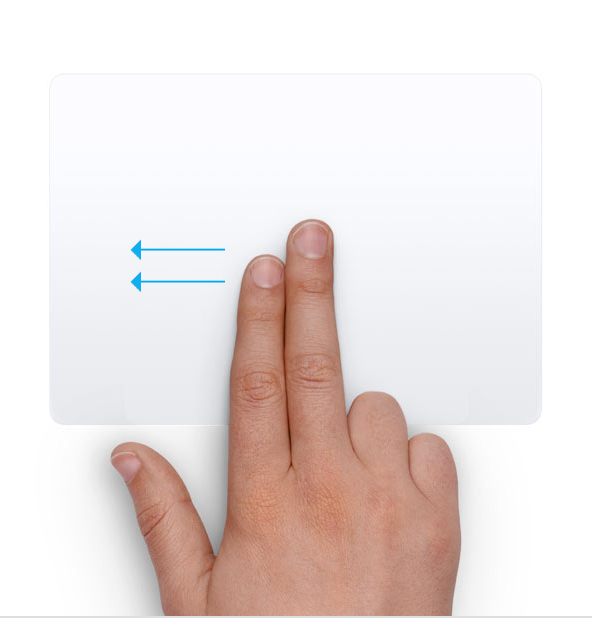
Переход между страницами смахиванием
Для отображения предыдущей или следующей страницы смахните двумя пальцами влево или вправо.
Открытие Центра уведомлений
Чтобы открыть Центр уведомлений, смахните двумя пальцами влево от правого края.
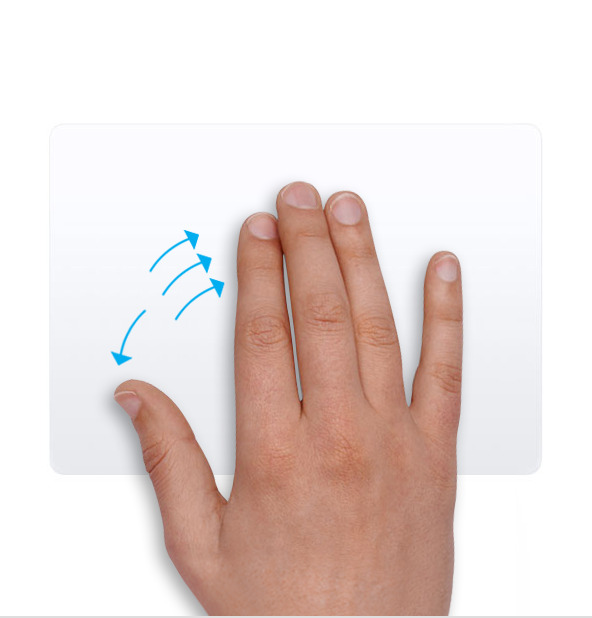
Перетаскивание тремя пальцами
Используйте три пальца для перетаскивания объектов по экрану, затем щелкните или нажмите, чтобы отпустить перетаскиваемый объект. Эта функция включается в разделе «Универсальный доступ».
Поиск и детекторы данных
Нажмите тремя пальцами для доступа к поиску слова или действиям с датами, адресами, номерами телефонов и другими данными.
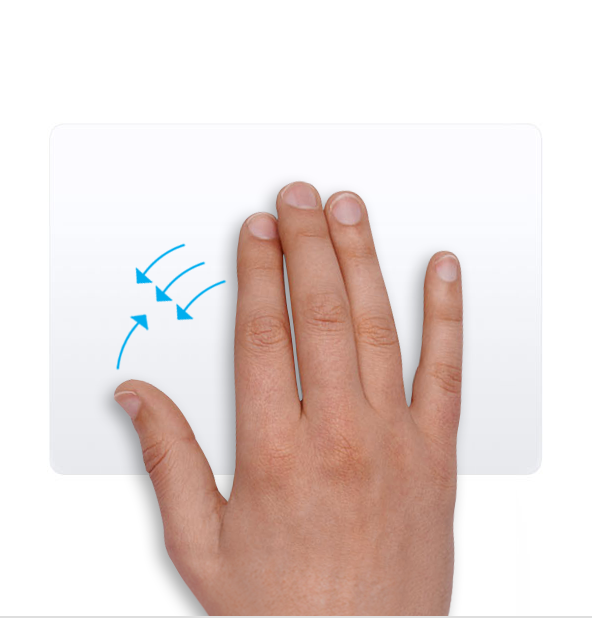
Отображение рабочего стола
Разведите большой и три других пальца, чтобы отобразить рабочий стол.
Launchpad
Чтобы отобразить Launchpad, сведите большой и три других пальца.
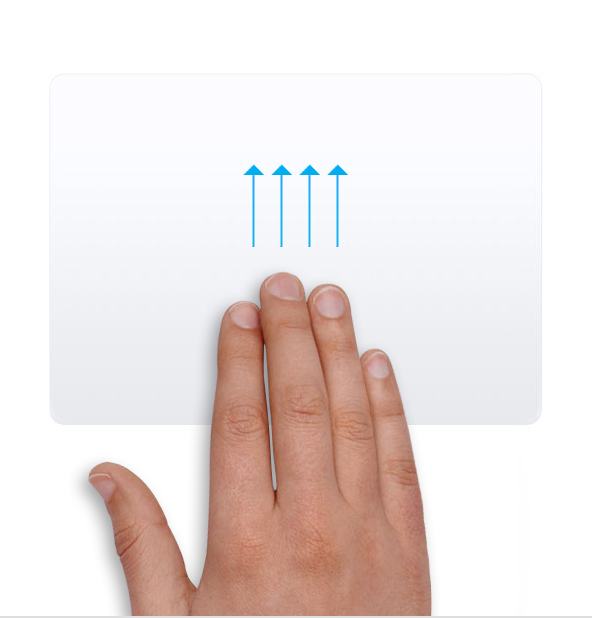
Mission Control
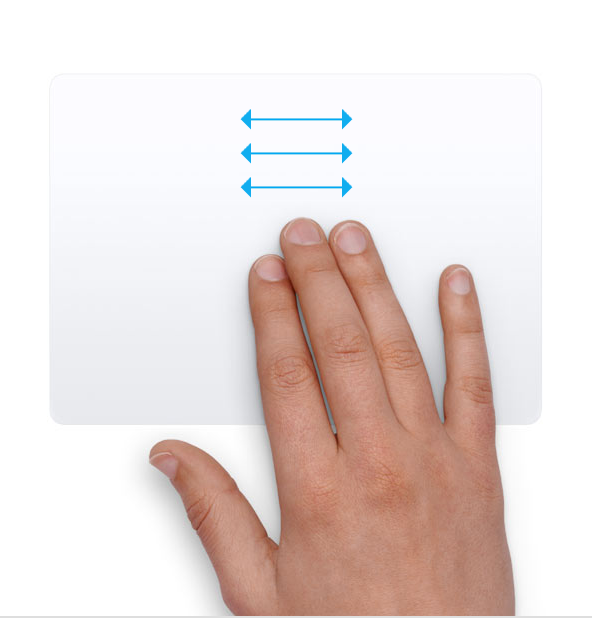
Смахните четырьмя пальцами 2 , чтобы открыть Mission Control.
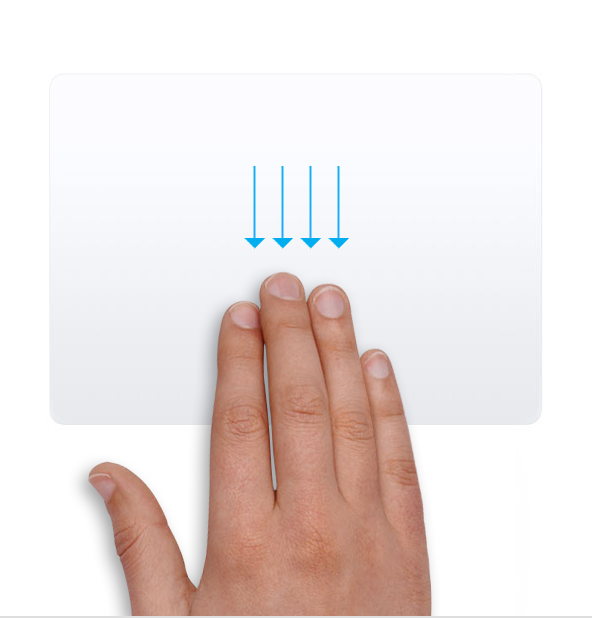
Exposé
Смахните четырьмя пальцами 2 , чтобы отобразить все окна используемого приложения.
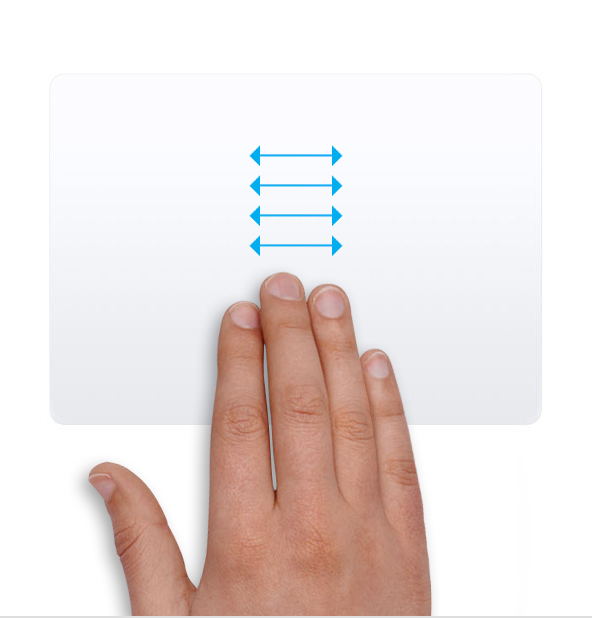
Смахивание для перехода между полноэкранными приложениями
Смахните четырьмя пальцами влево или вправо 2 для перехода между рабочими столами и полноэкранными приложениями.

Жесты мыши
Для получения дополнительных сведений об этих жестах перейдите в меню Apple () > «Системные настройки» и щелкните «Мышь». Здесь можно отключить какой-либо жест, сменить тип жеста и узнать, какие жесты поддерживаются компьютером Mac. Для поддержки жестов мыши требуется Magic Mouse.

Вторичный щелчок (щелчок правой кнопкой мыши)
Щелкните правой стороной мыши.
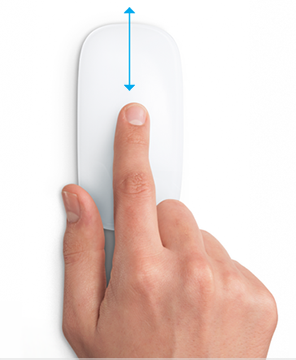
Прокрутка
Проведите одним пальцем вверх или вниз для прокрутки. 1

Смарт-масштабирование
Для увеличения и уменьшения масштаба веб-страницы или документа PDF используйте двойное нажатие одним пальцем.

Mission Control
Для открытия Mission Control используйте двойное нажатие двумя пальцами.
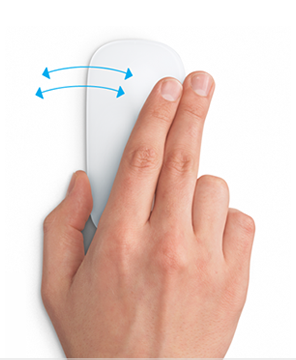
Смахивание для перехода между полноэкранными приложениями
Смахните двумя пальцами влево или вправо для перехода между рабочими столами и полноэкранными приложениями.
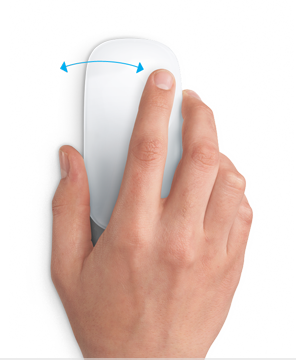
Переход между страницами смахиванием
Для отображения предыдущей или следующей страницы смахните одним пальцем влево или вправо.
1. Отключить прокрутку с помощью трекпада можно в разделе «Универсальный доступ».
2. В некоторых версиях macOS для этого жеста используются три, а не четыре пальца.
Источник
iOS mobile scroll in Web + React

Every developer who’s ever had to deal with scrollable floating elements in iOS will agree with the following fact: there is a direct relationship between iOS scrolling and headaches.
As the title states, this isn’t limited to Safari mobile: the scope of this article covers all iOS mobile devices and their browsers.
There are some very descriptive posts outside there already (see resources at the end of the article). Their main goal is to offer a way to overcome iOS behavior when handling nested scrolling.
Unfortunately, to date, there is no perfect way around it. The goal of this post is to show the evolution of the solution we ended up building at Turo.
State of the art
- Level 1: prevent background scroll in almost every browser
- Level 2: enable iOS momentum scroll in nested containers
- Level 3: prevent background scroll in iOS mobile
- Level 4: enable momentum scroll without scrolling the background
- Level 5: centralize scroll management: IosMobileScrollContext
- Level 6: iOS Safari restricted browser area
Getting to business
Level 1: prevent background scroll in almost every browser
The two most popular ways to achieve this are clean and straightforward CSS approaches.
Then, we need to add this class to the element, using means such as vanilla JS: document.body.classList.add(‘is-scrollLocked’) .
Level 2: enable iOS momentum scroll in nested containers
This is actually a WebKit feature that can also be achieved using CSS only (Don’t get overly excited, I promise there’s going to be some JS further down the post).
This class should now be used in scrollable containers where we’d like to enable momentum scroll (including the document body itself).
Level 3: prevent background scroll in iOS mobile
iOS mobile is going to be our special headache when handling scrollable containers. The CSS solution stated in “Level 1” isn’t going to be enough here.
This time, we need to rely on Javascript. Specifically, we need to prevent the touchmove event because otherwise it will bubble up and end up causing a scroll event even if overflow is hidden .
The snippet to handle this scenario is not too complex, we need to add an event listener to window just considering a specific quirk: we have to specify a third parameter to mark this event listener as not passive . You can read up on why it’s required in this MDN link (or you could also try it and then see the console warning).
Level 4: enable momentum scroll without scrolling the background
I’ll start off by defining what I call the bounce effect: if you’ve ever tried scrolling past the end of a document in iOS touch screens, you may have noticed the full page gets dragged away from the bottom of the screen and then it bounces back to the edge.
The bounce effect happens not only at body level, but also at nested scrollable elements level. There is one side effect to this animation: a bounce triggers a scroll event at the document level, no matter where it was originated, and it can’t be prevented.
The consequence of this behavior is what we call an “undesired” scroll. Think of a scrollable modal on top of a list; scrolling inside the modal ends up scrolling the background list, too.
What’s the solution to this? Should we disable momentum scroll? We definitely want to keep smooth scrolling, but we don’t want users to end up in an unexpected state after closing the modal.
Our solution: prevent the bounce altogether!
How can this be done? Piece of cake: prevent the scroll from reaching the first and the last pixel of the scroll height. This needs to happen before we give touchmove events a change to bubble up, so we need to listen to touchstart. Here’s a snippet showing how to achieve it:
Level 5: complex layout scroll management: SafariScrollProvider
What happens when you stumble upon a complex layout where some of its pieces should be static, some of them should be scrollable and, worst of all, you need to prevent unwanted background scroll?
At Turo, we use React, so the following step-up is going to rely on the React Context API.
By embracing React context, we can basically create a single component to manage when should we allow scrolling and when should we prevent it.
The idea is to register all scrollable and non-scrollable elements in a single place and bind a single event listener to prevent touchmove (be efficient whenever you can).
- IosMobileScrollContext with its and
- . This component registers a non-scrollable div.
- . This component registers a scrollable div and prevents the bounce by implementing the “Level 3” handler.
The snippets above should give you a broad idea of how to achieve the desired behavior. The provider and scrollable components could check for iOS mobile before binding the events and we should also integrate the generic CSS solutions for the rest of the browsers.
Level 6: iOS Safari restricted browser area
Here comes a fact about Safari mobile: there’s a restricted area.

Interesting discovery, isn’t it? Well, it turns it comes with the following features:
- It’s a 100% width * 44px height block.
- It’s anchored at the bottom of the browser.
- It’s not always visible.
- It listens to touch events. Tapping in it shows Safari’s bottom navigation bar.
- Scrolling up on a document shows it.
- Scrolling down more than a certain amount of pixels hides it.
- touchmove events on it trigger a document scroll.
- touchmove events in this area are not controlled by the DOM, but by Safari itself.
Essentially, this means the background will still be scrollable when scrolling too close to the bottom edge of the browser. At the moment, the only workaround for this consists in:
- Store the current scroll position when opening a new scrollable element in the foreground.
- Whenever a document scroll event happens, compare the background scroll position with the previously stored value.
- If the position changed, restore the previous position.
Key takeaway
The most valuable lesson I’ve learned following this process is: it’s important to take into account iOS mobile into your designs (hello again, Internet Explorer), but beware: sometimes you’re going to need to decide and set some limits to your scope. You now have the tools to either compromise or take head-on what you need to implement for your cross-browser scroll experience.
Источник
Что такое scroll apple
A scroll view lets people browse content that’s larger than the view’s visible area, such as text in a document or a collection of images, by scrolling horizontally and vertically. A scroll view itself has no appearance, but can display horizontal and vertical scroll bars, each of which consists of a track containing a draggable control known as a knob. The height of a knob reflects the quantity of scrollable content. For example, a small knob indicates that there’s lots of content available to scroll.
Scroll views support several scrolling methods.
| Scrolling method | Description |
|---|---|
| Continuous scrolling | Content scrolls as the user swipes the trackpad with two fingers, swipes the mouse surface with one finger, or clicks and drags a knob. |
| Line by line scrolling | Content scrolls one line at a time as the user presses the arrow keys. |
| Page by page scrolling | Content scrolls one page at a time as the user presses the arrow keys while pressing Option. |
Account for scroll bars in your layout. By default, scroll bars are transient and only appear during user interaction. The user can enable them all the time, however, by changing a setting in General preferences. Some input devices also cause scroll bars to be displayed all the time. If necessary, adjust the layout of your window so important interface elements don’t appear beneath scroll bars, which extend into the content area of a view. The scroll bar track has a thickness of 15 points (regular size) or 11 points (small or mini size).
Respect the user’s scroll bar settings. Let the user decide whether scroll bars are visible. Avoid placing controls inline with a scroll bar because such controls cause scroll bars to appear even when they’re set to be transient.
Don’t override the default scrolling gestures or keyboard shortcuts. Users are accustomed to the systemwide scrolling behavior.
Consider helping people discover when a window’s content is scrollable. Because scroll bars aren’t always visible, it can be helpful to make it obvious when content extends beyond the view. Displaying partial content at the bottom edge of the view is a great way to show that there’s more to see. Don’t feel that content peeking like this is a requirement, however. Scrolling is an intuitive and nondestructive action that users don’t mind experimenting with. When faced with a window full of text, the vast majority will instinctively try scrolling to see if more content is available.
Coordinate the knob color with your interface. A knob can adopt either a dark or light appearance. A dark knob—for use above a light background—is the default.
Don’t place a scroll view inside of another scroll view. Nested scroll bars create an unpredictable interface that’s difficult to control.
Don’t move window content when transient scroll bars appear. Transient scroll bars are translucent, so users can see window content beneath them. Constantly shifting content every time scroll bars appear can be disorienting.
Scroll an appropriate amount when performing page-by-page scrolling. Typically, a page is considered the current height or width of the view, minus at least one unit of overlap to maintain context. You define the unit of overlap so that it makes sense for the displayed content. For example, one unit might equal a line of text, a row of icons, or part of a picture. Persistently pressing an arrow key while pressing Option should cause continuous page-by-page scrolling until the end of the document is reached.
Scroll an appropriate amount when the scroll bar track is clicked. Clicking within a scroll bar track should either jump to the next page or the current insertion point, depending on the user’s preferences. Persistently clicking within a scroll bar track should cause continuous scrolling until the knob reaches the location of the pointer.
Scroll automatically when appropriate. The user should initiate scrolling most of the time, but your app should perform automatic scrolling in certain situations:
- When your app performs an operation that results in making a new selection or moving the insertion point. For example, when the user searches for text and your app locates it, scroll to show the new selection.
- When the user enters information in a location that’s not currently visible. For example, if the insertion point is on one page and the user has navigated to another page, scroll back to the insertion point.
- When the user moves the pointer past the edge of the view while making a selection, follow the pointer by scrolling in the direction the pointer moves.
- When the user selects something, scrolls to a new location, and then tries to perform an operation on the selection, scroll back to the selection before performing the operation.
In all cases, automatic scrolling should only move the document as much as necessary. Minimizing automatic scrolling helps people retain context. For example, if part of a selection is visible after performing an operation, scrolling isn’t necessary.
If possible, show a selection in context when automatically scrolling to it. If the entire window shows only the selected content, it can be difficult for users to remember the position of the selection within the overall content.
Never use a scroll bar as a slider. A scroll bar repositions content within a view. A slider lets the user make a fine-grained selection within a range of values. See Sliders.
Consider using small or mini scroll bars in a panel, if necessary. If space is tight, it can be acceptable to use smaller scroll bars in panels that need to coexist with other windows. Note that if a window uses small or mini scroll bars, all other controls in that window’s content area should also be the smaller version.
Источник


