- Cisco jabber как настроить андроид
- Настройка Cisco Jabber for Android
- Исходные параметры
- Настройка стационарного телефона
- Настройка свойств пользователя
- Проверка
- Пробный логин Cisco Jabber
- Настройка Cisco Jabber for Android на CUCM
- Настройка свойств пользователя
- Support
- Cisco Jabber for Android 10.5 Quick Start Guide
- Hierarchical Navigation
- Viewing Options
- Cisco Jabber
- Set Up
- Prepare for Setup
- Certificate Validation
- Set up with URL
- Set Up Using Simple Sign-In
- Manually Set Up Cisco WebEx Messenger
- Manually Set Up Cisco Unified Communications Manager IM and Presence
- Manually Set Up Phone Services Only
- Use Cisco Jabber
- For Phone
- For Tablet
- Add Contact from Directory
- Make Call from Contacts
- Start Chat from Contacts
- Troubleshoot
- Send Problem Report
- Sign-In Issues
- Application Failure
Cisco jabber как настроить андроид

— Samsung Galaxy S II (AT&T) running Android 2.3
— Samsung Galaxy S International (GT-I9000) running 2.2.1 or 2.3
— Samsung Galaxy Tab International (GT-P1000) running 2.2.1 or 2.3
Однако, как показывает практика, работает джаббер и на отличных от самсунга устройств..главное условие здесь — версия андроида 2.2 или 2.3
Итак, скачиваем бесплатно джаббер из андроид-маркета себе на телефон, устанавливаем..затем необходимо провести определенные манипуляции на корпоративном колл-менеджере..я покажу на примере CUCM 8.6.1, однако всё ниженаписанное справедливо и для более низких версий с той разницей, что на версиях 8.5 и ниже необходимо устанавливать и настраивать dial-rules (проверить необходимость этого на практике не могу, т.к. этих версий под рукой нет).
Прежде чем добавить на CUCM новое андроид-устройство, необходимо установить device-темплейт для него — device COP file, который называется cmterm-android_8.6.2v17.cop.sgn
Скачать последнюю версию этого файла можно здесь. Для скачивания необходим ССО с соответствующими правами.
После скачивания идем в Cisco Unified OS Administration. Далее выбираем Software Upgrades — Install/Upgrade. Дальше выбираем способ, каким будем закачивать файлик на CUCM (я всегда использую ftp) и, собственно, устанавливаем его. После установки рестартуем сервис Cisco Tftp.
Теперь можно приступить непосредственно к добавлению устройства. Идем в Cisco Unified CM Administration, далее Device — Phone — Add New. В списке Phone Type выбираем Cisco Dual Mode for Android. Откроется почти стандартное окошко добавления нового аппарата. И здесь всё проставляем как обычно: девайс пул, CSS и т.п.
Теперь необходимо остановить внимание на нескольких важных пунктах настройки
Device Name должно обязательно быть написано большими буквами и обязательно начинаться с префикса BOT — BOTPETROV, например
Sip Profile — создаем свой новый..в первую очередь для того, чтобы джаббер-клиент нормально работал в фоне. Идем в Device — Device Settings — SIP Profile и создаем новый профайл со следующими настройками:
После ввода всех настроек жмем Save и Apply.
Далее конфигурируем DN для этого устройства — всё как обычно.
Вот собственно и всё. надеюсь ничего не забыл..
Источник
Настройка Cisco Jabber for Android

В данном материале подробно рассматривается настройка пользователя, имеющего стационарный телефон, а также мобильный телефон Samsung Galaxy, на который мы установим Cisco Jabber For Android.
Исходные параметры
CUCM Version 11.5
Имя Ivan
Фамилия Zolotov
Город Tyumen
Login izolotov
DN 1356
Настройка стационарного телефона
Заходим в свойства телефона и выставляем:
- Description: 1356 — Tyumen — Ivan Zolotov
- Device pool: Tyumen_pool
- Calling Search Space: Tyumen_Internal_css
- Owner User ID: izolotov
Жмем Save, затем для применения параметров Apply. При этом телефон перезагрузится.
На той же странице слева вверху щелкнем “Line 1” и зайдем в свойства линии и заполним следующие поля:
- Directory Number: 1356
- Route Partition: Oncluster_pt
- Description: 1356 — Tyumen — Ivan Zolotov
- Alerting name: 1356 Ivan Zolotov
- ASCII Alerting name: 1356 Ivan Zolotov
- Calling Search Space: Tyumen_Internal_css
- Выставляем CSS Tyumen_Internal_css для параметров Call Forward:
- Forward All
- Forward Busy Internal
- Forward Busy External
- Forward No Answer Internal
- Forward No Answer External
- Display (Internal Caller ID): 1356 Ivan Zolotov
- ASCII Display (Internal Caller ID): 1356 Ivan Zolotov
- Line Text Label: 1356 Ivan Zolotov
- ASCII Line Text Label: 1356 Ivan Zolotov
- Нажимаем Save (без этого не появится кнопка Associate end users)
- Users Associated with Line – выбираем заведенного пользователя
- Нажимаем Save – Apply
Настройка свойств пользователя
User Management -> End User
Controlled Devices, жмём Device Associations – находим стационарный телефон и добавляем его
Permissions Information, добавляем Standard CCM End Users.
Проверка
Стационарный телефон должен успешно звонить и принимать звонки.
Пользователь должен успешно заходить на Cisco Unified Communications Self Care Portal
Пробный логин Cisco Jabber
Даже без предварительных настроек на CUCM. Пользователь уже должен успешно логиниться в Cisco Jabber:
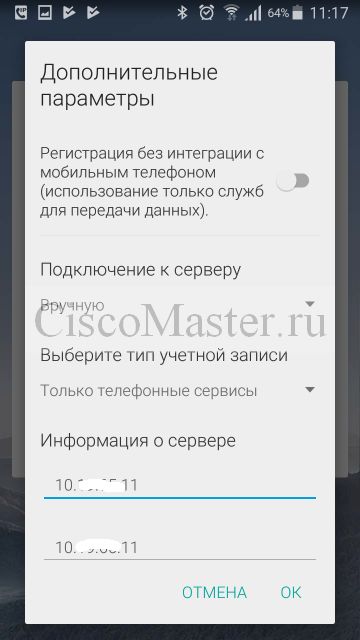
Для начала настроим параметры сервера: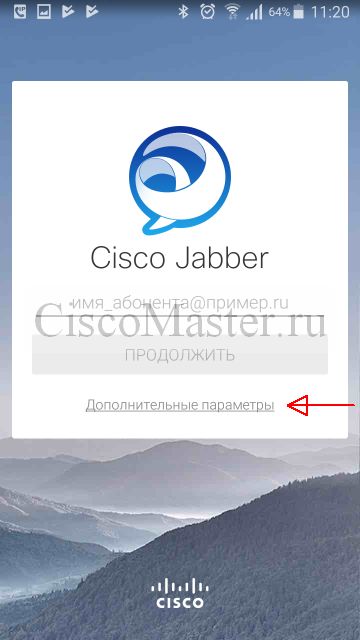
Далее логинимся пользователем в формате username@AD_domain_name_fqdn + доменный пароль этого пользователя.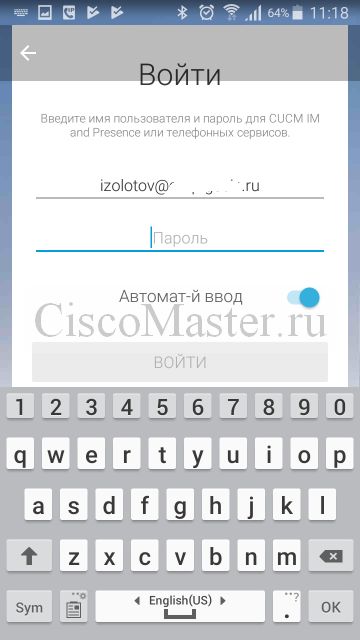
После успешного логина мы увидим: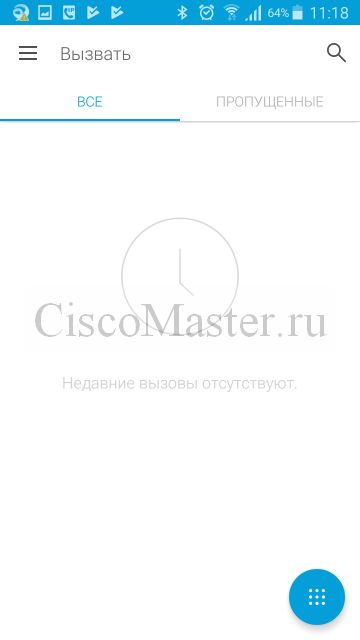
Но при попытке вызвать клавиатуру будет выдаваться ошибка: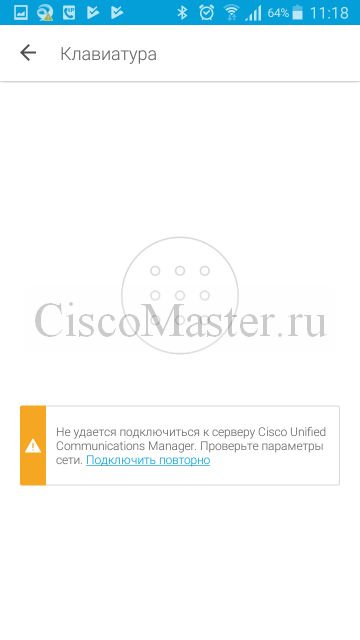
Настройка Cisco Jabber for Android на CUCM
Настроим теперь Cisco Jabber for Android в качестве второго аппарата.
Перед началом следует проверить что наш Device pool поддерживает кодек G.711.
Идём
Device > Phone > Add > Cisco Dual Mode for Android
Вводим параметры устройства:
- Device Name: BOTIZOLOTOV
- Имя Device Name должно быть UPPERCASE и должно начинаться с BOT
- Длина до 15 символов
- Может включать симвоолы A to Z, 0 to 9, dash (-), or underscore (_)
- Рекомендуется задавать в формате BOTUSERNAME
- Description: 1356 — Tyumen — Ivan Zolotov
- Device pool: Tyumen_pool
- Phone Button Template: Standard Dual Mode for Android
- Calling Search Space: Tyumen_Internal_css
- Owner User ID: izolotov
- Primary Phone: выбрать соответствующий desktop Phone
- Device Security Profile: Cisco Dual Mode for Android — Standard SIP Non-Secure Profile
- SIP Profile: Standard SIP Profile
- Нажимаем Save – Apply
На той же странице слева вверху щелкнем “Line 1” и зайдем в свойства линии и заполним следующие поля:
- Directory Number: 1356
- Route Partition: Oncluster_pt
Система автоматом «узнает» этот DN и подгрузит все параметры данного DN. - Нажимаем Save – Apply
После этого при логине в Jabber мы уже сможем принимать и отправлять звонки.
Настройка свойств пользователя
User Management -> End User
Controlled Devices, жмём Device Associations – находим Jabber телефон и добавляем его
Источник
Support
Cisco Jabber for Android 10.5 Quick Start Guide
Hierarchical Navigation
Viewing Options
Cisco Jabber
Welcome to Cisco Jabber.
Use this guide to set up the app and use some key features.
After setup, learn more by viewing the user guides in the Cisco Jabber Settings menu.
Set Up
The steps to set up Cisco Jabber vary, depending on how your administrator set up your account.
Prepare for Setup
After you download Cisco Jabber for Android from Google Play and install it, perform the following steps to prepare for setup:
- Get your setup information. Your system administrator must give you the sign-in method and account information.

NoteCisco Unified Communications Manager IM and Presence Service is formerly known as Cisco Unified Presence .
Sign-In Method Account Information - URL (that you use to start the setup process)
- username
- password
- username and domain (for example, username@example.com )
- password
Manual Cisco WebEx Messenger
- username and domain (for example, username@example.com )
- password
Manual Cisco Unified Communications Manager IM and Presence Service
- username and domain (for example, username@example.com )
- password
- server address
Manual Phone Services only
- TFTP server address
- CCMCIP server address
- username and domain (for example, username@example.com )
- password
Certificate Validation
When you set up and use Cisco Jabber , you may be prompted to validate your server certificates to connect to your services.
Depending on your account setup, you may need to verify server certificates for the following services:
- Instant Messaging
- Phone Services
- Voicemail
- Directory
- Expressway Mobile and Remote Access
- SSO IDP certification for SSO deployments
NoteDepending on how your administrator sets up the servers, you may have to validate multiple certificates for Instant Messaging and Phone Services. Set up with URL
Procedure
Step 1 On your Android device, tap the setup URL that your administrator provided. Step 2 After Cisco Jabber opens, read the end user license agreement and terms of service, and then tap Accept . Step 3 Review the In Cisco Jabber screens, and then tap Get Started Now . Step 4 Click the provided URL. Step 5 Enter your password. Step 6 Tap Sign In . Step 7 If prompted to validate your server certificates, contact your administrator to verify that you should accept the certificates. After you sign in, Cisco Jabber opens. Set Up Using Simple Sign-In
Procedure
- On most screens, swipe to the right.
- Where available, tap
- Enter a name or user ID in the Search box to search your corporate directory, Recents, and Contacts.
- Tap the desired contact in the search results.
- Tap Answer to accept the call.
- If prompted, press a number on the keypad.
- Open your Internet browser.
- Try to access the administration pages for your corporate calling system by entering the following URL in your Internet browser: http:// Cisco Unified Communications Manager server name or IP address /ucmuser.
- If you cannot access the administration pages for your corporate calling system, try again from a different network access point. If you still cannot access the administration pages for your corporate calling system, contact your system administrator to find out if there is a network issue.
- Open a ping utility to ping the Cisco Unified Communications Manager IM and Presence Service server.
- Enter the Fully Qualified Domain Name or IP address of the server in one of the following formats:
- presence server name.domain .com
- ip address.domain .com
If you cannot ping the server, contact your system administrator.
Step 1 Open Cisco Jabber . Step 2 Read the end user license agreement and terms of service, and then tap Accept . Step 3 Review the In Cisco Jabber screens, and then tap Get Started Now . Step 4 Enter your username and domain in the following format: username@example.com . Step 5 Tap Continue . Step 6 If prompted, enter your password. Step 7 Tap Sign In . Step 8 If prompted to validate your server certificates, contact your administrator to verify that you should accept the certificates. After you sign in, Cisco Jabber opens.
Manually Set Up Cisco WebEx Messenger
Procedure
Step 1 Open Cisco Jabber . Step 2 Read the end user license agreement and terms of service, and then tap Accept . Step 3 Review the In Cisco Jabber screens, and then tap Get Started Now . Step 4 Tap Advanced settings . Step 5 In the Connect to server drop-down list, select Manually . Step 6 In the Select account type drop-down list, select WebEx Instant Messaging . Step 7 Tap OK . Step 8 Enter your username and domain in the following format: username@example.com . Step 9 Tap Continue . Step 10 Enter your password. Step 11 Tap Sign In . After you sign in, Cisco Jabber opens. Step 12 If prompted to validate your server certificates, contact your administrator to verify that you should accept the certificates. Manually Set Up Cisco Unified Communications Manager IM and Presence
Procedure
Step 1 Open Cisco Jabber . Step 2 Read the end user license agreement and terms of service, and then tap Accept . Step 3 Review the In Cisco Jabber screens, and then tap Get Started Now . Step 4 Tap Advanced settings . Step 5 In the Connect to server drop-down list, select Manually . Step 6 In the Select account type drop-down list, select CUCM IM and Presence . Step 7 In the Server information field, enter the presence server address that your administrator provided. Step 8 Tap OK . Step 9 Enter your username and domain in the following format: username@example.com. Step 10 Tap Continue . Step 11 Enter your password. Step 12 Tap Sign In . After you sign in, Cisco Jabber opens.
Step 13 If prompted to validate your server certificates, contact your administrator to verify that you should accept the certificates. Manually Set Up Phone Services Only
Procedure
Step 1 Open Cisco Jabber . Step 2 Read the end user license agreement and terms of service, and then tap Accept . Step 3 Review the In Cisco Jabber screens, and then tap Get Started Now . Step 4 Tap Advanced settings . Step 5 In the Connect to server drop-down list, select Manually . Step 6 In the Select account type drop-down list, select Phone Services Only . Step 7 In the Server information area, enter the TFTP and CCMCIP server addresses that your administrator provided. Step 8 Tap OK . Step 9 Enter your username and domain in the following format: username@example.com . Step 10 Tap Continue . Step 11 Enter your password. Step 12 Tap Sign In . After you sign in, Cisco Jabber opens.
Step 13 If prompted to validate your server certificates, contact your administrator to verify that you should accept the certificates. Use Cisco Jabber
For Phone
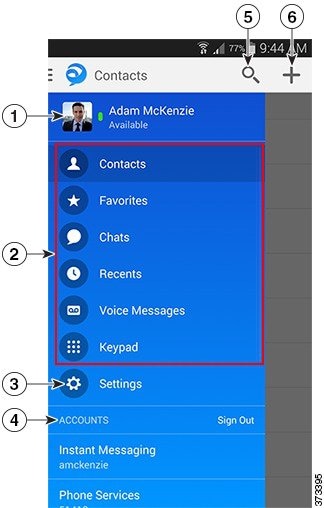
Cisco Jabber displays the Contacts screen after you sign in if you have been configured for both Instant Messaging and Presence and Voice and Video Calling. Cisco Jabber displays the Keypad screen after you sign in if you have been configured for Voice and Video Calling only.
Procedure
Step 1 To navigate, follow one of these steps: Step 2 Tap the following items to use the navigation drawer. Note Depending on your account setup, you may not see all the features shown here.
1. View and edit your availability status.
2. Access your features.
3. Edit your settings.
4. View account information or sign out of your account.
5. Search for contacts or make a call.
For Tablet
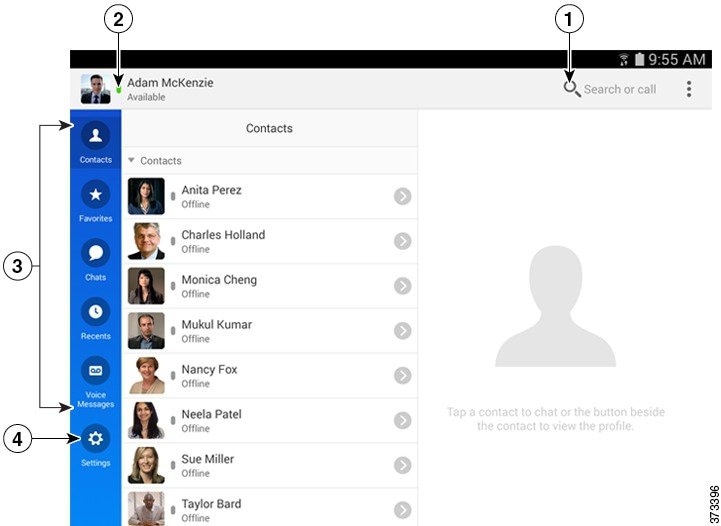
Cisco Jabber displays the Contacts screen after you sign in.
Use the navigation bar on the left to select the area of the application to use.
Note Depending on your account setup, you may not see all the features shown here.
1. Search for contacts or make a call.
2. View and edit your availability status.
3. Access your features.
4. Edit your settings.
Add Contact from Directory
Procedure
Step 1 On the Contacts screen, tap .Step 2 To search for a contact, follow these steps: Step 3 (Optional) Assign the contact to a group. Step 4 (Optional) To add the contact to your Favorites list, tap the Add to Favorites switch to turn it on. Step 5 Tap Done . Make Call from Contacts
Procedure
Step 1 On the Contacts screen, tap the photo or avatar for the desired contact in the list. Step 2 Select a phone number. Step 3 If using Dial via Office, follow these steps: After you accept the call, the corporate calling system calls the number you dialed. The Dial via Office call opens in the native phone application.
Start Chat from Contacts
Troubleshoot
Send Problem Report
Use this procedure to send a problem report using the Cisco Jabber settings.
TipYou can also send a report by tapping the «Send problem report» link in an error message. Procedure
Step 1 On the Settings screen, under Help , tap Problem Reporting . Step 2 If you can reproduce your problem, tap the Detailed Logging switch to turn it on. Step 3 Tap Send Problem Report . Cisco Jabber opens your Email application with a new message that contains a prefilled subject line and attached log files.
Step 4 Enter a description of the problem in the body of the email message and send it to your system administrator. Tip Include the time that the problem occurred. Check your Recents list to find that time.
What to Do Next
To save battery power and storage space, tap the Detailed Logging switch to turn it off after you no longer need it.
Sign-In Issues
If you cannot sign in, try the following troubleshooting tips.
Procedure
Step 1 Check that you are using a supported device and operating system. For information about supported devices and operating systems, see the Cisco Jabber for Android Release Notes for your release. Step 2 Check that you are using the correct release of Cisco Jabber for Android . You can download the latest release of Cisco Jabber for Android from the Google Play Store.
Step 3 Check that your VPN is connected (if VPN is required). If your VPN is not connected and you are not using Expressway Remote and Mobile Access, contact your system administrator for configuration details. Step 4 If you are using Phone Services, check the network connection between your device and the corporate network as follows: Contact your system administrator if you do not have the address for your company’s Cisco Unified Communications Manager server.
Step 5 If you are using Cisco Unified Communications Manager IM and Presence Service Service, check the network connection between your device and the server as follows: Step 6 If you are using a tablet, contact your system administrator to ensure it has been set up for use. Some tablet services require additional configuration that may not have been performed. Step 7 If you still cannot set up Cisco Jabber for Android , send a problem report to your system administrator. Application Failure
If Cisco Jabber for Android fails, Cisco recommends that you clear the application data and force-stop the application before restarting.
Procedure
Step 1 Open the Android Settings application. Step 2 Depending on your operating system, tap either Apps or Application manager . Step 3 Tap Cisco Jabber . Step 4 Tap Clear data . Step 5 Tap Force stop . THE SPECIFICATIONS AND INFORMATION REGARDING THE PRODUCTS IN THIS MANUAL ARE SUBJECT TO CHANGE WITHOUT NOTICE. ALL STATEMENTS, INFORMATION, AND RECOMMENDATIONS IN THIS MANUAL ARE BELIEVED TO BE ACCURATE BUT ARE PRESENTED WITHOUT WARRANTY OF ANY KIND, EXPRESS OR IMPLIED. USERS MUST TAKE FULL RESPONSIBILITY FOR THEIR APPLICATION OF ANY PRODUCTS.
THE SOFTWARE LICENSE AND LIMITED WARRANTY FOR THE ACCOMPANYING PRODUCT ARE SET FORTH IN THE INFORMATION PACKET THAT SHIPPED WITH THE PRODUCT AND ARE INCORPORATED HEREIN BY THIS REFERENCE. IF YOU ARE UNABLE TO LOCATE THE SOFTWARE LICENSE OR LIMITED WARRANTY, CONTACT YOUR CISCO REPRESENTATIVE FOR A COPY.
The Cisco implementation of TCP header compression is an adaptation of a program developed by the University of California, Berkeley (UCB) as part of UCB’s public domain version of the UNIX operating system. All rights reserved. Copyright © 1981, Regents of the University of California.
NOTWITHSTANDING ANY OTHER WARRANTY HEREIN, ALL DOCUMENT FILES AND SOFTWARE OF THESE SUPPLIERS ARE PROVIDED “AS IS» WITH ALL FAULTS. CISCO AND THE ABOVE-NAMED SUPPLIERS DISCLAIM ALL WARRANTIES, EXPRESSED OR IMPLIED, INCLUDING, WITHOUT LIMITATION, THOSE OF MERCHANTABILITY, FITNESS FOR A PARTICULAR PURPOSE AND NONINFRINGEMENT OR ARISING FROM A COURSE OF DEALING, USAGE, OR TRADE PRACTICE.
IN NO EVENT SHALL CISCO OR ITS SUPPLIERS BE LIABLE FOR ANY INDIRECT, SPECIAL, CONSEQUENTIAL, OR INCIDENTAL DAMAGES, INCLUDING, WITHOUT LIMITATION, LOST PROFITS OR LOSS OR DAMAGE TO DATA ARISING OUT OF THE USE OR INABILITY TO USE THIS MANUAL, EVEN IF CISCO OR ITS SUPPLIERS HAVE BEEN ADVISED OF THE POSSIBILITY OF SUCH DAMAGES.
Any Internet Protocol (IP) addresses and phone numbers used in this document are not intended to be actual addresses and phone numbers. Any examples, command display output, network topology diagrams, and other figures included in the document are shown for illustrative purposes only. Any use of actual IP addresses or phone numbers in illustrative content is unintentional and coincidental.
Cisco and the Cisco logo are trademarks or registered trademarks of Cisco and/or its affiliates in the U.S. and other countries. To view a list of Cisco trademarks, go to this URL: http://www.cisco.com/go/trademarks. Third-party trademarks mentioned are the property of their respective owners. The use of the word partner does not imply a partnership relationship between Cisco and any other company. (1110R)
Copyright © 2014, Cisco Systems, Inc. All rights reserved.
Источник
 Когда к мобильному устройству присоединены наушникиОС Google Android развивается, и по всему видимому


 .
.


