- DM Blog
- How to Create HTML Signatures for Apple Mail and iPhone
- How to create an HTML Signature in Apple Mail
- Create a new signature
- Find your mail signature file
- Edit HTML signature in Apple mail
- Correct the signature headers
- Replace the signature body code
- Edit the signature template details
- Save and lock mail signature file
- How did you like this blog?
- Start your day with great quality content
- Apple-interchange-newline class appearing in RadEditor
- 1 Answer , 1 is accepted
DM Blog
How to Create HTML Signatures for Apple Mail and iPhone
In older versions of Mail, you’d have to use Safari to save your HTML as a .webarchive first, and then open your
/Library/Mail folder, navigate to the «Signatures» folder, find the correct signature and then replace the file. Not too complicated, but still not as simple as it should be.
In more recent versions of Mail, the process is almost the same, (you still have to find the signature in your
/Library/Mail/V2/MailData/Signatures folder and replace the correct file), but now instead of using .webarchives, you have to convert the HTML signature to use Quoted-Printable encoding. Luckily, PHP 5.3+ comes with two functions, quoted_printable_encode() and quoted_printable_decode() to encode and decode quoted-printable text.
But why would you even want to have HTML in your email signature in the first place?
I’ve used HTML in my signatures for a variety of reasons. At one point, I was using a 1×1 clear png (or web beacons) to track if/when emails with a certain signature were being read, which obviously requires the image to be loaded from a server as well as a bunch of server-side code to track things properly. If you didn’t know, email marketers do this all the time to learn more about their subscribers and track the effectiveness of their campaigns…
Nowadays, however, my reason for wanting to have HTML in my email signature is mostly to be able to include a Feedburner Headline Animator of my events and/or my blog articles. I also recently appended custom campaign parameters to the links in my signature so that I can have better information in my analytics by knowing how people reach my websites.
If all you want to do is add links to your email signature, you can do that using the signature editor in Mail and don’t need to go through all this trouble. (Just highlight the text and type Command-K on your keyboard and you’ll get a popup asking you to enter the link.) But the problem with that editor is that it won’t let you remove the underline from the link (it will let you edit the color of the link though.)
All of my email signatures have the underlines removed from the links (using text-decoration:none; in the style attribute) and are set to display in a grey color. Once the iPhone came out, it automatically converted my phone number into a link too, but it was bright blue and underlined – yuck! So the solution was to add tel: links to the phone numbers and that solved the formatting issue: +1 (416) 555-1234
To make things easier for me, I created a PHP-based signature generator a while back and I’ve been using it to great success for quite a while now. Every one of my signatures has my name, my phone number, a link to my music site and a link to my blog — they only differ in which Feedburner headline animators they include (or none), so having a generator to automate this made a lot of sense. I also use it to create Michelle’s email signatures too.
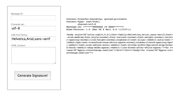
You can download a stripped-down, simplified version of this email generator (and modify it to suit your own needs) from here: signatures.php (zipped). You can also click the image above to see what it looks like – no nonsense, very simple.
It adds the headers necessary for the signature, wraps your HTML in some default HTML and CSS that Apple creates for all email signatures and converts it to quoted-printable encoding. When the signature is generated, it will show you the HTML signature with the quoted-printable text below so you can copy and paste it into the correct file. Easy!
Here’s the default HTML that your HTML content will be wrapped in (this is what Apple includes with all signatures created in Mail.app):
In my own signatures, I prefer to use font-family:Helvetica, Arial, sans-serif; (not just Helvetica) since not all computers (Windows) have Helvetica installed. The only other thing is, from what I can tell, Apple uses a new
When you’re done making your changes and have edited or replaced the correct files, lock the files in the Finder (highlight the files, click Command-Option-I to bring up the inspector and check the «Locked» box) and then open Mail again to test it out. I forgot to mention, you should probably close mail before you make any changes to your signature files, just in case…
If you sync your settings with iCloud and have more than one Mac, you may also want to paste these signatures into the corresponding files in the
mail/Data/Mail Data/Signatures folder (it contains the same files as the
/Library/Mail/V2/MailData/Signatures folder, but with «ubiquitous_» prepended to the filenames.)
And to get the same signature on your iPhone, just create and save a new draft message with your HTML signature in Mail.app, then open that draft on your iPhone, select the text and copy it, switch to Settings->Mail, Contacts, Calendars and paste your signature on the «Signature» screen. Easy!
In a future article, I’ll explain the process to create a retina Feedburner Headline Animator so stay tuned! (You can subscribe to RSS, email updates or Twitter.)
Источник
How to create an HTML Signature in Apple Mail
Adding any HTML code directly into your Apply mail signature is a bit tricky. However, we can use some tricks to add the Nicereply CSAT. Follow our guide to create perfect HTML signature in Apple mail.
Create a new signature
Let’s go to Mail > Preferences > Signatures and click “+” button. Set e.g. “Nicereply” name to your signature and add just your full name to your new email signature. Our sample email signature now looks like this:

At this point, we need to close Preferences and quit Mail application.
Find your mail signature file
You know Apple, they love playing hide & seek, so we have to find your new signature file hidden in your Library folder. Open the Finder, click on the Go menu, and hold the Alt/Option key down. You will see the “Library” folder. Choose that Library folder and navigate to one of the following folders:
- If you’re using iCloud, go to
mail/Data/MailData/Signatures/
If not using iCloud, head to
/Library/Mail/V3/MailData/Signatures/ if you are using El Capitan already
In the Signatures folder you should easily recognise your signature file by the Date Modified:

Edit HTML signature in Apple mail
Right click on the signature file Open with > Other… and choose TextEdit application. Take a deep breath and don’t worry. You don’t need to understand this “Chinese soup”. I will guide you through it step-by-step.
Your signature file will open in TextEdit and should look similar to mine:
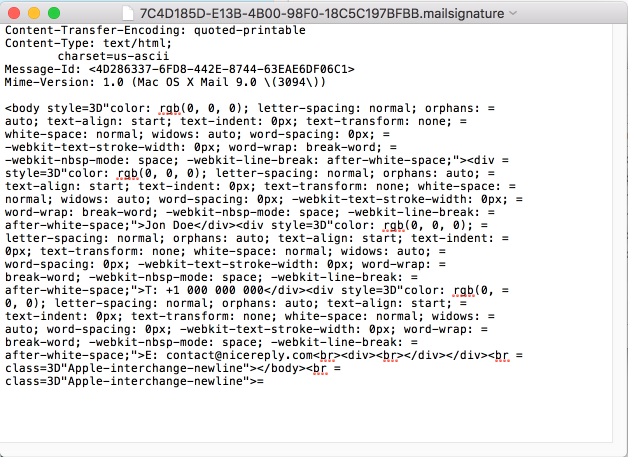
Correct the signature headers
If the first line of your signature file does not contain ” 7bit”, please change the first line to:
If you’d like to use non-english (non-ASCII) characters, make sure your 3rd line is set to ” utf-8″ too:
Replace the signature body code
Let’s replace the mess of characters with some nice HTML code. Replace the rest of the signature code, starting on the line #7 with with “ Rating Page Settings > Rating Link, copy your CSAT code and paste it into your mail signature (replace the comment) and save the file. The source code of your signature should now be similar to this one:

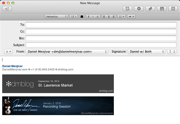
And in an email it would appear like this:

Edit the signature template details
These last two pictures will help you understand the details of the HTMl template we’ve used. At this point you can edit the template code:
- Edit the “How nice was my reply?” question,
- Replace “Your Name” placeholder with your real name,
- Replace “your.email@example.com” with your real email – twice!,
- Edit/delete the phone number and,
- Edit/delete the website URL “http://www.example.com” and link text “example.com”
Of course, you may delete the whole second block
and make some other magic with the HTML signature in Apple mail.
Save and lock mail signature file
When you are finished, Save the mail signature file and lock the file (otherwise, Apple mail will destroy everything you‘ve done). Click on the arrow in the header bezel of TextEdit and lock the mail signature file:

Congratulations! You have now become an Apple Mail Signature Guru.
Close the TextEdit window, open Apple mail and check your signature in Mail > Preferences. The images may be missing in Preferences, but don’t worry- try to send an email to yourself or a colleague. Everything should be fine in a real email message:

PS: If you would like to edit your new HTML signature in Apple mail you should:
- Quit Apple Mail,
- open the mail signature file with TextEdit from the Library folder,
- unlock the file,
- make changes to the code,
- save, lock and close the file
How did you like this blog?


Start your day with great quality content
Stay updated with our newsletter

Are you a freelance writer? Do you want your articles published on Nicereply blog?
Источник
Apple-interchange-newline class appearing in RadEditor
While trying to debug an issue with the RadEditor that we’re having I ran into this and am not sure why or where it’s coming from.
In Design mode I create a table, for example a 2×2 table with a number in each cell.
I go into HTML mode and remove the
So all I have in the HTML is the following:
| 1 | 2 |
| 3 | 4 |
Now I got back into Design mode, press the Enter key, and copy and paste the existing table.
The result is the following:
| 1 | 2 |
| 3 | 4 |
Where did that class reference come from and why is it there?
FYI, we are using version 2011.3.1305.40. I am using the RadEditor on Chrome on a Windows 7.
Any ideas would be good.
One side question: what does FixEnclosingP literally do when you disable it? What does it do when you enable it?
1 Answer , 1 is accepted


The
is added by Chrome. You can reproduce the same behavior in an editable IFRAME element as the attached one. Here is a video demonstrating my test: http://screencast.com/t/MbUTSmecj7r. If you would like you can attach to the OnClientPasteHtml event of RadEditor, check for the Paste command and strip this tag.
I also found that this behavior does not exist in an editable DIV. You can set the content area as an editable DIV by setting ContentAreaMode=»Div».
By default, Internet Explorer wraps the content inside a paragraph tag — this is the default root
tag. If this tag is missing the browser automatically adds it. We got many request however to change this behavior, because it was ‘tricking» the validators to believe that there is content in the editor. Secondly it was spoiling the layout of page because the content loaded in the editor without the paragraph would be returned surrounded by a paragraph. That’s why we decided to change this by implementing the FixEnclosingP content filter which removes this root paragraph in Internet Explorer. If you need this paragraph tag then just disable this filter using the DisableFilter server method of RadEditor or the ContentFilters property, e.g.
Best regards,
Rumen
the Telerik team
Источник


