- How to Securely Delete Photos and Clear All Data From Your Android Phone
- How to Clear App Data and Cache on Android?
- Part 1: What is Cached Data on Android?
- Part 2: How to Clear System Cache data in Android Recovery Mode?
- Part 3: How to Clear All App’s Cache Data?
- Part 4: How to Clear Cache Data for A Specific App?
How to Securely Delete Photos and Clear All Data From Your Android Phone
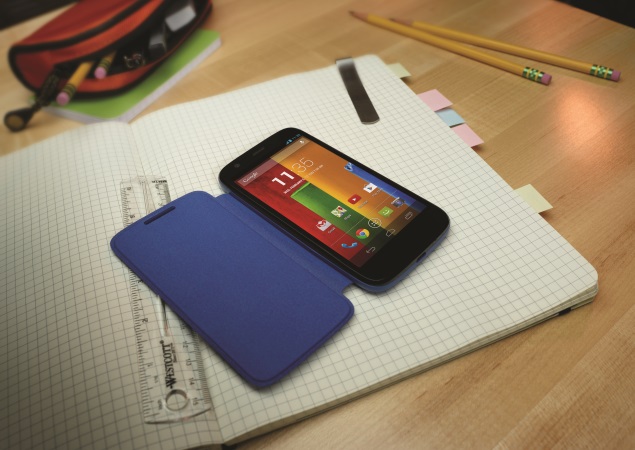
If you are reselling your old phone, or just handing it over to a loved one, you want to make sure that all your personal data is completely deleted before you do this. We’ve already described the process in case you’re moving on from an iPhone, and if you have an Android phone, this is what you need to know.
Please note that the exact steps will vary depending on the version of Android that you are using, and the manufacturer of the device. Settings are slightly different in the versions of Android, and manufacturer skins can change the names of settings or the exact menus. However, the general instructions are the same across all devices.
microSD card
The first decision you need to make is about the microSD card. In case your old phone has a microSD card, you can simply insert the card in your new phone and continue using it — most data like photos, videos etc. should get migrated seamlessly.
In case your new phone does not have a microSD card slot, or you would not like to carry forward the card for some reason then you should delete all the data on the card by formatting it. First, back up all your pictures and videos.
- Connect your phone to the computer with a USB cable. If you are on a Mac, make sure you have the Android File Transfer application installed before you do this.
- Open My Computer on your PC, or Finder on your Mac.
- Navigate to the SD card and copy all the files you want to save to your computer.
- After the copying is done, you can unplug your phone.
Now, you can format your memory card.
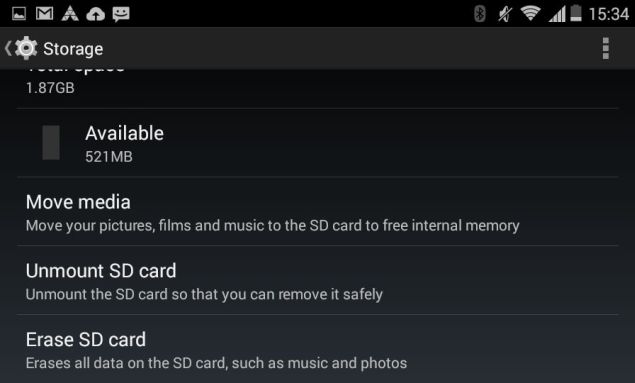
- On your phone, go to Settings > Storage.
- Scroll to the bottom and tap Erase SD card. You’ll see a warning message telling you that you’ll lose all the data on the card.
- Tap the Erase SD card button to continue. If your SD card is secured with a password, you’ll need to enter the PIN to continue.
 A determined person can still recover your files from a formatted SD card, but the easiest way to deal with this is by «layering». Simply put, fill the space with something else, delete it, and repeat this process a couple of times and your original data is gone forever.
So for example, if you have a 2GB microSD card you’ve erased — reconnect it to your PC, and copy a file that’s about 2GB to the card. Delete the file right away. Do this again, two or three times. The whole process shouldn’t take more than ten minutes, but you can then safely sell the card as well.
Backing up the data on your phone
The most important thing to do is to ensure that you don’t lose any of your contacts or pictures. The good thing with Android is that you need a Google account to set up the phone, and it automatically backs up your device. To make sure that this is the case, do the following.
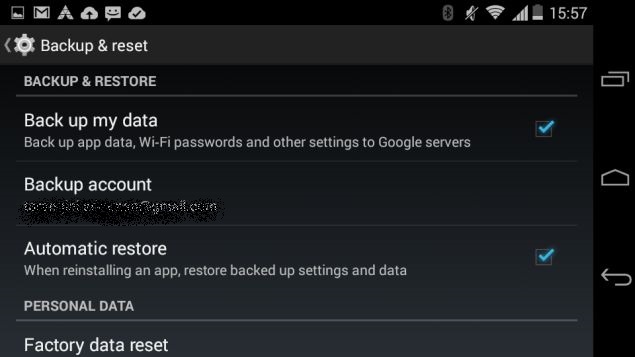
- On your phone, go to Settings > Backup & reset.
- You should see a setting called Back up my data. Make sure that it’s ticked.
- Next, press Back, and then scroll down to ACCOUNTS. Tap on Google.
- You’ll see your Google account which was used to set up the phone with a green sync symbol next to it. Tap the account.
- Make sure that all the options are ticked — this will use your Google account to sync everything from your calendar to contacts to email to the photos that you take, which get automatically backed up to Google+.
- Not all versions of Android automatically back up pictures. We checked on a 2011 Samsung Galaxy Note and didn’t see the option, while the recent Moto E does have this option. In case your phone does not support this, you’ll have to use a PC to back up media via the USB as described above.
- Back up any other media files to your computer by connecting the phone to your PC using a USB cable. Follow the steps in the first half of the SD card section above to copy the files to your computer.
This option will also backup the application data for some of your apps. Apps need to be registered with the Android operating system for this backup and restore service to work, and not all your apps may support this. To be safe, we recommend manually backing application data for all your favourite apps, like this method for backing up your WhatsApp messages.
Delete everything
Now that you’ve made a backup, you can safely delete everything on your phone. This is what you do.
First, fully erase the SD card as discussed above or take it out and keep it safely if you plan to use it in your new phone.

A simple factory reset will delete everything on your phone, but this data can still be recovered by a really determined user. If you want to be really sure no one can recover your data even after it is deleted then make sure you enable hardware encryption on your phone. For most people it should be safe to skip steps 1 and 2 and jump straight to step 3.
1. Go to Settings > Security and tap Encrypt phone. This takes a long time, so you need to connect your phone to the charger to proceed.
2. Tap Encrypt phone again to proceed. Some people have noted that at times this doesn’t work right away, and you might need to try it a few times.
The process can take an hour, and so you’ll need to leave your phone on the charger and wait.
Once this is done, just reset the phone:
3. Go to Settings > Backup & reset. Tap Factory data reset. On the next screen, tick the box marked Erase phone data. You can also choose to remove data from the memory card on some phones — so be careful what button you tap on.
4. You’ll see a warning screen — tap Reset phone to continue.
5. This process may take a few minutes and your phone should reboot to the state that it shipped in, prompting you to choose language and sign-in all over again.
Congratulations, you’ve deleted all the data on your Android phone.
Restoring your files on another phone
If you followed the steps mentioned above in backing up properly, then you should be able to get all your data back without any difficulty at all. For one thing, if you’re continuing to use your old microSD card in your new phone, then your movies, music and photos get transferred automatically.
Otherwise, when you get your new Android phones, just sign in with the same Google account to carry over your contacts and other data, and transfer the files from your computer using the USB cable in the same way that you copied them to the computer as described above.
In case you are switching to an iOS device, you can still sync your Google account to transfer your contacts and calendar, while you can use iTunes to transfer the backed up media files.If you found this tutorial useful, check out more in our How To section. If you have any tips that can help to securely wipe Android phones, let us know via the comments.
For the latest tech news and reviews, follow Gadgets 360 on Twitter, Facebook, and Google News. For the latest videos on gadgets and tech, subscribe to our YouTube channel.
Источник
How to Clear App Data and Cache on Android?

Alice MJ
Oct 29, 2021 • Filed to: Erase Phone Data • Proven solutions
Smartphones, for individual has become everything, these days. From setting an alarm to managing our health and fitness, we depend on smartphones to do every job. And specially with Android based smartphones, we are a lot more powerful per say. One can search and download numerous apps, as much as the device memory can hold. Hence it will not be breathtaking to know that Android smartphones have a market share of 81.7% in the smartphone market. Although a lot of people use Android smartphones because it is easy to use and offers a lot of features. However, most users do not care to know the basics about apps, the way apps work and App Cache etc. Knowing about Apps and how they use memory will help users in making their devices faster and manage the device’s memory efficiently. Although speed and memory capacity of a smartphone depends on its capacity, Android users can manage their smartphones better by clearing App Cache.
Therefore, in this article, we will learn about App cache and the methods of clearing it.
Part 1: What is Cached Data on Android?
Android Operating System functions by segregating memory for different purposes. One type of memory is the Cache Memory, where cached data is stored. Cached data are sets of duplicated information about the web pages or websites you visit. Android smartphones save cached data to improve the user experience. Generally, the user experience is improved by providing a fast response to browsing requests made by the users. This is possible because the data stored in the cached memory is easily accessible and the device responds to user request faster by fetching previously stored data from the cached memory. Every app that uses the internet has its own cache data which it uses to perform functions faster. This data keeps on increasing, depending on your browsing frequency. Thus, more and more device memory is occupied which creates a memory deficit for the user due to the large amount of cached data which gets stored.
The good part is that Android allows users to wipe cache and if users clear cache Android or wipe cache or clear app data, some memory can be freed for other uses.
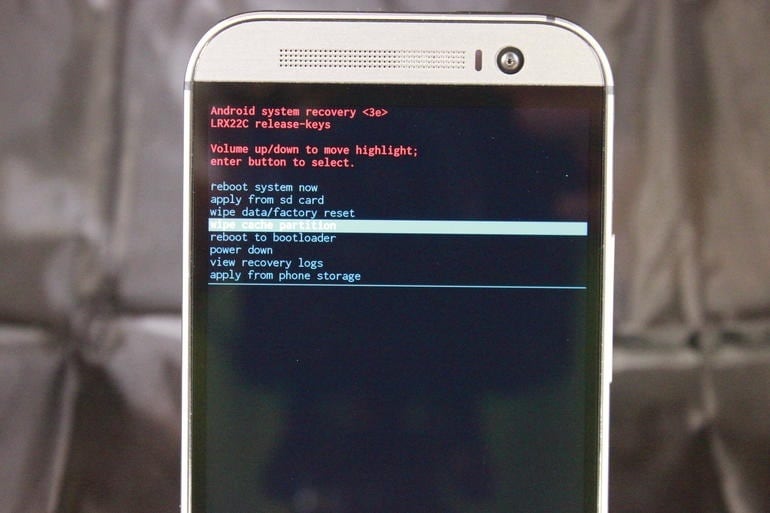
Part 2: How to Clear System Cache data in Android Recovery Mode?
System Cache data includes files that can be accessed easily by the Android system so as to make the Android user experience smooth. By clearing this cache, you can release some amount of device storage for other uses. One of the easiest methods to clear cache Android is to clear all the system cache data in Android Recovery Mode. This method involves booting an Android smartphone into Recover Mode which is quite easy, although it sounds difficult. Also, clearing or wiping the system cache will not delete any information in your system or downloaded applications.
Following are the steps to clear System Cache.
Step 1: switch off your device
Start off with switching off your Android smartphone. Only then you will be able to boot your mobile into Recovery mode.
Step 2: boot your smartphone into Recovery.
Now, the smartphone must be booted into Recovery mode. This can be done by pressing a combination of buttons like the Power, Volume and Home button simultaneously. This combination varies from device to device. So make sure to find the right combination for your device. Generally, it is Volume Up + Home + Power button.
Step 3: Navigate and select “Recovery”
Using the volume buttons to move up and down, move down until ”Recovery” option is highlighted. Select it by pressing the Power button.
Step 4: Wipe the Cache
In the consequent screen, navigate down until “Wipe cache partition” option is highlighted. Now, select it by pressing the power button. After it is done, using the volume button to navigate and power button to select, Reboot your device to finish the process.
Part 3: How to Clear All App’s Cache Data?
Well, you can also delete App Cache. Deleting the App Cache of all the apps running on your smartphone will help you gain a substantial amount of memory. To clear app data for all apps on your device, simply follow the steps given below.
Step 1: launch Settings App
On your smartphone, open the “Settings” app by tapping on the Gear icon.
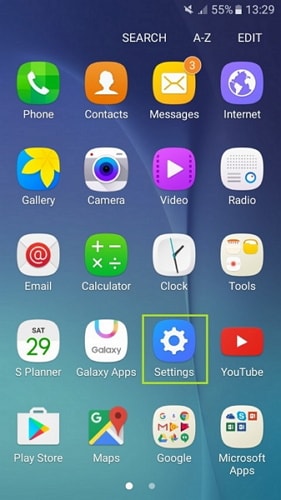
Step 2: select “Storage” option
In Settings, scroll down to find “Storage” option. Tap on it and open Storage.

Step 3: open the internal storage memory
All the Cached data is stored in the internal storage of the device. So, open the internal storage of your device. You will be able to see details about the composition of memory.
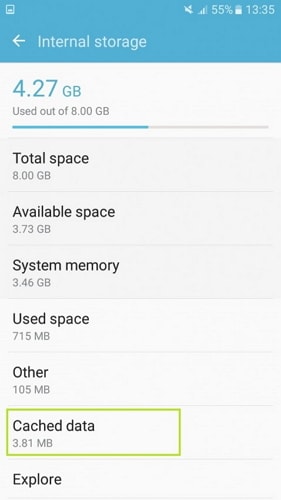
This will also show you how much memory is occupied by Cached data. Now, tap on “Cached data” option.
Step 4: Clear the Cache memory
A popup will appear on your smart phone’s screen asking for your confirmation to delete the Cache memory of apps. Confirm it by tapping on “Delete” option.
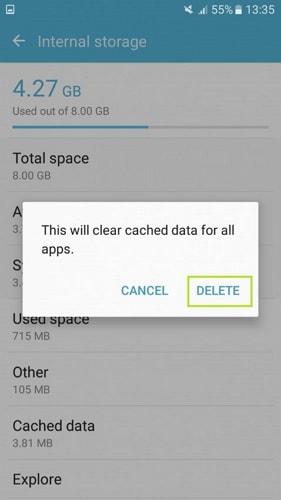
Now, the cache data of all apps in your device will be deleted.
Part 4: How to Clear Cache Data for A Specific App?
Sometimes, certain apps may stop working or become unresponsive. These things happen very frequently and this may require you to clear app data of the app which is not working properly. Also, clearing app data of one particular app alone will not impact the cache data of other apps and hence those apps will work fast as usual. The following steps will teach you how to clear the cache data of the app of your choice.
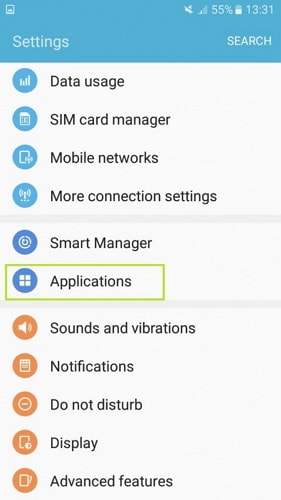
Step 1: Open the “Settings” app on your smartphone.
Step 2: open “Applications”
Now, scroll down to find the “Applications” option. Tap On the icon and open it.
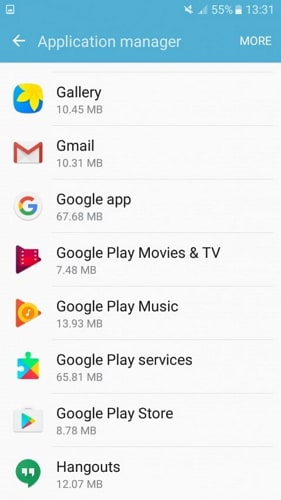
Step 3: Select the application of your choice
Applications will display the list of all applications that occupy memory and run on your device. Scroll down to find the application whose cache data you wish to delete and open it.
Step 4: Open the Storage section of the app
Now, all details about the App of your choice will be displayed. Tap on “Storage” option to open the Storage section of the app. This will display the memory occupied by the app.
Step 5: Clear the cache data
Now, tap on the “Clear cache” option in the screen. Doing so will delete all the Cached data corresponding to the selected app.
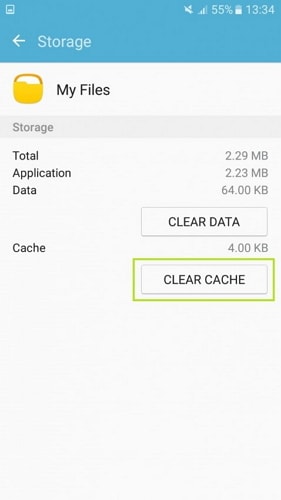
To clear app data, just tap on “Clear data” option. There you go, the cache has been cleared to clear app data on your device.
Hence, these are the various methods in which the cache memory in your Android smartphone can be deleted. Every method described above is different but all are very easy to perform. No additional equipment is needed to use the methods given above. Depending on your need, you can select the method that is the most suitable to you.
Источник


