- Question: Q: Unable to Mount — com.apple.DiskManagement.disenter error — 119930872
- Helpful answers
- Question: Q: Unable to Mount — com.apple.DiskManagement.disenter error — 119930872
- Question: Q: An external disk refuses to mount, com.apple.DiskManagement.disenter error -119930868.
- All replies
- Дисковая утилита для macOS 10.11 и более поздних версий: ошибки и вопросы
Question: Q: Unable to Mount — com.apple.DiskManagement.disenter error — 119930872
My MacBook Pro (15-inch, 2018), 2.2 Core i7, Catalina 10.15.7 does not not mount USB flash drives (‘greyed’ in Disk Utility). Interestingly, formatting the drive helps, though after I flash an ISO image there (I need to use it as a LiveUSB for a Linux system), it would not mount the drive citing ‘Unable to Mount — com.apple.DiskManagement.disenter error — 119930872’.
I have seen that somebody solved this problem by relogging, but that does not help.
Posted on Dec 18, 2020 9:31 AM
Helpful answers
macOS doesn’t recognize Linux file systems used Linux LiveUSB drives.
Unfortunately newer versions of Disk Utility from macOS 10.13+ doesn’t show the physical drives by default. To see the physical drives on the left pane of Disk Utility click on «View» within Disk Utility and select «Show All Devices». Select the physical drive to erase.
Sometimes macOS just has issues when a drive has had an .iso image «burned» to a drive and the above technique may not work. When this happens you need to zero out the beginning of the drive after which Disk Utility should be able to erase the drive normally. You will need to use the Terminal app command line utility «dd» to do this or you can use a Windows or Linux system to repartition and reformat the USB drive.
Dec 18, 2020 7:31 PM
There’s more to the conversation
Loading page content
Page content loaded
macOS doesn’t recognize Linux file systems used Linux LiveUSB drives.
Unfortunately newer versions of Disk Utility from macOS 10.13+ doesn’t show the physical drives by default. To see the physical drives on the left pane of Disk Utility click on «View» within Disk Utility and select «Show All Devices». Select the physical drive to erase.
Sometimes macOS just has issues when a drive has had an .iso image «burned» to a drive and the above technique may not work. When this happens you need to zero out the beginning of the drive after which Disk Utility should be able to erase the drive normally. You will need to use the Terminal app command line utility «dd» to do this or you can use a Windows or Linux system to repartition and reformat the USB drive.
Источник
Question: Q: Unable to Mount — com.apple.DiskManagement.disenter error — 119930872
I’ve tried reformatting, changing formats, terminal mount etc.
I thought this might be a specific hard drive issue, but turns out none of my hard drives mount.
I see the drives inside diskutil, however the volumes are always greyed out.
I’m not sure this is a Catalina Issue, since the issue was happening prior to me updating. Regardless updating it to Catalina didn’t work.
I have 2 Lacies and a Toshiba.
They all work fine w/ my older macbook air.
Not working for:
MacBook Pro (15-inch, 2019)
2.6 GHz 6-Core Intel Core i7
Able to mount on:
Macbook Air 2012 13in
2GHz Intel Core i7
I purchased Disk Drill (thinking i need recover data) and was able to recover files.
But the real issue is my macbook pro, seeing that I can view the files perfectly fine on my macbook air.
Anybody else seeing this?
Thanks in advance!
MacBook Pro with Touch Bar
Posted on Apr 11, 2020 11:27 AM
So after calling customer support and trying everything, nothing worked.
- Reinstalling Catalina
- starting in Recovery Mode (I could mount / dismount), but didn’t do anything
- ctrl + option + shift (7 seconds) etc.
- terminal diskutil mount.
But I did find a way, to get things to work.
- restarting
- plugin your external drives.
- Logout of the current user, and then log back in.
Источник
Question: Q: An external disk refuses to mount, com.apple.DiskManagement.disenter error -119930868.
What causes this particular error and what can I do to mount this drive or retrieve the data from it?
iMac Line (2012 and Later)
Posted on Oct 9, 2019 3:22 AM
All replies
Ok so its been a week since i pressed the «i have this problem too button»
i spent most of my days not being able to write on the disk only read it and last night i tried to repair the disk again in disk utility. it didnt seem to do anything but this morning i noticed it finished the process and i pressed mount and it worked.
Sharing & permissions changed to » you have custom access». what i want to say is ease us and tuxera didnt do anything or the western digital discovery. The only thing that worked was my patience.
Dec 16, 2019 2:10 AM
Open Activity monitor and forse quit there fsck_ext. Will solve issuer.
Oct 29, 2019 7:03 PM
This doesn’t really help. I don’t want to lose all the info I have on my external drive. You’ve made it sound like it’s the drive issue but it’s really with how the new Catalina update is working to read these drives. Please provide a better fix. I need drive access without reformatting & it’s worked fine up till the latest update.
Oct 19, 2019 6:53 AM
On my system, I just have to wait for some time till I can mount my external drive (SD, for example).
Seems like Catalina runs fsck on them if they were not safely removed last time.
Drive mounts itself after it’s checked for errors. It just takes time.
Oct 23, 2019 11:36 AM
I’m having a similar issue — «com.apple.DiskManagement.disenter error 0.» since the Catalina upgrade.
I’ve a partitioned 2Tb drive — half I drag & drop files to, the other half is for Time Machine. I have another disc that I use as a backup for the files/data but not as Time Machine.
My partition for dragging files into mounts but the Time Machine partition won’t. It wt was last seen in action trying to backup a few days ago but announced it had insufficient space.
I’ll also post on a Time Machine forum
Oct 25, 2019 1:42 AM
I recently purchased a new IMac and upgraded it to Catalina. BIG mistake!! I have this same problem and it will not mount any external hard drives. These drives all still work fine on my old macBook running Mojave 10.14.1. This problem started when I Accidentally unplugged a drive and didn’t trash the icon first. Another problem is Disk Utility and some other programs will not respond to a QUIT command. The only way to get them to quit is to force quit them. I assume you will have a fix soon.
Oct 19, 2019 6:52 PM
The only solution I could find was to install Tuxera. This suggestion was posted on a similar Q as the solution & it worked for me. Microsoft NTFS for Mac by Tuxera 2019
Oct 30, 2019 5:45 AM
There’s more to the conversation
Loading page content
Page content loaded
I am trying to mount a micro SD for my Go Pro. If I format it using the Camera it will not mount. If I format using disk utility it will not work in the Camera I get an error code (com.apple.DiskManagement.disenter error 49223.) I am currently running Catalina
Apr 27, 2020 1:45 PM
does the info from this link help —
Apr 27, 2020 2:14 PM
I Had the same issue, looking for answer what user «mac1317» replied was resolved my issue which was: «Open Activity monitor and forse quit there fsck_ext. Will solve issuer. «
It was very helpful, Thanks very much user «mac1317!»
May 4, 2020 10:50 PM
An external disk refuses to mount, com.apple.DiskManagement.disenter error — 0
I just cold-cut turkey pull the USB chord after many failed tries to mount unsuccessfully and when I plugged it back in it worked and I was able to retrieve all my data, IT WORKED!
May 6, 2020 12:24 AM
i just started having this issues today
May 6, 2020 9:41 AM
I will probably just wait I probably wait i probably did not eject probably
May 6, 2020 9:43 AM
usb drive will not mount Dissenter error
May 6, 2020 10:39 AM
Could not mount disk
(com.apple.diskmanagement.disenter error -119930868) What do I do?
May 6, 2020 4:15 PM
Try this, it worked for me:
- With the device (disk) inserted, open Utilities → Disk Utility. You will see the disk shown as /dev/diskxax (x=numeric a=alpha) i.e. /dev/disk5s2
- Click on View (top left of window) and select “Show all devices” from the drop-down. The name of the actual physical device will be shown (i.e. “ScanDisk Cruzer Blade. or whatever your device is).
- The /dev/diskxax is shown under the name of the physical disk. It will present as faded (grayed out) text. It will not be mounted.
- Select the physical disk. It will present in the main box with a red bar with the legend underneath the bar in small letters with the size of the drive.
- Select “Erase” from the options at the top of the Disk Utility window.
- Enter the desired name for the device and select your desired filesystem.
- Click on “Erase” and then select “Show details”.
- Once the erase and format of the disk is completed the disk will present as mounted and the /dev/diskxax will be shown in a normal state (i.e. not grayed out).
- The device is now ready for use
May 6, 2020 4:35 PM
Yes you can reformat the disk for future use but all of the data will be lost
May 6, 2020 9:12 PM
There is no process «fsck_ext» running on my machine
May 11, 2020 1:09 PM
Solution for my disk not mounting is to format it? lol
May 11, 2020 1:10 PM
That was the problem for me too domagoj240. That’s why I purchased the Tuxera NTFS app.
May 12, 2020 6:00 AM
Force quitting fsck_ext just worked for me. I think like others have said if I would have waited long enough with it plugged in I might have seen it after if finishes the fsck checks and mounts.
APPLE if you ever read these. maybe the work that «fsck_ext» is doing could be bubbled to the users to say «Be patient your hard drive is being checked for errors. » and a progress bar if possible even just the spinny kind on that dialog would help. Let us know what the machine is doing. I realize that it was most likely caused by me pulling the plug instead of hitting eject (I would love to hear a quick explain on why that works on windows but not macs). Sad fact is that I bet a lot of people thought they had a failed drive as it looks to be faulty when you plug it in. I was certainly relieved to see the folders appear again. As soon as it showed up I ran disk first aid to make sure all was good and will work hard on not yanking that cable. Thanks again to all you good folks sharing the answers to the hard questions!
May 20, 2020 6:05 PM
Catalina doesn’t recognize the exFAT format anymore.
I had to sacrifice my old backups on my 1TB external HD, and erased it using disk utility. I used the recommended format and it works now. Good think i still have my other external HD that had the same info which I connected to my old laptop.
It’s frustrating indeed but that was the only solution that worked for me.
Источник
Дисковая утилита для macOS 10.11 и более поздних версий: ошибки и вопросы
В этой статье рассматриваются распространенные вопросы и сообщения об ошибках, связанные с использованием приложения «Дисковая утилита». Данный список сообщений не является исчерпывающим, поэтому вашей ошибки здесь может не быть.
Эта статья предназначена для пользователей следующих версий macOS:
- macOS 10.15 (Catalina);
- macOS 10.14 (Mojave);
- macOS 10.13 (High Sierra);
- macOS 10.12 (Sierra);
- macOS 10.11 (El Capitan).
Не знаете, какая у вас версия? Проверьте.
Примечание. При переформатировании все данные с накопителя удаляются, поэтому нужную информацию следует предварительно скопировать на другой диск.
Если у вас macOS 10.13 (High Sierra) или более поздней версии, обязательно смените режим просмотра в Дисковой утилите. Нажмите «Вид» и выберите вместо стандартного режима «Показывать только тома» опцию Показывать все устройства. В версиях 10.11 и 10.12 эта опция недоступна.

Вашему накопителю в Дисковой утилите будут соответствовать две или три записи. Это зависит от того, как он отформатирован. Запись верхнего уровня (без отступа) обозначает физический накопитель. Как правило, его название содержит слово «Носитель» или Media. Прямо под ней находятся дочерние записи с отступами — они соответствуют томам (разделам).
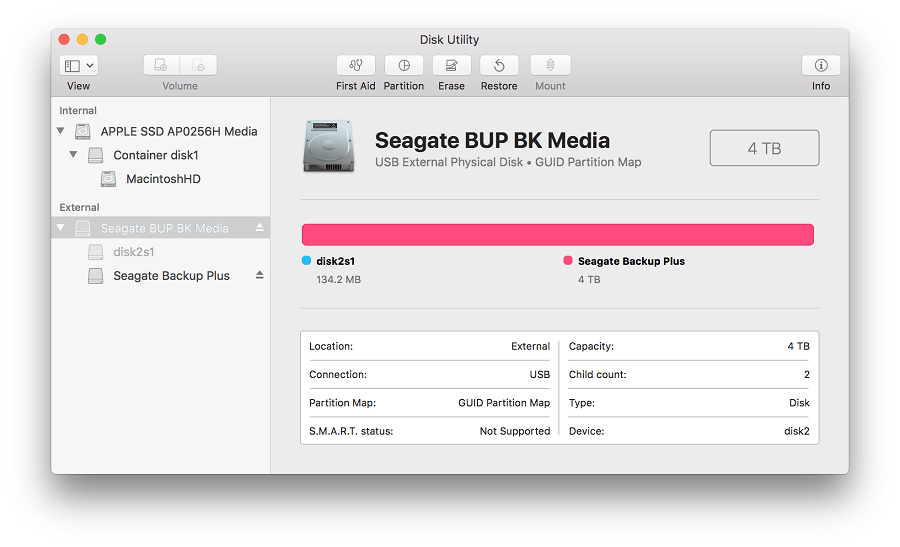
Это нужно знать на случай, если вам понадобится стереть с накопителя данные. Доступные варианты будут зависеть от того, какую запись вы выберете — для всего накопителя или для отдельного тома. Поэтому при форматировании важно выбирать запись верхнего уровня (без отступа).
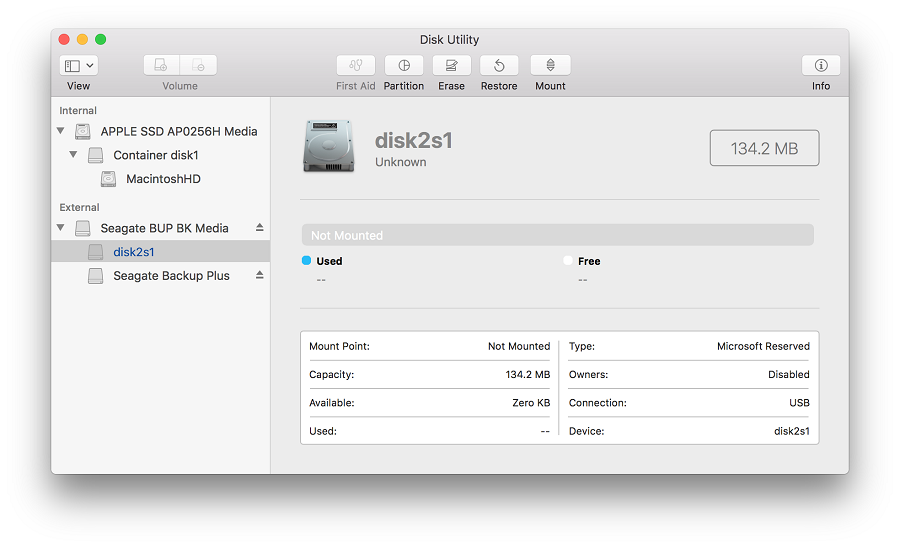
Откуда на накопителе взялся том размером 134,2 МБ?
Он отображается, потому что ваш накопитель настроен для ОС Windows с использованием схемы разделов GUID и файловой системы NTFS. В Дисковой утилите тип этого тома обозначается как Зарезервировано Microsoft. Это нормально для накопителей, отформатированных в NTFS. Технические подробности см. в документации Microsoft. Если вы собираетесь использовать накопитель только с Mac, рекомендуем его переформатировать. Если же вы планируете подключать его и к компьютерам с ОС Windows, ничего делать не нужно.
Почему кнопка «Разбить на разделы» неактивна?
Эта проблема появилась в macOS 10.11 (El Capitan) и свойственна всем более поздним версиям macOS. Кнопка неактивна, потому что на накопителе используется главная загрузочная запись (MBR), которая обычно применяется на дисках емкостью до 3 ТБ. Если навести курсор мыши на кнопку «Разбить на разделы», появится подсказка от Apple с соответствующей информацией.
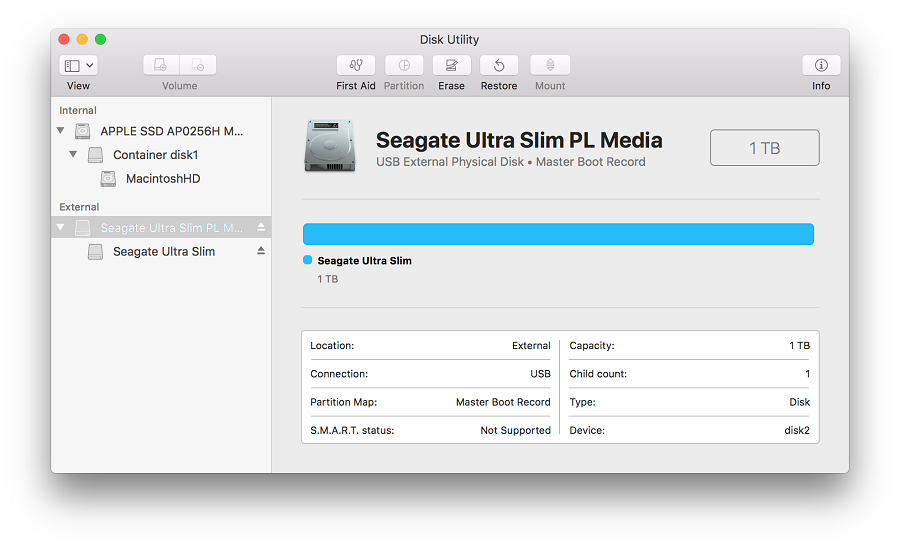
Чтобы решить проблему, отформатируйте накопитель с использованием схемы разделов GUID. Если накопитель планируется использовать только с компьютерами Mac, выберите специализированный формат для macOS — например, Mac OS Extended (журналируемая) или APFS. Если же вы планируете подключать накопитель и к компьютерам с ОС Windows, задайте формат exFAT.
Если накопитель будет использоваться и с macOS, и с Windows, сделайте резервную копию всех важных данных с него и отформатируйте его в exFAT под macOS. Как отформатировать накопитель в exFAT…
Если вы планируете использовать накопитель только в macOS, отформатируйте его в Mac OS Extended (журналируемая). Этот формат оптимизирован специально для устройств Apple. По-другому он называется HFS+. Как отформатировать накопитель в HFS+…
Ошибка: MediaKit сообщает, что на устройстве недостаточно свободного места
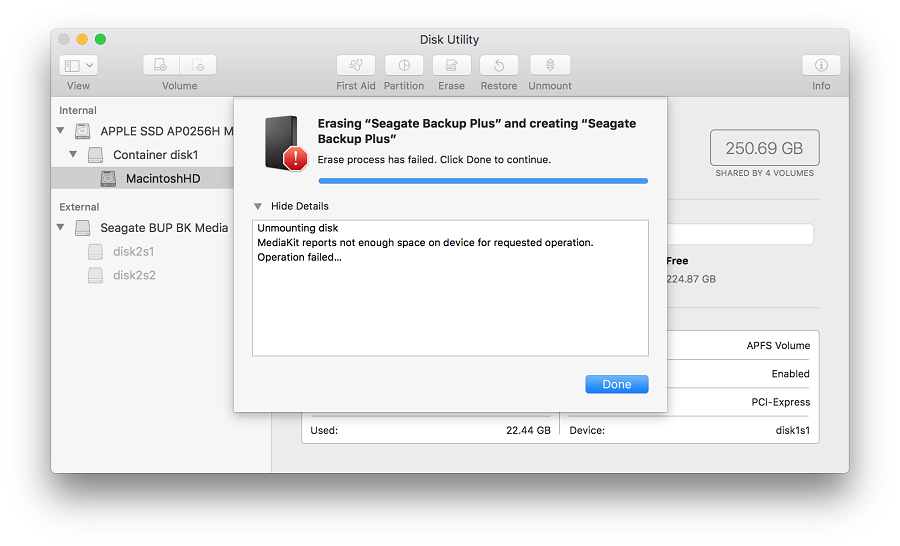
Такая ошибка может возникать при стирании данных и разбиении на разделы. Это происходит, потому что ОС пытается использовать том «Зарезервировано Microsoft» емкостью 134,2 МБ для тома EFI, минимальный размер которого — 200 МБ. Технические подробности см. в документации Apple.
Эту проблему можно решить разными способами, но проще всего отформатировать накопитель с использованием схемы разделов GUID. Тогда Дисковая утилита сможет создать на нем собственные тома. Если этот вариант недоступен, включите режим просмотра Показывать все устройства вверху слева (см. начало этой статьи).
Если накопитель будет использоваться и с macOS, и с Windows, сделайте резервную копию всех важных данных с него и отформатируйте его в exFAT под macOS. Как отформатировать накопитель в exFAT…
Если вы планируете использовать накопитель только в macOS, отформатируйте его в Mac OS Extended (журналируемая). Этот формат оптимизирован специально для устройств Apple. По-другому он называется HFS+. Как отформатировать накопитель в HFS+…
Ошибка: не удалось отключить диск
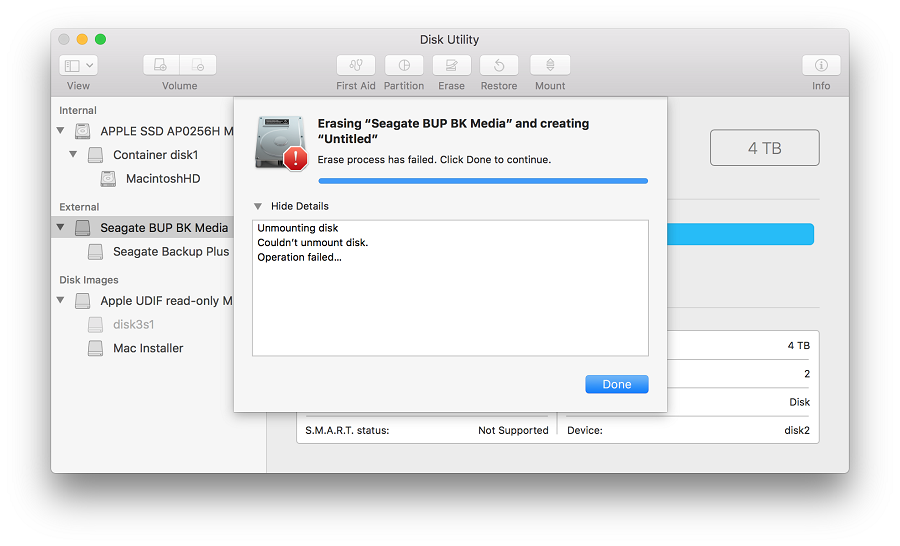
Такая ошибка может возникать по ряду причин. Это происходит, если накопитель занят — например, когда на нем открыт образ диска. В таком случае извлеките образ и еще раз попробуйте отформатировать диск.
Если вы считаете, что диск не занят никаким процессом, просто запустите форматирование еще раз. Если это не поможет, выделите том и нажмите «Отключить». После этого мешающий процесс должен завершиться.
Если и это не поможет, выключите компьютер, отключите накопитель и перезагрузите компьютер. Когда ОС загрузится, подключите накопитель и вновь попробуйте его отформатировать.
Ошибка: ошибка com.apple.DiskManagement.disenter 49223
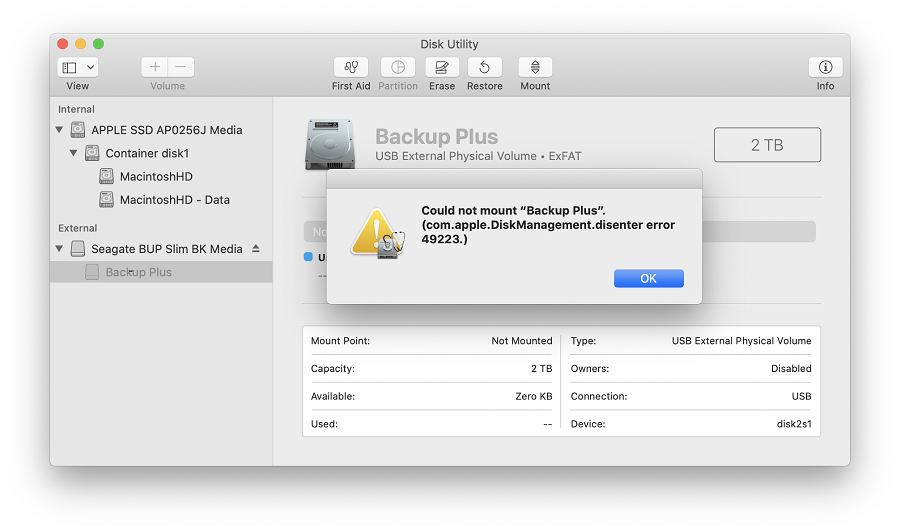
Такая ошибка случается с накопителями, отформатированными в exFAT. Если накопитель используется и с macOS, и с ОС Windows, его нужно форматировать только на компьютере с macOS. Дело в том, что она не поддерживает некоторые размеры кластеров (блоков), создаваемые при форматировании в ОС Windows. Из-за этого накопитель может не подключаться. Это сообщение об ошибке выводится, если попытаться вручную подключить накопитель в Дисковой утилите.
Если накопитель будет использоваться и с macOS, и с Windows, сделайте резервную копию всех важных данных с него и отформатируйте его в exFAT под macOS. Как отформатировать накопитель в exFAT…
Если вы планируете использовать накопитель только в macOS, отформатируйте его в Mac OS Extended (журналируемая). Этот формат оптимизирован специально для устройств Apple. По-другому он называется HFS+. Как отформатировать накопитель в HFS+…
Ошибка: ошибка com.apple.DiskManagement.disenter 49153
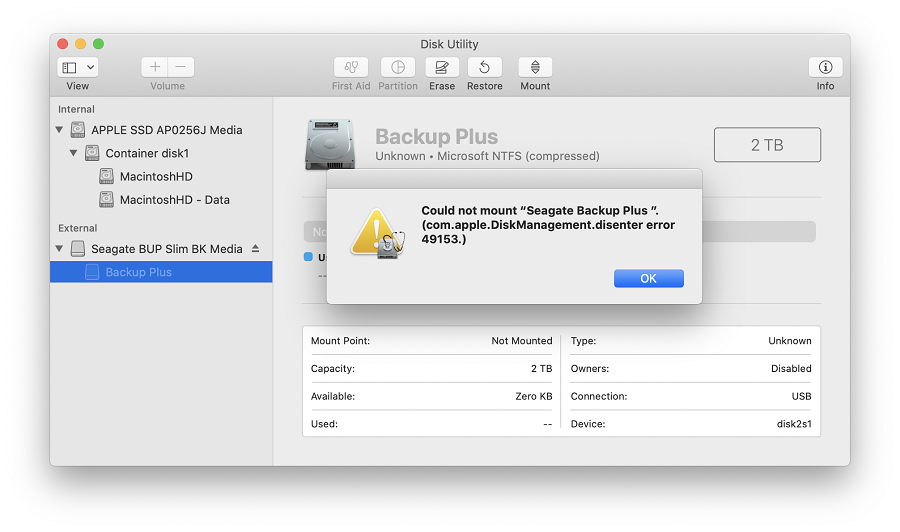
Такая ошибка характерна для внешних жестких дисков и некоторых других накопителей. Она возникает, если диск отформатирован в NTFS и для него используется драйвер Paragon. Обычно причина проблемы заключается именно в драйвере.
Чтобы решить проблему, удалите и заново установите драйвер Paragon. Как удалить драйвер Paragon… Если у вас macOS 10.13 (High Sierra) или более поздней версии, при установке обязательно выберите для расширения ядра опцию «Разрешить». Если кнопка «Разрешить» отсутствует, попробуйте смонтировать накопитель с помощью программного обеспечения Paragon и проверить, не выдается ли сообщение об ошибке. После этого кнопка «Разрешить» может появиться на панели «Защита и безопасность».
ПРИМЕЧАНИЕ. Версия Paragon для дисков Seagate несовместима с накопителями LaCie. Если вы используете полную версию Paragon, удалите и вновь установите ее, следуя инструкциям в Paragon.
Что делать, если решить проблему не удалось?
Если у вас есть доступ к другому компьютеру Mac, попробуйте подключить накопитель к нему и вновь запустить стирание данных.
Если у вас есть возможность воспользоваться другим компьютером с ОС Windows, подключите накопитель к этому компьютеру и отформатируйте его с помощью утилиты diskpart. Как пользоваться diskpart… Затем вновь подключите накопитель к компьютеру Mac и попробуйте стереть данные.
Источник


