- Question: Q: Help! Bootcamp partition quirks, weirdness, and oddities, oh my (com.apple.DiskManagement.disenter error 49223.)
- Как восстановить права доступа к диску и исправить ошибки на Mac OS X
- Проверка и исправление ошибок на дисках в Mac OS X
- Как восстановить права доступа к диску на Mac OS X через Дисковую утилиту?
- Как восстановить права доступа к диску на Mac OS X через Терминал?
- Что делать, если внешний жесткий диск не отображается на Mac
- Question: Q: An external disk refuses to mount, com.apple.DiskManagement.disenter error -119930868.
- All replies
Question: Q: Help! Bootcamp partition quirks, weirdness, and oddities, oh my (com.apple.DiskManagement.disenter error 49223.)
For starters, here is some information about my Macbook:
Now to the problem! I have a windows partition that I dual boot. Initially, this partition was recognized, and could be set as a Startup Disk. Now, it no longer appears as an option as evidenced in this screenshot:
If I try and mount the windows drive manually (from Disk Utility), I get the following error: Could not mount «BOOTCAMP». (com.apple.DiskManagement.disenter error 49223.)
I’ve also tried to mount it in Paragon Hard Disk Manager (https://www.paragon-software.com/hdm-mac/)[version 1.3.873 . the most recent version] with no luck:
Nevertheless, if I reboot and hold down the option button, I am able to select the Windows partition, and I’m able to successfully boot into it. The problem is, as soon as the machine reboots from windows, it returns back to macOS. Not exactly a problem, I get it, but it’s more of a nuisance when Windows is updating and needs to reboot multiple times, forcing me to stay there and hold the option button down every time it reboots. Additionally, I can’t access the data on the windows partition while I’m in macOS and that’s a ******. And no, the macOS drive isn’t recognized when I try and select the startup disk using the bootcamp control panel in windows either; they are both oblivious to each other,
For triage purposes (for those of you willing to try and help me), here is a screenshot of my partitions (both in Paragon, and Disk Utility):
Paragon: (notice how the bootcamp partition is outside of the APFS container):
Disk Utility:
I would VERY MUCH appreciate any guidance you can give so that I can return this mess back to normal WITHOUT having to destroy anything and go through the entire bootcamp process again.
For instance, do I need to move the bootcamp partition inside the APFS container? Is that even possible? Any and all suggestions are appreciated. Thank you!
Источник
Как восстановить права доступа к диску и исправить ошибки на Mac OS X
Когда система OS X начинает работать нестабильно, первое, что рекомендуют делать специалисты — проверить диск на наличие ошибок, исправить их и восстановить права доступа к диску. В этом материале мы расскажем как это сделать.
Внимание! Перед началом проверки и исправления ошибок на системном диске (где установлена OS X), а также восстановлением прав доступа, настоятельно рекомендуем закрыть все программы (Command (⌘) + Q) и не запускать никакие процессы.
Проверка и исправление ошибок на дисках в Mac OS X
Компьютерам, как и людям, свойственно ошибаться. Главное в случае ухудшения работы системы OS X вовремя исправлять эти ошибки. Сделать это достаточно просто, благо, инженеры Apple позаботились об этом и встроили «Дисковую утилиту», которая в несколько кликов выявит проблему и позволит её исправить.
1. Откройте Finder → Программы → Утилиты → Дисковая утилита или воспользуйтесь поиском Spotlight.
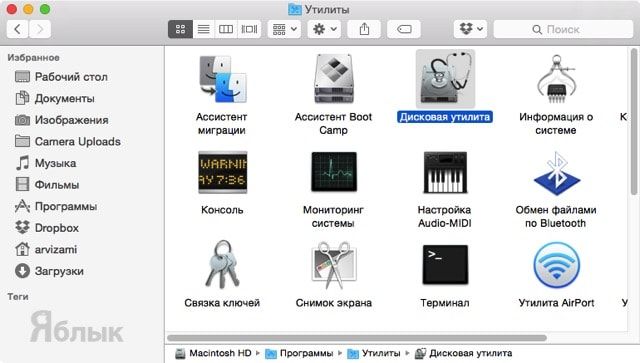 2. В левой боковой колонке выберите необходимый жёсткий диск.
3. В рабочей области перейдите во вкладку «Первая помощь».
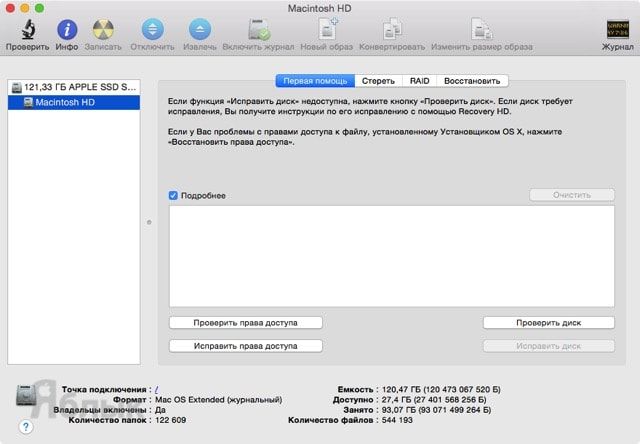 4. Выберите пункт «Проверить диск» и дождитесь окончания проверки, длительность которой будет варьироваться в зависимости от объёма накопителя, его наполненности и мощности самого Mac.
5. Если Дисковая утилита найдёт ошибки, то нажмите кнопку «Исправить диск».
Как восстановить права доступа к диску на Mac OS X через Дисковую утилиту?
Иногда случается так, что права доступа в системе могут быть исправлены на некорректные. В большинстве случаев это происходит по вине неправильно работающих установщиков программ. Из-за этого система может не получить доступ к важным системным настройкам, компонентам и расширениям.
1. Откройте Finder → Программы → Утилиты → Дисковая утилита или воспользуйтесь поиском Spotlight.
2. В левой боковой колонке выберите необходимый жёсткий диск.
3. В рабочей области перейдите во вкладку «Первая помощь».
4. Выберите пункт «Проверить права доступа» и дождитесь окончания проверки.
5. Нажмите кнопку «Исправить права доступа».
Как восстановить права доступа к диску на Mac OS X через Терминал?
1. Откройте Finder → Программы → Утилиты → Терминал или воспользуйтесь поиском Spotlight.
2. Введите следующую команду:
sudo diskutil repairPermissions /
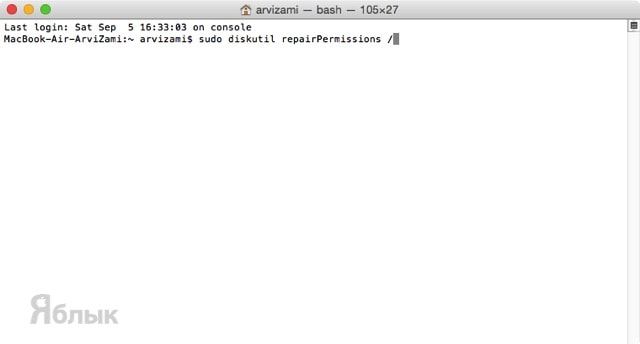 Когда начнётся процесс, вы увидите сообщение типа:
Started verify/repair permissions on disk0s2 Macintosh HD
Чтобы исправить права доступа к другому (несистемному) диску, замените «/» на имя другого диска, например:
sudo diskutil repairPermissions WD-ArviZami
Источник
Что делать, если внешний жесткий диск не отображается на Mac
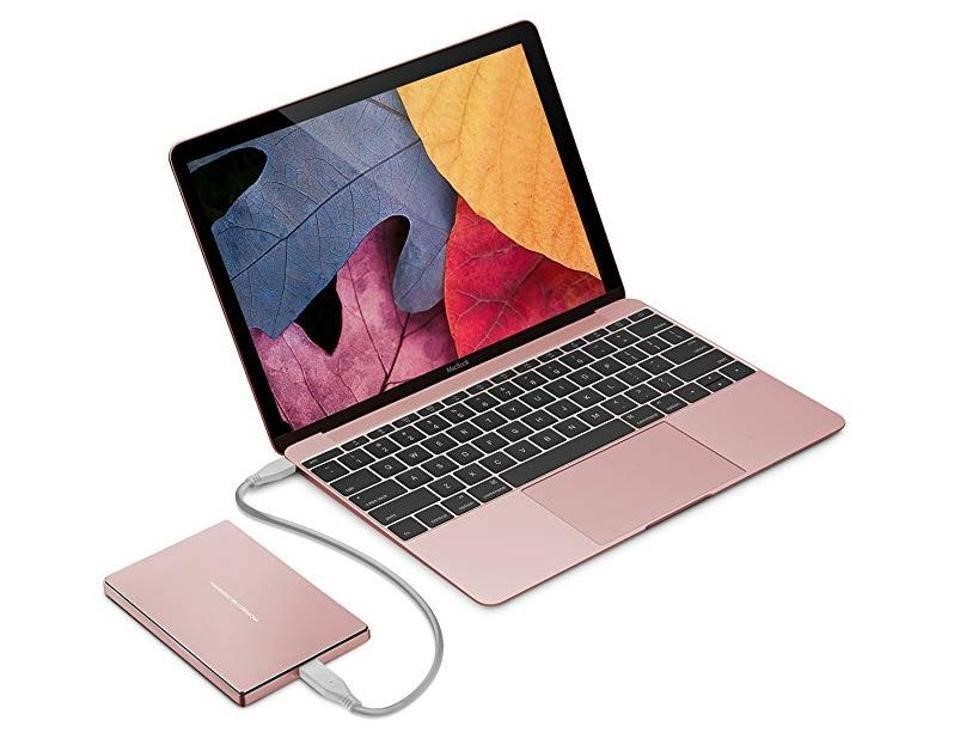
Увеличить объем памяти Mac не так просто, и чаще всего стоит больших денег. Поэтому многие обращаются к более экономичному решению проблемы – использованию внешнего жесткого диска. Но бывает, что внешний диск не отображается на Mac. Чаще всего накопитель появляется в списке устройств через несколько секунд после подключения к USB-порту. Но что делать, если этого не происходит?
Есть несколько причин, по которым внешний жесткий диск не отображается на Mac. Чаще всего их можно самостоятельно и быстро исправить.
В первую очередь проверьте, правильно ли подключен накопитель. Проверьте надёжно ли USB-кабель (или HDMI) подключен к диску или к Mac.
Если кабель подключен правильно, то, возможно, он неисправен. Попробуйте подключить то же устройство другим кабелем.
Проверьте USB-порты. Убедитесь, что разъем USB не расшатаны и не деформированы. В них не должно быть пыли. Попробуйте вставить кабель в другой порт.
Перезагрузите Mac. Иногда, если USB-диск не загружается, причина проблемы – операционная система. Попробуйте перезагрузить Mac. Выберете «Меню Apple», а затем – «Перезагрузить», либо зажмите кнопку питания, и, когда появится диалоговое окно, нажмите «Перезагрузить» или клавишу «R». Перезагрузка устройства очищает память MacOS.
Сбросить NVRAM. Иногда в оперативной памяти может возникнуть ошибка, из-за которой внешний накопитель не отображается при подключении. Сброс NVRAM поможет решить эту проблему.
Выключите или перезагрузите Mac, включите его и сразу же зажмите одновременно четыре клавиши: Options, Command, P и R. Зажмите их примерно на 20 секунд. Устройство запустится, а после того, как вы услышите второй сигнал при запуске – отпустите клавиши.
Важно: после сброса NVRAM придется заново настроить звук, часовой пояс и разрешение экрана. Убедитесь, что выбрали правильный часовой пояс. Ошибка может повлиять на способ хранения и организации файлов.
Убедитесь, что диск совместим с macOS. Не все внешние накопители предназначены для работы с Mac. Возможно, вы пытаетесь подключить устройство совместимое только с Windows (чаще всего это диски отформатированные под файловую систему NTFS). Mac чаще всего работает с FAT32.
Сбросить SMC (контроллер управления системой). Иногда сброс SMC может помочь, так как он отвечает за такие функции как питание и оборудование.
Методы сброса SMC зависят от модели компьютера, поэтому найдите здесь свой Mac и выполните действия по инструкции.
Используйте дисковую утилиту для поиска диска. Если сброс NVRAM не помог, то попробуйте открыть Дисковую утилиту и посмотреть, отображается ли там накопитель. Дисковая утилита расположена в Системных настройках. Ее также можно найти с помощью Spotlight.
Если вы найдете в Дисковой утилите внешний накопитель, то выберете параметр «Подключить». После этого диск появится на рабочем столе и в разделе «Внешние диски» в меню «Finder».
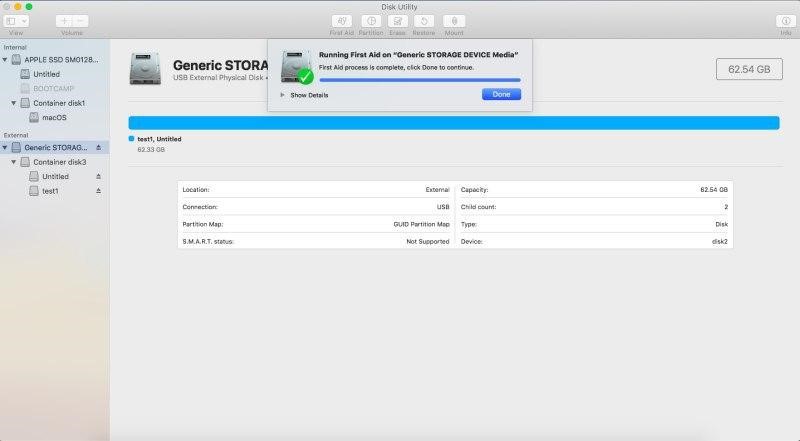
Восстановить диск с помощью First Aid. Файловая система может быть повреждена из-за неправильного извлечения диска или «битых» секторов. Для восстановления поврежденного внешнего накопителя можно использовать First Aid (Первая помощь) – утилиту для восстановления неисправных дисков.
- В программе «Дисковая утилита» выберите «Вид», затем – «Показать все устройства»
- Выберете необходимый внешний диск в боковой панели
- Нажмите «Первая помощь» и выберете «Выполнить» и «Продолжить»
Использовать программу iBoysoft Mac Data Recovery, чтобы сохранить данные на диске. Если и First Aid не смог восстановить внешний жесткий диск – всё серьезнее. Накопитель нужно переформатировать, чтобы назначить для него новую файловую систему.
Самая большая проблема: переформатирование очистит жесткий диск и сотрет с него все данные. Если у вас нет резервной копии диска, а на нем – важные данные, которые вы не хотите потерять, то восстановить их можно с помощью утилиты iBoysoft Data Recovery for Mac.
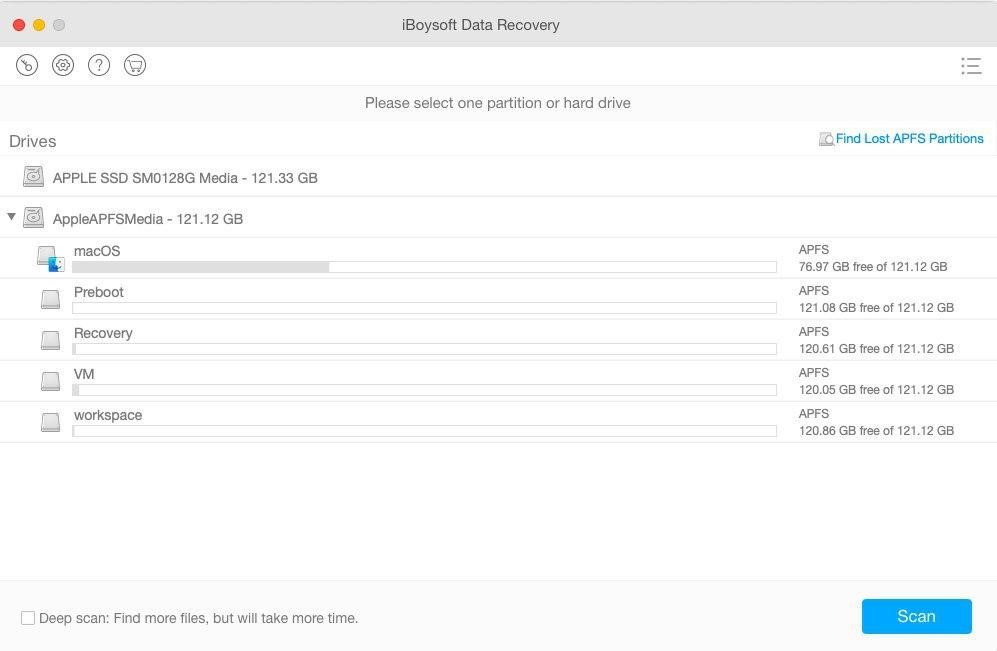
iBoysoft Data Recovery for Mac – мощное средство восстановления данных на поврежденном жестком диске.
Чтобы восстановить данные и переформатировать поврежденный накопитель нужно:
- Загрузите и установите iBoysoft Mac Data Recovery на Mac.
- Просканируйте потерянные данные на внешнем жестком диске. После запуска программы вы увидите поврежденный накопитель. Для поиска файлов на нем нажмите «Scan».
- Просмотрите результаты поиска, выберите необходимые файлы и нажмите «Recover».
- Запустите Дисковую утилиту и найдите в боковой панели внешний жесткий диск.
- Выберите его и нажмите «Стереть», чтобы переформатировать его.
Подробнее о решении проблемы таким способом можно прочитать в авторитетном источнике.
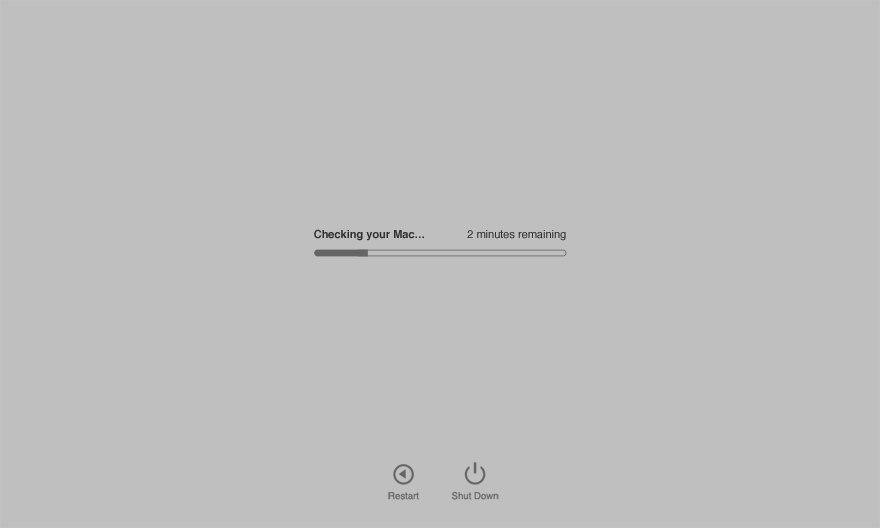
Запустить «Диагностику Apple» по поиску проблем с оборудованием. «Диагностика Apple» – это набор инструментов, используемый техническими специалистами для поиска неисправностей. Он поможет подтвердить или опровергнуть ваши опасения. В случае, если внешний накопитель поврежден физически, его нужно отправить в местный ремонтный центр.
- Отключите все внешние устройства. Оставьте только необходимые: клавиатуру, мышь и монитор.
- Перезагрузите Mac и во время включения зажмите клавишу «D». Удерживайте ее, пока не появится окно выбора языка.
- После выбора языка начнётся проверка компьютера.
- После завершения диагностики, вам будет предложены варианты решения проблемы.
Источник
Question: Q: An external disk refuses to mount, com.apple.DiskManagement.disenter error -119930868.
What causes this particular error and what can I do to mount this drive or retrieve the data from it?
iMac Line (2012 and Later)
Posted on Oct 9, 2019 3:22 AM
All replies
Ok so its been a week since i pressed the «i have this problem too button»
i spent most of my days not being able to write on the disk only read it and last night i tried to repair the disk again in disk utility. it didnt seem to do anything but this morning i noticed it finished the process and i pressed mount and it worked.
Sharing & permissions changed to » you have custom access». what i want to say is ease us and tuxera didnt do anything or the western digital discovery. The only thing that worked was my patience.
Dec 16, 2019 2:10 AM
Open Activity monitor and forse quit there fsck_ext. Will solve issuer.
Oct 29, 2019 7:03 PM
This doesn’t really help. I don’t want to lose all the info I have on my external drive. You’ve made it sound like it’s the drive issue but it’s really with how the new Catalina update is working to read these drives. Please provide a better fix. I need drive access without reformatting & it’s worked fine up till the latest update.
Oct 19, 2019 6:53 AM
On my system, I just have to wait for some time till I can mount my external drive (SD, for example).
Seems like Catalina runs fsck on them if they were not safely removed last time.
Drive mounts itself after it’s checked for errors. It just takes time.
Oct 23, 2019 11:36 AM
I’m having a similar issue — «com.apple.DiskManagement.disenter error 0.» since the Catalina upgrade.
I’ve a partitioned 2Tb drive — half I drag & drop files to, the other half is for Time Machine. I have another disc that I use as a backup for the files/data but not as Time Machine.
My partition for dragging files into mounts but the Time Machine partition won’t. It wt was last seen in action trying to backup a few days ago but announced it had insufficient space.
I’ll also post on a Time Machine forum
Oct 25, 2019 1:42 AM
I recently purchased a new IMac and upgraded it to Catalina. BIG mistake!! I have this same problem and it will not mount any external hard drives. These drives all still work fine on my old macBook running Mojave 10.14.1. This problem started when I Accidentally unplugged a drive and didn’t trash the icon first. Another problem is Disk Utility and some other programs will not respond to a QUIT command. The only way to get them to quit is to force quit them. I assume you will have a fix soon.
Oct 19, 2019 6:52 PM
The only solution I could find was to install Tuxera. This suggestion was posted on a similar Q as the solution & it worked for me. Microsoft NTFS for Mac by Tuxera 2019
Oct 30, 2019 5:45 AM
There’s more to the conversation
Loading page content
Page content loaded
I am trying to mount a micro SD for my Go Pro. If I format it using the Camera it will not mount. If I format using disk utility it will not work in the Camera I get an error code (com.apple.DiskManagement.disenter error 49223.) I am currently running Catalina
Apr 27, 2020 1:45 PM
does the info from this link help —
Apr 27, 2020 2:14 PM
I Had the same issue, looking for answer what user «mac1317» replied was resolved my issue which was: «Open Activity monitor and forse quit there fsck_ext. Will solve issuer. «
It was very helpful, Thanks very much user «mac1317!»
May 4, 2020 10:50 PM
An external disk refuses to mount, com.apple.DiskManagement.disenter error — 0
I just cold-cut turkey pull the USB chord after many failed tries to mount unsuccessfully and when I plugged it back in it worked and I was able to retrieve all my data, IT WORKED!
May 6, 2020 12:24 AM
i just started having this issues today
May 6, 2020 9:41 AM
I will probably just wait I probably wait i probably did not eject probably
May 6, 2020 9:43 AM
usb drive will not mount Dissenter error
May 6, 2020 10:39 AM
Could not mount disk
(com.apple.diskmanagement.disenter error -119930868) What do I do?
May 6, 2020 4:15 PM
Try this, it worked for me:
- With the device (disk) inserted, open Utilities → Disk Utility. You will see the disk shown as /dev/diskxax (x=numeric a=alpha) i.e. /dev/disk5s2
- Click on View (top left of window) and select “Show all devices” from the drop-down. The name of the actual physical device will be shown (i.e. “ScanDisk Cruzer Blade. or whatever your device is).
- The /dev/diskxax is shown under the name of the physical disk. It will present as faded (grayed out) text. It will not be mounted.
- Select the physical disk. It will present in the main box with a red bar with the legend underneath the bar in small letters with the size of the drive.
- Select “Erase” from the options at the top of the Disk Utility window.
- Enter the desired name for the device and select your desired filesystem.
- Click on “Erase” and then select “Show details”.
- Once the erase and format of the disk is completed the disk will present as mounted and the /dev/diskxax will be shown in a normal state (i.e. not grayed out).
- The device is now ready for use
May 6, 2020 4:35 PM
Yes you can reformat the disk for future use but all of the data will be lost
May 6, 2020 9:12 PM
There is no process «fsck_ext» running on my machine
May 11, 2020 1:09 PM
Solution for my disk not mounting is to format it? lol
May 11, 2020 1:10 PM
That was the problem for me too domagoj240. That’s why I purchased the Tuxera NTFS app.
May 12, 2020 6:00 AM
Force quitting fsck_ext just worked for me. I think like others have said if I would have waited long enough with it plugged in I might have seen it after if finishes the fsck checks and mounts.
APPLE if you ever read these. maybe the work that «fsck_ext» is doing could be bubbled to the users to say «Be patient your hard drive is being checked for errors. » and a progress bar if possible even just the spinny kind on that dialog would help. Let us know what the machine is doing. I realize that it was most likely caused by me pulling the plug instead of hitting eject (I would love to hear a quick explain on why that works on windows but not macs). Sad fact is that I bet a lot of people thought they had a failed drive as it looks to be faulty when you plug it in. I was certainly relieved to see the folders appear again. As soon as it showed up I ran disk first aid to make sure all was good and will work hard on not yanking that cable. Thanks again to all you good folks sharing the answers to the hard questions!
May 20, 2020 6:05 PM
Catalina doesn’t recognize the exFAT format anymore.
I had to sacrifice my old backups on my 1TB external HD, and erased it using disk utility. I used the recommended format and it works now. Good think i still have my other external HD that had the same info which I connected to my old laptop.
It’s frustrating indeed but that was the only solution that worked for me.
Источник


