- Dadaviz
- Com.google.android.gms — что это за процесс
- Что это такое?
- Ошибки, связанные с com.google.android.gms
- Develop Android Auto App using Android Studio
- By: Ambreen Altaf Hussain
- Android Auto
- Test Your Application on Emulator:
- Android Auto Connectivity Broken #742
- Comments
- Alex9001 commented May 30, 2019 •
Dadaviz
Ваш IT помощник
Com.google.android.gms — что это за процесс
Наш небольшой обзор затронет важное приложение на Андроид девайсах. Вы узнаете что это за процесс com.google.android.gms — отчего возникают ошибки, связанные с его работой и как их лечить.
В процессе работы Андроид устройства, постоянно возникают системные сбои или ошибки приложений. Так, все чаще многие пользователи смартфонов, сталкиваются с проблемой нестабильной работы программы com.google.android.gms. Кто-то получает уведомления о том, что одноименный процесс остановлен или произошла ошибка. Мы разобрались что это такое и как устранить все баги, связанные с его работой.
Что это такое?
Com.google.android.gms — это фоновый процесс, отвечающий за работу приложения Google Mobile Services (GMS). Программа GMS — это лицензированное приложение от Гугл, отвечающее за фоновую работу следующих сервисов на Андроиде — Сервисы Google Play, Play market, Gmail, Chrome, Maps, Youtube, Translate, Waze и др.

Это приложение играет важную роль на телефоне, так как отвечает за загрузку системных обновлений программ и игровых сервисов, а также обеспечивает работу многих ключевых функций на Android-устройствах. Для стабильной работы требуется 1-2% системной памяти.
Ошибки, связанные с com.google.android.gms
На многих телефонах с OS Android то и дело возникают различные накладки, связанные с работой программки GMS. Это два основных бага — процесс остановлен или произошла ошибка в com.google.android.gms.persistent.
Причины возникновения нестабильной работы могут быть разные:
- ошибка синхронизации учетной записи Гугл на телефоне;
- нехватка системной памяти;
- криво установленные обновления;
- влияние вирусных программ и др.
Метод исправления таких ошибок, в принципе, стандартный:
- Для начала проверьте, что бы память телефона не была забита;
- Далее перейдите в настройки — диспетчер приложений. Во вкладке Все или Работающие отыщите запущенную службу com.google.android.gms — очистите кэш и перезапустите её. Также процесс может быть прописан как Службы Google или MobileSyncService.
- Отключите синхронизацию учетной записи Гугл и снова авторизуйтесь;
- Примените обновления для Андроид приложений, в первую очередь: Сервисы Google Play, Плей Маркет.
- Перезагрузите телефон и примените системную очистку от мусора на Андроиде.
Данные методы должны исправить проблему и настроить стабильную работу на Андроид телефоне.
Источник
Develop Android Auto App using Android Studio
After serving several years of Android OS into mobile phones, Google launches Android platform for vehicles named Android Auto. While driving a car it is a difficult task to get connected with friends and family especially when it is urgent to inform about the meeting plan and so on.
By: Ambreen Altaf Hussain
Android Auto
Android Auto provides great experiences into your car devices such as Voice reply of your text messages without losing concentration from the road. It provides Car-Optimized Android User Interface which is quite easy to interact with Voice Actions and Touchscreen.
Android Auto launches with support of two types of applications.
Audio Apps
Messaging Apps
You can create a new application or can modify your existing messaging or audio application to run into cars.
Let’s get start with creating an application for android auto:
Note: Install v4 support library that is required to create notifications compatible for android auto devices.

Declaring Auto Capabilities:
The features that your automotive app is going to support should be declared in an XML Configuration file and make a reference of that file in your app’s manifest by adding these lines.
Now, Create an XML file named “automotive_app_desc” under res/XML directory and declare the feature you want to access in your Android auto, basically there are two features
Media – Used for media elements and auto playback.
Notifications – Used for notifications and auto messaging.
Declare the feature you want to use in automotive_app_desc
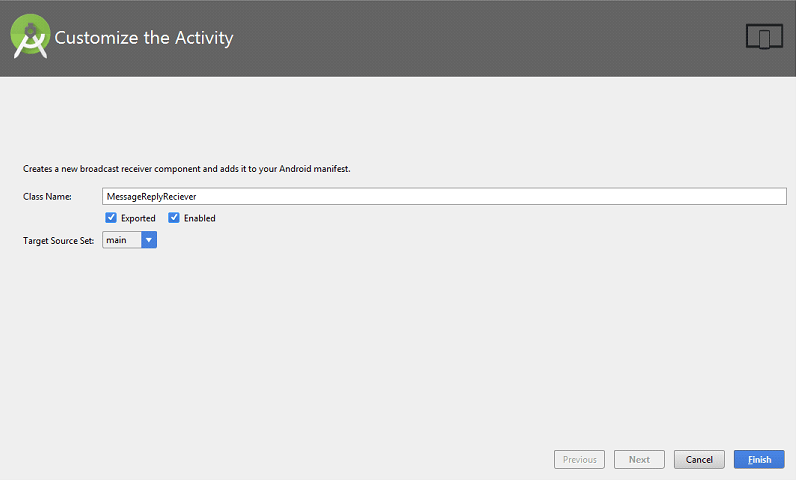
You need to add a MessageReplyReciever for replying from you android auto. Add by right click on project new Others BroadCast Reciever.
Register this activity in your android’s manifest by adding these lines
Now, when you have added a Replying Service you have to add also a Read Service which extends Broadcast Receiver.
Also register this activity into app’s manifest. Now your manifest should look like this.
Androidmanifest.xml:
Let’s move towards the coding.
Now first step is to create the intent and pendingintent for which will be triggered when the messages heard and replied to the participant
int conversation_id = 42;
private Intent createIntent(int conversationId, String action) <
return new Intent()
.addFlags(Intent.FLAG_INCLUDE_STOPPED_PACKAGES)
.setAction(REPLY_ACTION)
.putExtra(«CONVERSATION_ID», conversation_id);
>
setAction method will take the action parameter you declared in the intent-filter in app’s manifest whereas conversation_id connects the participant to the user.
Now declare the pending intent for read and reply separately.
PendingIntent For Read:
PendingIntent readPendingIntent = PendingIntent.getBroadcast(getApplicationContext(),
conversation_id,
createIntent(conversation_id, READ_ACTION),
PendingIntent.FLAG_UPDATE_CURRENT);
PendingIntent For Write:
PendingIntent replyIntent = PendingIntent.getBroadcast(getApplicationContext(),
conversation_id,
createIntent(conversation_id, REPLY_ACTION),
PendingIntent.FLAG_UPDATE_CURRENT);
Build a RemoteInput for receiving voice input in a Car Notification
RemoteInput remoteInput = new RemoteInput.Builder(EXTRA_VOICE_REPLY)
.setLabel(«Reply by voice»)
.build();
Create the Unread Conversation and populate it with the participant name,read and reply intents.
UnreadConversation.Builder unreadConvBuilder =
new UnreadConversation.Builder(participant)
.setLatestTimestamp(timestamp)
.setReadPendingIntent(readPendingIntent)
.setReplyAction(replyIntent, remoteInput);
Create the NotificationCompat Builder to show notifications on android auto.
NotificationCompat.Builder builder = new NotificationCompat.Builder(getApplicationContext())
.setContentText(message)
.setWhen(timestamp)
.setContentTitle(participant)
.setContentIntent(readPendingIntent)
.extend(new CarExtender().setUnreadConversation(unreadConvBuilder.build()));
mNotificationManager.notify(conversation_id, builder.build());
CarExtender Constructor is used to extend regular notifications into Android Auto notifications.
.extend(new CarExtender().setUnreadConversation(unreadConvBuilder.build());
Now, lets’s have a look at complete code:
MessageReadReceiver.java:
package com.mobilesiri.androidauto;
import android.content.BroadcastReceiver;
import android.content.Context;
import android.content.Intent;
import android.support.v4.app.NotificationManagerCompat;
import android.util.Log;
public class MessageReadReceiver extends BroadcastReceiver <
private static final String TAG = MessageReadReceiver.class.getSimpleName();
@Override
public void onReceive(Context context, Intent intent) <
if (MyMessagingService.READ_ACTION.equals(intent.getAction())) <
int conversationId = intent.getIntExtra(MyMessagingService.CONVERSATION_ID, -1);
if (conversationId != -1) <
Log.d(TAG, «Conversation » + conversationId + » was read»);
NotificationManagerCompat notificationManager = NotificationManagerCompat.from(context);
notificationManager.cancel(conversationId);
>
>
>
>
MessageReplyReceiver.java:
package com.mobilesiri.androidauto;
import android.content.BroadcastReceiver;
import android.content.Context;
import android.content.Intent;
import android.os.Bundle;
import android.support.v4.app.RemoteInput;
import android.util.Log;
public class MessageReplyReceiver extends BroadcastReceiver <
private static final String TAG = MessageReplyReceiver.class.getSimpleName();
@Override
public void onReceive(Context context, Intent intent) <
if (MyMessagingService.REPLY_ACTION.equals(intent.getAction())) <
int conversationId = intent.getIntExtra(MyMessagingService.CONVERSATION_ID, -1);
CharSequence reply = getMessageText(intent);
Log.d(TAG, «Got reply (» + reply + «) for ConversationId » + conversationId);
>
>
private CharSequence getMessageText(Intent intent) <
Bundle remoteInput = RemoteInput.getResultsFromIntent(intent);
if (remoteInput != null) <
return remoteInput.getCharSequence(MyMessagingService.EXTRA_VOICE_REPLY);
>
return null;
>
>
MainActivity.java:
package com.mobilesiri.androidauto;
import android.app.PendingIntent;
import android.content.Intent;
import android.os.Handler;
import android.os.IBinder;
import android.os.Message;
import android.os.Messenger;
import android.support.v4.app.NotificationCompat;
import android.support.v4.app.NotificationManagerCompat;
import android.support.v4.app.RemoteInput;
import android.support.v7.app.AppCompatActivity;
import android.os.Bundle;
import android.view.View;
import android.widget.Button;
import android.widget.Toast;
public class MainActivity extends AppCompatActivity <
public static final String READ_ACTION =
«com.mobilesiri.androidauto.ACTION_MESSAGE_READ»;
public static final String REPLY_ACTION =
«com.mobilesiri.androidauto.ACTION_MESSAGE_REPLY»;
public static final String CONVERSATION_ID = «conversation_id»;
public static final String EXTRA_VOICE_REPLY = «extra_voice_reply»;
private static final String TAG = MyMessagingService.class.getSimpleName();
final Messenger mMessenger = new Messenger(new IncomingHandler());
private NotificationManagerCompat mNotificationManager;
@Override
protected void onCreate(Bundle savedInstanceState) <
super.onCreate(savedInstanceState);
setContentView(R.layout.activity_main);
mNotificationManager = NotificationManagerCompat.from(getApplicationContext());
>
public IBinder onBind(Intent intent) <
return mMessenger.getBinder();
>
int conversation_id = 42;
private Intent createIntent(int conversationId, String action) <
return new Intent()
.addFlags(Intent.FLAG_INCLUDE_STOPPED_PACKAGES)
.setAction(REPLY_ACTION)
.putExtra(«CONVERSATION_ID», conversation_id);
>
private void sendNotification(int conversationId, String message,
String participant, long timestamp) <
PendingIntent readPendingIntent = PendingIntent.getBroadcast(getApplicationContext(),
conversation_id,
createIntent(conversation_id, READ_ACTION),
PendingIntent.FLAG_UPDATE_CURRENT);
RemoteInput remoteInput = new RemoteInput.Builder(EXTRA_VOICE_REPLY)
.setLabel(«Reply by voice»)
.build();
PendingIntent replyIntent = PendingIntent.getBroadcast(getApplicationContext(),
conversation_id,
createIntent(conversation_id, REPLY_ACTION),
PendingIntent.FLAG_UPDATE_CURRENT);
NotificationCompat.CarExtender.UnreadConversation.Builder unreadConvBuilder =
new NotificationCompat.CarExtender.UnreadConversation.Builder(participant)
.setLatestTimestamp(timestamp)
.setReadPendingIntent(readPendingIntent)
.setReplyAction(replyIntent, remoteInput);
NotificationCompat.Builder builder = new NotificationCompat.Builder(getApplicationContext())
.setContentText(message)
.setWhen(timestamp)
.setContentTitle(participant)
.setContentIntent(readPendingIntent)
.extend(new NotificationCompat.CarExtender().setUnreadConversation(unreadConvBuilder.build()));
mNotificationManager.notify(conversation_id, builder.build());
>
class IncomingHandler extends Handler <
@Override
public void handleMessage(Message msg) <
sendNotification(1, «Hello! How are you?», «Ambreen Altaf»,
System.currentTimeMillis());
>
>
>
Test Your Application on Emulator:
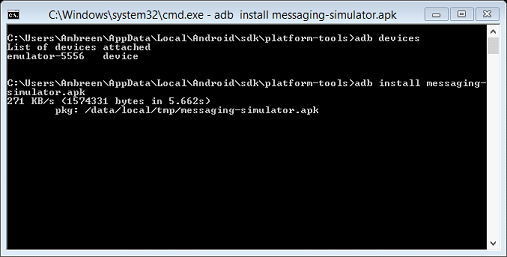
It’s not necessary that you should have a car device to test your application. You can run it on your emulator by installing Android Auto API from the SDK manager. When you have done with installation check your sdk extras google simulators, you will get two apk’s one for media browsing and second one is for messaging-simulator. Now you have to install this apk into your emulator for this copy messaging-simulator.apk into sdkplatform-tools. Now run command prompt here and type these command
Run messaging simulator in your emulator, it will ask you for the notification enabling.
Источник
Android Auto Connectivity Broken #742
Comments
Alex9001 commented May 30, 2019 •
Only issues related to the code of The Open GApps Project scripts themselves
If you have found an issue with a pre-built OpenGApps.org package please use the XDA-Developers forum thread
Checklist
- The issue is not answered by reading the FAQ
- The issue is part of The Open GApps Project scope (and not of the pre-built OpenGApps.org packages scope, for support on those see XDA Forum)
If Open GApps compilation fails:
If Open GApps installation fails:
- Is the issue reproducible using the latest version of your recovery?
- Is the issue reproducible with (the latest) TWRP recovery? (other recoveries are only best-effort)
If receiving force closures after Open GApps installation:
- The issue is NOT an error within one of the bundled Google applications itself (verify by e.g. installing the application from the Play Store instead)
- The issue is reproducible on clean (=wiped /data/ partition) installation
- The affected ROM includes the necessary patches and functionality as noted for Android versions and Platforms
- No non-AOSP hacks like privacy guards’ permission restrictions etcetera are applied
Issue description:
When I plug my phone into my car’s Android Auto dash it doesn’t work and says «Please unplug, wait a moment and re-plug your device.» Running LineageOS 16 for Payton and opengapps (latest builds). Works fine with a rooted stock build.
Reproduction Steps:
- Install lineage + twrp + opengapps
- Boot phone, complete setup, install Android Auto and Google Maps
- Connect phone to automobile with wire
- Android Auto crashes
Expected behavior:
Connecting phone to car’s dashboard should launch android auto instead of an error.
Observed behavior:
Android Auto won’t work with OpenGApps and MindTheGApps regardless of what rom is used (I’ve tested Oreo and Pie roms). It will work just fine with stock device builds. It is not because the cable is bad. Android Auto application launches just fine on the device, but it does not work tethered to an automobile’s dashboard.
The text was updated successfully, but these errors were encountered:
Источник


