- Xcode IDE
- Source Editor
- Assistant Editor
- Version Editor
- Interface Builder Built-In
- Simulator
- Integrated Build System
- Compilers
- Graphical Debugger
- Continuous Integration
- Asset Catalog
- Open Quickly
- OpenGL Frame Capture
- Complete Documentation
- Live Issues
- Fix-it
- Quick Help
- XCTest Framework
- Static Analysis
- SwiftUI
- Declarative syntax
- Design tools
- Native on all Apple platforms
- Live mode
- Instruments
- Data Recording
- Visual Comparison
- Drill Down
- Instrument Library
- Zombie Detection
- Source View
- Low-Overhead Sampling
- Custom Instruments
- System Trace
- Other tools included in macOS
- Command Line Tools
- Script languages
- Apple Event Bridge
- Audio Tools
- Terminal 2
- Source Control: Git and Subversion
- UNIX tools
- Editors
- FileMerge
- How to Install Command Line Tools in Mac OS X (Without Xcode)
- Installing Command Line Tools in Mac OS X
- What Installs with Command Line Tools and Where
- Troubleshooting “not currently available” error
- Building from the Command Line with Xcode FAQ
- Building from the Command Line with Xcode FAQ
- What is the Command Line Tools Package?
- Downloading command-line tools is not available in Xcode for macOS 10.9. How can I install them on my machine?
- How can I uninstall the command-line tools?
- I have multiple versions of Xcode installed on my machine. What version of Xcode do the command-line tools currently use?
- How do I select the default version of Xcode to use for my command-line tools?
- How do I build my projects from the command line?
- My app has multiple build configurations. How do I set a default build configuration for xcodebuild?
- How do I run unit tests from the command line?
Xcode IDE
Source Editor
Write code using a professional editor with advanced code completion, code folding, syntax highlighting, and message bubbles that display warning, errors, and other context-sensitive information inline with your code.
Assistant Editor
The Assistant button splits the editor in two, creating a secondary pane that automatically displays files that are most helpful to you based on the code you are actively editing. It can show the header counterpart, the superclass, callers, callees, or other helpful files.
Version Editor
Xcode’s Version editor displays a running timeline of commits, helps you determine blame, and graphically goes back in time to compare source files, with full support for Subversion and Git source control (SCM) systems.
Interface Builder Built-In
Design and test your user interface without writing a line of code, prototype in minutes, then graphically connect your interface to the source within the Xcode editor.
Simulator
With the iOS SDK, Xcode can build, install, run, and debug Cocoa Touch apps in a Mac-based Simulator for a streamlined development workflow.
Integrated Build System
Handles the most complex builds, scaling to maximize the power of multi-core Macs, and will automatically sign, provision, and install iPad and iPhone apps onto a device.
Compilers
The powerful open-source LLVM compiler for C, C++, and Objective-C is built into Xcode and available from Terminal. With it, your code compiles quickly, and is optimized by Apple to produce blazing-fast apps specifically tuned for the CPUs in iPhone, iPad, and Mac.
Graphical Debugger
Debug your app directly within the Xcode editor. Hover over any variable to drill into its contents, use Quick Look to see the data it contains, or right-click to add the variable to the watch list.
Continuous Integration
Xcode Server controls server-side bots that continuously build, analyze, test, and even archive your Xcode projects. The Xcode IDE configures these bots, analyzes nightly build and test results, and can track down which check-in broke the build.
Asset Catalog
The asset catalog editor in Xcode manages your app’s images, grouping together various resolutions of the same asset. When building, Xcode compiles the asset catalog into the most efficient bundle for final distribution.
Open Quickly
Simply press Cmd-Shift-O to instantly open any file within your workspace using the primary editor, or hold the Option key when selecting a file to open it in the Assistant editor. Open Quickly is an essential tool in any keyboard-driven workflow.
OpenGL Frame Capture
Press a single button to capture a complete representation of the current OpenGL frame from an iOS device. Xcode displays the shader information, and can visually construct how the frame was assembled within the Xcode debugger.
Complete Documentation
Easily search and find anything within Help or the Documentation and API Reference viewer.
Live Issues
Just like a word processor highlights spelling errors, Live Issues highlights common coding mistakes, without the need to click ‘build’ first.
Fix-it
Xcode goes beyond just reporting errors. When you make a coding mistake, Xcode will immediately alert you, and a single keyboard shortcut will instantly fix the issue, so you won’t miss a beat while coding.
Quick Help
Shortened API documentation is displayed while you’re programming, including comments that you write for your code. A brief overview is presented during code completion, with more links and references available within the Utility area.
XCTest Framework
XCTest APIs make it easy to build unit tests that exercise app functionality and are capable of running on Mac, iPad, iPhone, or Simulator.
Static Analysis
Find bugs in your code before the app is even run by letting the built-in static analyzer try out thousands of possible code paths in a few seconds. You’ll get a report of potential bugs that could have remained hidden or are nearly impossible to replicate.
SwiftUI
Declarative syntax
Write simpler code with a declarative Swift syntax that clearly states what your user interface should do.
Design tools
Drag and drop to construct or edit your interface. Quickly make changes to visual UI elements with pop-up inspectors.
Native on all Apple platforms
Your apps gain incredible native performance and take advantage of the proven technologies, controls, and user experiences of Apple platforms to feel fully integrated.
Live mode
See your design change instantly in one or many exact previews. Switch the design canvas to live mode to instantly interact with your running app in Xcode or on a connected device.
Instruments
Data Recording
Tell Instruments which app to analyze, what type of data to collect, and simply click the big red button as data is collected and stored for further analysis.
Visual Comparison
As data is recorded and displayed over time it is easy to see relationships, both between different types of collected data, or the same data collected over multiple runs.
Drill Down
Inspect data spikes on the graph to see what code is executing at the time, then easily jump into Xcode to fix the problem.
Instrument Library
Choose any of the bundled instruments in the library from low-level CPU, network, or file activity, to advanced graphics and user-event instruments.
Zombie Detection
Hard-to-find errors and crashes can be trapped within Instruments when an app tries to access memory that is no longer available.
Source View
Drill down through data points, sort to find the most CPU-consuming methods, and view the code directly within the Instruments UI to pinpoint the problem.
Low-Overhead Sampling
Sample performance data with a simple key press, using low overhead to collect high-fidelity information.
Custom Instruments
Create your own Instruments using DTrace and the Instruments custom builder.
System Trace
Taking up very few resources, Instruments records information about all the processes on your system, revealing performance bottlenecks caused as processes interact.
Other tools included in macOS
Command Line Tools
Download the macOS SDK, headers, and build tools such as the Apple LLVM compiler and Make. These tools make it easy to install open source software or develop on UNIX within Terminal. macOS can automatically download these tools the first time you try to build software, and they are available on the downloads page.
Script languages
macOS comes with AppleScript, Perl, Python, and Ruby already installed. And because macOS is built on UNIX, you can easily build your versions of popular open source languages using Xcode or the command line developer tools that come with macOS.
Apple Event Bridge
AppleScript and Automator get much of their power from the underlying Apple Event engine, making it easy to automate tasks on macOS. This bridge lets you command and query apps from additional languages such as Objective-C, Ruby, and Python, using the same messaging architecture as AppleScript.
Audio Tools
The AU Lab tool enables mixing and manipulation of audio streams.
Terminal 2
Terminal 2 provides access to the UNIX shell with tabs, colors, and Unicode support.
Source Control: Git and Subversion
The Xcode IDE supports both of these SCM systems directly within the IDE, and makes them available from the command line.
UNIX tools
These include all of the most popular command line tools such as make, awk, sed, ssh, tar, and zip.
Editors
The editors in macOS include TextEdit, xed (the Xcode editor), plus vim and emacs.
FileMerge
Compare, differentiate, and merge any text document.
Xcode Documentation
Find details and step-by-step instructions on how to use Xcode.
Documentation
Browse the latest documentation, including tutorials, sample code, articles, and API reference.
Session videos
See the latest in Apple technologies presented at WWDC and other events.
Forums
Ask questions and discuss development topics with Apple engineers and other developers.
Источник
How to Install Command Line Tools in Mac OS X (Without Xcode)
 Mac users who prefer to have a more traditional Unix toolkit accessible to them through the Terminal may wish to install the optional Command Line Tools subsection of the Xcode IDE. From MacOS Monterey, Big Sur, Catalina, Mojave, High Sierra, Sierra, OS X El Capitan, Yosemite, Mavericks onward, this is now easily possible directly and without installing the entire Xcode package first, no developer account is required either.
The Command Line Tool package gives Mac terminal users many commonly used tools, utilities, and compilers, including make, GCC, clang, perl, svn, git, size, strip, strings, libtool, cpp, what, and many other useful commands that are usually found in default linux installations. We’ve included the full list of new binaries available through the command line toolkit below for those interested, or you can just see for yourself after you have installed the package, which we’ll walk through here.
This guide is geared towards MacOS Monterey 12, macOS Big Sur 11, macOS Catalina, macOS Mojave 10.14.x, 10.13 High Sierra, 10.12 Sierra, OS X 10.11 El Capitan, OS X 10.10 Yosemite, and Mac OS X 10.9, and newer releases. Mac users running prior versions of Mac OS X can continue to directly install Command Line Tools and gcc (without Xcode) through a package installer available through the Apple Developer website as described here.
Installing Command Line Tools in Mac OS X
- Launch the Terminal, found in /Applications/Utilities/
- Type the following command string:
xcode-select —install
A software update popup window will appear that asks: “The xcode-select command requires the command line developer tools. Would you like to install the tools now?” choose to confirm this by clicking “Install”, then agree to the Terms of Service when requested (feel free to read them thoroughly, we’ll be here)
Wait for the Command Line Tools package download to complete, it’ll be about 130MB and installs fairly quickly depending on your connection speed
The installer goes away on its own when complete, and you can then confirm everything is working by trying to use one of the commands that were just installed, like gcc, git, svn, rebase, make, ld, otool, nm, whatever you want from the list below. Assuming the installation went uninterrupted, the command will execute as expected. This also means you can compile and install things from source code directly without having to use a package manager. Enjoy your new unix command line toolkit!
What Installs with Command Line Tools and Where
For those interested in knowing the details of what is installed on their Mac and where it’s going, the entire command line toolkit package gets placed in the following directory:
You can browse through that directory if you want to, or you can just have awareness of it just in case you want to modify or adjust any of the package at a later time.
Note that directory is the root /Library of Mac OS, not a user
If you want to see the 61 new commands available to you, they’re all in /Library/Developer/CommandLineTools/usr/bin/ but we have also listed them alphabetically below for convenience:
ar
as
asa
bison
BuildStrings
c++
c89
c99
cc
clang
clang++
cmpdylib
codesign_allocate
CpMac
cpp
ctags
ctf_insert
DeRez
dsymutil
dwarfdump
dyldinfo
flex
flex++
g++
gatherheaderdoc
gcc
gcov
GetFileInfo
git
git-cvsserver
git-receive-pack
git-shell
git-upload-archive
git-upload-pack
gm4
gnumake
gperf
hdxml2manxml
headerdoc2html
indent
install_name_tool
ld
lex
libtool
lipo
lldb
lorder
m4
make
MergePef
mig
mkdep
MvMac
nasm
ndisasm
nm
nmedit
otool
pagestuff
projectInfo
ranlib
rebase
redo_prebinding
ResMerger
resolveLinks
Rez
RezDet
RezWack
rpcgen
segedit
SetFile
size
SplitForks
strings
strip
svn
svnadmin
svndumpfilter
svnlook
svnrdump
svnserve
svnsync
svnversion
unifdef
unifdefall
UnRezWack
unwinddump
what
xml2man
yacc
Troubleshooting “not currently available” error
Getting an error message that says “Can’t install the software because it is not currently available from the Software Update server”? Well you’re in luck, because that error message probably indicates you already have Xcode installed on the Mac.
From Mac OS X 10.9 onward, if Xcode is already installed in Mac OS X then Command Line Tools becomes installed as well (you can check this by trying to run gcc or make from the terminal). Accordingly, this tutorial is aimed at users who do not want to install the broader Xcode development package, and would rather only have the command line utilities installed instead. Yes, that means you can uninstall the entire Xcode app and only install the command line tools if you want to, since for many users and sysadmins that’s the only reason they installed Xcode to begin with.
Источник
Building from the Command Line with Xcode FAQ
Building from the Command Line with Xcode FAQ
This document provides answers to frequently asked questions about command line tools.
What is the Command Line Tools Package?
The Command Line Tools Package is a small self-contained package available for download separately from Xcode and that allows you to do command line development in macOS. It consists of the macOS SDK and command-line tools such as Clang, which are installed in the /Library/Developer/CommandLineTools directory.
Downloading command-line tools is not available in Xcode for macOS 10.9. How can I install them on my machine?
In macOS 10.9 and later, the Downloads pane of Xcode Preferences does not support downloading command-line tools. Use any of the following methods to install command-line tools on your system:
If Xcode is installed on your machine, then there is no need to install them. Xcode comes bundled with all your command-line tools. macOS 10.9 and later includes shims or wrapper executables. These shims, installed in /usr/bin , can map any tool included in /usr/bin to the corresponding one inside Xcode. xcrun is one of such shims, which allows you to find or run any tool inside Xcode from the command line. Use it to invoke any tool within Xcode from the command line as shown in Listing 1 .
Listing 1 Using xcrun to run dwarfdump in the Terminal application.
Download the Command Line Tools package from the Developer website
The Command Line Tools package is available for download on the Download for Apple Developers page. Log in with your Apple ID, then search and download the Command Line Tools package appropriate for your machine such as macOS 10.12 as shown in Figure 1 .
Figure 1 Download page for the Command Line Tools package. 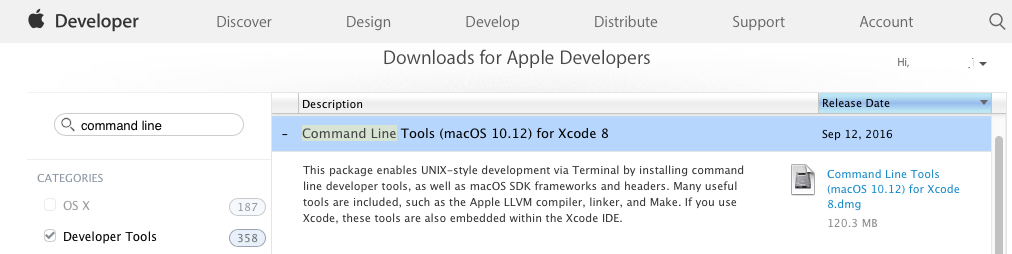
Note: In macOS 10.9 and later, Software update notifies you when new versions of the command-line tools are available for update.
Install the Command Line Tools package via the Terminal application
You can install the Command Line Tools package by running the xcode-select —install command.
Note: macOS comes bundled with xcode-select , a command-line tool that is installed in /usr/bin . It allows you to manage the active developer directory for Xcode and other BSD development tools. See its man page for more information.
How can I uninstall the command-line tools?
Xcode includes all of the command-line tools. If it is installed on your system, remove it to uninstall the command-line tools.
If the /Library/Developer/CommandLineTools directory exists on your system, remove it to uninstall the command-line tools.
I have multiple versions of Xcode installed on my machine. What version of Xcode do the command-line tools currently use?
To find out what version of Xcode is being used by your tools, run the following command in Terminal:
Listing 2 Printing the version of Xcode currently used by the command-line tools.
How do I select the default version of Xcode to use for my command-line tools?
To select a default Xcode for your command-line tools, run the following command in Terminal:
is the path to the Xcode.app package you wish to use for development.
Listing 3 Setting the default Xcode version.
How do I build my projects from the command line?
xcodebuild is a command-line tool that allows you to perform build, query, analyze, test, and archive operations on your Xcode projects and workspaces from the command line. It operates on one or more targets contained in your project, or a scheme contained in your project or workspace. xcodebuild provides several options for performing these operations as seen its man page . xcodebuild saves the output of your commands in the locations defined in the Locations preferences pane of your Xcode application, by default.
See below for various xcodebuild usage. Be sure to navigate to the directory containing your project or workspace in Terminal before running any of the following commands.
To list all schemes in your workspace, run the following command in Terminal:
where is the name of your workspace.
Listing 4 Listing all schemes in the MyApplication workspace.
To list all targets, build configurations, and schemes used in your project, run the following command in Terminal:
where is the name of your project.
Listing 5 Listing all information about MyProject, an Xcode project.
To build a scheme in your project, run the following command in Terminal:
where and build are respectively the name of your scheme to be built and the action to be performed on your scheme.
Listing 6 Building the tvOS scheme.
Note: xcodebuild supports various build actions such as build , analyze , and archive that can be performed on your target or scheme. However, build is performed by default when no action is specified as shown in Listing 7 .
To build your target with a configuration file, run the following command in Terminal:
where and are respectively the name of your target to be built and the name of your configuration file. See Xcode Help’s Build configuration file reference for more information about xcconfig files.
Listing 7 Building the iOS target with a configuration file.
To change the output locations of your xcodebuild command, use the SYMROOT (Build Products Path) and DSTROOT (Installation Build Products Location) build settings that respectively specify a location for your debug products and .dSYM files and one for your released products. See Xcode Help’s Build setting reference for more information about these build settings.
Listing 8 Setting up a location for iOS’ debug app version.
Listing 9 Setting up a location for iOS’s released app version.
My app has multiple build configurations. How do I set a default build configuration for xcodebuild?
In Xcode, the Configurations section of your project’s Info pane provides a pop-up menu, which sets the default configuration to be used by xcodebuild when building a target. Use this pop-up menu to select a default build configuration for xcodebuild as seen in Figure 2 .
Figure 2 Debug set as the default build configuration for xcodebuild. 
How do I run unit tests from the command line?
xcodebuild provides several options for running unit tests.
To build and run unit tests from the command line, execute the following command in Terminal:
To build unit tests without running them from the command line, execute the following command in Terminal:
To run unit tests without building them from the command line, execute any of the following command in Terminal:
The test action requires specifying a scheme and a destination. See How do I implement the Build For Testing and Test Without Building features from the command line? for more information about build-for-testing and test-without-building actions.
The -workspace option allows you to specify the name of your workspace. Use this option when your scheme is contained in an Xcode workspace.
The -project option allows you to specify the name of your Xcode project. Use this option when your scheme is contained in an Xcode project. It is required when there are multiple Xcode projects in the same directory and optional, otherwise.
The -destination option allows you to specify a destination for your unit tests. It takes an argument , which describes the device, simulator, or Mac to use as a destination. It consists of a set of comma-separated key=value pairs, which are dependent upon the the device, simulator, or Mac being used.
The -only-testing and -skip-testing options, which are optional, allow you to run only a specific test and to skip a test, respectively. They take an argument , which specifies the test to be executed or excluded. test-identifier ‘s format is as follows:
TestTarget , which is required, is the name of the test bundle. TestClass and TestMethod , which are both optional, respectively represent the name of the class and the name of the method to be tested.
Note: See Xcode Scheme and Run your app in Simulator for more information about scheme and destination, respectively.
For macOS apps, destinationspecifier supports the platform and arch keys as seen in Table 1 . Both keys are required for running your unit tests in macOS.
Источник


