- What is Compressor?
- Export and display anything
- Leverage built-in settings and destinations
- Customize your output for efficiency
- Compressor
- Информация
- Описание
- What is Compressor?
- Export and display anything
- Leverage built-in settings and destinations
- Customize your output for efficiency
- Compressor interface
- Current view
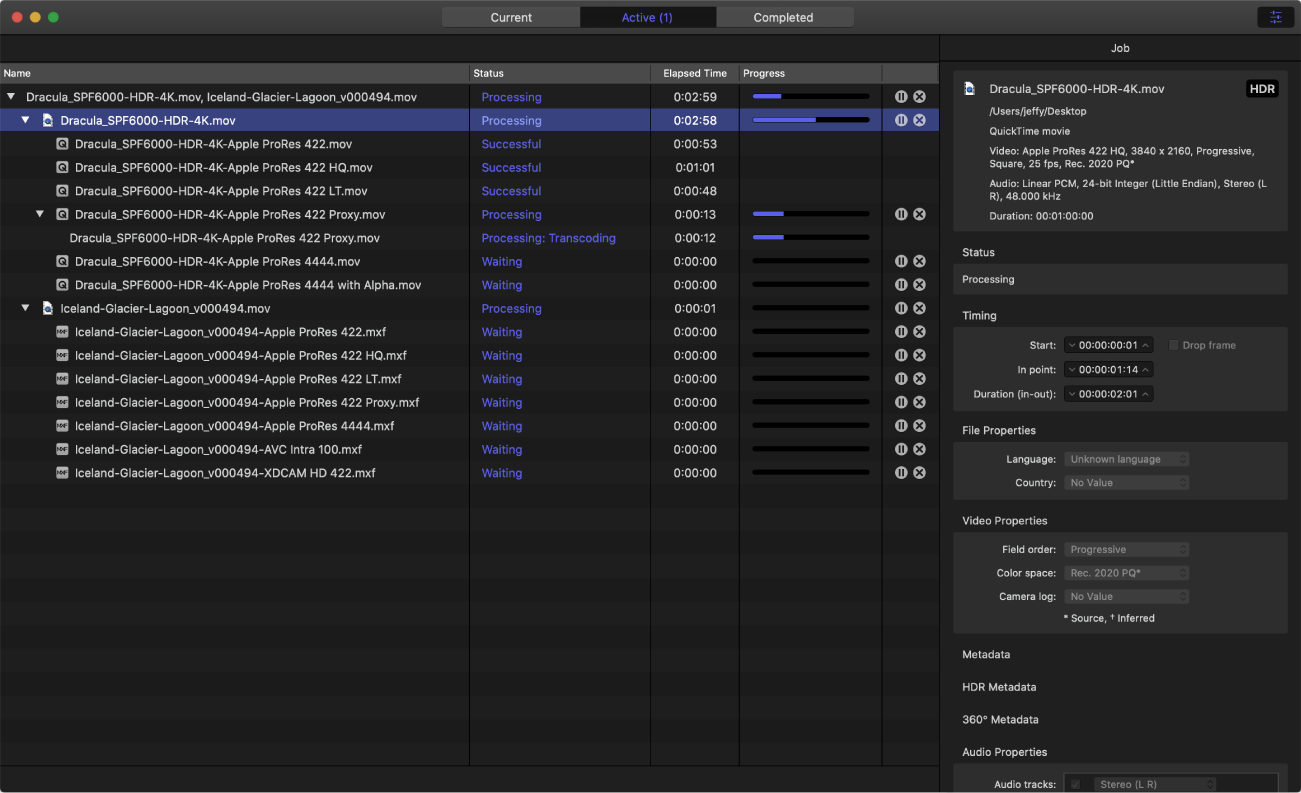
- Active view
- Completed view
- Errors & Warnings window
What is Compressor?
Compressor is an application that transcodes media files into a variety of formats.
Export and display anything
Export video for viewing on Apple devices in standard-definition (SD), high-definition (HD), and 4K formats (including H.264 and HEVC, also known as H.265).
Export and upload immersive 360° video viewable on video-sharing websites or in a virtual-reality (VR) headset.
Burn video and audio content to disc (DVD or Blu-ray) using H.264, for DVD, and Dolby Digital formats.
Export audio and video podcasts in H.264, AAC, and MP3 formats.
Submit video content to the iTunes Store in standard- and high-quality formats—including 4K HDR.
View high-dynamic-range video in the preview window on a supported display.
Export HDR video for viewing on HDR-capable TVs and displays.
Leverage built-in settings and destinations
Compressor comes with built-in settings that you can use to transcode files into the most common media formats.
Compressor also provides preconfigured destinations that transcode files and then perform actions on the transcoded files. For example, if you transcode a source file using the built-in Add to TV Home Videos destination, the destination outputs a high-quality QuickTime movie file and then automatically adds the file to your Home Videos library on Apple TV.
Customize your output for efficiency
In addition to transcoding source files, you can use Compressor to:
Create custom settings and destinations. You can use a variety of formats to build custom settings and destinations tailored to your unique transcoding workflows. For example, you can create a custom setting with specific frame dimensions or with video and audio filters applied. And when you create a destination, you can apply a job action that is performed after the file is transcoded—such as sending an email message or running an Automator workflow.
Create settings to transcode Final Cut Pro and Motion projects. You can create a custom setting in Compressor and then use it to transcode Final Cut Pro or Motion projects. For example, you can create a setting that outputs a file with the bit rate of your choice.
Transcode files using a network of shared computers. If you need more processing power and shorter transcoding times, you can create a group of shared computers to distribute and speed the transcoding process.
Create Compressor droplets. You can create a droplet to simplify your workflow. A droplet is a standalone application that lets you transcode media files in the Finder by simply dragging and dropping.
Create Watch Folders. You can configure a watch folder in Compressor to transcode media files as soon as they are saved, exported, or moved to that folder.
Download this guide: Apple Books | PDF
Источник
Compressor
Информация
Описание
Compressor плотно интегрируется с Final Cut Pro для добавления настраиваемых параметров вывода, распределенной кодировки и расширенных функций доставки. Благодаря поддержке видео 360 °, HDR, HEVC и MXF, это самый мощный и гибкий способ экспорта проектов Final Cut Pro.
Гладкий интерфейс соответствует Final Cut Pro и упрощает навигацию по проектам сжатия. Просмотрите настройки кодировки на левой боковой панели и откройте инспектор, чтобы быстро настроить расширенные аудио и видео свойства. Ваша партия появляется в центре, прямо под большим средством просмотра, которое позволяет просматривать и перемещать файл.
Compressor использует движок рендеринга с Final Cut Pro и Motion для обеспечения постоянной скорости и качества в приложениях. Он использует аппаратные кодеры для H.264 и HEVC, распространяет работу на нескольких ядрах процессора на вашем Mac и использует высокоскоростной графический процессор на графической карте для ускорения выполнения задач обработки изображений.
Независимо от того, настраиваете ли вы существующий параметр Compressor в Final Cut Pro или создаете совершенно новый, вы можете поделиться результатами с другими редакторами Final Cut Pro, даже если у них нет Compressor, установленного в их системах. Вы также можете создавать назначения, которые объединяют параметр кодирования с действием post-encode для автоматизации таких задач, как отправка по электронной почте, копирование и перемещение файлов или выполнение пользовательского сценария.
Функции распределенного кодирования являются частью Compressor, без необходимости отдельного приложения. Просто установите Compressor на любой Mac в своей сети и активируйте его как узел кластера для распределенной кодировки.
Кодируйте задания без специального оборудования, используя предварительно сконфигурированные группы компьютеров Mac в вашей сети. Функция «Общие компьютеры» устанавливает кластеры узлов кодирования на основе доступности назначенных компьютеров. Он может даже использовать незанятые процессорные ядра на одном компьютере, используя всю вычислительную мощность многоядерных систем.
Источник
What is Compressor?
Compressor is an application that transcodes media files into a variety of formats.
Export and display anything
Export video for viewing on Apple devices in standard-definition (SD), high-definition (HD), and 4K formats (including H.264 and HEVC, also known as H.265).
Export and upload immersive 360° video viewable on video-sharing websites or in a virtual-reality (VR) headset.
Burn video and audio content to disc (DVD or Blu-ray) using H.264, for DVD, and Dolby Digital formats.
Export audio and video podcasts in H.264, AAC, and MP3 formats.
Submit video content to the iTunes Store in standard- and high-quality formats—including 4K HDR.
View high-dynamic-range video in the preview window on a supported display.
Export HDR video for viewing on HDR-capable TVs and displays.
Leverage built-in settings and destinations
Compressor comes with built-in settings that you can use to transcode files into the most common media formats.
Compressor also provides preconfigured destinations that transcode files and then perform actions on the transcoded files. For example, if you transcode a source file using the built-in Add to TV Home Videos destination, the destination outputs a high-quality QuickTime movie file and then automatically adds the file to your Home Videos library on Apple TV.
Customize your output for efficiency
In addition to transcoding source files, you can use Compressor to:
Create custom settings and destinations. You can use a variety of formats to build custom settings and destinations tailored to your unique transcoding workflows. For example, you can create a custom setting with specific frame dimensions or with video and audio filters applied. And when you create a destination, you can apply a job action that is performed after the file is transcoded—such as sending an email message or running an Automator workflow.
Create settings to transcode Final Cut Pro and Motion projects. You can create a custom setting in Compressor and then use it to transcode Final Cut Pro or Motion projects. For example, you can create a setting that outputs a file with the bit rate of your choice.
Transcode files using a network of shared computers. If you need more processing power and shorter transcoding times, you can create a group of shared computers to distribute and speed the transcoding process.
Create Compressor droplets. You can create a droplet to simplify your workflow. A droplet is a standalone application that lets you transcode media files in the Finder by simply dragging and dropping.
Create Watch Folders. You can configure a watch folder in Compressor to transcode media files as soon as they are saved, exported, or moved to that folder.
Download this guide: Apple Books | PDF
Источник
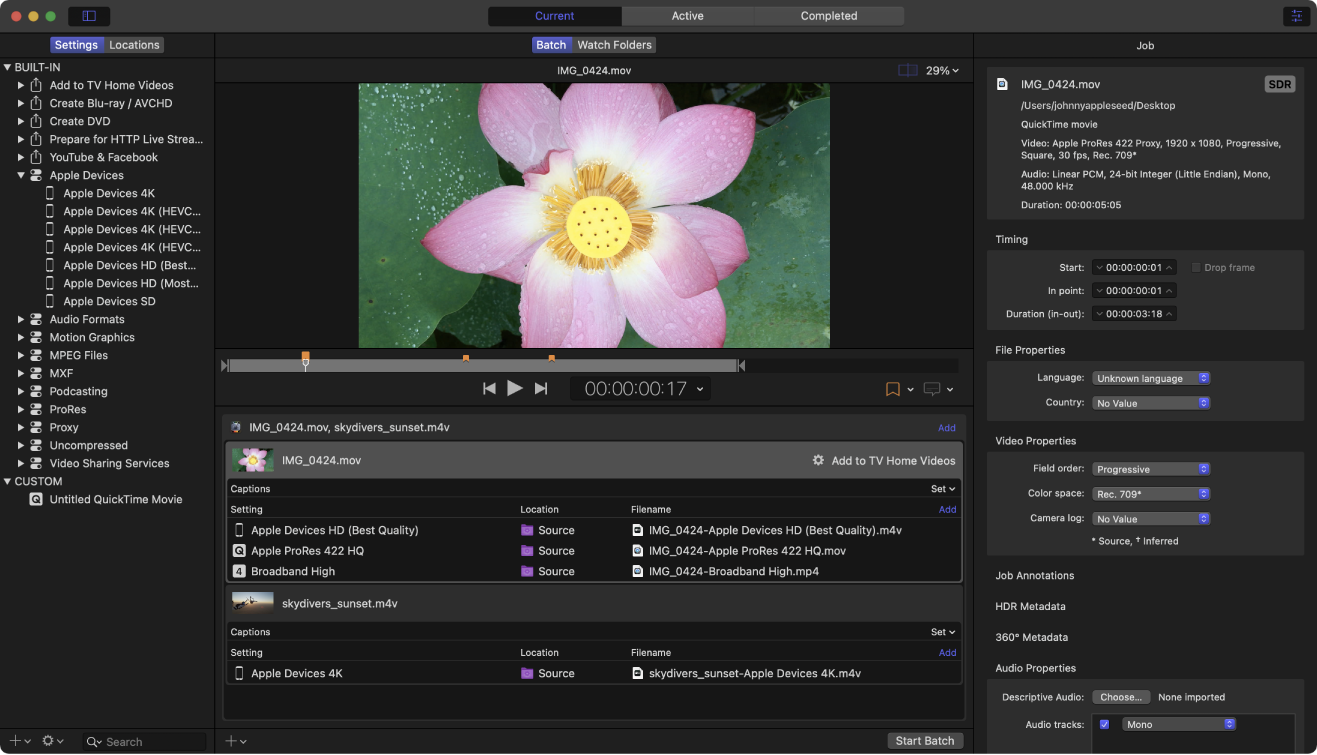
Compressor interface
The Compressor window has three views: Current, Active, and Completed. You can switch between these views by clicking a view button at the top of the window.
Current view
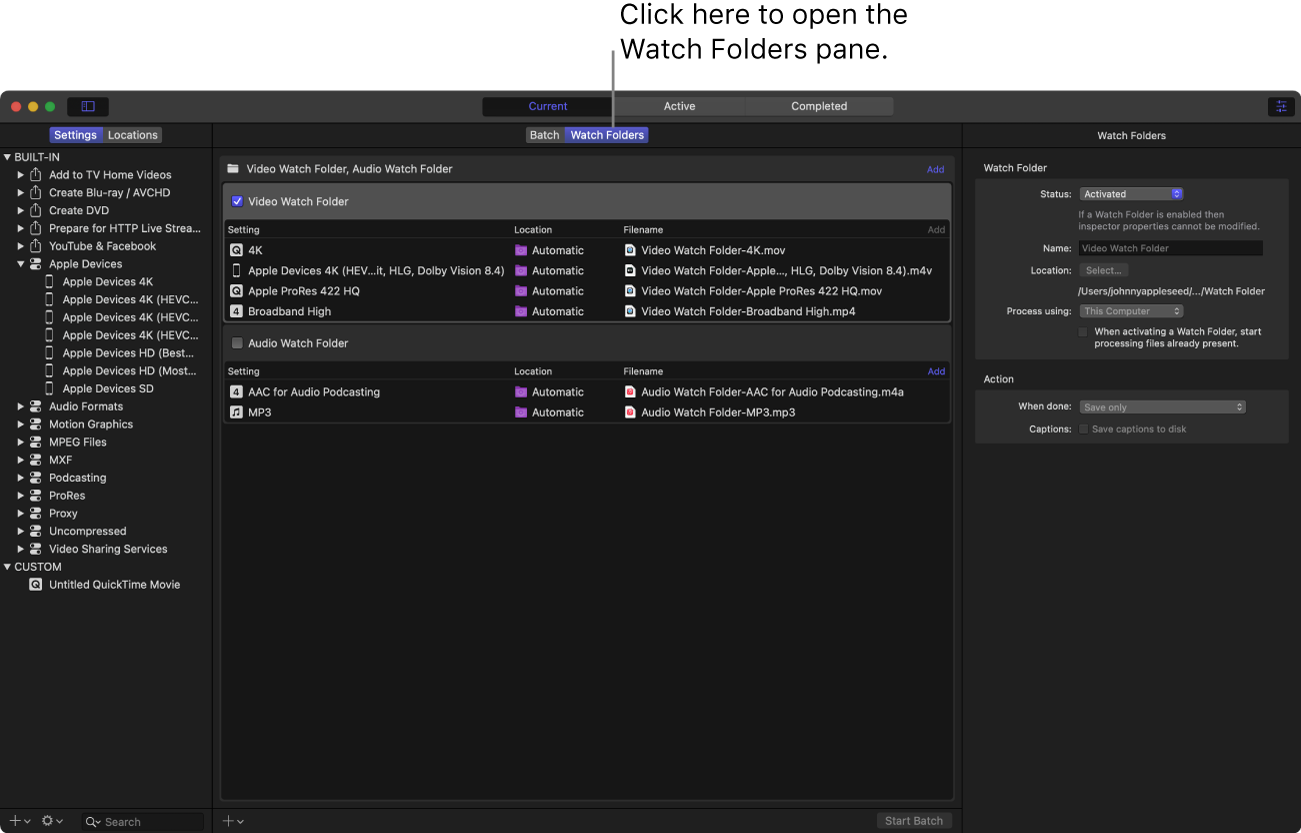
Current view is the default view in Compressor. It contains two panes: the Batch pane, where you can prepare and submit transcoding jobs in batches; and the Watch Folders pane, where you can set up watch folders and configure Compressor to automatically transcode files when they’re added to the folders.
Batch pane: The Batch pane has two basic areas, one for previewing your media files and the other for displaying the transcoding batches to be processed in a given session.
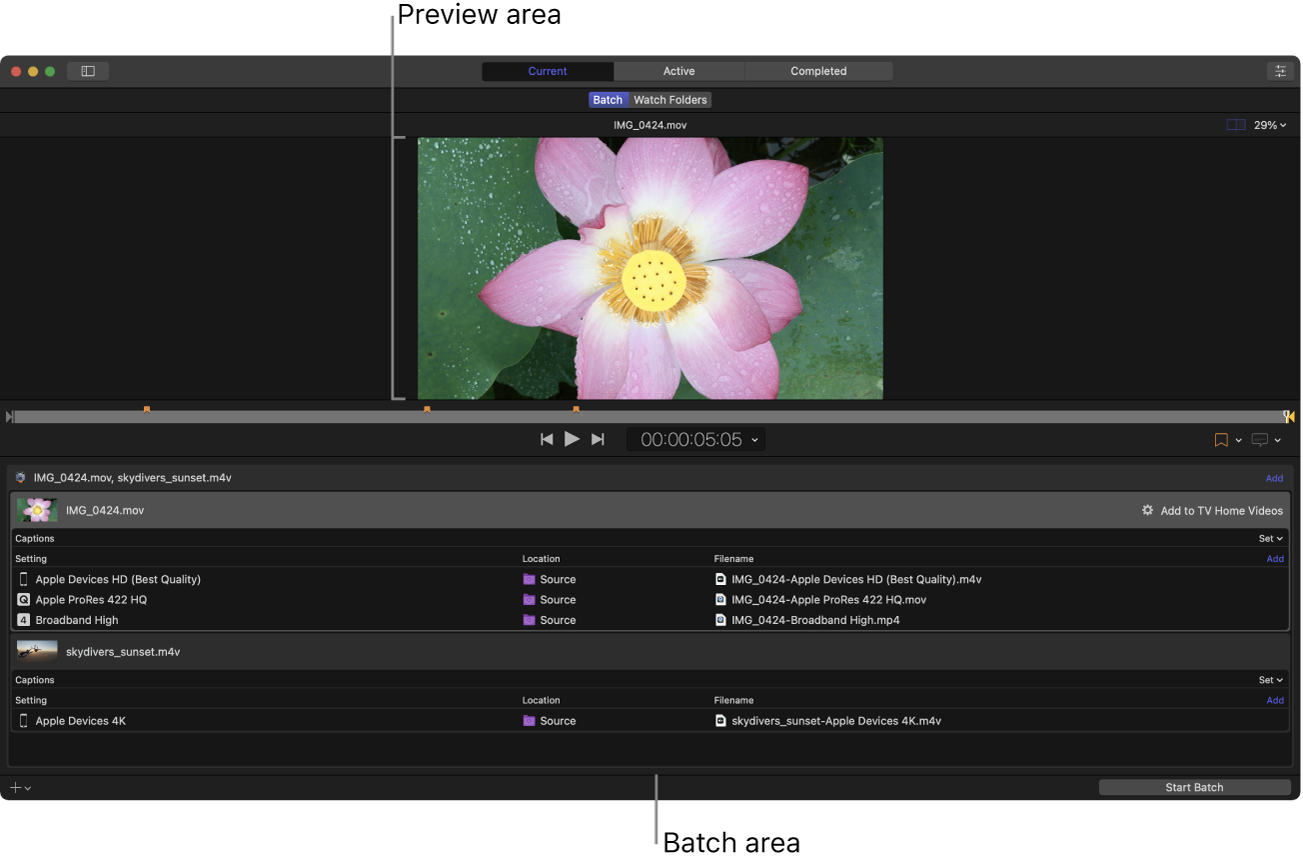
Preview area: A viewer with playback controls that shows how your media file will look and sound after transcoding. In this area you can also add metadata and markers to be included in the transcoded file.
Batch area: A list under the preview area that displays the transcoding batches you add to Compressor. A batch is one or more transcoding jobs. A job is a source file to which you apply transcoding instructions. Each job in the batch area displays information about the source file, the job’s transcoding instructions (setting, output location, output filename, and any caption data that you’ve added), and post-transcoding actions (such as uploading the finished file to a video-sharing website).
Watch Folders pane: The Watch Folders pane displays the list of watch folders you’ve added to Compressor, along with the transcoding jobs that each watch folder applies to the files added to them.
Important: If you use Compressor 4.5.4 or earlier, then open Compressor 4.6, the preview area may not appear in the Batch pane. This is because earlier versions of Compressor don’t support the watch folders feature. To display the preview area again, choose Window > Reset to Default Layout.
You can expand the Current view to display additional areas:
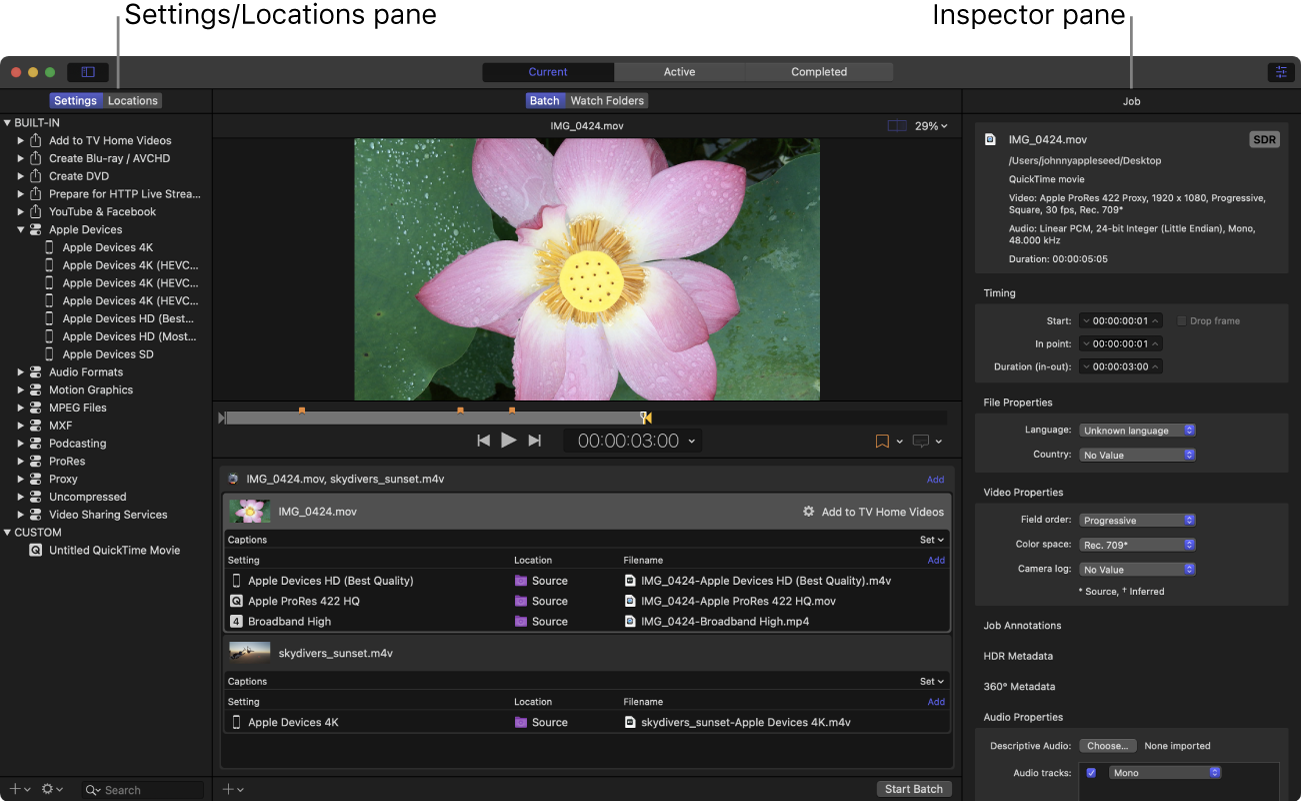
Settings and Locations pane: Click the Settings & Locations button  at the top-left corner of the Compressor window to expand this area, then click Settings or Locations to display the individual panes. The Settings pane provides quick access to all the built-in destinations and settings, as well as to any custom destinations or settings that you created. Likewise, the Locations pane provides quick access to all the built-in save locations, and to any custom save locations that you created. You apply settings, destinations, and locations to a job by dragging an item from these panes to the job in the batch area.
Inspector pane: Click the Inspector button  in the upper-right corner of the Compressor window to expand this area. The inspector pane has several views that change, depending on the item you’ve selected. When you select a batch (by clicking the background of the batch area), the Batch inspector appears, displaying basic information about the current batch. When you select a job in the batch area, the Job inspector appears; this area displays a summary of the source file’s transcoding format, an SDR or HDR badge that specifies whether the source file is a standard-dynamic-range or high-dynamic-range video, and controls for adding metadata and modifying job actions. When you select a specific transcoding instruction in the batch area (one of the rows under the job), the General, Video, and Audio inspectors appear. These three panes contain adjustable properties that you can use to customize the setting or destination. And if you add captions to a job, selecting the captions file in the batch area opens the Closed Captions inspector or Subtitles inspector.
Active view
In Active view, the Compressor window displays status information about batches (and their constituent jobs) currently being transcoded. In this view, you can monitor progress bars as well as pause or cancel the transcoding process.
Completed view
In Completed view in Compressor, you can view information about batches and jobs that have been successfully transcoded, as well as information about items that failed to transcode.
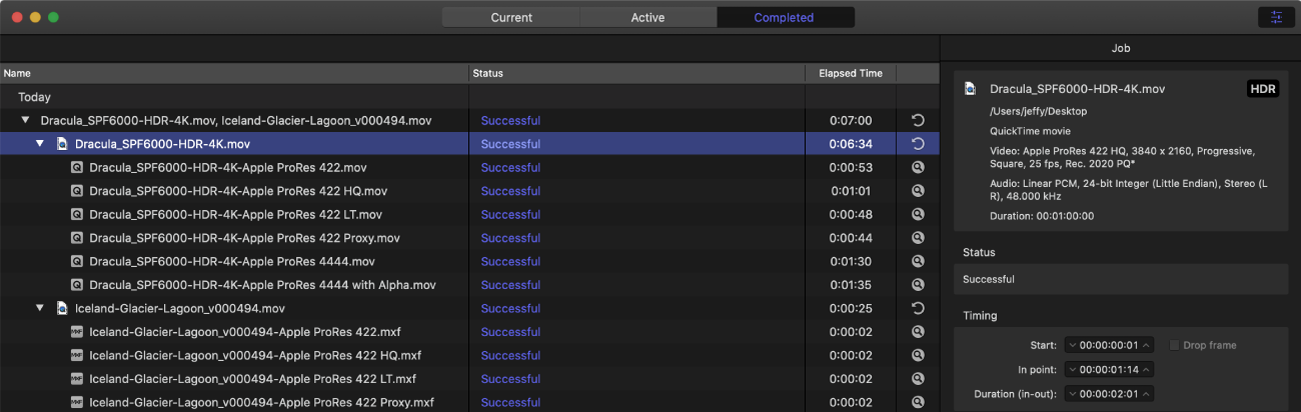
A list of batches is shown on the left side of the window. Click a disclosure triangle beside a batch to see its constituent jobs and output files. Select a batch, job, or output file in the list to see additional information in the inspector pane (on the right).
Errors & Warnings window
The Errors & Warnings window in Compressor lists any errors or warnings that may prevent a batch from being properly processed. If you see an alert icon (  or
or  ) in the batch area, there are one or more problems with the batch. Click the alert icon (or press Command-E) to open the Errors & Warnings window.
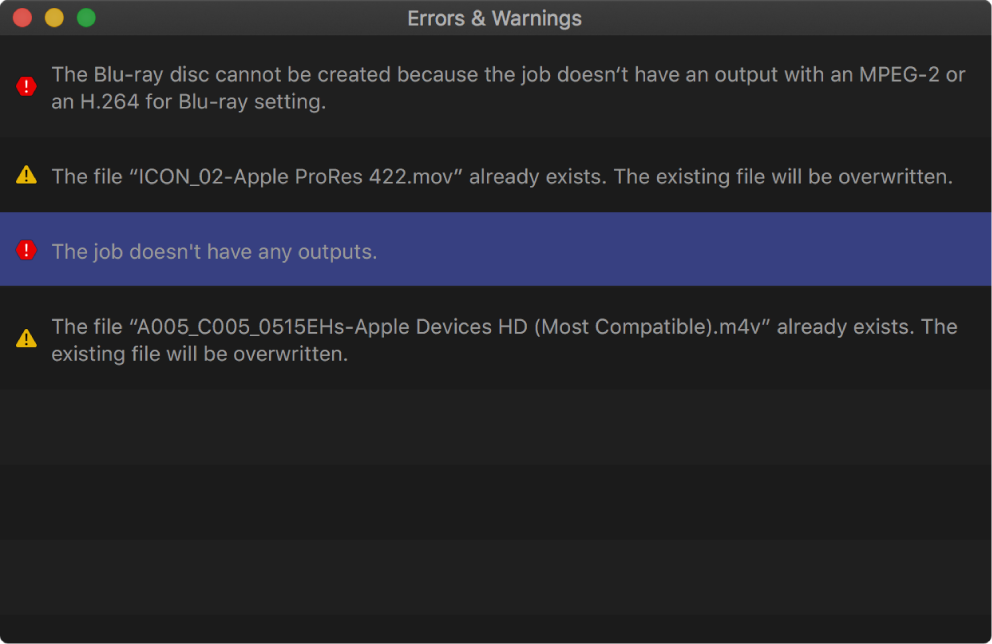
In the Errors & Warnings window, click an alert message to highlight the affected job in the batch area. Alerts showing a yellow yield sign are warnings that won’t prevent a batch from being started but may result in errors or unexpected results. Alerts showing a red stop sign  are errors that must be fixed before a batch can be started.
Note: Some errors visible in the Errors & Warnings window don’t have a corresponding alert icon in the batch area.
Download this guide: Apple Books | PDF
Источник


