- Configuration
- In this document
- See also
- Update channels
- Proxy Settings
- Setting up the Android Studio Proxy
- Android Plugin for Gradle HTTP proxy settings
- SDK Manager HTTP Proxy Settings
- Android Studio для NDK под Windows
- Установка и настройка Android Studio
- Install and configure the NDK and CMake
- Install NDK and CMake automatically
- Install the NDK and CMake
- Configure a specific version of CMake
- Groovy
- Kotlin
- Install a specific version of the NDK
- Configure specific versions of the NDK in your project
- Groovy
- Kotlin
- Default NDK version per AGP version
Configuration
In this document
See also
During installation, Android Studio provides wizards and templates that verify your system requirements, such as the Java Development Kit (JDK) and available RAM, and configure default settings, such as an optimized default Android Virtual Device (AVD) emulation and updated system images. This document describes additional configuration settings you may want to use to customize your use of Android Studio.
For specific documentation about emulator and device setup and use, see Managing Virtual Devices, Using Hardware Devices, and OEM USB Drivers.
Update channels
Android Studio provides four update channels to keep Android Studio up-to-date based on your code-level preference:
- Canary channel: Canary builds provide bleeding edge releases, updated about weekly. While these builds do get tested, they are still subject to bugs, as we want people to see what’s new as soon as possible. This is not recommended for production.
- Dev channel: Dev builds are hand-picked older canary builds that survived the test of time. They are updated roughly bi-weekly or monthly.
- Beta channel: Beta builds are used for beta-quality releases before a production release.
- Stable channel: Used for stable, production-ready versions.
By default, Android Studio uses the Stable channel. Use File > Settings > Appearance & Behavior System Settings > Updates to change your channel setting.
Proxy Settings
Proxies serve as intermediary connection points between HTTP clients and web servers that add security and privacy to internet connections.
To support running Android Studio behind a firewall, set the proxy settings for the Android Studio IDE and the SDK Manager. Use the Android Studio IDE HTTP Proxy settings page to set the HTTP proxy settings for Android Studio. The SDK Manager has a separate HTTP Proxy settings page.
When running the Android Plugin for Gradle from the command line or on machines where Android Studio is not installed, such as continuous integration servers, set the proxy settings in the Gradle build file.
Note: After the initial installation of the Android Studio bundle, Android Studio can run with internet access or off-line. However, Android Studio requires an internet connection for Setup Wizard synchronization, 3rd-party library access, access to remote repositories, Gradle initialization and synchronization, and Android Studio version updates.
Setting up the Android Studio Proxy
Android Studio supports HTTP proxy settings so you can run Android Studio behind a firewall or secure network. To set the HTTP proxy settings in Android Studio:
- From the main menu choose File > Settings > Appearance & Behavior — System Settings — HTTP Proxy.
- In Android Studio, open the IDE Settings dialog.
- On Windows and Linux, choose File > Settings > IDE Setting — HTTP Proxy.
- On Mac, choose Android Studio > Preferences > IDE Setting — HTTP Proxy.
The HTTP Proxy page appears.
- Select auto-detection to use an auto-configuration URL to configure the proxy settings or manual to enter each of the settings. For a detailed explanation of these settings, see HTTP Proxy.
- Click Apply to enable the proxy settings.
Android Plugin for Gradle HTTP proxy settings
For application-specific HTTP proxy settings, set the proxy settings in the build.gradle file as required for each application module.
For project-wide HTTP proxy settings, set the proxy settings in the gradle/gradle.properties file.
For information about using Gradle properties for proxy settings, see the Gradle User Guide.
Note: When using Android Studio, the settings in the Android Studio IDE HTTP proxy settings page override the HTTP proxy settings in the gradle.properties file.
SDK Manager HTTP Proxy Settings
SDK Manager proxy settings enable proxy internet access for Android package and library updates from SDK Manager packages.
To set the SDK Manager settings for proxy internet access, start the SDK Manager and open the SDK Manager page.
- On Windows, select Tools > Options from the menu bar.
- On Mac and Linux, choose Tools > Options from the system menu bar.
The Android SDK Manager page appears. Enter the settings and click Apply.
Источник
Android Studio для NDK под Windows

На днях я обнаружил, что версия Android Studio неуклонно стремится к единице, в связи с чем задумался об изучении этого инструмента. Чтобы не было скучно, я решил поделиться своим опытом и собранными граблями в виде статьи-туториала.
Сразу хочу оговориться, что я не являюсь гуру Android-разработки, поэтому каких-либо откровений в тексте вы не найдете. Зато тут есть пошаговая инструкция по установке и настройке Android Studio под Windows и созданию простейшего проекта с использованием Android NDK.
Также заранее предупреждаю: статья получилась большой и очень подробной (честно, сам не ожидал), даже несмотря на то, что я почти все скриншоты и некоторые листинги кода спрятал под спойлеры.
На момент написания последней версией Android Studio была 0.8.1, для последующих версий необходимые действия могут отличаться от нижеописанных (очень надеюсь, что в лучшую сторону).
Установка и настройка Android Studio
1. Необходимо установить JDK (Java Development Kit) и JRE (Java Runtime Environment).
Раньше Android SDK поддерживал только JDK версии 6, но теперь это в прошлом. Поддерживается 7 и даже 8 (по крайней мере, именно 8-ю версию я указал в качестве JAVA_HOME и в настройках Android Studio, и никаких проблем не испытал).
JRE же нужен для запуска самой студии. У меня она использует версию 7.
Скачать JDK и JRE версий больше 6 можно с сайта Oracle.
Переменную JAVA_HOME теперь, вроде бы, можно не устанавливать, так как в Android Studio мы будем в настройках прописывать путь к JDK. Но я ее установил. Для этого нужно:
- Зайти в Панель управления\Система и безопасность\Система, выбрать слева Дополнительные параметры системы, в открывшемся диалоге найти кнопку Переменные среды.
- Создать системную или пользовательскую переменную JAVA_HOME и указать для нее путь к JDK. У меня указан вот такой путь: C:\Program Files\Java\jdk1.8.0_05.
2. Если у вас установлен Android SDK.
В комплекте с Android Studio идет свой Android SDK. И, если вы хотите использовать именно его, то в некоторых случаях может случиться странное. Например, у меня при обновлении SDK через SDK Manager часть файлов записывалась в старую папку, и возникли проблемы, когда я эту папку удалил. Скорее всего это произошло из-за того, что в реестре хранился ключ с путем к старой папке. Поэтому имеет смысл почистить реестр. Для этого нужно запустить regedit.exe и найти HKEY_LOCAL_MACHINE\Software\Android SDK Tools для 32-битных машин либо HKEY_LOCAL_MACHINE\Software\Wow6432Node\Android SDK Tools для 64-битных машин и удалить Android SDK Tools. Если в реестре вашей системы таких ключей нет, то все в порядке.
Если у вас установлена переменная среды ANDROID_SDK_HOME и вы хотите, чтобы она указывала на старую установку, то, по идее, это не должно стать проблемой, так как при настройке Android Studio мы укажем ей путь к SDK. Проблемы могут возникнуть, если эту переменную использует какое-либо из приложений, входящих в состав Android SDK.
3. Теперь переходим к установке Android Studio.
Нужно скачать Android Studio для вашей системы с официальной страницы и установить ее. По умолчанию, если выбрать «Установить только для меня» ставится в \Users\ \AppData\Local\Android\android-studio\, иначе ставится в \Program FIles (x86)\Android\android-studio\. Можно выбрать и другую папку.
После установки запускаем Android Studio.
Источник
Install and configure the NDK and CMake
To compile and debug native code for your app, you need the following components:
- The Android Native Development Kit (NDK): a set of tools that allows you to use C and C++ code with Android.
- CMake: an external build tool that works alongside Gradle to build your native library. You do not need this component if you only plan to use ndk-build.
- LLDB: the debugger Android Studio uses to debug native code. By default, LLDB will be installed alongside Android Studio.
This page describes how to install these components automatically, or by using Android Studio or the sdkmanager tool to download and install them manually.
Install NDK and CMake automatically
Android Gradle Plugin 4.2.0+ can automatically install the required NDK and CMake the first time you build your project if their licenses have been accepted in advance. If you’ve already read and agree to the license terms, then you can pre-accept the licenses in scripts with the following command:
Install the NDK and CMake
When you install the NDK, Android Studio selects the latest available NDK. For most projects, installing this default version of the NDK is sufficient. If your project needs one or more specific versions of the NDK, though, you can download and configure specific versions. Doing so helps you ensure reproducible builds across projects that each depend on a specific version of the NDK. Android Studio installs all versions of the NDK in the android-sdk /ndk/ directory.
To install CMake and the default NDK in Android Studio, do the following:
With a project open, click Tools > SDK Manager.
Click the SDK Tools tab.
Select the NDK (Side by side) and CMake checkboxes.
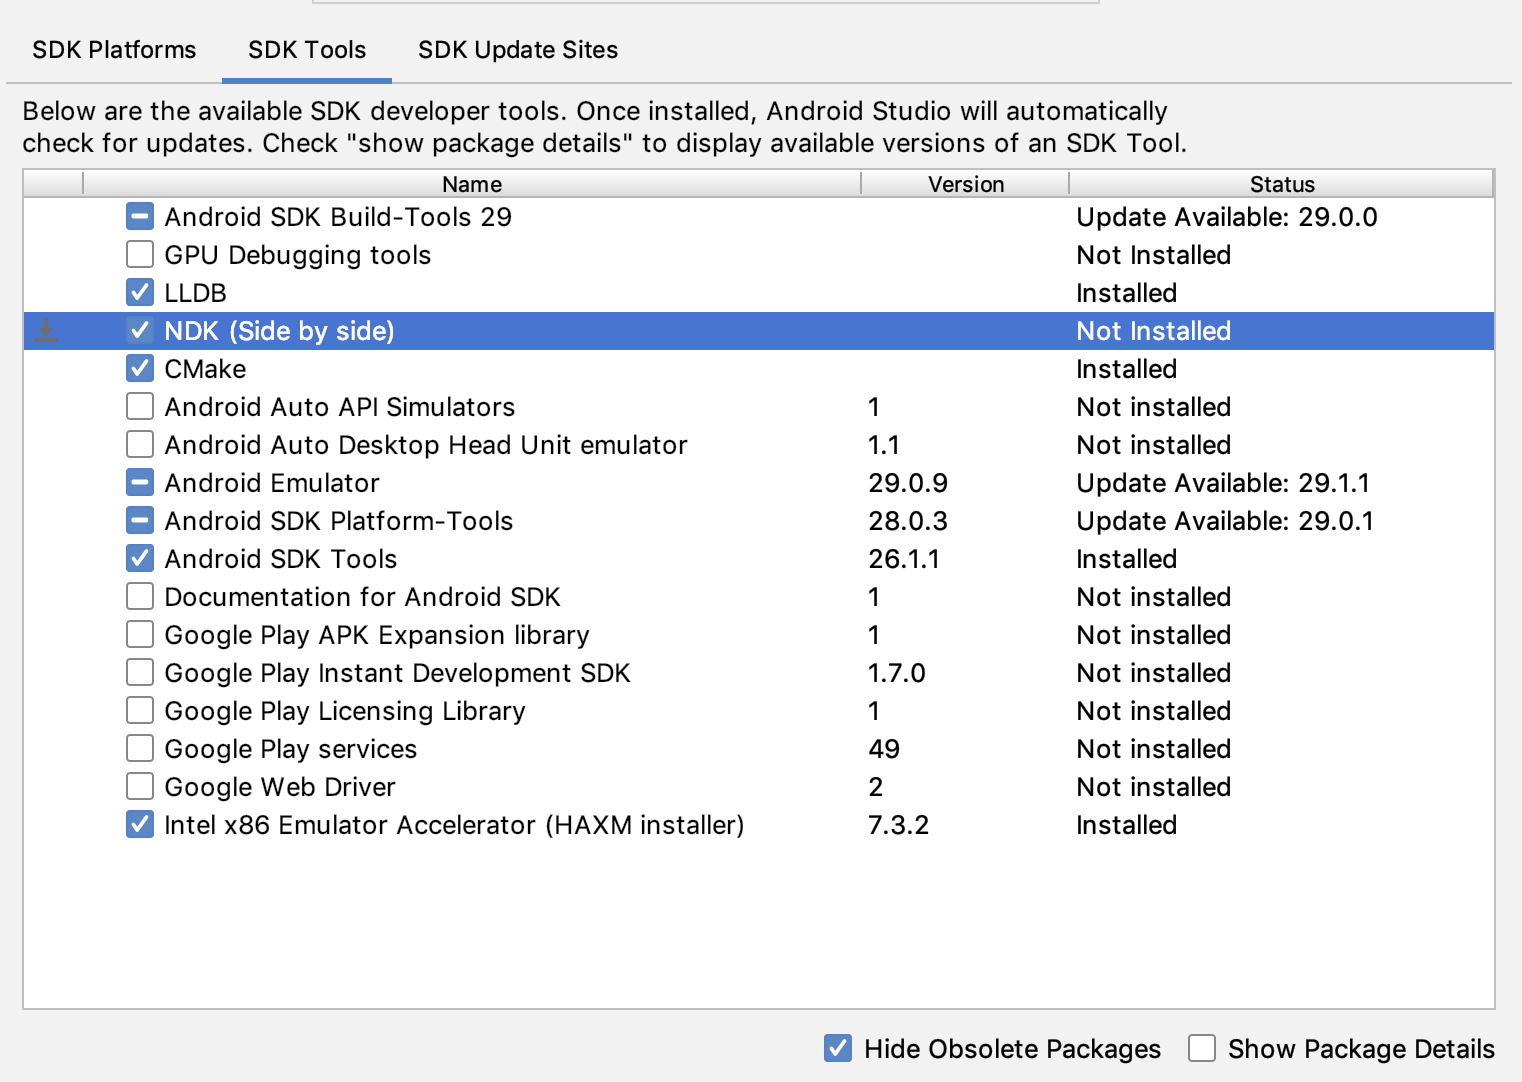 Figure 1: The SDK Tools window showing the NDK (Side by side) option
Click OK.
A dialog box tells you how much space the NDK package consumes on disk.
Click OK.
When the installation is complete, click Finish.
Your project automatically syncs the build file and performs a build. Resolve any errors that occur.
Configure a specific version of CMake
The SDK Manager includes the 3.6.0 forked version of CMake and version 3.10.2. Projects that don’t set a specific CMake version are built with CMake 3.10.2. To set the CMake version, add the following to your module’s build.gradle file:
Groovy
Kotlin
If you want to use a CMake version that is not included by the SDK Manager, follow these steps:
- Download and install CMake from the official CMake website.
- Specify the CMake version you want Gradle to use in your module’s build.gradle file.
Either add the path to the CMake installation to your PATH environment variable or include it in your project’s local.properties file, as shown. If Gradle is unable to find the version of CMake you specified in your build.gradle file, you get a build error.
If you don’t already have the Ninja build system installed on your workstation, go to the official Ninja website, and download and install the latest version of Ninja available for your OS. Make sure to also add the path to the Ninja installation to your PATH environment variable.
Install a specific version of the NDK
To install a specific version of the NDK, do the following:
With a project open, click Tools > SDK Manager.
Click the SDK Tools tab.
Select the Show Package Details checkbox.
Select the NDK (Side by side) checkbox and the checkboxes below it that correspond to the NDK versions you want to install. Android Studio installs all versions of the NDK in the android-sdk /ndk/ directory.
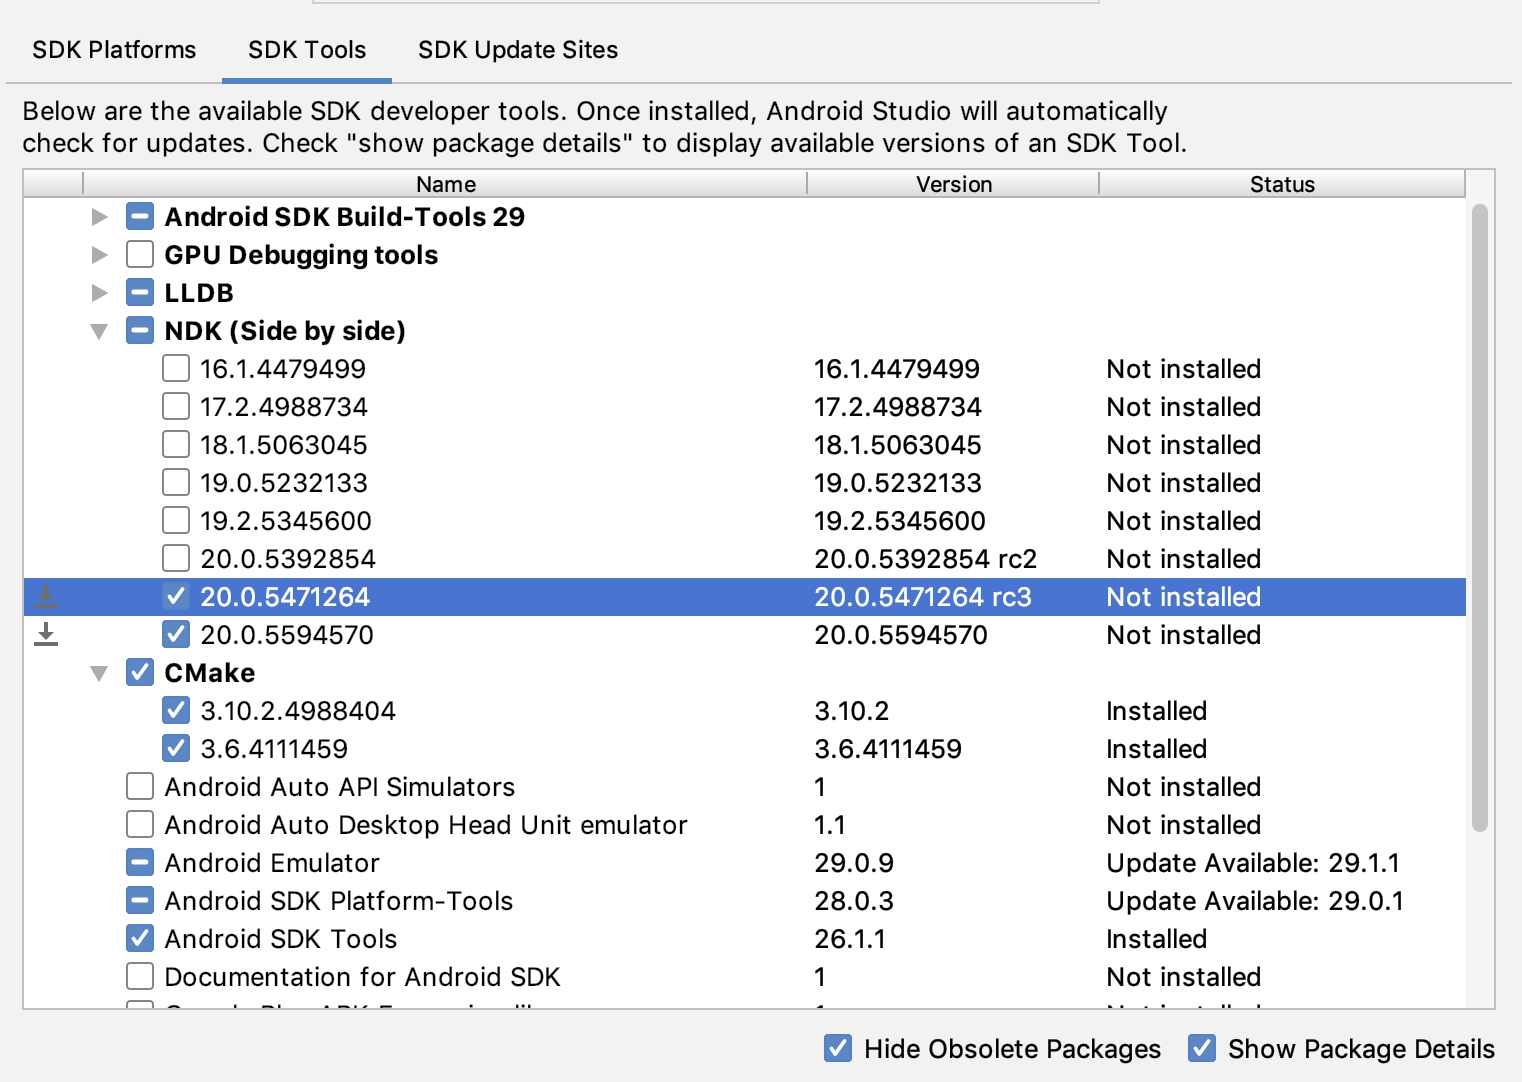 Figure 2: The SDK Tools window showing the NDK (Side by side) options
Click OK.
A dialog box tells you how much space the NDK package(s) consumes.
Click OK.
When the installation is complete, click Finish.
Your project automatically syncs the build file and performs a build. Resolve any errors that occur.
Configure each module with the version of the NDK you want it to use. When using Android Studio 3.6 or higher, if you do not specify the version, the Android Gradle plugin chooses a version that it is known to be compatible with.
Configure specific versions of the NDK in your project
You may need to configure the version of the NDK in your project if one of the following is true:
- Your project is inherited and you need to use specific versions of the NDK and the Android Gradle plugin (AGP). For more information, see Configure the NDK for the Android Gradle plugin.
You have multiple versions of the NDK installed and you want to use a specific one. In this case, specify the version using the android.ndkVersion property in the module’s build.gradle file, as shown in the following code sample.
Groovy
Kotlin
Default NDK version per AGP version
Before release, each AGP version is thoroughly tested with the latest stable NDK release at that time. For AGP version 3.6 and above, that NDK version will be used to build your projects if you do NOT specify an NDK version in the build.gradle file. The default NDK version is documented inside the AGP release notes. The current default NDK versions are listed in the following table:
| Android Studio/Gradle Plugin Version | |||||||
|---|---|---|---|---|---|---|---|
| 7.0 | 4.2 | 4.1 | 4.0 | 3.6 | 3.5 | 3.4 | |
| Default NDK version specified for the version of AGP | 21.4.7075529 | 21.4.7075529 | 21.1.6352462 | 21.0.6113669 | 20.0.5594570 | No default specified | |
Content and code samples on this page are subject to the licenses described in the Content License. Java is a registered trademark of Oracle and/or its affiliates.
Источник


