- Set Up Device for Development
- Enable Debugging on the Device
- Android 9.0+
- Android 8.0 and Android 8.1
- Android 7.1 and lower
- Verify that USB debugging is enabled
- Android 9.0+
- Android 8.0 and Android 8.1
- Android 7.1 and lower
- Connect the device to the computer
- Alternate connection via Wifi
- Connecting over WiFi
- Troubleshooting
- Install USB Drivers
- Download the USB Drivers
- Installing the USB Driver
- Summary
- Взаимодействие Android-устройств в локальной сети
- О чем это и для кого это?
- Какие возможные способы решения существуют?
- How To Connect Android Mobile To Laptop Computer
- App Information
- What is Smart View or Screen Mirroring
- So, let’s begin;
- You Might Have Some Question?
- Requirements
- Settings To Do On Your PC / Laptop
- Step one: (On our PC)
- Step 2: (On your PC)
- Step 3: (On your PC)
- Settings To Do On Your Mobile (Any Android Device)
- Step 4 (On your Mobile Phone)
- Extra features
- Step 5 (On your Android)
- Step 6 (On your PC)
Set Up Device for Development
This article explains how to setup an Android device and connect it to a computer so that the device may be used to run and debug Xamarin.Android applications.
After testing on an Android emulator, you will want to see and test your apps running on an Android device. You will need to enable debugging and connect the device to the computer.
Each of these steps will be covered in more detail in the sections below.
Enable Debugging on the Device
A device must be enabled for debugging in order to test an Android application. Developer options on Android have been hidden by default since version 4.2, and enabling them can vary based on the Android version.
Android 9.0+
For Android 9.0 and higher, debugging is enabled by following these steps:
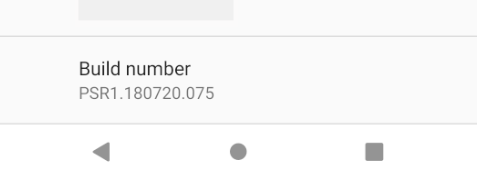
- Go to the Settings screen.
- Select About Phone .
- Tap Build Number 7 times until You are now a developer! is visible.
Android 8.0 and Android 8.1
- Go to the Settings screen.
- Select System.
- Select About Phone
- Tap Build Number 7 times until You are now a developer! is visible.
Android 7.1 and lower
- Go to the Settings screen.
- Select About Phone.
- Tap Build Number 7 times until You are now a developer! is visible.
Verify that USB debugging is enabled
After enabling developer mode on your device, you must ensure that USB debugging is enabled on the device. This also varies based on the Android version.
Android 9.0+
Navigate to Settings > System > Advanced > Developer Options and enable USB Debugging.
Android 8.0 and Android 8.1
Navigate to Settings > System > Developer Options and enable USB Debugging.
Android 7.1 and lower
Navigate to Settings > Developer Options and enable USB Debugging.
Once the Developer Options tab is available under Settings > System, open it to reveal developer settings:
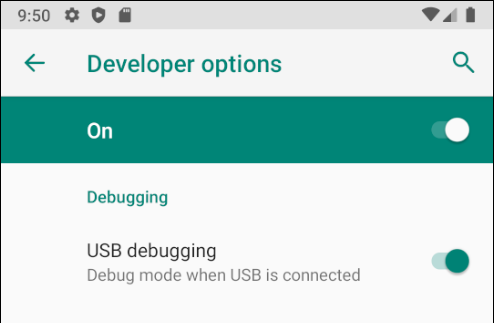
This is the place to enable developer options such as USB debugging and stay awake mode.
Connect the device to the computer
The final step is to connect the device to the computer. The easiest and most reliable way is to do so over USB.
You will receive a prompt to trust the computer on your device if you have not used it for debugging before. You can also check Always allow from this computer to prevent requiring this prompt each time you connect the device.

Alternate connection via Wifi
It is possible to connect an Android device to a computer without using a USB cable, over WiFi. This technique requires more effort but could be useful when the device is too far from the computer to remain constantly plugged-in via cable.
Connecting over WiFi
By default, the Android Debug Bridge (ADB) is configured to communicate with an Android device via USB. It is possible to reconfigure it to use TCP/IP instead of USB. To do this, both the device and the computer must be on the same WiFi network. To setup your environment to debug over WiFi complete the following steps from the command line:
Determine the IP address of your Android device. One way to find out the IP address is to look under Settings > Network & internet > Wi-Fi, then tap on the WiFi network that the device is connected to, and then tap on Advanced. This will open a dropdown showing information about the network connection, similar to what is seen in the screenshot below:
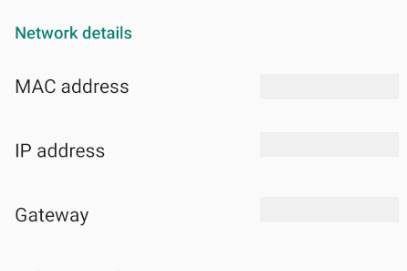
On some versions of Android the IP address won’t be listed there but can be found instead under Settings > About phone > Status.
Connect your Android device to your computer via USB.
Next, restart ADB so that it using TCP on port 5555. From a command prompt, type the following command:
After this command is issued, your computer will not be able to listen to devices that are connected via USB.
Disconnect the USB cable connecting your device to your computer.
Configure ADB so that it will connect to your Android device on the port that was specified in step 1 above:
Once this command finishes the Android device is connected to the computer via WiFi.
When you’re finished debugging via WiFi, it’s possible to reset ADB back to USB mode with the following command:
It’s possible to request ADB to list the devices that are connected to the computer. Regardless of how the devices are connected, you can issue the following command at the command prompt to see what is connected:
Troubleshooting
In some cases you might find that your device cannot connect to the computer. In this case you may want to verify that USB drivers are installed.
Install USB Drivers
This step is not necessary for macOS; just connect the device to the Mac with a USB cable.
It may be necessary to install some extra drivers before a Windows computer will recognize an Android device connected by USB.
These are the steps to set up a Google Nexus device and are provided as a reference. Steps for your specific device may vary, but will follow a similar pattern. Search the internet for your device if you have trouble.
Run the android.bat application in the [Android SDK install path]\tools directory. By default, the Xamarin.Android installer will put the Android SDK in following location on a Windows computer:
Download the USB Drivers
Google Nexus devices (with the exception of the Galaxy Nexus) require the Google USB Driver. The driver for the Galaxy Nexus is distributed by Samsung. All other Android devices should use the USB driver from their respective manufacturer.
Install the Google USB Driver package by starting the Android SDK Manager, and expanding the Extras folder, as can be seen in the follow screenshot:
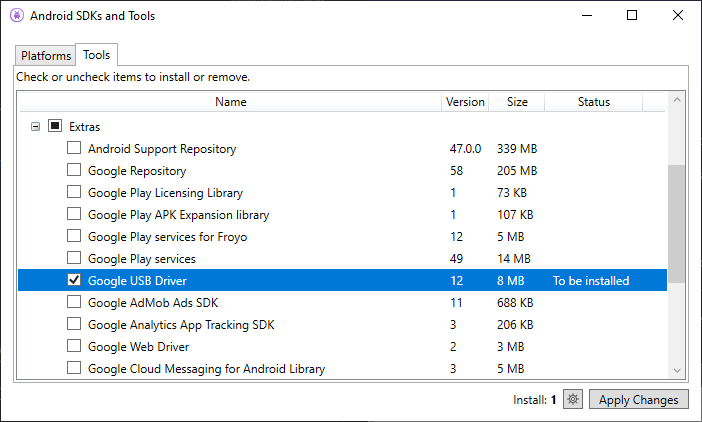
Check the Google USB Driver box, and click the Apply Changes button. The driver files are downloaded to the following location:
[Android SDK install path]\extras\google\usb\_driver
The default path for a Xamarin.Android installation is:
Installing the USB Driver
After the USB drivers are downloaded, it is necessary to install them. To install the drivers on Windows 7:
Connect your device to the computer with a USB cable.
Right-click on the Computer from your desktop or Windows Explorer, and select Manage .
Select Devices in the left pane.
Locate and expand Other Devices in the right pane.
Right-click the device name and select Update Driver Software . This will launch the Hardware Update Wizard.
Select Browse my computer for driver software and click Next .
Click Browse and locate the USB driver folder (the Google USB driver is located in [Android SDK install path]\extras\google\usb_driver).
Click Next to install the driver.
Summary
This article discussed how to configure an Android device for development by enabling debugging on the device. It also covered how to connect the device to a computer using either USB or WiFi.
Источник
Взаимодействие Android-устройств в локальной сети

Предположим, мы пишем игру для Android, которая подразумевает некое сетевое взаимодействие между устройствами. Причем наши устройства находятся в одной сети и мы хотим, чтобы взаимодействие между ними осуществлялось быстро, а значит вариант с обменом данными через интернет нам не подходит. Ах да, еще одна маленькая ложка дегтя — мы хотим охватить максимально возможную аудиторию, для чего нам необходимо поддерживать Android 2.3.
Что же нам делать? Давайте поговорим об этом, а заодно рассмотрим относительно новые возможности Android SDK для соединения двух и более устройств.
О чем это и для кого это?
Как-то раз, уйдя с предыдущего места работы и погрузившись в заслуженный отдых, я принялся писать сетевую игру, в которую могут играть люди, находящиеся в одной локальной сети. И сразу же столкнулся с тем, что для нормального функционирования подобной игры нам мало соорудить сетевое взаимодействие — нам нужно сделать нормальное и быстрое обнаружение устройств в сети. Собственно, в данной статье я поделюсь своим опытом в реализации решения для данной задачи.
Сразу оговорюсь, что статья предназначена в большей мере для тех, кто имеет опыт Android-разработки, написал несколько приложений и хочет расширить свой кругозор, а также улучшить профессиональные навыки.
Какие возможные способы решения существуют?
- Android Network Service Discovery. Простой и эффективный способ обнаружения устройств. На Android Developer есть пошаговое руководство по подключению NSD, есть пример NsdChat, который можно скачать там же. Но есть один существенный минус — данный метод поддерживается только начиная с API Level 16, то есть с Android 4.1 Jelly Bean;
- Второе решение, предлагаемое нам на сайте Android Developer — Wi-Fi Peer-to-Peer. Проблема этого метода та же самая — поддерживается он только начиная с API Level 16;
- Есть странное решение, которое предлагается некоторыми программистами на Stack Overflow — самостоятельно сканировать локальную сеть на предмет наличия сервера. То есть проходить по всем адресам сети. Это уже сейчас звучит как странный велосипед, а теперь представьте, что порт нашего сервера назначается автоматически. Таким образом, сканирование даже самую небольшой сети становится достаточно долгой и трудоемкой задачей;
- Наконец, мы можем обратить внимание на Java-библиотеки и написать что-нибудь с их использованием. Например, JmDNS.
Последний способ выглядит вполне адекватным и, кажется, может обеспечить нас требуемой скоростью и удобством обнаружения устройств в сети для конечного пользователя.
Я вооружился JmDNS и решил попробовать соорудить несколько классов, которые по максимуму упростят написание описанных выше приложений. Но для начала пришлось немного повырезать дубликаты .class-файлов из jar-пакета JmDNS (проблема описана здесь):
Далее я взял исходный код NsdChat с Android Developer и изменил его служебный класс, который отвечает за инициализацию сокетов и организацию сетевого взаимодействия. Также я написал wrapper для JmDNS
Здесь размещены 4 основные функции для работы Network Discovery:
- startServer для создания сервера и регистрации соответствующего сервиса в локальной сети;
- findServers для поиска серверов;
- reset для окончания работы с Network Discovery и последующего освобождения ресурсов;
- wifiLock для запроса блокировки Wi-Fi.
В завершении я написал универсальный класс ConnectionWrapper для полноценной организации обнаружения, а также обмена сообщениями в локальной сети. Таким образом, создание сервера в конечном приложении выглядит следующим образом:
А вот и mServerHandler, использующийся для приема и обработки сообщений:
Отправка сообщений еще проще:
И, наконец, метод для обнаружения и подключения к серверу:
Как видите, все очень просто. А главное, все это работает в любой версии Android для максимум двух устройств. Но сделать так, чтобы это работало для условно неограниченного числа устройств очень легко, и очевидное решение придет к вам почти сразу после детального изучения класса Connection. Пусть это будет в качестве домашнего задания.
Ах, да, весь код доступен для изучения и использования всеми желающими в моем репозитории на GitHub.. И, конечно, не исключаю то, что некоторые вещи можно сделать лучше и проще, поэтому не стесняйтесь форкать и делать pull request’ы.
Источник
How To Connect Android Mobile To Laptop Computer

App Information
Hello guys, today in this post I am going to show how to connect Mobile to laptop very easily and instantly. The method I would like to share with you guys doesn’t require any extra software, USB Driver, Android App or something else. All your needs are, you have a laptop computer and an Android mobile device that you want to connect. This kind of connectivity is also known as Screen Mirroring or Smart view anyways.
What is Smart View or Screen Mirroring
Well, actually when you have to mirror your screen from one device to another. The basic thing is to get a larger view or to enjoy the same screen on more than one device. When it comes to connecting two of the devices are your laptop a Mobile. This would be very beneficial in so many aspects that people may want to do.
So, let’s begin;
As I already mentioned in the above paragraph that this method overcomes these below points. Connect your Android Mobile phones to the laptop without using a USB data cable. No PC software or neither any Android Application is necessary to get this job done.
You Might Have Some Question?
Let me first answer all of the questions that come up on your mind with such connectivity.
How to connect mobile to laptop wireless or just using your WiFi internet connection. You can connect your mobile to PC via WIFi network is now possible.
Requirements
- A Windows installed Laptop or a Desktop Computer
- Any Android Mobile phone
- WiFi network
Initially, you have to connect your both devices (laptop & Mobile Device) to the same WiFi network. Right after just follow the steps one after gradually that I listed below. Your further clarification I take screenshots and grab them into the post to make it more clear.
Settings To Do On Your PC / Laptop
To connect your Android Mobile phone to PC you have to tack some steps on your PC. And at the same time on your Android Mobile phone as well. So, here I mentioned the steps to do first on your Computer. Then in the down section of this post, you can find the Mobile things to know about the term. Which you are searching for, that how to connect Mobile to PC Laptop with a WiFi connection (Wireless).
Step one: (On our PC)
Go to the notification area on your Window’s taskbar > Click on all settings option there.
Check the Number (1) and (2) from the below screenshot Image.
Step 2: (On your PC)
Now just click on the System where you can find Display, Sounds, Notifications and power options.
Step 3: (On your PC)
Now just go to the Projecting to this PC option by scrolling down from System menu.
Now that’s all, the above things you should have to do on your Windows Computer. Underneath are the steps which you have to do on your Mobile phone so you will get connected both devices.
Settings To Do On Your Mobile (Any Android Device)
Step 4 (On your Mobile Phone)
Extra features
From your drop-down menu tap on the Smart view option. In some devices, this smart View also named Screen Mirroring. So first make sure of it. For clarity check the image just right below.
Step 5 (On your Android)
Your Mobile phone automatically detects at the moment right away. And detect your PC / Laptop within a while. So just tap on it and it will make you connect both devices. I-e Connect your Android Mobile phone to PC laptop.
Step 6 (On your PC)
So, in the end, you have to just click on the Ok button. That a screen appears on your PC after your phone detects that PC.
After this click, immediately you see your Mobile screen is appearing / Mirroring on your Computers / Laptop Windows.
You can use this smart view to fulfill your projector requirements in a very simple way. Make your screen larger and surf your Mobile screen over on your Computer.
Wait, this is not the end here, you can also take control of your Computer’s screen from your phone. And at the same time, you can control your phone’s screen from your Laptop. That’s really cool yeah. I know this would be fun now to connect your Mobile to laptop ever. Thanks for your visit and enjoy a happy Smart Screen View.
Источник


