- Работа с устройствами USB в Android
- Права доступа
- Принтеры
- Преобразователи USB-Serial
- Резюме
- Android Debug Bridge (ADB) Connect to Device over USB, WiFi
- What is Android Debug Bridge (ADB)?
- USB debugging and ADB Configuration-
- How to Connect to an Emulator
- How to Connect Android Device with ADB (Android Debug Bridge)
- How to Configuring ADB for Wi-Fi Support
- How to Connect an Android to a PC
- Corded and wireless options to connecting your phone to your computer
- What to Know
- How to Connect an Android to a PC
- Connect an Android to a PC With USB
- Connect an Android to a PC With AirDroid
- Connect an Android to a PC With Bluetooth
- Connect an Android to a PC With Microsoft Your Phone
Работа с устройствами USB в Android
В недавней статье на Geektimes в комментариях возник вопрос о поддержке в ОС Android периферии, подключенной к шине USB. Действительно, большинство вендорского ПО, к примеру, для работы с принтерами и МФУ, поддерживает только подключение по сети. Однако это не означает, что в самой ОС Android нет такой возможности — это означает лишь то, что большинство устройств не имеют полноценного USB хоста, и далеко не все имеют поддержку OTG. По сети же могут работать абсолютно все без исключения.
Большинство устройств на Android при наличии порта OTG поддерживают на уровне системы (ядра Linux или стандартных компонентов Android) следующие классы устройств:
- Устройства ввода — клавиатуры, мыши, джойстики (HID)
- Накопители (Mass Storage)
Несколько реже:
- Сотовые модемы
- Сетевые адаптеры
- Вебкамеры
Хабы поддерживаются при наличии полноценных хост-портов, но не поддерживаются на портах OTG.
Подробнее список устройств, поддерживаемых на уровне ядра Linux, можно получить в sysfs:
$ ls /sys/bus/usb/drivers
Если же модуль в принципе доступен в исходниках ядра Linux, но не включен в Android — не стоит рассчитывать на то, что его получится собрать и расставить на все целевые системы.
Однако, начиная с Android 3.1 (API 12), в системе содержатся средства, достаточные для поддержки на уровне приложения любой USB периферии. Данные средства описаны в разделе USB Host руководства по Android API. Здесь же я хочу привести примеры реальной работы с некоторыми видами устройств.
Права доступа
Как и для прочих действий, Android требует, чтобы приложение получило разрешение на доступ к USB периферии. Существует 2 способа получить такое разрешение:
- Задекларировать список устройств в AndroidManifest
- Явно показать пользователю диалог “разрешить”
Поскольку для моих задач лишние вопросы к пользователю были нежелательны, я использовал первый способ.
Итак, нам необходимо добавить в манифест следующее:
А в res/xml/device_filter.xml вписать следующее:
Отмечу, что хотя общепринято указывать VID:PID в 16-ричной системе счисления, здесь они должны быть указаны в десятичной. В документации заявляется, что возможно указание только класса, без VID и PID, но у меня это не стало работать.
Принтеры
На примере принтера я покажу, как непосредственно использовать API android.hardware.usb. На уровне передачи данных все принтеры поддерживают стандартый класс USB устройств:
Класс предельно простой. В рамках этого класса устройство должно поддерживать:
- Обязательный bulk out endpoind для отправки данных на принтер
- Опциональный bulk in endpoind для получения статуса принтера
- 3 управляющих запроса
Код, приведенный ниже, предоставляет функциональность, аналогичную устройству /dev/usb/lp в Linux. Далее нам нужен фильтр, преобразующий исходный документ в пакет данных, понятный конкретной модели принтера. Но это тема иной статьи. Как один из вариантов — можно собрать ghostscript с помощью NDK.
Для работы с устройством нам в первую очередь нужно:
1. Найти устройство. В примере для простоты я ищу первый попавшийся:
2. Получить endpoint’ы:
3. Непосредсвенно открыть устройство:
4. После этого мы можем читать и писать в устройство:
5. По завершении работы — закрыть устройство:
Преобразователи USB-Serial
В отличие от притеров, преобразователи USB-Serial гораздо менее стандартизированы. Существует несколько распространенных чипов, для которых существенно отличается установка параметров последовательного порта — битрейта, чётности и проч. К счастью, есть библиотека github.com/mik3y/usb-serial-for-android, поддерживающая практически все существующие чипы. Библиотека полностью скрывает USB API, сводя все необходимые действия к минимуму вызовов с минимумом параметров.
1. Найти и открыть устройство:
2. Установить параметры последовательного порта:
3. Читать и писать в порт:
4. По завершении работы — закрыть порт:
Резюме
Надеюсь, что мне удалось показать, что работа с USB периферией достаточно проста и логична. Безусловно, реализация протоколов некоторых конкретных устройств не блещет простотой — но это проявится в любой системе в одинаковой степени.
Все приведенные примеры я взял из реального проекта, лишь исключил очевидные проверки, оставив только ключевые строки.
Источник
Android Debug Bridge (ADB) Connect to Device over USB, WiFi
Updated October 7, 2021
What is Android Debug Bridge (ADB)?
Android Debug Bridge (ADB) is a command-line tool that allows you to communicate with a device. It is used to bridge communication between an emulator instance (Android device) and the background running daemon process (server). It helps you perform different actions like installing or debugging a device and run various commands on a device by providing access to a Unix shell.
Using any real device for mobile automation Testing has always been a challenge for testers. But, Android offers a handful of solutions to connect a real device over USB (Universal Serial Bus), i.e., Android Debug Bridge (ADB).
In this tutorial, you will learn-
USB debugging and ADB Configuration-
APPIUM offers an advantage to execute test on real devices. But prior to run the test, we need to setup following pre-requisite.
- USB debugging should be enabled
- ADB configuration
- Desired capability setup as per the hardware changes.
Here we will see both, connecting to emulator as well as with real device for testing. See steps below for connecting to an emulator.
How to Connect to an Emulator
Pre-Requisite- SDK (Software Development Kit) should be installed on the machine. ADB in Android is packaged with Google’s Android SDK (Software Development Kit).
Steps to enable ADB from SDK Manager.
Step 1) Open Android SDK folder
Step 2) Double click on SDK Manager
Step 3) From the list of all packages select Tools and mark the checkbox for
- Android SDK Tools and
- Android SDK Platform-tools.

How to Connect Android Device with ADB (Android Debug Bridge)
Step 1) Enable USB Debugging on your device
Enable USB debugging option from ‘Developer Option’ in Android phone. Now, connect your Android device to the computer using USB cable.

Step 2) Go to the Android SDK folder
Open the local folder where Android SDK files has been saved ‘Android SDK >> Platform-tools’ eg: C:\android-sdk\platform-tools

Step 3) Open the Command window
Inside folder hold Shift + Right click menu >> Select ‘Open command window here’ option.
It will open the folder using command prompt.
Note– you can also open the folder path directly from the Run command in command prompt.

This command window will directly open the folder in command prompt window.

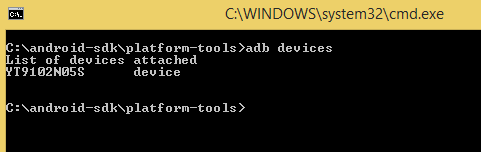
Step 4) Connect an external Android device
Now, prior to check the device, user have to connect an external Android device (mobile phone). To connect use the device USB cable connector to the system. Then in above command prompt type command-
It will display all list of all the connected devices.
But, prior to this we should check that ADB server. Check whether it is running as background process or not. Just open the command prompt from above mentioned procedure and write ‘adb’ and press enter. It should display all the adb’s process running.
When server starts, it always bind the local TCP port 5037. All ADB clients listen to 5037 TCP port to communicate with server request.
Now, the running ADB server can scan all connected emulator or device instances by scanning the port.
Always remember that ADB daemon runs on odd numbered port between the ranges of 5555 to 5558.
ADB daemon process runs with console connection that acquires even number port for connection.
For example: If single device connected then server automatically scan the device and get connected but if multiple device or emulator running the user need to give ADB connect to device USB command line instruction to connect.
The emulator instance connected on odd numbered port 5557 has the same console running over even numbered 5556 port ie. Each running devices has 1 odd and 1 even connected port.
Command to detect all connected device –
Command detecting a single device from multiple connected devices-
It will detect the adb connection for device -5554 and install the application.
So, this way user can set up a successful connection to access ADB USB connect instances using ADB commands.
How to Configuring ADB for Wi-Fi Support
Just like configuring ADB connect USB, user can also configure ADB over wi-fi.
Pre-requisite
- Both Android device and the host computer should be connected to same wireless network and
- Device Bluetooth option should disabled.
Steps to connect-
- Connect device using USB cable to the host computer. Confirm USB debugging is enabled in device.
- Set target device to connect TCP/IP on port 5555

- Now, disconnect the USB cable from the device.
- In Android device find the IP address from Settings >> wi-fi Setting >> Advanced >> IP Address.Use the same Android Debug Bridge IP address to connect the device via ADB connect device USB connection
Hence, the final configuration done and ‘adb’ successfully configured over wireless network.
NOTE- If any connection error occurred just reset or kill the adb host connection. For that use following command
Источник
How to Connect an Android to a PC
Corded and wireless options to connecting your phone to your computer
:max_bytes(150000):strip_icc()/RyanDube-214359-8f50cb3133cd47c7ae1f3d4f09349f4e.JPG)
What to Know
- Connect the devices with a USB cable. Then on Android, select Transfer files. On PC, select Open device to view files >This PC.
- Connect wirelessly with AirDroid from Google Play, Bluetooth, or the Microsoft Your Phone app.
This article explains how to connect an Android to a PC by using a USB cable or a wireless connection via AirDroid, Bluetooth, or the Microsoft Your Phone app.
How to Connect an Android to a PC
If you want to connect an Android to a PC, there are several options. The most common approach is to use a USB cable, but there are a number of wireless solutions that’ll work just as well, and often offer a faster connection.
Most Android devices come with a USB charging cable, with the charger end connected via the USB end of the wire. If you unplug the USB end from the charger, you can plug that end into your PC to initiate a connection with your computer.
However, if you don’t have your USB cable with you, or prefer a wireless solution, these are the ways you can connect an Android to a PC without a cable:
- Using AirDroid: This popular app uses your home network to establish a connection between your computer and Android device and transfer files.
- Bluetooth: Most modern computers have Bluetooth available. You can use Bluetooth to transfer files from your Android.
- Microsoft’s Your Phone App: Microsoft now offers a new app for Windows 10 users called Your Phone, which provides an easy connection with your Android.
:max_bytes(150000):strip_icc()/how-to-connect-an-android-to-a-pc-4706506-24-9dde1a57312d4b5b9cdc41966886b12c.png)
Connect an Android to a PC With USB
Using a USB cable to connect your Android to your PC is easy, but it only allows you to transfer files back and forth. You can’t remotely control your Android using this connection.
First, connect the micro-USB end of the cable to your phone, and the USB end to your computer.
:max_bytes(150000):strip_icc()/how-to-connect-an-android-to-a-pc-4706506-1-398123e05e964ad6a438b4265e048611.png)
When you connect your Android to your PC via the USB cable, you’ll see a USB connection notification in your Android notifications area. Tap the notification, then tap Transfer files.
:max_bytes(150000):strip_icc()/Screenshot_20190727-135701-ce78732b77ce4082956ab38a292e98e9.png)
On your computer, you’ll see a notification asking what you’d like to do with the new USB device. Select this notification.
:max_bytes(150000):strip_icc()/001-how-to-connect-an-android-to-a-pc-dc4c09c4783c49c39db7535e2a5db29f.jpg)
This will open a window to select how you’d like to use the device. Select Open device to view files.
:max_bytes(150000):strip_icc()/002-how-to-connect-an-android-to-a-pc-38cf09b4175b4bd2ba2b80c86b378656.jpg)
Now, when you open Windows Explorer, select This PC and you’ll see your device available. Select the device to expand it and browse through all of the folders and files on your phone.
:max_bytes(150000):strip_icc()/003-how-to-connect-an-android-to-a-pc-e48337ff3b774fe6939dc939a22e598f.jpg)
Connect an Android to a PC With AirDroid
AirDroid is an impressive app because it allows you to not only transfer files to and from your Android, but it also includes a number of remote control features.
Install AirDroid from Google Play onto your Android device.
Open the app and enable the features you plan to use. You may need to create a new AirDroid account if this is the first time you’re using the app.
:max_bytes(150000):strip_icc()/how-to-connect-an-android-to-a-pc-4706506-11-1161686384e24c8cb64399f786832ef3.png)
Some features, such as remotely controlling your Android screen, requires root access to the device. Additionally, some features are disabled unless you purchase the Premium plan.
Visit AirDroid Web, and log into the same account you created above.
:max_bytes(150000):strip_icc()/how-to-connect-an-android-to-a-pc-4706506-6-02726a28a3e64421b7d4d4306b2cd8ea.png)
Once you connect, you’ll see the main dashboard. On the right, you’ll see a toolbox with a summary of information about your phone storage. On the left, you’ll see all of the apps that let you control your phone.
:max_bytes(150000):strip_icc()/how-to-connect-an-android-to-a-pc-4706506-7-1e61f04ec6dd43f9aac7482bfd627c3f.png)
Select the Files app to browse files on your phone and transfer files back and forth.
:max_bytes(150000):strip_icc()/004-how-to-connect-an-android-to-a-pc-bdffb19fbc414f50a1419490c3f0fa88.jpg)
Select the Messages app to review stored messages on your phone or to launch a new SMS session with anyone in your contacts list.
:max_bytes(150000):strip_icc()/005-how-to-connect-an-android-to-a-pc-7e6357369d7749a9ad3f05d15b821fd8.jpg)
You can even use the Camera app to remotely view and control the camera on your Android phone.
:max_bytes(150000):strip_icc()/006-how-to-connect-an-android-to-a-pc-a991031c1a8e427dac4a09df4266c3fa.jpg)
Connect an Android to a PC With Bluetooth
If you only need a connection to transfer files, bluetooth is an excellent option because it requires no wires and the transfers are fast and easy.
Make sure bluetooth is turned on for both your Android device and your computer. When it is, you’ll see the computer show up on your Android as an available device to pair with.
:max_bytes(150000):strip_icc()/Screenshot_20190727-153141-85c3a5adb4194525ab8c826675e84ea9.png)
Tap this device to pair with it. You should see a pair code appear on both the PC and on your android device. Tap Pair to complete the connection.
:max_bytes(150000):strip_icc()/007-how-to-connect-an-android-to-a-pc-c04542dbcb864f238c86a0892c992c63.jpg)
Once connected, on your PC right-click the bluetooth icon on the right side of the taskbar, then select either Send a File or Receive a File.
:max_bytes(150000):strip_icc()/008-how-to-connect-an-android-to-a-pc-282d3d7f64e04d4d9032647f34bdd623.jpg)
Next, browse to the file on your PC that you want to transfer and select Next.
:max_bytes(150000):strip_icc()/009-how-to-connect-an-android-to-a-pc-f879193787d14bdaaf2c8ec0e5a769af.jpg)
This will initiate the file transfer from your PC to your Android.
:max_bytes(150000):strip_icc()/how-to-connect-an-android-to-a-pc-4706506-16-4052fa4dbf4c443289ca0d608101b1f5.png)
Connect an Android to a PC With Microsoft Your Phone
Another convenient cloud bases service that’ll let you access your phone’s files, texts, and notifications is a new service provided by Microsoft called Your Phone.
The Your Phone app is ideal for those situations when you’ve forgotten your phone at home. From your laptop, you can still see all messages and notifications you might have otherwise missed.
Install the Microsoft Your Phone app from Google Play onto your Android. You’ll need to accept all of the requested security permissions.
Install the Your Phone app from the Microsoft Store onto your Windows 10 PC.
Launch the Your Phone app on your computer and select Android as the phone type that you want to connect to. Then select Get started.
:max_bytes(150000):strip_icc()/010-how-to-connect-an-android-to-a-pc-61b14ca40b654b6ab016194cd0de3307.jpg)
Your computer will connect to your Android phone. Select Photos from the left panel to view all photos on your phone.
:max_bytes(150000):strip_icc()/011-how-to-connect-an-android-to-a-pc-c4826309356b458ebbb1aa55312850d9.jpg)
Select Messages to view messages, or send and receive new messages, from your computer through your Android phone.
:max_bytes(150000):strip_icc()/012-how-to-connect-an-android-to-a-pc-3d6fab6bd52a443b8eb918a2e78d909a.jpg)
Select Notifications to view all recent notifications on your Android phone.
Источник


