- Connect Android Device with Wifi within Android Studio
- No More Cable Required.
- Step 1:
- Step 2 :
- Step 3:
- Adobe Photoshop CC Advanced for Photography — John Academy
- Learn the advanced functions of Adobe Photoshop CC to create and enhance your images, photos, artwork, and other…
- Define Resource Layout Id In the Constructor Activity/ Fragment — With AndroidX
- Reduce the number of methods from your activity/fragment
- Using Coil to Download Images on Android in Kotlin
- A new way to download images on Android in Kotlin
- Create an Instant App Using Android App Bundle
- Using App Bundle in place of the deprecated Instant App feature plugin
- Building UIs Using Android Jetpack Compose
- No need to write XML layouts-Jetpack Compose will do the magic
- Convert Your PNG & JPEG into WebP Images Android
- Reduce more assets size with webP images
- Взаимодействие Android-устройств в локальной сети
- О чем это и для кого это?
- Какие возможные способы решения существуют?
- Беспроводная отладка Android 11
- Connect android to android with wifi
- Connect android to android with wifi
Connect Android Device with Wifi within Android Studio
No More Cable Required.

May 31, 2018 · 3 min read

In Android Studio we have a lot of plugins available one of them is Android wifi ADB.
Every developer gets irritated when they used a cable to connect with the android device, the android cable itself irritating every time you need to plug the cable with your system this is so hectic isn’t?
So Android Studio comes up with the variety of plugins and Android wifi adb is one of them, so let’s started how you can set up this plugin in an android studio.
If you want to l earn through video then check the link below. Also, do subscribe to my channel for more Android-related videos.
Step 1:
Go to File -> Settings

Step 2 :
Go to Plugins and Browse the repository and Search Android Wifi ADB and install it.

Step 3:
Then restart your Android Studio and now you can see on the right-side panel the section of android wifi ADB, Now just plug your Android device and press the connect button after that the state will be “Connected”. Now you are able to do your testing through wifi.

That’s it you have done 🙂 now no more cable required every time.

If you want to become a Professional Photographer then check it out this below link.
Adobe Photoshop CC Advanced for Photography — John Academy
Learn the advanced functions of Adobe Photoshop CC to create and enhance your images, photos, artwork, and other…
I hope this article is helpful. If you think something is missing, have questions, or would like to give feedback, go ahead and leave a comment below. I’d appreciate the feedback.
I’ve written some other Android-related content, and if you liked what you read here, you’ll probably also enjoy this:
Define Resource Layout Id In the Constructor Activity/ Fragment — With AndroidX
Reduce the number of methods from your activity/fragment
Using Coil to Download Images on Android in Kotlin
A new way to download images on Android in Kotlin
Create an Instant App Using Android App Bundle
Using App Bundle in place of the deprecated Instant App feature plugin
Building UIs Using Android Jetpack Compose
No need to write XML layouts-Jetpack Compose will do the magic
Convert Your PNG & JPEG into WebP Images Android
Reduce more assets size with webP images
Sharing (knowledge) is caring 😊 Thanks for reading this article. Be sure to clap or recommend this article if you found it helpful. It means a lot to me.
Источник
Взаимодействие Android-устройств в локальной сети

Предположим, мы пишем игру для Android, которая подразумевает некое сетевое взаимодействие между устройствами. Причем наши устройства находятся в одной сети и мы хотим, чтобы взаимодействие между ними осуществлялось быстро, а значит вариант с обменом данными через интернет нам не подходит. Ах да, еще одна маленькая ложка дегтя — мы хотим охватить максимально возможную аудиторию, для чего нам необходимо поддерживать Android 2.3.
Что же нам делать? Давайте поговорим об этом, а заодно рассмотрим относительно новые возможности Android SDK для соединения двух и более устройств.
О чем это и для кого это?
Как-то раз, уйдя с предыдущего места работы и погрузившись в заслуженный отдых, я принялся писать сетевую игру, в которую могут играть люди, находящиеся в одной локальной сети. И сразу же столкнулся с тем, что для нормального функционирования подобной игры нам мало соорудить сетевое взаимодействие — нам нужно сделать нормальное и быстрое обнаружение устройств в сети. Собственно, в данной статье я поделюсь своим опытом в реализации решения для данной задачи.
Сразу оговорюсь, что статья предназначена в большей мере для тех, кто имеет опыт Android-разработки, написал несколько приложений и хочет расширить свой кругозор, а также улучшить профессиональные навыки.
Какие возможные способы решения существуют?
- Android Network Service Discovery. Простой и эффективный способ обнаружения устройств. На Android Developer есть пошаговое руководство по подключению NSD, есть пример NsdChat, который можно скачать там же. Но есть один существенный минус — данный метод поддерживается только начиная с API Level 16, то есть с Android 4.1 Jelly Bean;
- Второе решение, предлагаемое нам на сайте Android Developer — Wi-Fi Peer-to-Peer. Проблема этого метода та же самая — поддерживается он только начиная с API Level 16;
- Есть странное решение, которое предлагается некоторыми программистами на Stack Overflow — самостоятельно сканировать локальную сеть на предмет наличия сервера. То есть проходить по всем адресам сети. Это уже сейчас звучит как странный велосипед, а теперь представьте, что порт нашего сервера назначается автоматически. Таким образом, сканирование даже самую небольшой сети становится достаточно долгой и трудоемкой задачей;
- Наконец, мы можем обратить внимание на Java-библиотеки и написать что-нибудь с их использованием. Например, JmDNS.
Последний способ выглядит вполне адекватным и, кажется, может обеспечить нас требуемой скоростью и удобством обнаружения устройств в сети для конечного пользователя.
Я вооружился JmDNS и решил попробовать соорудить несколько классов, которые по максимуму упростят написание описанных выше приложений. Но для начала пришлось немного повырезать дубликаты .class-файлов из jar-пакета JmDNS (проблема описана здесь):
Далее я взял исходный код NsdChat с Android Developer и изменил его служебный класс, который отвечает за инициализацию сокетов и организацию сетевого взаимодействия. Также я написал wrapper для JmDNS
Здесь размещены 4 основные функции для работы Network Discovery:
- startServer для создания сервера и регистрации соответствующего сервиса в локальной сети;
- findServers для поиска серверов;
- reset для окончания работы с Network Discovery и последующего освобождения ресурсов;
- wifiLock для запроса блокировки Wi-Fi.
В завершении я написал универсальный класс ConnectionWrapper для полноценной организации обнаружения, а также обмена сообщениями в локальной сети. Таким образом, создание сервера в конечном приложении выглядит следующим образом:
А вот и mServerHandler, использующийся для приема и обработки сообщений:
Отправка сообщений еще проще:
И, наконец, метод для обнаружения и подключения к серверу:
Как видите, все очень просто. А главное, все это работает в любой версии Android для максимум двух устройств. Но сделать так, чтобы это работало для условно неограниченного числа устройств очень легко, и очевидное решение придет к вам почти сразу после детального изучения класса Connection. Пусть это будет в качестве домашнего задания.
Ах, да, весь код доступен для изучения и использования всеми желающими в моем репозитории на GitHub.. И, конечно, не исключаю то, что некоторые вещи можно сделать лучше и проще, поэтому не стесняйтесь форкать и делать pull request’ы.
Источник
Беспроводная отладка Android 11
Режим дебага по WiFi теперь доступен, начиная с версии ОС Android 11. Давайте разберемся, как подключить устройство по Wi-Fi и смотреть логи в Logcat.
Нам необходимо убедиться, что у нас имеется все необходимое для соединения, а именно:
- установлен компонент Android SDK Platform-Tools версии не ниже 30.0.0 (April 2020), но естественно необходимо поставить последнюю версию, в которой разработчики пофиксили существующие на данный момент баги;
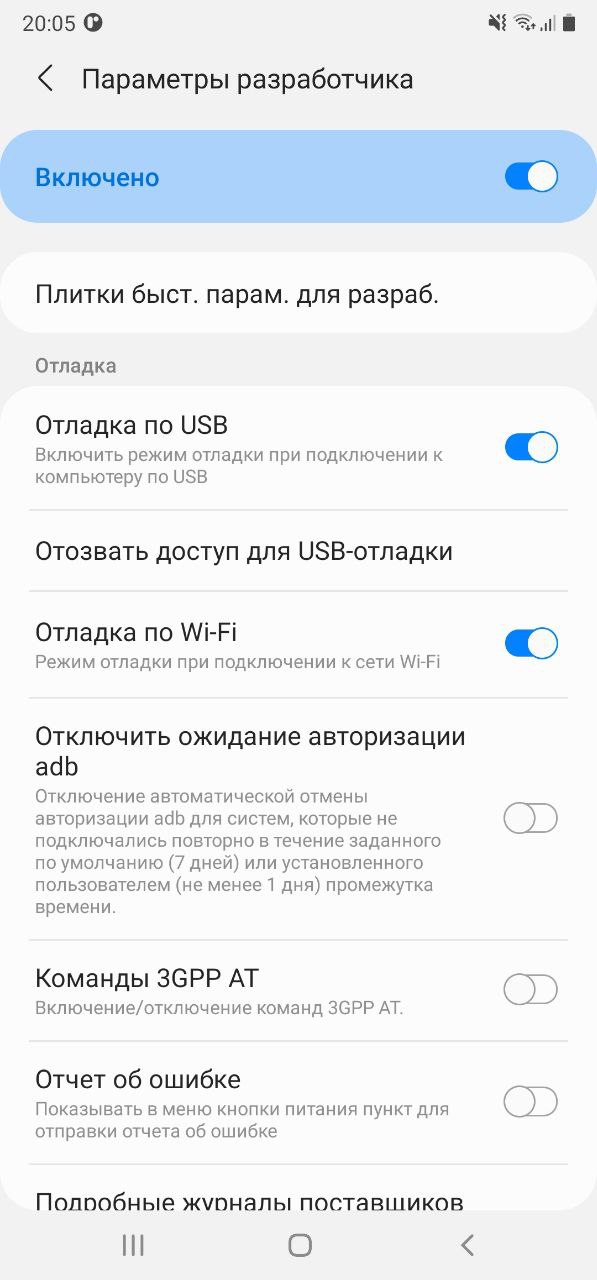
- включенрежим разработчика на вашем устройстве;
- на устройстве версия ОС Android 11.
Переходим в режим разработчика на нашем устройстве и активируем «Отладку по Wi-Fi».
Далее необходимо выбрать раздел «Подключить устройство с помощью кода подключения».
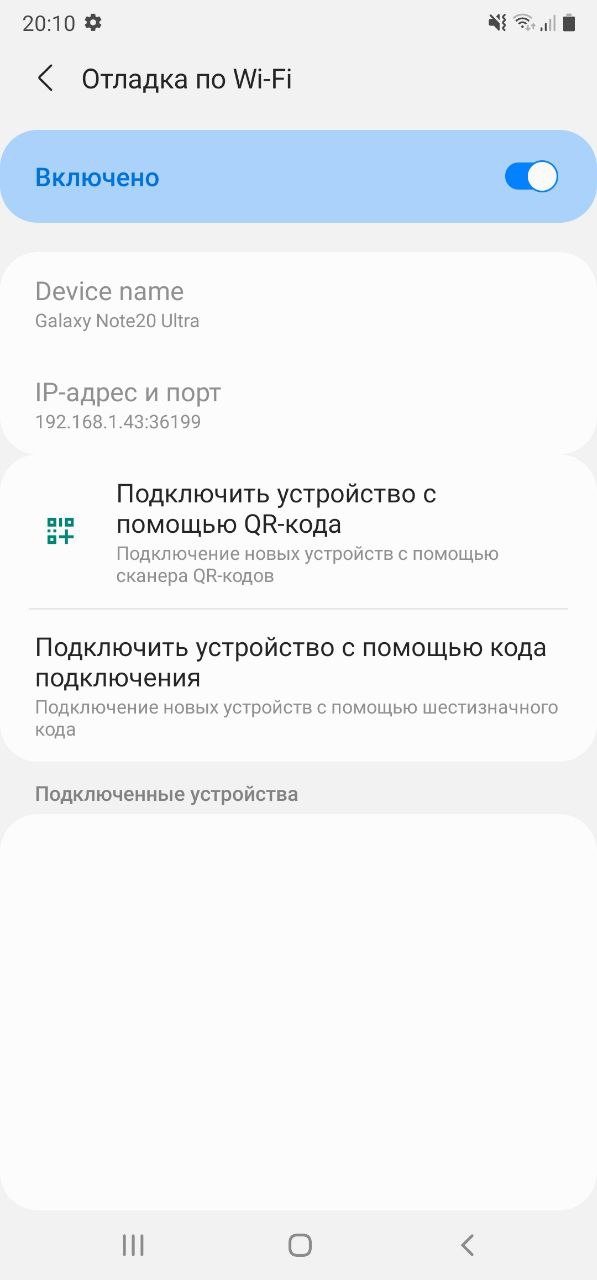
В боттомшите отобразится сам код подключения к устройству и IP-адрес и порт.

Откроем Android Studio, перейдем во вкладку Terminal, далее введем и выполним команду adb pair ipaddr:port где ipaddr и port — данные из боттомшита «Подключение к устройству». Следующим шагом — вводим код подключения и получим push на устройство об успешном подключении.
Перейдем на вкладку Logcat и все, что нам осталось — выбрать наше устройстве из списка подключенных устройств, в конкретном примере это Samsung SM-N985F.
Источник
Connect android to android with wifi
Android wifi is a demo aplication that shows you how to connect and send messages to Arduino via wifi communication , the demo android app is also provided in google play under the link https://play.google.com/store/apps/details?id=com.tofaha.Android_wifi . the communication system based on sever/client communication , in which android app act like client and the arduino program as server.
Android side (Kotlin) :
in the android side the steps to communicate to arduino is very easy , the socket client is used for that , the socket client needs two parameters to find the tareget wifi module the first parameter is the wifi module IP address , and the seconde parameter is the port number , well the first thing you need to do is to open a socket connection , the server side (arduino with wifi module) has to be launched first and then the client (android device) will reach the server by the ip address and port number , you should be aware of where you instanciate the socket because it has to be instanciated in diffrent thread then the UI thread , if you do it in UI thread the app will crash , here sample how to open socket connection inside asyncTask:
Open socket connection
and to send messages to server , you will need printWriter object to write in socket ibject that you already created and the socket will do the rest , here how you can do it :
class SendMessages(msg: String) : AsyncTask () <
and to recieve messages from server , all you need to do is create an instance of bufferReader and pass the socket to it as parameter , and of course you need to do that inside loop with time out as optional , so whenever the server send message the socket object will receive it and bufferdReader will read the message from socket and you write it to the UI thread , here is the code (I used anko library in this code):
to close the connection that what you do : socket.close() method :
class CLoseConnection : AsyncTask ()<
Server Side (Arduino with wifi module)
in the server side I use arduino with wifi module(ESP8266) , well the first thing you need to consider is how to communicate arduino with the module , the communication will be done by the serial communication(Rx/Tx) , arduino board contains UART(Universal Asynchronious Receiver Transmmiter) , and the number of UART that arduino board contain is depend on the type of arduino like arduino uno has only one UART , so we are going to use the library of the serialSoftwar in arduino and by this library we can write and read to serial buffer (Rx/Tx) , after that we attach the Rx and Tx pin to Tx and Rx pin of the ESP8266 , this is how to communicate arduino with ESP8266 :
Communicate arduino with esp module
ESP configuration and setup with AT commands
after the communication is established you now need to configure ESP as you need it to work , and that will be done by the ATcommand , in arduino IDE we will type the ATcommand and write it to the serialSoftware :
Receive messages from client
after the configuration and setup of the ESP now you are ready to send and recieve data from client : to recieve data from client is very easy step , first you need to prepare the server and that will be done in the setup part , after that you write this code inside the loop method :
Send messages to client
to send data to client , well in this case to establish the client you need communication id , so if there are for exemple 5 client , so you need 5 communication id to send to each client , and in the case there is only one client you can use 0 as the value of the communication id :
Источник
Connect android to android with wifi
Android WiFi ADB — IntelliJ/Android Studio Plugin ![]()
IntelliJ and Android Studio plugin created to quickly connect your Android device over WiFi to install, run and debug your applications without a USB connected. Press one button and forget about your USB cable.
Android WiFI ADB plugin adds a button to your IntelliJ/Android Studio Toolbar to connect your device to your computer over WiFi.
To use this plugin the project opened in your IntelliJ/Android Studio has to be an Android project configured with the Android SDK.
Archived repository: Maintaining this project up to date for all the different Android devices without having access to the physical devices is not possible at all right now. Most of the bugs reported ar related to the adb installation and not to the plugin code so this repository will keep archived for now.
Connect all devices button:


Connect your device to your computer using a USB cable. Then press the button, and a notification will pop up saying that the phone has been connected. Disconnect your USB once the plugin shows your device is connected. Open the Android WiFi ADB tab at the right side to see all the devices and manage your connections. Your device will be connected over WiFi now. You can now deploy, run and debug your device using your WiFi connection. Remember that your device and your computer have to be in the same WiFi connection. Also, you have to first connect your device with a USB every time you open Android Studio, for setting up the connection over WiFi.
If you want to handle your devices connection individually, open the Android WiFi ADB dashboard you will find at the right of your IDE.
Download and install Android WiFi ADB directly from Intellij / Android Studio: Preferences/Settings->Plugins->Browse Repositories
Alternatively, you can download the plugin from the JetBrains plugin site and install it manually in: Preferences/Settings->Plugins->Install plugin from disk .
Build the project
If you need some information about how to build this project review IntelliJ Idea’s Gradle Plugin documentation.
Do you want to contribute?
Please, do it! If you have any improvement or you’ve found any bug, send a pull request with the code or open an issue 🙂
Источник


