- Как включить отладку по USB на Android
- Включение отладки по USB на Android телефоне или планшете
- Видео инструкция
- Remote debug Android devices
- # Step 1: Discover your Android device
- # Troubleshooting: DevTools is not detecting the Android device
- # Step 2: Debug content on your Android device from your development machine
- # More actions: pause, focus, reload, or close a tab
- # Inspect elements
- # Screencast your Android screen to your development machine
- Knowledge about USB Debugging Android
- Part1
- Part2
- Part3
- What is USB Debugging?
- Why I need to enable USB Debugging Mode?
- How to Enable USB Debugging on Android?
- How to Enable USB Debugging on Samsung Devices
- How to Enable USB Debugging on HUAWEI Devices
Как включить отладку по USB на Android
Включенная отладка по USB на Android устройстве может потребоваться для самых разных целей: прежде всего, для выполнения команд в adb shell (прошивка, кастомный рекавери, запись экрана), но не только: например, включенная функция может пригодиться и для восстановления данных на Android.
В этой пошаговой инструкции подробно о том, как включить отладку по USB на Android 5-7 (в общем-то, то же самое будет и на версиях 4.0-4.4), в видео показано включение отладки на Android 9 Pie и на смартфонах Samsung Galaxy.
Скриншоты и пункты меню в руководстве соответствуют почти чистой ОС Android 6 на телефоне Moto (то же самое будет на Nexus и Pixel), но принципиальной разницы в действиях на других устройствах, таких как Samsung, LG, Lenovo, Meizu, Xiaomi или Huawei не будет, все действия практически те же самые, также в статье присутствуют текстовые пути для настроек на других версиях Android и марках телефонов.
Включение отладки по USB на Android телефоне или планшете
Для того, чтобы появилась возможность включить отладку по USB, сначала необходимо включить режим разработчика Android, сделать это можно следующим образом.
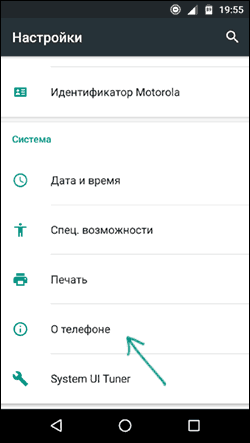
- Зайдите в Настройки и нажмите пункт «О телефоне» или «О планшете», на Samsung — «Сведения о телефоне» — «Сведения о ПО». На чистом Android 9.0 зайдите в пункт «Система» — «О телефоне».

- Найдите пункт «Номер сборки» (на телефонах Xiaomi и некоторых других — пункт «Версия MIUI») и несколько раз нажимайте по нему, пока не увидите сообщение о том, что вы стали разработчиком.

Теперь в меню «Настройки» вашего телефона появится новый пункт «Для разработчиков» и можно переходить к следующему этапу (может быть полезно: Как включить и отключить режим разработчика на Android).
Процесс включения отладки по USB также состоит из нескольких очень простых шагов:
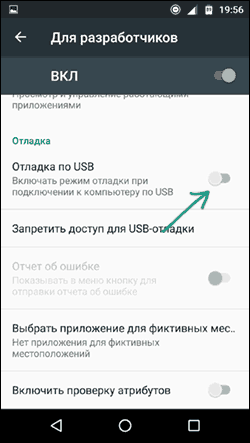
- Зайдите в «Настройки» — «Для разработчиков». На Android 9, например, на Nokia — в Настройки — Система — Дополнительно — Для разработчиков. На некоторых китайских телефонах, например, на Xiaomi — в Настройки — Дополнительно — Для разработчиков или Настройки — Расширенные настройки — Для разработчиков. Если вверху страницы есть переключатель, который установлен в положение «Выкл», переключите его в «Вкл».
- В разделе «Отладка» включите пункт «Отладка по USB», чтобы включить режим отладки по USB.
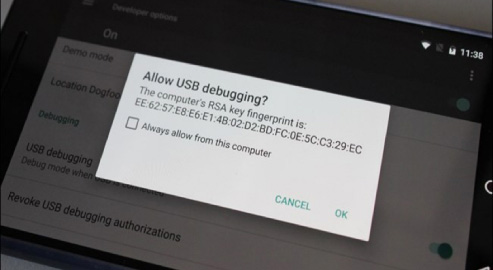
- Подтвердите включение отладки в окне «Разрешить отладку по USB», внимательно прочитав предупреждение.


На этом всё готово — отладка по USB на вашем Android телефоне включена и ее можно использовать с нужными вам целями.
Видео инструкция
В дальнейшем, вы можете отключить отладку в том же разделе меню, а при необходимости — отключить и убрать из меню Настроек пункт «Для разработчиков» (ссылка на инструкцию с необходимыми действиями была приведена выше).
А вдруг и это будет интересно:
17.07.2021 в 22:27
Здравствуйте! С помощью «Для разработчиков» и «Отладки USB» я удалял проблему связи, через кабель компьютер видел и изображения, и видео, и я оперировал ими. И это прекрасно!
Но есть пару но.
1. На всё время данной связи связи с интернетом не было (пока я работал с файлами через кабель, файлы, направляемые ко мне как и всегда через вай-фай, отсутствовали. И как только восстановил через Google связь, файлы гурьбой прилетели).
2. Второе но — после восстановления интернета связь через кабель с компьютером опять отсутствует. Как и ранее.
Есть ли вариант разовой настройки на связи одновременно и с интернетом, и компьютером по USB навсегда, кто знает?
28.09.2021 в 17:24
13.10.2021 в 18:30
Спасибо, никак не мог разобраться с просмотром файлов с телефона Redmi 4 на ПК, очень помогли.
Источник
Remote debug Android devices
Published on Monday, April 13, 2015

Technically, I’m a writer
Remote debug live content on an Android device from your Windows, Mac, or Linux computer. This tutorial teaches you how to:
- Set up your Android device for remote debugging, and discover it from your development machine.
- Inspect and debug live content on your Android device from your development machine.
- Screencast content from your Android device onto a DevTools instance on your development machine.

Figure 1. Remote Debugging lets you inspect a page running on an Android device from your development machine.
# Step 1: Discover your Android device
The workflow below works for most users. See Troubleshooting: DevTools is not detecting the Android device for more help.
Open the Developer Options screen on your Android. See Configure On-Device Developer Options.
Select Enable USB Debugging.
On your development machine, open Chrome.
Go to chrome://inspect#devices .
Make sure that the Discover USB devices checkbox is enabled.

Figure 2. The Discover USB Devices checkbox is enabled
Connect your Android device directly to your development machine using a USB cable. The first time you do this, you usually see that DevTools has detected an offline device. If you see the model name of your Android device, then DevTools has successfully established the connection to your device. Continue to Step 2.

Figure 3. The Remote Target has successfully detected an offline device that is pending authorization
If your device is showing up as Offline, accept the Allow USB Debugging permission prompt on your Android device.
# Troubleshooting: DevTools is not detecting the Android device
Make sure that your hardware is set up correctly:
- If you’re using a USB hub, try connecting your Android device directly to your development machine instead.
- Try unplugging the USB cable between your Android device and development machine, and then plugging it back in. Do it while your Android and development machine screens are unlocked.
- Make sure that your USB cable works. You should be able to inspect files on your Android device from your development machine.
Make sure that your software is set up correctly:
- If your development machine is running Windows, try manually installing the USB drivers for your Android device. See Install OEM USB Drivers.
- Some combinations of Windows and Android devices (especially Samsung) require extra set up. See Chrome DevTools Devices does not detect device when plugged in.
If you don’t see the Allow USB Debugging prompt on your Android device try:
- Disconnecting and then re-connecting the USB cable while DevTools is in focus on your development machine and your Android homescreen is showing. In other words, sometimes the prompt doesn’t show up when your Android or development machine screens are locked.
- Updating the display settings for your Android device and development machine so that they never go to sleep.
- Setting Android’s USB mode to PTP. See Galaxy S4 does not show Authorize USB debugging dialog box.
- Select Revoke USB Debugging Authorizations from the Developer Options screen on your Android device to reset it to a fresh state.
If you find a solution that is not mentioned in this section or in Chrome DevTools Devices does not detect device when plugged in, please add an answer to that Stack Overflow question, or open an issue in the webfundamentals repository!
# Step 2: Debug content on your Android device from your development machine
Open Chrome on your Android device.
In the chrome://inspect/#devices , you see your Android device’s model name, followed by its serial number. Below that, you can see the version of Chrome that’s running on the device, with the version number in parentheses. Each open Chrome tab gets its own section. You can interact with that tab from this section. If there are any apps using WebView, you see a section for each of those apps, too. In Figure 5 there are no tabs or WebViews open.

Figure 4. A connected remote device
In the Open tab with url text box, enter a URL and then click Open. The page opens in a new tab on your Android device.
Click Inspect next to the URL that you just opened. A new DevTools instance opens. The version of Chrome running on your Android device determines the version of DevTools that opens on your development machine. So, if your Android device is running a very old version of Chrome, the DevTools instance may look very different than what you’re used to.
# More actions: pause, focus, reload, or close a tab
Below the URL you can find a menu to pause, focus, reload or close a tab.

Figure 5. The menu for pausing, reloading, focusing, or closing a tab
# Inspect elements
Go to the Elements panel of your DevTools instance, and hover over an element to highlight it in the viewport of your Android device.
You can also tap an element on your Android device screen to select it in the Elements panel. Click Select Element  on your DevTools instance, and then tap the element on your Android device screen. Note that Select Element is disabled after the first touch, so you need to re-enable it every time you want to use this feature.
# Screencast your Android screen to your development machine
Click Toggle Screencast  to view the content of your Android device in your DevTools instance.
You can interact with the screencast in multiple ways:
- Clicks are translated into taps, firing proper touch events on the device.
- Keystrokes on your computer are sent to the device.
- To simulate a pinch gesture, hold Shift while dragging.
- To scroll, use your trackpad or mouse wheel, or fling with your mouse pointer.
Some notes on screencasts:
- Screencasts only display page content. Transparent portions of the screencast represent device interfaces, such as the Chrome address bar, the Android status bar, or the Android keyboard.
- Screencasts negatively affect frame rates. Disable screencasting while measuring scrolls or animations to get a more accurate picture of your page’s performance.
- If your Android device screen locks, the content of your screencast disappears. Unlock your Android device screen to automatically resume the screencast.
Last updated: Monday, April 13, 2015 • Improve article
Источник
Knowledge about
USB Debugging Android
What is USB debugging? How do I enable USB debugging?
Just follow the manual instructions in our guide, and you’ll be a master in no time.
(Recommended: Mirror Android phone after USB debugging? Tenorshare Phone Mirror can easily display Android screen on PC in real-time.)
Free Download For Windows 11/10/8.1/8/7
Part1
What is USB Debugging Android?
Part2
How to Enable USB Debugging?
Part3
How to Turn off USB Debugging?
What is USB Debugging?
In a word, USB debugging is a way for an Android device to communicate with the Android SDK (Software Developer Kit) using USB connectivity. It permits an Android device to communicate with computers directly, thus the Android device can receive terminal commands, files, etc. from the computer, and the computer can pull crucial information like log files of the Android device.
Why I need to enable USB Debugging Mode?
USB debugging mode grants you high-level access to your device. It is important when you need system-level clearance, such as coding a new app, transferring data between an Android device and the computer, mirroring Android to PC, rooting your device, flashing firmware with ADB commands, and reading log data of the Android device.
How to Enable USB Debugging on Android?
The steps to enable USB debugging depend on the version of Android and vary from the Android device brand to brand. If you are not sure about how to enable USB debugging on Samsung, Huawei, Xiaomi, HTC, LG, etc., follow the quick guide given below.
How to Enable USB Debugging on Samsung Devices
Step 1: Unlock your phone and go to «Settings» and select «About phone».
Step 2: Choose «Software information» and tap «Build number» about seven times until you see a message saying «Developer mode has been enabled».
Step 3: Go back to Settings and the «Developer options» menu is now under Settings.
Step 4: Enter «Developer options» and turn on the «USB debugging» button.
Step 5: If you see a messages «Allow USB Debugging», click «OK». Now you have enabled debugging on your Samsung Galaxy successfully.
Step 1: On your Samsung Galaxy S7/S7 Edge. Head to «Settings» > «About phone» > «Software info».
Step 2: Tap «Build number» several times until you see a message that says «Developer mode has been enabled».
Step 3: Go back to Settings and the «Developer options» menu is now under Settings.
Step 4: Enter «Developer options» and enable «USB debugging» option.
Step 5: When you connect your Samsung phone to computer using a USB cable, you will see a message «Allow USB debugging» for connection, click «OK».
Step 1: On your device, head to «Settings» > «About device» (About phone for S5).
Step 2: Scroll down and tap «Build number» several times until you see a message that says «Developer mode has been enabled».
Step 3: Go back to Settings and the «Developer options» menu is now under Settings.
Step 4: Select «Developer options» and enable the USB debugging option.
Step 5: Now you can connect your device to a desktop computer via USB and you will see a message «Allow USB debugging» for connection, click «OK».
Step 1: Turn on your Samsung Galaxy Note 10/9/8. Head to «Settings» > «About phone» > «Software information».
Step 2: Tap «Build number» about seven times and you will see a message saying «Developer mode has been enabled».
Step 3: Select on the Back button and tap on «Developer options» under Settings.
Step 4: Slide the «Developer Options» button to «On» and turn on «USB debugging». If prompted, tap OK to confirm.
Step 1: Unlock your phone and go to Settings > About device > Software info.
Step 2: Scroll down the screen and tap «Build number» several times until you see a message that says «You are now a developer! /Developer mode has been enabled».
Step 3: Go back to Settings. Tap on «Developer option» and drag the switch to right to turn it on.
Step 4: Under developer option, enable «USB debugging» and you will see a message “Allow USB debugging” when you connect your phone to the computer.
How to Enable USB Debugging on HUAWEI Devices
Step 1: Head to «Settings» > «About phone» at the bottom of the interface.
Step 2: Tap «Build number» about seven times until you get the prompt «You are now a developer!».
Step 3: Go back to setting and you can see the «Developer options», select Developer options.
Step 4: Turn on the “USB debugging”, and you have debugged your Huawei Mate 7 or Huawei Mate 8 successfully. Remember to tap «OK» to allow USB debugging when connect your Huawei phone to computer with the USB cable.
Step 1: Go to «Settings» > «About phone».
Step 2: Find «Build number» and tap seven times on it until you get a message saying that «You are now a developer!».
Step 3: Return to Settings and the «Developer options» menu in now under Settings. Select Developer options.
Step 4: Enter «Developer options» and slide to turn «USB debugging» on.
Step 5: After that, when connect your Huawei phone to computer via USB cable you will see a message «Allow USB debugging». Click «OK» to allow a connection.
Step 1: Unlock your phone and go to «Settings» > «About phone».
Step 2: Tap «Build number» seven times until you see a message saying that » You are now a developer!».
Step 3: Now you have enabled developer option. Go back to settings and you will see «Developer options» under Settings.
Step 4: Enter «Developer options» and slide to turn on the «USB debugging».
Step 5: Now you have successfully debugged your Huawei Honor 6/7/8. Next time when you connect your phone to computer using a USB cable and see a message «Allow USB debugging», click «OK» to allow a connection.
Источник


