- Работа с устройствами USB в Android
- Права доступа
- Принтеры
- Преобразователи USB-Serial
- Резюме
- How to Fix Android USB Device Not Recognized but Charging Problem
- Solution 1. Connect Android to Computer as MTP to Fix Charging Only Problem
- Solution 2. Update or Install Proper Driver for Android USB Driver Not Working Problem
- Update Driver for Android Phone Manually
- Install Proper Driver via Manufacturer Tools
- Solution 3. Install Necessary Kit for Windows 10 to Fix Android Not Detected Problem
- Solution 4. Try a Trick to Fix Android Not Recognized Problem Caused by Hardware
- Bottom Line
- How to connect a USB flash drive to your Android phone
- How to check if your phone supports USB On-The-Go
- What you’ll need to connect USB flash storage to your Android phone
- A USB OTG cable
- A USB flash storage device
- How to connect a USB flash storage device to your Android phone
- How to safely disconnect a USB flash storage device from your Android phone
- Are you connected?
- Samsung needs to bring back its iPod competitor
- VoLTE: How to use it and why you should care
- PlayStation reportedly planning service to compete with Xbox Game Pass
- These are the best USB-C cables you can find for Android Auto
Работа с устройствами USB в Android
В недавней статье на Geektimes в комментариях возник вопрос о поддержке в ОС Android периферии, подключенной к шине USB. Действительно, большинство вендорского ПО, к примеру, для работы с принтерами и МФУ, поддерживает только подключение по сети. Однако это не означает, что в самой ОС Android нет такой возможности — это означает лишь то, что большинство устройств не имеют полноценного USB хоста, и далеко не все имеют поддержку OTG. По сети же могут работать абсолютно все без исключения.
Большинство устройств на Android при наличии порта OTG поддерживают на уровне системы (ядра Linux или стандартных компонентов Android) следующие классы устройств:
- Устройства ввода — клавиатуры, мыши, джойстики (HID)
- Накопители (Mass Storage)
Несколько реже:
- Сотовые модемы
- Сетевые адаптеры
- Вебкамеры
Хабы поддерживаются при наличии полноценных хост-портов, но не поддерживаются на портах OTG.
Подробнее список устройств, поддерживаемых на уровне ядра Linux, можно получить в sysfs:
$ ls /sys/bus/usb/drivers
Если же модуль в принципе доступен в исходниках ядра Linux, но не включен в Android — не стоит рассчитывать на то, что его получится собрать и расставить на все целевые системы.
Однако, начиная с Android 3.1 (API 12), в системе содержатся средства, достаточные для поддержки на уровне приложения любой USB периферии. Данные средства описаны в разделе USB Host руководства по Android API. Здесь же я хочу привести примеры реальной работы с некоторыми видами устройств.
Права доступа
Как и для прочих действий, Android требует, чтобы приложение получило разрешение на доступ к USB периферии. Существует 2 способа получить такое разрешение:
- Задекларировать список устройств в AndroidManifest
- Явно показать пользователю диалог “разрешить”
Поскольку для моих задач лишние вопросы к пользователю были нежелательны, я использовал первый способ.
Итак, нам необходимо добавить в манифест следующее:
А в res/xml/device_filter.xml вписать следующее:
Отмечу, что хотя общепринято указывать VID:PID в 16-ричной системе счисления, здесь они должны быть указаны в десятичной. В документации заявляется, что возможно указание только класса, без VID и PID, но у меня это не стало работать.
Принтеры
На примере принтера я покажу, как непосредственно использовать API android.hardware.usb. На уровне передачи данных все принтеры поддерживают стандартый класс USB устройств:
Класс предельно простой. В рамках этого класса устройство должно поддерживать:
- Обязательный bulk out endpoind для отправки данных на принтер
- Опциональный bulk in endpoind для получения статуса принтера
- 3 управляющих запроса
Код, приведенный ниже, предоставляет функциональность, аналогичную устройству /dev/usb/lp в Linux. Далее нам нужен фильтр, преобразующий исходный документ в пакет данных, понятный конкретной модели принтера. Но это тема иной статьи. Как один из вариантов — можно собрать ghostscript с помощью NDK.
Для работы с устройством нам в первую очередь нужно:
1. Найти устройство. В примере для простоты я ищу первый попавшийся:
2. Получить endpoint’ы:
3. Непосредсвенно открыть устройство:
4. После этого мы можем читать и писать в устройство:
5. По завершении работы — закрыть устройство:
Преобразователи USB-Serial
В отличие от притеров, преобразователи USB-Serial гораздо менее стандартизированы. Существует несколько распространенных чипов, для которых существенно отличается установка параметров последовательного порта — битрейта, чётности и проч. К счастью, есть библиотека github.com/mik3y/usb-serial-for-android, поддерживающая практически все существующие чипы. Библиотека полностью скрывает USB API, сводя все необходимые действия к минимуму вызовов с минимумом параметров.
1. Найти и открыть устройство:
2. Установить параметры последовательного порта:
3. Читать и писать в порт:
4. По завершении работы — закрыть порт:
Резюме
Надеюсь, что мне удалось показать, что работа с USB периферией достаточно проста и логична. Безусловно, реализация протоколов некоторых конкретных устройств не блещет простотой — но это проявится в любой системе в одинаковой степени.
Все приведенные примеры я взял из реального проекта, лишь исключил очевидные проверки, оставив только ключевые строки.
Источник
How to Fix Android USB Device Not Recognized but Charging Problem
It is frustrating to find that your Android device is not recognized as USB driver when you want to transfer files between phone and PC or recover data from Android phone. While the result is similar, the causes and solutions may vary from case to case. Similar symptoms or notifications, like “USB device not recognized”, “PC not recognizing Android phone”, or “USB device not detected but charging”, may occur on different devices. Please check following solutions to fix Android USB device not recognized on Windows problem.
Tip: In case you mistakenly deleted important files, don’t hesitate to try the best data recovery software to get files back from computer, external hard drive, SD card or USB drive (not including mobile phones).
Try Following Measures First
Here are some small tips that might help and won’t take a long time even if not working.
- Try a new USB cable and another computer. Some cables are power only.
- Connect Android device to PC directly instead of through USB hub.
- Reboot phone and connect to PC while in Airplane mode.
- Remove battery and SIM card, and wait a while, then put them back and reboot.
- If Windows detects your phone but doesn’t find any content, you should unlock your phone screen and try again.
If above tricks don’t work for you, please try solutions below.
Solution 1. Connect Android to Computer as MTP to Fix Charging Only Problem
Android device can be connected as Media device (MTP), Camera (PTP), USB flash drive, Charge only, etc. If you want to transfer files between phone and PC, you need to set USB connection as MTP mode.
When an Android device is connected to computer, a notification should appear on the drop-down menu named as “Connected as a …” or “USB Charge Only”. You can tap it to open USB computer connection options and choose MTP from the list.
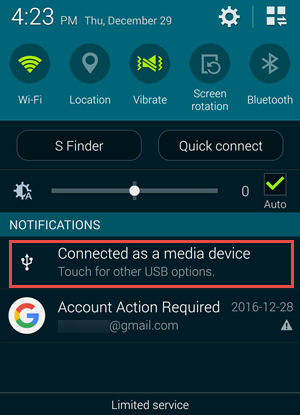
If nothing appears when connected to computer, which often happens after system upgrade, you’ll have to find USB connection menu manually. Try following methods.
- Go to Settings> Storage> More (three dots menu)> USB computer connection, choose Media device (MTP).
- For Android 6.0, go to Settings> About phone (> Software info), tap “Build number” 7-10 times. Back to Settings> Developer options, check “Select USB Configuration”, choose MTP. But no way to set MTP as default on Marshmallow.
- Dial *#0808#, if you get “USB Settings”, choose MTP+ADB, then reboot.
Solution 2. Update or Install Proper Driver for Android USB Driver Not Working Problem
Sometimes Windows won’t recognize Android device because the driver is corrupted and USB driver not working. Hence, you need to update or install proper driver for your device. Following are two common methods. (Check more ways to install Android USB driver.)
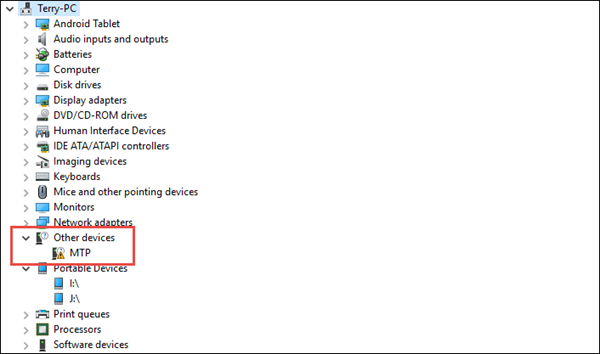
Update Driver for Android Phone Manually
- Step 1. Go to Start> Control Panel.
- Step 2. Click “System and Security”, then “System”.
- Step 3. Click “Device Manager” on the left list.
- Step 4. Locate and expand “Other devices” or “Portable devices” and find the driver. If there is a problem with the driver, it should be labelled with a yellow exclamation mark.

- Step 5. Right click on the driver and choose “Update Driver Software…”.
- Step 6. Successively choose “Browse my computer for driver software”> “Let me pick a list of device drivers on my computer”, then hit “MTP USB Device” and click Next. Once the driver is updated, connect your device again.
Install Proper Driver via Manufacturer Tools
Manufacturer management tools usually go with drivers for their devices. You can install official management software, like Samsung Kies or Smart Switch, and HTC Sync Manager, on your computer. Then connect your phone to computer and run the software to install drivers automatically.
Solution 3. Install Necessary Kit for Windows 10 to Fix Android Not Detected Problem
If you encounter Android USB not recognizing problem after Windows 10 upgrade, you’ll need to install some missing files to help Windows 10 recognize your Android phone as MTP device. The following two might help.
Media Transfer Protocol Porting Kit
Media Feature Pack
Notice: Check more tips about Windows 10 doesn’t recognize Android.
Solution 4. Try a Trick to Fix Android Not Recognized Problem Caused by Hardware
If none of the above solutions can fix your Android device connection problem, it might be a hardware glitch, and you may try this trick. This is not a regular tech tip, but many people say it works. Please do it at your own risk.
- Step 1. Hold your phone and look at the micro USB port.
- Step 2. Insert something tiny and nonmetallic into the USB port, and lift up the thin contact points gently.
- Step 3. Connect your phone and PC with USB cable again.
Bottom Line
The solutions above have helped some people fix Android not recognized problem. However, it is not possible to cover all conditions or fix all issues in one article. You may keep searching for other methods or return your device to the manufacturer for help. If your trouble is solved, don’t hesitate to share your experience with us in the comment below, so that more people will benefit from it or have the confidence to keep trying.
Источник
How to connect a USB flash drive to your Android phone

Say you’re going to a party and your friends have asked you to play amateur DJ. Your phone has some music on it, but there’s so much more on your thumb drive or external solid state drive. You don’t want to bring an entire laptop to the party! Why not hook it up to your phone?
Another scenario: you’re going on a long road trip or flight and you can’t imagine anything better than watching movies the whole time. Problem is, you can’t fit them all on the internal or removable storage on your Android phone. Bring your flash drive! It’s full of movies!
Connecting a USB flash storage device to your Android phone is cheap and easy. Let’s find out what you need and, finally, how to get everything connected and safely disconnected again.
How to check if your phone supports USB On-The-Go
Not all Android phones support USB On-The-Go (OTG) functionality. If you don’t have the correct guts in your phone you’re not going to be hooking anything up with OTG. Luckily, to check if your phone is compatible requires just one app download.
The Google Play Store has a great app called OTG? that you can download now on your phone. It scans your phone automatically and will let you know if you’re one of the lucky ones. If you are, keep reading.
What you’ll need to connect USB flash storage to your Android phone
Connecting USB flash storage to your Android phone is easy and cheap. Here’s what you’ll need:
A USB OTG cable

Some Android phones, like the Galaxy S7, come with a USB OTG cable in the box — but most don’t. If your Android phone didn’t come with an OTG cable, you can pick them up off Amazon for super cheap.
This cable is what allows you to hook up your phone to your flash storage device. Without it you’re pooched.
The one linked to here is made by Ugreen — it’s $5, it has a one year warranty, and it works great. The cable is six inches long, so you’ll be able to set your flash storage device and phone down any way you’d like. Can’t really beat that.
A USB flash storage device
This one is largely up to you. Any storage with a USB connector will work as long as it’s formatted as FAT32. If you want a ton of storage you’ll probably want a solid state drive with a USB connector (but beware of the power draw — not all drives will work!). If you’re OK with less storage, a thumb drive will do the trick.

If you don’t already have an OTG cable or a USB flash storage device, you can purchase an all-in-one flash drive and OTG connector. The one pictured here, made by Patriot, has 128GB of storage, has USB and micro-USB male connectors, and only costs about $40. You can plug it into your computer, transfer files onto it, then plug it into your phone and stream media without the need for a separate OTG cable.
How to connect a USB flash storage device to your Android phone
- Plug your USB OTG cable into your Android phone.
- Plug your USB flash storage device into the female connector of your OTG cable. The file explorer on your phone should automatically pop up.
That’s it! As long as your USB flash storage device is connected you’ll be able to play media from it. Be careful you don’t remove the storage device while using or transferring files.
How to safely disconnect a USB flash storage device from your Android phone
- Swipe down from the top of your phone’s screen.
Tap USB mass storage connected.
Simple as that. You can now safely unplug your flash storage device without risking corruption of any files.
Are you connected?
Do you use OTG cables to connect flash storage to your Android phone? Do you use a different method? Let us know in the comments section below!
We may earn a commission for purchases using our links. Learn more.
![]()
Samsung needs to bring back its iPod competitor
I don’t want to buy an iPod Touch. Since I want a reasonably priced PMP with acceptable audio hardware that can install a few crucial apps, I might have to.
![]()
VoLTE: How to use it and why you should care
VoLTE — or Voice over LTE — is the new standard for calling throughout the U.S., Canada, and parts of Europe. Not only does it facilitate much higher call quality between cell phones, but it allows devices to stay connected to LTE while on a call, improving data speeds for everyone.
![]()
PlayStation reportedly planning service to compete with Xbox Game Pass
Sony is planning to create a service similar to Xbox Game Pass, according to a new report. The service could launch as early as sometime in the spring of 2022, with multiple tiers.
![]()
These are the best USB-C cables you can find for Android Auto
Android Auto is an absolute necessity when driving, regardless of whether you’re headed out to the grocery store or for a long road trip. These cables will ensure your phone stays protected and charged, no matter what.
Источник


