- How to Share Internet from Windows, Mac or Linux to Android device
- Windows:
- Mac:
- Linux:
- Connect Android to Mac: methods and solutions (2021 edition)
- SyncMate
- Table of contents
- How to connect Android to Mac via USB
- SyncMate Expert
- using SyncMate
- using Android File Transfer
- How to connect Android phone to Mac via Wi — Fi
- SyncMate Expert
- using SyncMate
- using AirDroid
- How to access Android from Mac using Bluetooth
- SyncMate Expert
- using SyncMate
- using Bluetooth File Exchange
- Android to Mac — Keep All Data in Sync
- How to Sync Samsung Phone
- Sync Samsung Phone and Tablet in 2 Ways
- HTC Sync — All that you Need to Know
- Try 2 Tips to Sync Music from iTunes to HTC One
- How to Sync Google Pixel with Mac
- 2 Ways to Sync Google Pixel Photos with Mac
How to Share Internet from Windows, Mac or Linux to Android device
Most people are aware that Android devices can be used as a USB tether for sharing mobile data to a computer, but a nifty trick is the same procedure in reverse – that is, sharing a computer’s internet connection with the Android device. It’s known as “reverse tethering”, and it’s a fairly easy thing to setup.
There are different ways to achieve this depending on your operating system, so I will share methods for Windows, Mac, and Linux systems.
Windows:
- Download and install the Connectify Hotspot software on your computer, and proceed with the instructions on screen. Connectify Hotspot essentially creates a hotspot network through your computer’s WiFi antenna – of course, there’s a native Windows method of achieving this, but Connectify Hotspot is far less technical and more user-friendly.
- To configure Connectify Hotspot, you simply create a network by entering the desired name in the SSID field, and a password. Then you choose the connection you want to share, such as the Wi-Fi network your computer is connected to.
- In SSID type the connection name you want to give, this will be the wi-fi network name that you will see on your Android. Give your network a password if you want to use a secured network. Now select from the connection you want to share. i.e. This is the adapter which has the internet. Select the Wi-Fi network using which you will connect your Android Phone.
- Now enable your Android device’s WiFi, and click “Start Hotspot” in Connectify. You should be able to see the network on your phone’s list of available WiFi networks, so simply choose the SSID from Connectify, provide the password, and you’re all set.
Mac:
- First go to System Preferences > Sharing.
- Click on Internet Sharing, and under the dropdown box for “Share your connection from:”, choose the network your Mac is connected to, such as Ethernet or WiFi.
- Now in the box for “To computers using”, choose either Bluetooth PAN or AirPort, depending on your Mac OS/X version. However, if you’re sharing a Mac’s internet to a non-Apple device through AirPort, Mac absolutely requires a 5 or 13 letter WEP key. No more, no less.
- After you’re broadcasting the SSID from your Mac, go ahead and connect to it under your Android device’s WiFi settings.
Linux:
Please note this requires a rooted Android phone – you can search Appuals for Android root guides for your device.
You’ll also need ADB and Fastboot installed, which is easily obtained with:
sudo apt-get install android-tools-adb android-tools-fastboot
Finally, you should have a Terminal Emulator installed on your phone.
- If you meet those prerequisites, go ahead and connect your Android device to your PC over USB.
- Now launch a Linux terminal, and type the following commands:
Ifconfig
- This should display the network interface from the connected Android device, typically usb0 but in some cases it can be something else. In the commands I am giving, make sure to change usb0 to the actual network interface being used.
- So now type in the terminal:sudo ifconfig usb0 10.42.0.1 netmask 255.255.255.0
echo 1 | sudo tee /proc/sys/net/ipv4/ip_forward
sudo iptables -t nat -F
sudo iptables -t nat -A POSTROUTING -j MASQUERADE
- Now we have to type the next command on your Android’s terminal emulator :
adb shell busybox ifconfig
- After that last command, it should display a different network interface being used, for example So again, change the commands I am sharing to whatever is your actual network interface.
adb shell ifconfig rndis0 10.42.0.2 netmask 255.255.255.0
adb shell route add default gw 10.42.0.1 dev rndis0
- Now we can test the internet sharing by trying to send a ping from your phone’s Terminal Emulator, so type on your phone:
adb shell ping 8.8.8.8
If you get a successful ping, then you’re all set to go.
Источник
Connect Android to Mac: methods and solutions (2021 edition)

SyncMate
Do you regularly need to connect your Mac to Android phones and devices? If you have to access Android from Mac and vice versa regularly, you should have an easy way to do it. It is vital to ensure you always have the most up-to-date information across all your devices — not to mention you’ll be able to access your photos, contacts, calendar appointments and movies no matter where you are and which device you’re using. Whether you want to sync your most recent photos or contacts or do a full backup of all data on your phone or tablet, there are tools out there to help you connect Android phone to Mac computers. This guide explains different ways to sync and transfer files between Android and Mac with useful info, and tricks to help you connect Android to Mac quickly and easily.
Table of contents
How to connect Android to Mac via USB

SyncMate Expert
Most people know how to connect Android to Mac in the simplest way possible: with a USB cord plugged into the device and the computer. Using the USB cord will connect them technically, but that alone doesn’t mean they will sync files like it would if it was an iPhone to Mac or Android to PC.
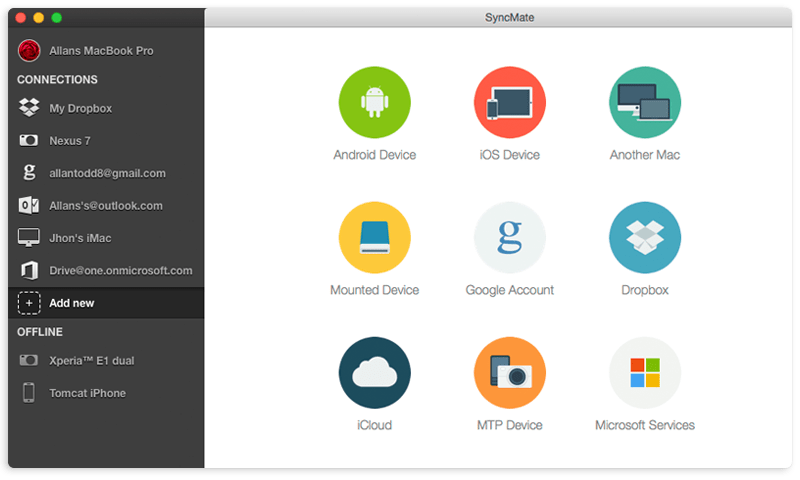
using SyncMate
After connecting your Android to your Mac with a USB, you’ll need an app to bridge the operating systems and make them compatible for file sharing. That’s where SyncMate comes into play. SyncMate makes it easy and fast to connect your Android to Mac and sync your files across devices. Follow these steps:
- First, connect your Android via USB to your Mac to install the SyncMate module automatically on your phone.
- Open SyncMate and choose add new device and pick Android as the device type in the window.
- Then select USB as the connection type.
- Then you need to enable USB debugging mode on your Android and ensure that the SyncMate module is launched.
- Next, you need to mount Android device as Mac storage to access the files stored on the phone.
- Once it is connected via USB, you can choose autosync to sync all data available on the device or selective sync to open only the plugins you want to sync at that moment.
using Android File Transfer
Another option to connect Android phone to Mac is by using Android File Transfer. This app was created by Google to make Android operating system compatible with Apple’s operating system on Mac. With Android File Transfer, your only option to connect Android to Mac is by using a USB cord. Follow these steps:
- Download and install Android File Transfer on your phone and Mac.
- Connect the Android to your Mac with the USB cable and open Mac Finder app to locate Android File Transfer under the list of devices.
- Choose the Android in the list of drives available to view a full list of apps and files.
- Drag and drop the files you want to sync to your Mac desktop or wherever you want to save them on your computer.
- You could also use your Android as an external hard drive (like a flash drive) to access files on your Android and transfer them to the Mac or even other devices you want to sync.
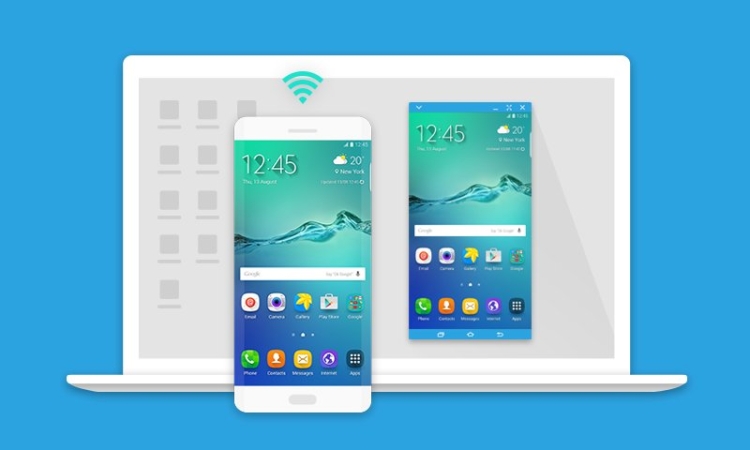
How to connect Android phone to Mac via Wi — Fi
SyncMate Expert
For some, connecting Android to Mac wirelessly through Wi-Fi connection is preferable to using USB. This can be more convenient because you can simply access Android from Mac without any extra steps like finding and plugging in your USB cord, which is especially helpful if you want to do a quick sync.
using SyncMate
SyncMate offers users the option to use Wi-Fi to connect Android to Mac and start syncing files, apps, messages, data, and more with just a few clicks. There is no convenient native application for Mac users to easily keep files updated on, but SyncMate solves this problem with these steps:
- Download and install SyncMate on your Android either by connecting it with USB to start an automatic installation or by scanning this QR code. You may have to enable the install in security settings.
- Once it installs, open SyncMate on your Android and allow syncing via Wi-Fi.
- Then in Access Control settings, you can either allow “Anyone can sync” to prevent warnings when connecting Android to Mac over Wi-Fi.
- Alternatively, you can add your Mac’s IP address (which is displayed in the module) to the “Ips that can sync” list, so that your phone recognizes your Mac on this IP address in the future.
- Then return to SyncMate app on your Mac and choose the connection settings for your Android device to decide what files sync!
using AirDroid
AirDroid is another app that allows Mac users to access Android files and data from their computer using Wi-Fi. AirDroid lets you search, upload files, and send messages on your Android from your Mac computer wirelessly. Using AirDroid to connect Mac and Android is easy. Just follow these steps to start syncing:
- Download and install AirDroid to your Android phone through the Google Play store or whatever app store you prefer.
- On your Mac, go to the AirDroid website at AirDroid.com and create a user account using your email address, Facebook, Google, or Twitter account.
- If you don’t want to create an account, you can also install the desktop version on your Mac and start syncing wirelessly in the app.
- With AirDroid on your Android and Mac and both device and computer connected to Wi-Fi, you should be able to select your Android from the AirDroid app on your Mac and start transferring files!
How to access Android from Mac using Bluetooth
SyncMate Expert
Using Bluetooth connection is another way to wirelessly connect your Android and Mac to sync files. Bluetooth is a technology developed in the 90s that uses radiowaves to connect devices and computers over a short range. Many people use Bluetooth for wireless headsets and speakers. Bluetooth can also connect your Android and Mac to transfer photos, music, messages, and more.
using SyncMate
Bluetooth alone won’t let you access Android files from your Mac, but SyncMate lets you use Bluetooth to wirelessly connect Android to Mac. SyncMate will help you to transfer photos, music, videos, contacts, and more from your Android to your Mac to stay organized. Follow these steps to use Bluetooth:
- Download and install SyncMate on your Android either by connecting it with USB to start an automatic installation or by scanning this QR code. You may have to enable the install in security settings.
- Once it installs, open SyncMate on your Android and select Bluetooth Sync to allow syncing via Bluetooth.
- Then pair your Android device with your Mac under Bluetooth in System Preferences and select your Android in the list.
- Once the devices are paired, return to the SyncMate app on your Mac and select your preferred connection settings to start transferring files, syncing calendars and contacts or whatever you need!
using Bluetooth File Exchange
A similar option for connecting Android and Mac is Bluetooth File Exchange, which is the macOS native utility. While it doesn’t offer as many features and settings for syncing files between Android and Mac, it offers a way to transfer some files between your device and computer without downloading an app.
- To use Bluetooth File Exchange, you will need to turn Bluetooth on your Android in the settings and Mac through the System Preferences and pair them.
- To transfer files from your Mac to Android, click the Bluetooth icon in your Mac’s menu bar and select your Android device, choosing “Send file to device.” Then select the file you want to send to your phone.
- If you want to upload a file from Android to Mac, you have to go to System Preferences and select Sharing and check “Bluetooth Sharing.” Then you can choose the destination of the files you want to transfer from Android to Mac.

Android to Mac — Keep All Data in Sync
How to Sync Samsung Phone
So when might you need to perform Android phone sync and backup your Samsung phone to your Mac? You might want to create a full backup of your Galaxy S20 in case it’s lost or stolen. Or perhaps you just want to backup your most precious photos from the holidays. You might even have music or movies on your phone that you want to watch or listen to on your Mac, or important calendar appointments that you’ll need both on your Mac and your smartphone.
Sync Samsung Phone and Tablet in 2 Ways
We’ve covered syncing your Samsung phone with your Mac, but what about if you need to sync your phone with your tablet? Perhaps you need to sync a movie from your phone to your tablet to watch on holiday or sync important work documents to your tablet for a conference. In this guide, we’ll reveal some best practices to sync your Samsung phone and tablet.
• Sync a Samsung Phone to a Tablet using SideSync
SideSync is a free app for syncing data across Samsung phones and tablets.
Here’s how to use SideSync:
- Download SideSync from the Play Store on both devices.
- Open the app on both devices. (Ensure they’re both connected to the same Wi-Fi network, or connect them via USB).
- You should see your tablet appear on your phone screen — tap it to connect. The first time this happens, you may get a prompt on your tablet — tap “OK”.
- Once connected, you’ll see a small menu. A single tap will take you to your files. You can drag and drop files from your phone to your tablet and vice versa.
SideSync can also be used to sync your Samsung phone or tablet with your PC.
• How to sync Samsung Phone with Tablet using SyncMate
One of the best ways to sync your Samsung phone with your tablet is to use a powerful tool like SyncMate.
Here’s how you can sync your phone and tablet using SyncMate:
- Download SyncMate and install it on your Mac. Open the app.
- In SyncMate’s main window click “Add New” on the left. Choose the Android device options in and connect your phone and tablet to your Mac.
- Select the device to sync with your Mac first (your Samsung phone, since we are moving data from it to your tablet) and choose the sync parameters. Don’t forget to set the sync direction from phone to Mac.
- Click “Sync”. Your Samsung phone will now sync with your Mac.
- Now choose the sync parameters for your tablet with the sync direction from Mac to tablet.
- Click “Sync” to sync the data you originally had on your phone to your tablet.
Note: SyncMate is a Mac app, so your Samsung phone and tablet will be synced through your Mac, i.e. data will be first transferred from your phone to Mac and then from Mac to your tablet (or vice versa).
HTC Sync — All that you Need to Know
If you own an HTC phone rather than a Samsung, you might be wondering how to sync your phone with Mac. You may need to sync Android to Mac to backup photos after a family event, transfer your favorite tracks to your Mac so you can listen at work, or even backup all your phone’s data in case it is ever lost or stolen. There are a number of ways to sync your HTC phone with Mac, but let’s start by looking at how you can sync photos.
Try 2 Tips to Sync Music from iTunes to HTC One
What if you need to sync your music to your HTC One from iTunes? Perhaps you’re heading off on an early-morning run and need your favorite tracks to get your adrenaline going. In this guide, we’ll show you how to sync your music from iTunes to HTC One, quickly and easily.
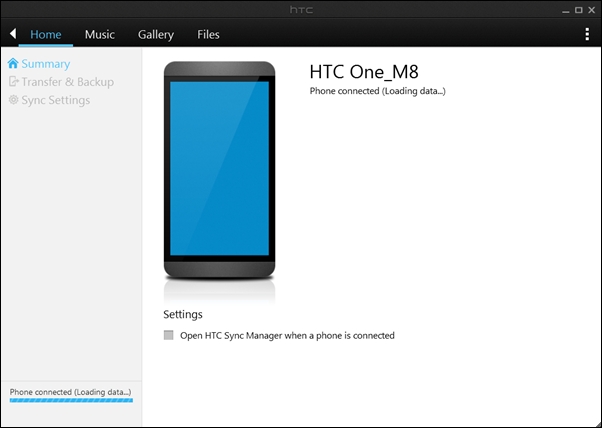
• How to sync iTunes to HTC One using HTC Sync Manager
The free HTC Sync Manager software helps you sync iTunes to HTC One. To sync, follow the below steps:
- Download and install HTC Sync Manager on your Mac, then launch it.
- Connect your phone to your Mac via USB cable and Sync Manager should automatically recognize it.
- Click the “Music” Tab. Under “This Computer” you should see your imported playlists. iTunes music can be found under “iTunes Artwork Screen Saver”.
- If your iTunes playlists aren’t showing, click “Display” in the left menu then click “Automatically import from iTunes to HTC Sync Manager”.
- Choose “Sync” in the left-hand menu, then check “Sync selected playlist”. Choose “iTunes Artwork Screen Saver” and click “Sync” to start the transfer.
This could take a few minutes, depending on how much music you have on your phone!
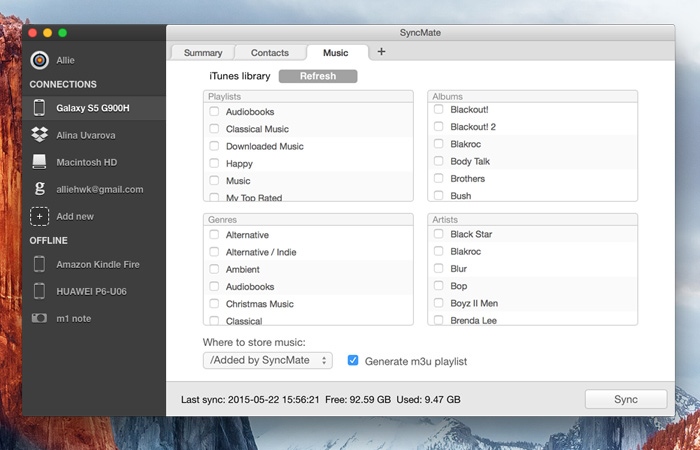
• How to sync iTunes on Mac with HTC using SyncMate
SyncMate is a one-stop solution for syncing iTunes on Mac with your HTC phone, and it’s quick and easy to do.
Here are the steps to follow to sync iTunes on Mac with HTC, so you can take your favorite music with you wherever you go:
- To sync iTunes on Mac with HTC, you’ll need the Expert Edition of SyncMate, so download and install the Free Edition then upgrade.
- Launch SyncMate and, in the left pane, click “Add New” and choose “Android Device”.
- Connect your HTC phone to your Mac via USB cable.
- Now, in the top panel click “+” and select “iTunes” from the plugin list. Then set your sync parameters.
- Audio conversion settings can be tuned if needed.
- Select the synchronization pair from the list, and click “Sync” to sync any selected playlists to your Mac.
Note: SyncMate will sync your existing Mac playlists with any playlists on your phone — or you can create a new playlist on Android using SyncMate.
How to Sync Google Pixel with Mac
If you’re the proud owner of a Google Pixel phone, you might need to sync your Pixel 4 XL’s photos with Mac in case your phone is lost or stolen or backup all your Pixel 3 XL apps in case you need to restore your phone to factory settings. Or maybe you rely on your phone to keep your contacts safe. Syncing your Google Pixel with Mac regularly backs up your important contacts and ensures you’ll never risk losing them again!
2 Ways to Sync Google Pixel Photos with Mac
Syncing your Google Pixel photos with Mac might be something you do regularly to backup your most precious photos — or you may need to do it after a special event like a birthday party or wedding. It’s easy when you know how, and in this guide, we’ll reveal some best practices to sync Google Pixel photos with Mac.
• How to transfer Google Pixel Photos with Android File Transfer
You can use Android File Transfer and a USB cable to transfer photos from your Google Pixel phone to your Mac. Here’s how:
- Download and install Android File Transfer on your Mac and launch it.
- Unlock your phone and connect it to your Mac via USB cable.
- Tap “Charging this device via USB” on your phone.
- Under “Use USB for” choose “File Transfer”
- The Android File Transfer window should open on your Mac: you can click and drag files between the two devices.
Note:Mac Android File Transfer should open automatically next time you connect your phone to your Mac.
• Sync Photos between Mac and Google Pixel [PRO way]
There is a more professional way to sync photos between Google Pixel and your Mac. SyncMate has been designed to make syncing a breeze, whatever device you’re using, and it minimizes the risk of losing your precious photos. Follow the below steps to sync photos between your Mac and Google Pixel phone using SyncMate:
- Download and install SyncMate, then upgrade to the Expert edition.
- Launch the tool and from the left pane select “Add New Link” then select “Android devices”.
- Use a USB cable (or Wi-Fi, or Bluetooth) to connect your Google Pixel phone to your Mac.
- Click “+” in the top panel and select “Photos” from the plugins list. Then it’s time to set your sync parameters (choose whether you want to sync specific images, albums, or folders or all of them, plus tweak your conversion settings if necessary).
- Don’t forget to set your sync direction from your phone to your Mac.
Click “Sync” and your photos will start to sync from your Google Pixel Phone to Mac — it couldn’t be easier (and usually takes just a few minutes)!
Источник


