- How to connect a USB flash drive to your Android phone
- How to check if your phone supports USB On-The-Go
- What you’ll need to connect USB flash storage to your Android phone
- A USB OTG cable
- A USB flash storage device
- How to connect a USB flash storage device to your Android phone
- How to safely disconnect a USB flash storage device from your Android phone
- Are you connected?
- Samsung needs to bring back its iPod competitor
- VoLTE: How to use it and why you should care
- PlayStation reportedly planning service to compete with Xbox Game Pass
- These are the best USB-C cables you can find for Android Auto
- How to Connect Your Android Phone With a Flash Drive
- Boost your phone storage with a portable USB flash drive
- What to Know
- How to Connect USB Storage to Android
- Using a Phone USB Adapter
- Why Use an Android Flash Drive?
- How to Connect your Android Device with a USB Cable.
- Introduction
- Enabling Developer Options on your Android Device.
- Enable USB Debugging.
- Download Transfer Companion to your Android Device.
- Download Droid Transfer to your PC.
- Run Droid Transfer on your PC
- Don’t forget to like & share with your friends!
How to connect a USB flash drive to your Android phone

Say you’re going to a party and your friends have asked you to play amateur DJ. Your phone has some music on it, but there’s so much more on your thumb drive or external solid state drive. You don’t want to bring an entire laptop to the party! Why not hook it up to your phone?
Another scenario: you’re going on a long road trip or flight and you can’t imagine anything better than watching movies the whole time. Problem is, you can’t fit them all on the internal or removable storage on your Android phone. Bring your flash drive! It’s full of movies!
Connecting a USB flash storage device to your Android phone is cheap and easy. Let’s find out what you need and, finally, how to get everything connected and safely disconnected again.
How to check if your phone supports USB On-The-Go
Not all Android phones support USB On-The-Go (OTG) functionality. If you don’t have the correct guts in your phone you’re not going to be hooking anything up with OTG. Luckily, to check if your phone is compatible requires just one app download.
The Google Play Store has a great app called OTG? that you can download now on your phone. It scans your phone automatically and will let you know if you’re one of the lucky ones. If you are, keep reading.
What you’ll need to connect USB flash storage to your Android phone
Connecting USB flash storage to your Android phone is easy and cheap. Here’s what you’ll need:
A USB OTG cable

Some Android phones, like the Galaxy S7, come with a USB OTG cable in the box — but most don’t. If your Android phone didn’t come with an OTG cable, you can pick them up off Amazon for super cheap.
This cable is what allows you to hook up your phone to your flash storage device. Without it you’re pooched.
The one linked to here is made by Ugreen — it’s $5, it has a one year warranty, and it works great. The cable is six inches long, so you’ll be able to set your flash storage device and phone down any way you’d like. Can’t really beat that.
A USB flash storage device
This one is largely up to you. Any storage with a USB connector will work as long as it’s formatted as FAT32. If you want a ton of storage you’ll probably want a solid state drive with a USB connector (but beware of the power draw — not all drives will work!). If you’re OK with less storage, a thumb drive will do the trick.

If you don’t already have an OTG cable or a USB flash storage device, you can purchase an all-in-one flash drive and OTG connector. The one pictured here, made by Patriot, has 128GB of storage, has USB and micro-USB male connectors, and only costs about $40. You can plug it into your computer, transfer files onto it, then plug it into your phone and stream media without the need for a separate OTG cable.
How to connect a USB flash storage device to your Android phone
- Plug your USB OTG cable into your Android phone.
- Plug your USB flash storage device into the female connector of your OTG cable. The file explorer on your phone should automatically pop up.
That’s it! As long as your USB flash storage device is connected you’ll be able to play media from it. Be careful you don’t remove the storage device while using or transferring files.
How to safely disconnect a USB flash storage device from your Android phone
- Swipe down from the top of your phone’s screen.
Tap USB mass storage connected.
Simple as that. You can now safely unplug your flash storage device without risking corruption of any files.
Are you connected?
Do you use OTG cables to connect flash storage to your Android phone? Do you use a different method? Let us know in the comments section below!
We may earn a commission for purchases using our links. Learn more.
![]()
Samsung needs to bring back its iPod competitor
I don’t want to buy an iPod Touch. Since I want a reasonably priced PMP with acceptable audio hardware that can install a few crucial apps, I might have to.
![]()
VoLTE: How to use it and why you should care
VoLTE — or Voice over LTE — is the new standard for calling throughout the U.S., Canada, and parts of Europe. Not only does it facilitate much higher call quality between cell phones, but it allows devices to stay connected to LTE while on a call, improving data speeds for everyone.
![]()
PlayStation reportedly planning service to compete with Xbox Game Pass
Sony is planning to create a service similar to Xbox Game Pass, according to a new report. The service could launch as early as sometime in the spring of 2022, with multiple tiers.
![]()
These are the best USB-C cables you can find for Android Auto
Android Auto is an absolute necessity when driving, regardless of whether you’re headed out to the grocery store or for a long road trip. These cables will ensure your phone stays protected and charged, no matter what.
Источник
How to Connect Your Android Phone With a Flash Drive
Boost your phone storage with a portable USB flash drive
:max_bytes(150000):strip_icc()/JonMartindaleheadshot2021-145018ccd03741b59f83e20327315e9a.jpeg)
What to Know
- Buy a flash drive with a connector that matches your phone, most likely USB-C or microUSB. Plug it in.
- If you already have a flash drive, buy an adapter to connect the USB drive to the phone.
This article explains how to connect your Android phone with a flash drive by buying a USB drive with a connector that matches your phone or by using an adaptor.
How to Connect USB Storage to Android
Modern phones have more storage than ever, and there are multiple ways to expand it further. While most might opt for cloud storage or adding an SD card to their mobile device, a flash drive for your Android phone has its advantages.
The only problem with using a USB drive connected to your Android device is smartphones don’t typically have a compatible connector. Most flash drives have USB type A ports, which makes them great for connecting to legacy PCs and laptops, but useless (at least initially) for hooking them up to your smartphone.
:max_bytes(150000):strip_icc()/androidusb02-f5835d9f17344b00af7b76717f59603b.jpg)
But that’s not always the case. The easiest way to connect a USB drive to your Android smartphone is to buy one with the right USB connector built into it and then plug it into your device.
- Check what port your phone has. Most modern devices have a singular USB port for charging and data transfer. Some recent devices have USB-C, while older devices have microUSB.
- When you know what you need, go to a general retail website like Amazon and search for your USB standard followed by «Flash,» for example, «microUSB flash.»
There are a number of factors you want to consider when making your selection:
- Compatibility: Make sure the flash drive has your smartphone’s USB connector on it. If your phone uses microUSB, you want the flash drive to have the correct male connector on it. If your device is USB-C, you want to make sure it has a male version of the connector instead.
- Speed: microUSB and USB-C are important for compatibility, but they don’t necessarily guarantee high speed. You want USB 3.0 at the least, though USB 3.1 is faster still. Faster speeds mean less waiting around when transferring large files between your phone and the flash drive.
- Versatility: If you want to only connect the flash drive to your smartphone, then only one connector is needed. However, there are some with microUSB/USB-C connectors and a USB type A connector on the other end, making it easy to connect the flash drive to your PC or laptop for transferring data between both devices.
- Storage size: If you only want to back up a few images, videos, or documents, 32GB is likely more than enough additional storage. However, if you want to store or transfer entire phones’ worth of data at a time and expect to do it often, you may want to opt for a larger 128GB or even 256GB flash drive. Some options extend up to a terabyte, but they are expensive.
Using a Phone USB Adapter
If the particular flash drive you want doesn’t have the connector you need, you aren’t out of luck just yet. There are adapters you can use which act as intermediaries between the two USB standards. They come in the form of cables and small adapters, which are little more than USB headers on each end.
:max_bytes(150000):strip_icc()/androidusb03-7ba6939846b04b32864b34cda7f836db.jpg)
The same kind of purchasing decisions factor in with adapters as they do with the drives. However, there is one more aspect to consider: Male and female adapter headers need to be correct in order to connect to your device and flash drive.
You’ll likely want a male microUSB/USB-C connector to plug in to your smartphone and a female USB type-A for your flash drive, but make sure it’s correct for your particular hardware before buying.
As with the USB flash drives, you want to consider the right speed of the adaptor. Many are USB 2.0 only, which can severely impact your data transfer speeds.
Why Use an Android Flash Drive?
Having a phone flash drive might seem a little clunky compared to greater on-board storage or using a cloud service, but think of it as an external drive for your PC or laptop. It’s entirely separate from your device, so if your mobile handset is damaged or lost, your data is still safely backed up. You also have complete control over its location and distribution. It’s safe as long as you keep it safe, which gives you the power over how protected the stored data is.
Better yet, with the larger size of a connected flash drive, you can increase the storage space of your mobile phone indefinitely, adding hundreds upon hundreds of gigabytes if you use more than one device or decide to spend a lot on a big one.
Источник
How to Connect your Android Device with a USB Cable.
Introduction
As well as connecting your Android device to Droid Transfer over your local WiFi network, you can also connect your Android device to your computer using a USB cable.
To do this — you need to change some of the settings on your Android device so that Droid Transfer and Transfer Companion (running on your Android device) can communicate. This support article shows you how.
Enabling Developer Options on your Android Device.
You need to change some settings on your Android device so that «Developer Mode» is enabled.
- Open your device settings and choose «About phone», «About device» or just «About».
- Look for the entry «Build Number», or «Build Version». This entry may be under a further sub-menu called «Software Information» or «Software Info» on some devices.
- Tap the «Build Number» entry five or six times. (No, really!)
Your device will show you how many taps are required to enable Developer Mode. When done your device will have Developer Mode enabled. - Go back to your main Settings menu — scroll down to the bottom, you should see a new entry called «Developer Options».

Congratulations! You’re now a developer! 😉
Enable USB Debugging.
Just a couple more settings to change.
- Tap to open «Developer Options»
- Make sure «Developer Options» is set to ON.
- Scroll down to «USB Debugging» and make sure that is enabled also. If it isn’t, slide the toggle switch to the right to enable it.
- Depending on your Android device — a window may pop up on your phone asking you to verify that you want to enable USB Debugging. Click OK or Apply to allow USB Debugging to become enabled.
Download Transfer Companion to your Android Device.
Download Transfer Companion to your Android device from the Google Play Store. You need to be running at least version 1.58 of Transfer Companion — so check for updates if you have previously downloaded Transfer Companion to your Android device.
![]()
Download Droid Transfer to your PC.
On your Windows PC, go to this address to download Droid Transfer.
Run Droid Transfer on your PC
Run Droid Transfer on your PC and when you see the connect screen:
![]()
Connect your Android device to your PC with a USB cable. Depending on your device, your phone may request permission for it to communicate with your PC.
Click OK or Allow on any prompts showing on your Android Device.
When Droid Transfer detects your device, it will launch Transfer Companion on your Android device and begin to load your phones data through the USB cable.
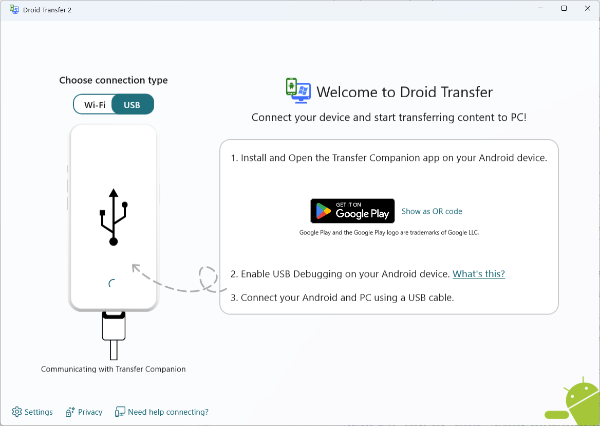
Connection should now made between Droid Transfer and Transfer Companion and you can start managing and copying your Android Phone content using Droid Transfer on your PC.
![]()
If you’re having troubles, check out our USB connection troubleshooting tips which will help you resolve any issues.
Don’t forget to like & share with your friends!
![]()
Read Next: Troubleshooting Droid Transfer WiFi Connection >
Источник


