- Три классных SSH клиента для iOS
- Prompt 2
- Cathode
- Serverauditor
- iPhone Tip: Things To Check If You Cannot Connect Via SSH
- How To: Connect to Your iPhone Via SSH
- Ubuntu Documentation
- Passwordless Access
- If all else fails
- Retrieving and setting the Firewire GUID (FirewireGuid)
- Alternative solution with MNPlight
- Setting up the iPod or iPhone
- Transferring Music
- Playing Music with standard iPod application
- Tips, Tricks, Troubleshooting, etc
- Converting/Watching Videos
- Syncing via Cable
- Speed
- Copying photos to the iPhone
- Syncing contacts calendar notes
- Syncing Music on Firmware 3.x
- Jauntry/Karmic synchronization
- Older posts on iPhone 3.0
- Creating and Adding Custom Ringtones to your iPhone
Три классных SSH клиента для iOS
Проблемы с серверами обычно случаются не тогда, когда сидишь в теплом офисе за компьютером, а когда ты в 50 км от города на даче и из техники у тебя только мобильный телефон. Для таких случаев необходимо иметь на своем iPhone хороший SSH-клиент.
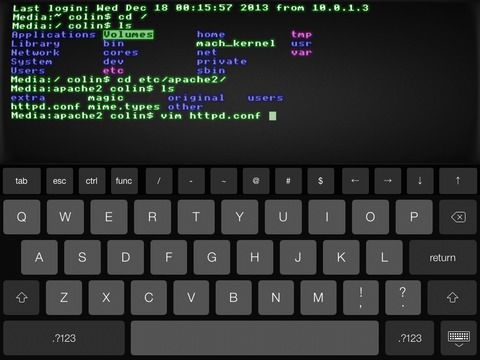
Prompt 2
Продукт позиционирует себя как максимально легкий в использовании и предельно безопасный. Пользователи называют его идеальным SSH-клиентом.
Достоинства:
- доступ к приложению по отпечатку пальца;
- возможность группировать закладки с данными доступа к разным серверам по папкам;
- кнопка срочной синхронизации всего и сразу;
- возможность создавать кнопки в панели инструментов для повторяющихся действий;
- генератор приватных ключей;
- удобный менеджер для управления приватными ключами.
Недостатки: не обнаружено, за исключением высокой стоимости.
Цена: 479 рублей.
Страница в AppStore
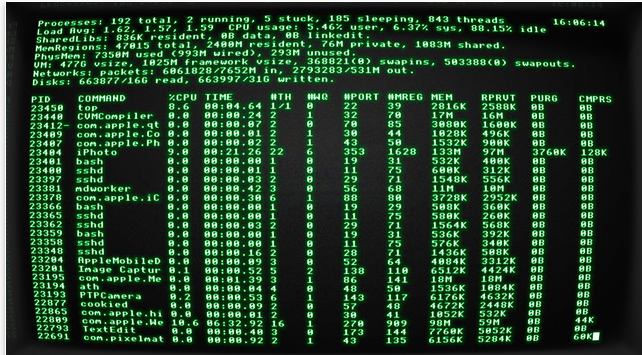
Cathode
У этого клиента нет такого количества интересных фишек для безопасности, как у вышеописанного собрата. Его главное достоинство – внешний вид. SSH-клиент Cathode выглядит как терминал из фильмов про хакеров 90-ых годов. Даже когда просто пингуешь на нем сервер, чувствуешь себя крутым взломщиком.
Достоинства:
- роскошные ретро-шрифты;
- поддержка нескольких соединений одновременно;
- создание закладок с данными для подключения к серверам;
- менеджер приватных SSH-ключей.
Недостатки: критических недостатков нет, но стоит отметить не столь удобное управление, как у Prompt 2.
Цена: 279 рублей.
Страница в AppStore
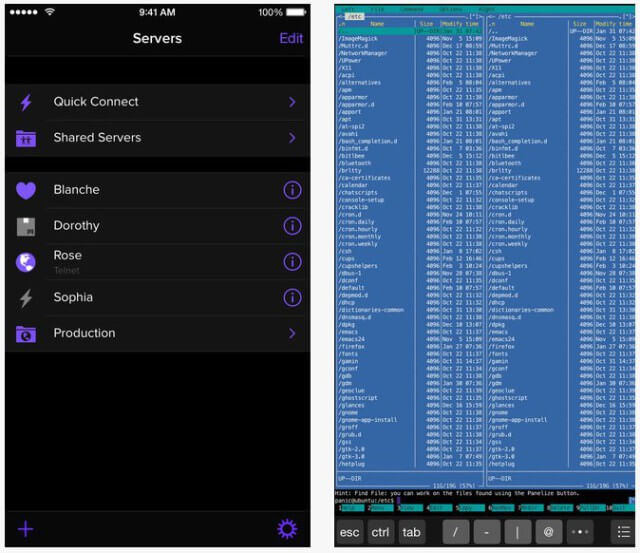
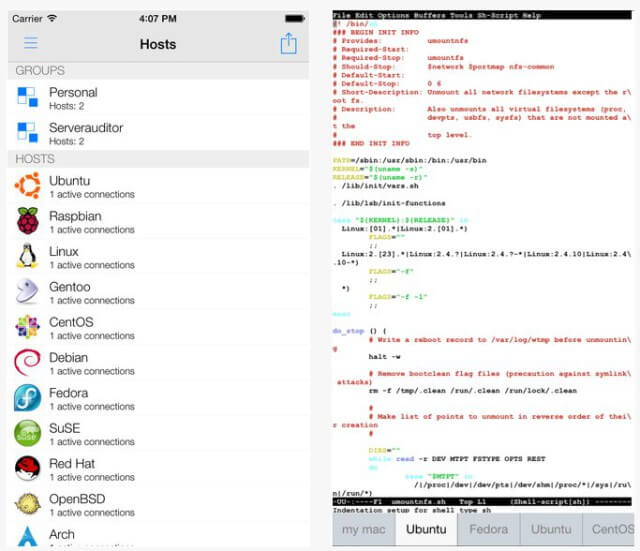
Serverauditor
Еще один качественный SSH-клиент с русскоязычным интерфейсом. У него намного меньше фич для обеспечения безопасности, но если вы работаете не в ФСБ, то имеющегося ассортимента вам будет вполне достаточно.
Достоинства:
- поддержка PuTTY ключей;
- импорт ключей через ITunes Files Sharing;
- настройка ПИН-кода для входа в приложение;
- генератор RSA/DSA ключей;
- объединение закладок с хостами в папки;
- напоминание об активных сессия перед закрытием соединения, если приложение в свернутом состоянии.
Недостатки: не обнаружено, с точки зрения удобства интерфейса не сильно уступает Prompt 2.
Цена: 349 рублей (некоторые функции доступны в бесплатной бета-версии).
Страница в AppStore
Источник
iPhone Tip: Things To Check If You Cannot Connect Via SSH


One of the most common topics that I see come up at iPhone forum sites over and over is problems with connecting to the iPhone via SSH. So I thought I ‘d do a quick post covering some good things to check when troubleshooting these issues.
These suggestions may not fix every SSH connection problem, but they should help you resolve most, and will certainly mean you ‘ve covered the basics and most likely causes of a connection failure.
In this post I ‘m going to assume that you are already comfortable with the basics of using SSH to connect to your iPhone, and have already got SSH apps setup on both your iPhone and the PC you ‘re using to connect to it.
If you ‘re not comfortable with the above, or need some help with your initial setup, please give my more general How-to post on this subject “ How To: Connect To Your iPhone Via SSH.
Ok, so let ‘s talk about what to do if you ‘ve got yourself all setup “ on the iPhone and PC “ with SSH apps and you still have problems connecting via SSH.
There are a variety of error messages you can get from SSH clients when connections fail. One of the most common is ‘Network error: Connection refused ‘. I ‘m not going to try to break this up into sections for every common error message “ for that, you might want to see this post that offers some advice along those lines for common WinSCP errors.
Instead, the suggestions below should be useful things to try for nearly all errors you ‘ll encounter. Many of them are quite obvious things “ but they are also things that most of us have had at least a few ‘DOH ‘ moments on, and these checks can bring a quick fix when we do.
Things To Try If You Cannot Connect To Your iPhone Via SSH:
- If you get a timeout error, try increasing the timeout setting
- Make sure SSH is turned on, on the iPhone – Generally the easiest way to do this is to use an app like SB Settings that gives you a GUI interface to toggle the service on and off with.
- Make sure WiFi is turned on, on the iPhone “ again, via SB Settings or the iPhone ‘s built-in Settings applet.
- Check that you are specifying the right port in your desktop SSH app (e.g. WinSCP on Windows or Cyberduck on Mac). The port needs to be 22.
- Make sure you are entering the correct “ and *current* “ IP address for the iPhone. If your iPhone gets a DHCP (dynamically configured) IP address from your router (as most do), then its address can and will change over time. So its IP address today may be different to the one it had last week when you last successfully connected. To check this go to Settings > WiFi “ and tap on the blue arrow next to your active WiFi connection “ the screen that takes you to will display the iPhone ‘s current IP address.
- Verify that the iPhone has a *valid* IP address. When you are checking the address per the above point, if you see an address that starts with 169.254.x then the iPhone is not getting a usable IP address “ and you need to troubleshoot that issue first.
- Remember that the iPhone and the PC you ‘re tying to connect from must be on the same WiFi network. One of the easiest ways to tell this is to see if their IP addresses look similar. For instance, many default home WiFi networks will have IP addresses that start with 192.168.x.
- Check that you do not have any antivirus, firewall, or security software on your PC that may be blocking your outbound SSH connection. One of the easiest ways to quickly rule this out (or pin the blame on it) is to shut down any and all of those services on your PC temporarily and try connecting. If it still fails, you know those services are not to blame.
- Password check “ you need to be using the correct username and password for connection to the iPhone. If you have never changed these (which the vast majority of iPhone users have not “ and you would know if you did) then the most likely defaults are username ‘root ‘ and password either ‘alpine ‘ or ‘dottie ‘. Please note “ you do not type the ‘ ‘ inverted commas around the username or password.
- The iPhone cannot be in ‘sleep mode ‘ when you are trying to connect. You may just want to change your Auto-Lock setting to ‘Never ‘ just for while you are connecting “ to avoid this issue.
- Make sure you are using the correct protocol setting in your desktop SSH app. This varies according to which client app you are using. WinSCP uses SCP, for example.
Again, checking and correcting these things may not resolve every connection issue you come across “ but they should help in the majority of cases. I hope some of you will find these helpful, and look forward to hearing any of your tips you ‘d like to share for these issues.
Источник
How To: Connect to Your iPhone Via SSH

We never seem to get round to doing enough of these How-To sort of posts, but I’m trying to knock out a few on topics that seem to come up frequently on iPhone forums and discussions – such as …
How To Connect to Your iPhone Via SSH
Topic Description: SSH (secure shell) is a network protocol that allows data to be exchanged over a secure channel, in this case between a computer and your iPhone. If you have a jailbroken iPhone, an SSH connection over a wireless network is often the best way to browse your iPhone, carry out simple file transfer back and forth to the iPhone, or manually install applications to it. This short guide provides a rundown of how to establish an SSH connection to your iPhone.
Requirements & Assumptions:
A jailbroken iPhone. For this guide we will assume you are running the current latest iPhone firmware, Version 1.1.4.
An SSH program on your computer. A couple of good free options are WinSCP for a Windows PC, and Cyberduck for a Mac.
The BSD Subsystem installed on your iPhone. You’ll find this under the System category in Installer.
OpenSSH (or another SSH variant) installed on your iPhone. This is also found under the System Category in Installer.
iPhone and computer need to be on the same (usually wireless) network. For the sake of this guide, we’ll assume both are on a home wireless network.
An ability to turn SSH On and Off on the iPhone. SSH programs on the iPhone do not create an icon on the home screen, so one of the easiest ways to do this is to use the BossPrefs application on the iPhone (to install it you’ll need to add the BigBoss source to Installer – which is http://sleepers.net/iphonerepo). There are other iPhone applications that do this as well, but BossPrefs is currenty the best of these in my view.
Steps:
- Make a note of your iPhone’s IP address. To find this, on your iPhone go to Settings > WiFi and tap on the blue arrow to the right of the name of your home network. On the screen that comes up, note the set of numbers listed in the IP Address field.
- Turn SSH On, on the iPhone. With BossPrefs and other similar applications, this is just a matter of tapping on the SSH entry to toggle it on and off. Please Note: it is good idea to make sure you toggle SSH back off when you are through using it.
- Launch your SSH app on your computer. WinSCP will land you on a new ‘Session’ screen straight away. On Cyberduck, you’ll need to choose ‘Open New Connection’. See screencaps at the top of this post and below for a look at how these screens appear. Then you need to fill in a few fields to specify how you want to connect and what device you want to connect to. The fields are named slightly differently depending on which program you use, but they are similar enough that you should be able to fill them in as follows:
Hostname or Server = enter your iPhone’s IP address in this field
File Protocol = should be SCP on WinSCP and SFTP on Cyberduck
Username = enter ‘root’ (without the quotes) in this field
Password = enter ‘alpine’ in this field (without the quotes) or whatever you have changed root’s password to, if you have ever changed it. - Once you have entered the information as above, hit ‘Login’ on WinSCP or ‘Connect’ on Cyberduck. It may take up to 30 seconds or so to connect.
- You will see a confirmation message asking if you will accept key exchange / connection with the device with the iPhone’s address. You’ll need to say Yes or Allow on these.
Once connected, you are presented with an Explorer-like view of the file system on the iPhone, or of the iPhone and your own computer. Once there, you can copy files and folders back and forth between the computer and iPhone.

UPDATE: There is shiny, new updated version of this post HERE – with some changes to reflect the current jailbreak environment, the Cydia app store, and newer jailbreak apps that are helpful in this process.
Источник
Ubuntu Documentation

Needs Expansion
This article is incomplete, and needs to be expanded. More info.
Passwordless Access
In order for programs like Amarok to connect to your iPhone via SSH without asking for a password, you can set up key based logins. You can skip this step if you’re happy mounting it manually from a terminal, typing your password each time.
- Make a private and a public key. We’ll specify a different identity than the default, so it won’t conflict with any existing keys you have. Run the following command in a terminal:
- This will create a directory called .ssh in your home directory, and place three files in there: iphone_identity, iphone_identity.pub, and known_hosts. iphone_identy is your private keyfile, and iphone_identity.pub is your public one. You want your device to have the public key so you can authenticate towards it with your private one.
- Install your public key to the device. If it asks if you want to accept the untrusted device as a trusted host, do so.
- Log into your iPhone again.
- If it at this point asks for your password, that means the server installed on the device has not yet been configured to accept keys as a method of authorization. Ergo, you are not using «Ste’s OpenSSH package», which will be mentioned later in this wiki. For the time being, the default password for 1.1.0 phones is ‘dottie’, and ‘alpine’ for 1.1.1 and 1.1.2 phones.
- Change the password. This is important for security. You will eventually be logging in via your key anyway, but make it something you’ll remember.
-
- NOTE: On firmware 1.1.3, BSD Subsystem maintainers highly recommend against using the «passwd» command until a stability bug is fixed. Until then, you can use this command, and replace the output password hashes for the users ‘root’ and ‘mobile’ in /etc/master.passwd on your device.
-
The following steps do NOT apply to Ste’s OpenSSH package, which is probably the most common one now. In order to get passwordless login working with Ste’s package, rename your
/.ssh/authorized_keys file on your device to
/.ssh/authorized_keys2 and proceed straight to adjusting the permissions as described below («if all else fails»). Full instructions can be found here.
If you are not using said package on your device, follow these instructions to enable the public key authorization method.
- Edit /etc/sshd_config (/etc/ssh/sshd_config on iPhone OS 3.0):
- Scroll down to the segment beginning with ‘#RSAAuthentication’, and set it up as follows:
- Remove any commenting hashmarks (#) prepended to the beginning of these three lines.
- Hit Ctrl+X to exit, and save your changes.
- At this point you should be finished. Reboot your device.
- Give it some time to start up, then try logging back in. This time, it should automatically authenticate using your private key.
- To make the process even simpler, add these lines to your
/.ssh/config file on your computer. Now you should be able to login with this simple command:
If all else fails
If you’re still asked for a password:
Check your local
/.ssh/iphone_identity.pub file and compare it with the
/.ssh/authenticated_keys file on your device. Does any entry match? If not, try the ssh-copy-id command again. Alternatively, just copy the contents of your iphone_identity.pub file and paste it on a line of its own in authenticated_keys. Entries must be one line only.
Retrieving and setting the Firewire GUID (FirewireGuid)
When you issue iphone-mount or ipod-touch-mount for the first time, the program silently attempts to generate this value using a USB connection. If you have never connected your device via USB before and try to mount it via WiFi for the first time, this step is missed and you end up with a database that your device refuses to read. This is (in nearly all cases) because the Firewire GUID (FirewireGuid) that the iPhone/iPod Touch specifically use to hash their database is either missing or invalid.
To fix this manually:
- Plug your iPhone/iPod device into your Ubuntu machine via USB
In Ubuntu, run Applications → Accessories → Terminal
Run «sudo lsusb -v -d 05ac: | grep iSerial | awk ‘
You may also get the GUID directly from the device by executing:
If all goes well, your music should now be recognized on the device!
Alternative solution with MNPlight
Add the http://iphone.lefessant.net/iphone link to your Ipod Touch or Iphone installer.
Install MNPlight.
For Ipod Touch you need to set the «FirewareGuid» of device (see previous section).
Set the Fireware GUID in MNPlight→Preferences.
Warning: Without this step MNPlight will corrupt your music database!
Copy your music in to /var/root/Media/MNPlight/Music folder of your Iphone/Ipod Touch and import it by MNPlight→Playlists→Import songs from directory
Use the guide above for further configuration.
Setting up the iPod or iPhone
Make sure your iPod is jailbroken. QuickPwn works well for 2.x firmware, and a quick Google search will point you to directions (Unfortunately, you’ll need to borrow a Windows or a Mac machine for the jailbreaking, but after that, it’s Ubuntu all the way). In the process of jailbreaking, make sure to select the option that installs Cydia (Cydia is a front-end for the iPhone’s apt port).
On your newly jailbroken iPod, update Cydia and install OpenSSH through it.You may need to reboot your iPhone by holding down the power button after installing OpenSSH to start the SSH Daemon.
Transferring Music
In Ubuntu, select Places>Connect to Server. In the dropdown box labeled «Service type,» select «SSH». In the «Server» field, input your iPod’s ip address (this can be found on your iPod by going to Settings>Wi-Fi>arrow-next-to-SSID-of-network-you’re-connected-to). Finally, under username, enter «mobile». Leave other fields blank. Click connect. (In Kubuntu, first install the ‘SSH’ and ‘OpenSSH’ packages. Then enter the following in Konqueror: sftp://root@[IP address]/var/mobile/media/music/ to get to your Music folder. Or, for videos, enter, sftp://root@[IP address]/var/media/. Your folder’s contents will appear in Konqueror, and then just drag-and-drop as below.)
Playing Music with standard iPod application
- To see new Tracks you transferred to the iPod, you need to fully quit and restart the Music Application. One Click on the Home Button only «minimizes» it, pressing the Home button 5 secs should work. I use SBSettings and the «Processes» Switch. Works fine. Restarting the iPod by pressing the «On/Off» Switch for 5 secs works, too.
- Enjoy!
Tips, Tricks, Troubleshooting, etc
The standard iPod music player is able to display album art embedded in ID3 tags OR organized as iTunes does it (in separate folders somewhere in your iTunes library location). If you have previusly synchronized your music with iTunes, the album art IS NOT embedded in the ID3 tags of your files. Adding music through amarok or gtkpod will switch the album art display mode of your iPod to displaying only embedded album art, so you’ll probably lose most of the album art added through iTunes. The only workaround I found is to copy your iPod music to your computer with amarok, then use EasyTag to embed the album art to the ID3 tags and then sync back to the ipod (it can be very time consuming).
You can change your password in your iPod by logging in from the terminal. Type «ssh mobile@ «, login, and type passwd to change the password.
There is also a root user on your iPod, and it is advisable to change that password as well. Follow the directions above, but use «ssh root@ » in the terminal.
Converting/Watching Videos
If you want to convert videos for use on the default iPhone video player, Handbrake is a good choice (there’s now a native Linux GUI version available) — it is now accepting any video input to create a Apple-compatible video file.
However, if your iPhone is jailbroken and you don’t want to play the video back using the native iPhone video player (which for example doesn’t support XVid/DiVX file formats), you do need to use a video converter like WinFF and an alternative video player such as MPlayer.
This conversion involves using mplayer4iphone (available through Cydia on jailbroken iPhones) and WinFF using an iPhone 3g with 2.2 firmware.
- Jailbreak your iPhone
- Install mplayer4iphone through Cydia
- Install WinFF on Ubuntu (Medibuntu repository) through Synaptic
- Now convert your videos using WinFF. Use these settings: 480×320, 15fps, XVid in AVI. It’s crucial to keep the fps to 15, since 24fps, etc. was jerky for me. Here’s my preset for WinFF if you want to create one: -r 15 -vcodec libxvid -vtag XVID -s 480×320 -aspect 4:3 -maxrate 1800k -b 1500k -qmin 3 -qmax 5 -bufsize 4096 -mbd 2 -bf 2 -flags +4mv -trellis 1 -cmp 2 -subcmp 2 -g 300 -acodec libmp3lame -ar 48000 -ab 128k -ac 2
- Once you have your video converted, connect to your iPhone using the SSH method detailed above. This will open a window showing your iPhone file structure.
- Mplayer needs your videos to be in this folder: root/var/media. Just drag your video files to that folder. (In Kubuntu, first install the ‘SSH’ and ‘OpenSSH’ packages. Then enter the following in Konqueror: sftp://root@[IP address]/var/media/. Your folder’s contents will appear in Konqueror, and then just drag-and-drop as above.)
Now you can just play your files in fullscreen on Mplayer on your iPhone, with audio synch working fine.
Syncing via Cable
Speed
iTunnel gives me about 400kb/sec iFuse gives me about 250kb/sec WLan gives me about 10 — 800kb/sec, WLan crowded places give less It is a good idea to create a Ad-hoc WLan and connect directly your iPod to you PC. I take speed up to 1,5MB/sec.
Copying photos to the iPhone
Photos can be copied into the Media/DCIM directory in the mobile account. They need to follow the directory and image numbering conventions used by the iPhone/iPod. Multiple image formats are allowed, but they should have a thumbnail (.THM) file which is a 55×55 pixel JPG file.
There is a command-line script that can copy images to the iPod Touch or iPhone using ipod-convenience or scp available at http://marginalhacks.com/#img2iphone
Note that it is free to use and source available, but not technically open source.
«»Alternative method using a webserver (3.x)»» You can use a webserver set up, accessible either via a local IP over wifi or a hosted server to transfer images to your iTouch or iPhone. Transfer the image to the webserver (/var/www/photo.jpeg), and then go to your IP in the web browser followed by the relative path and filename of the image (192.168.2.4/photo.jpeg), then hold your finger on the image until options appear. Click «Save Image» and it will be available in your photo browser for using as a wallpaper or whatever.
Syncing contacts calendar notes
Setting up the server following administration guide is straight forward and not that difficult. Here are the main steps:
Start Install: «./sh funambol-8.0.0.bin» read and accept the licens and press Enter to install it to /opt/Funambol you can either start the server when asked by the installation process or later by executing: «/opt/Funambol/bin/funambol start»
Funambol requires java, but the jre is shipped with the server, so there’s no need to care about.
Start the server and go to http://localhost:8080/ to see if it’s running. Now bring up the admintool executing «/opt/Funambol/admin/bin/funamboladmin»
Go to «File» in the menu and choose «Login». User the default values for your first login. (You should later change the password. See the admin guide for details about that.)
User name: admin Password: sa
Now «localhost» should appear in the main window, expand the tree and double click on user. And choose «add» in the right window. Now enter user credentials and select role «User». Click «add» and voila your server with an account is set up and ready for syncing.
Next step is getting your iphone ready. If your device is jailbroken, install «iPhoneSync» from Cydia. Otherwise go to the appstore and install the app «Funambol». iPhoneSync will let you synchronize contacts calendar and notes. Funambol will only allow Contacts (probably due restrictions in the appstore). Open the app and go to «Settings»->»Account» and enter «http://192.168.1.7:8080/funambol/ds» as server (replace the ip with the local one of your server or it’s hostname). For username and password you choose the same credentials, you entered adding a new user to funambol. Leave the settings and tap «Sync All» or «Sync Contacts» depending which app you’re using. If everything went fine, the data from your iphone should now be transfered to the funambol server.
Now let’s get to the linux client side.
Install thunderbird (a.k.a. icedove). On debian «apt-get install icedove» should do the job.
Also get the Funambol Mozilla Sync Client and install that too. https://mozilla-plugin.forge.funambol.org/
If you select the Tools menu in thunderbird, you should now find a «Funambol sync. » entry, which opens a small window with another Tools menu, where you can find the Options. Enter the same server location as in your iphone and the same user credentials. Close the options and click «Sync All» in the funambol window. thunderbird should now be synchronized with your iphone data on the funambol server.
If you prefer kontact and got an imap server running and use the buildin kolab imap store, to keep pim data on your boxes synchronized. Installing the kolab plugin for thunderbird, you can now keep kontact in sync with the iphone, using thunderbird just as a middleman in the syncing process. It’s not a fancy solution, but it at least it works. The plugin can be found at https://addons.mozilla.org/en-US/thunderbird/addon/519
Syncing Music on Firmware 3.x
Jauntry/Karmic synchronization
Packages have been released and it is possible to use your iPhone over USB without compiling in the following guide: http://www.webupd8.org/2010/01/easy-way-to-sync-your-iphone-with.html.
Also see Syncing with Amarok 1.4 below.
Older posts on iPhone 3.0
A project to enable syncing with iPhone Firmware 3.0 is under way (30 October 2009). See: http://marcansoft.com/blog/2009/10/iphone-syncing-on-linux/
One must install ifuse from the Ubuntu repos. Then, installing the SVN versions (as of November 25th, 2009) of gtkpod, libgpod, usbmuxd and related dependencies (from source — the distro packages MAY NOT work!) enables:
- Syncing Music.
- Syncing Photos.
- Syncing Videos.
Even though the support is alpha/beta in quality, it works well enough for testing purposes. In one user’s case, it has operated fine syncing large amounts of Audio and video both to and from the iDevice running firmware 3.1.2. After a short «Updating Library..» setop on the iDevice the next time the Music or Video application was opened, all songs and videos were present, had album art, and played correctly. YAY!
It’s possible now (December 28th, 2009), instructions are provided on these sites: http://marcansoft.com/blog/2009/10/iphone-syncing-on-linux-part-2/
Creating and Adding Custom Ringtones to your iPhone
Again, this requires ifuse and associated tools — you can find a comprehensive tutorial/howto here
Iphone connecting wireless (последним исправлял пользователь knome 2015-03-30 19:22:22)
The material on this wiki is available under a free license, see Copyright / License for details
You can contribute to this wiki, see Wiki Guide for details
Источник


