- Use iTunes to share files between your computer and your iOS or iPadOS device
- Before you begin
- What you need for File Sharing
- See which of your iOS and iPadOS apps can share files with your computer
- Copy files from your computer to your iOS or iPadOS app
- Copy files from an iOS or iPadOS app to your computer
- Open shared files
- Back up shared files
- Delete a shared file from your iOS device
- Синхронизация контента iTunes на ПК с другими устройствами по сети Wi-Fi
- Включение синхронизации по сети Wi-Fi
- Синхронизация устройства по сети Wi-Fi
- All Tips about «Connect iPhone to iTunes»
- Part 1. All Tips about Connect iPhone to iTunes
- Tip #1. Upgrade the latest version of iTunes
- Tip #2. Check the USB cable
- Tip #3. Remove the iTunes and re-install it
- Tip #4. Update windows if you are using windows 10
- Tip #5. Trust your iPhone
- Tip #6. Update your iPhone driver
- Tip #7. Check Apple mobile device
- Part 2: Connect iPhone to iTunes without launching iTunes itself
- Part 3. Comparison table
Use iTunes to share files between your computer and your iOS or iPadOS device
You can copy files between your computer and apps on your iOS or iPadOS device using File Sharing.
Before you begin
Instead of File Sharing, consider using iCloud Drive, Handoff, or AirDrop to keep your documents up to date across all of your devices.
iCloud Drive lets you securely access all of your documents from your iPhone, iPad, iPod touch, Mac, or PC. No matter which device you’re using, you’ll always have the most up to date documents when and where you need them.
With Handoff, you can start a document, email, or message on one device and pick up where you left off from another device. Handoff works with Apple apps such as Mail, Safari, Maps, Messages, Reminders, Calendar, Contacts, Pages, Numbers, and Keynote. Some third-party apps are also compatible.
AirDrop helps you share photos, videos, websites, locations, and more with other nearby Apple devices.

What you need for File Sharing
- The latest version of iTunes.
- The latest version of macOS or an up-to-date version of Windows 7 or later.
- An iPhone, iPad, or iPod touch with the latest version of iOS or iPadOS.
- An iOS or iPadOS app that works with File Sharing.
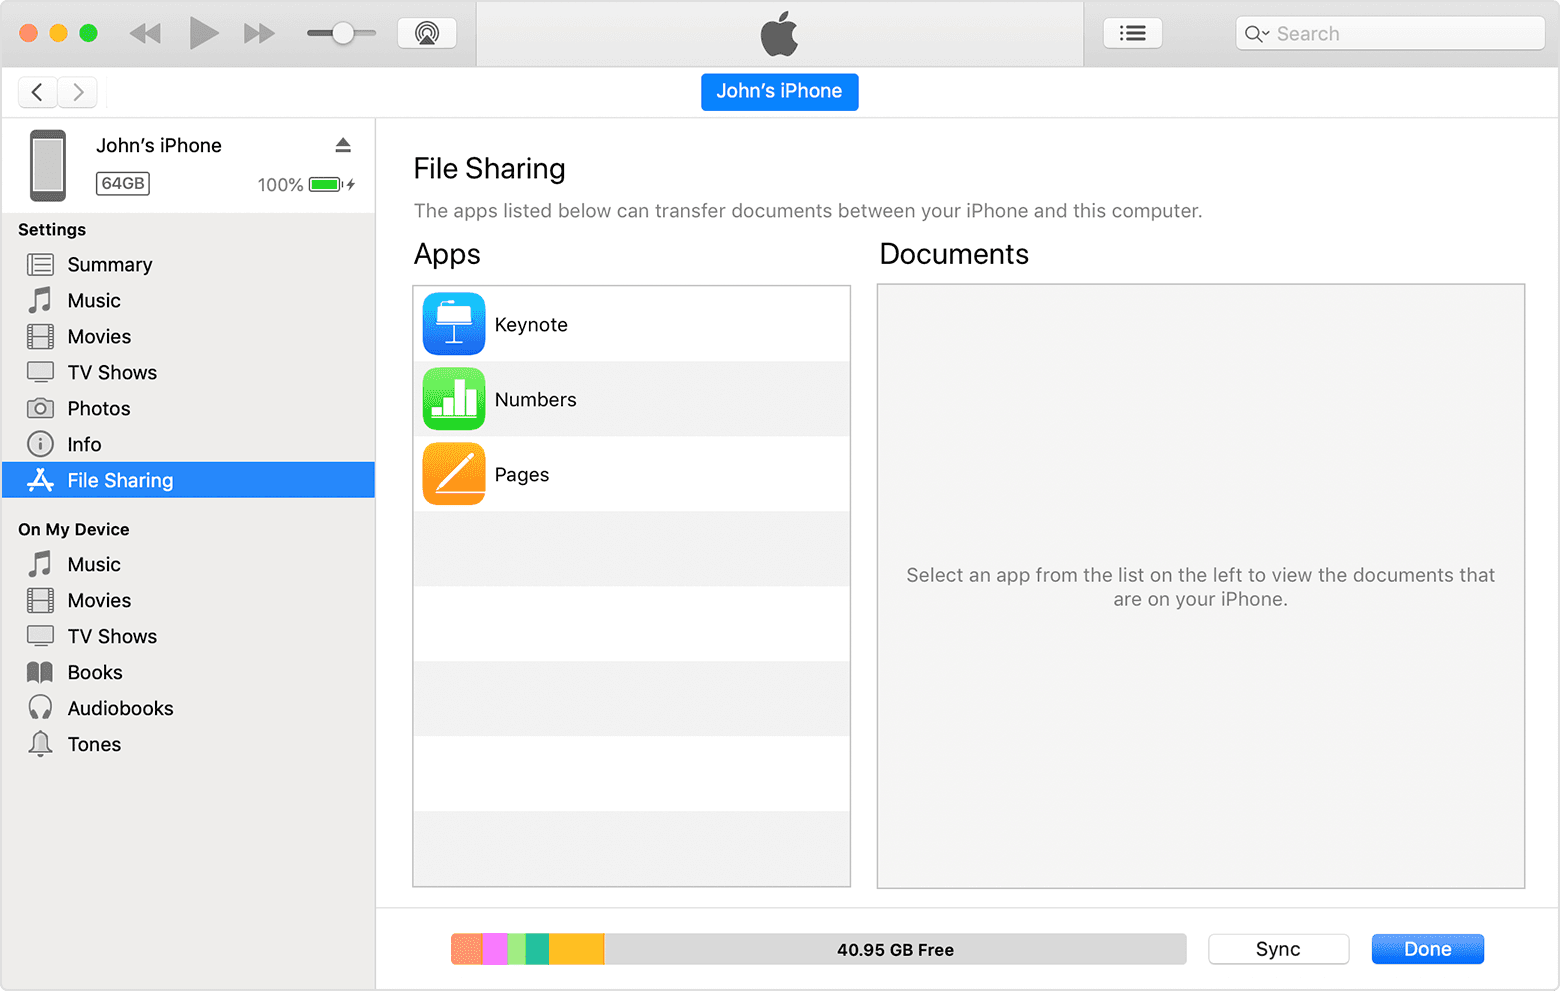
See which of your iOS and iPadOS apps can share files with your computer
- Open iTunes on your Mac or PC.
- Connect your iPhone, iPad, or iPod touch to your computer using the USB cable that came with your device.
- Click your device in iTunes. Get help if you can’t find it.

- In the left sidebar, click File Sharing.
- Select an app to see which files are available for sharing in that app on your device. If you don’t see a File Sharing section, your device has no file-sharing apps.

Copy files from your computer to your iOS or iPadOS app
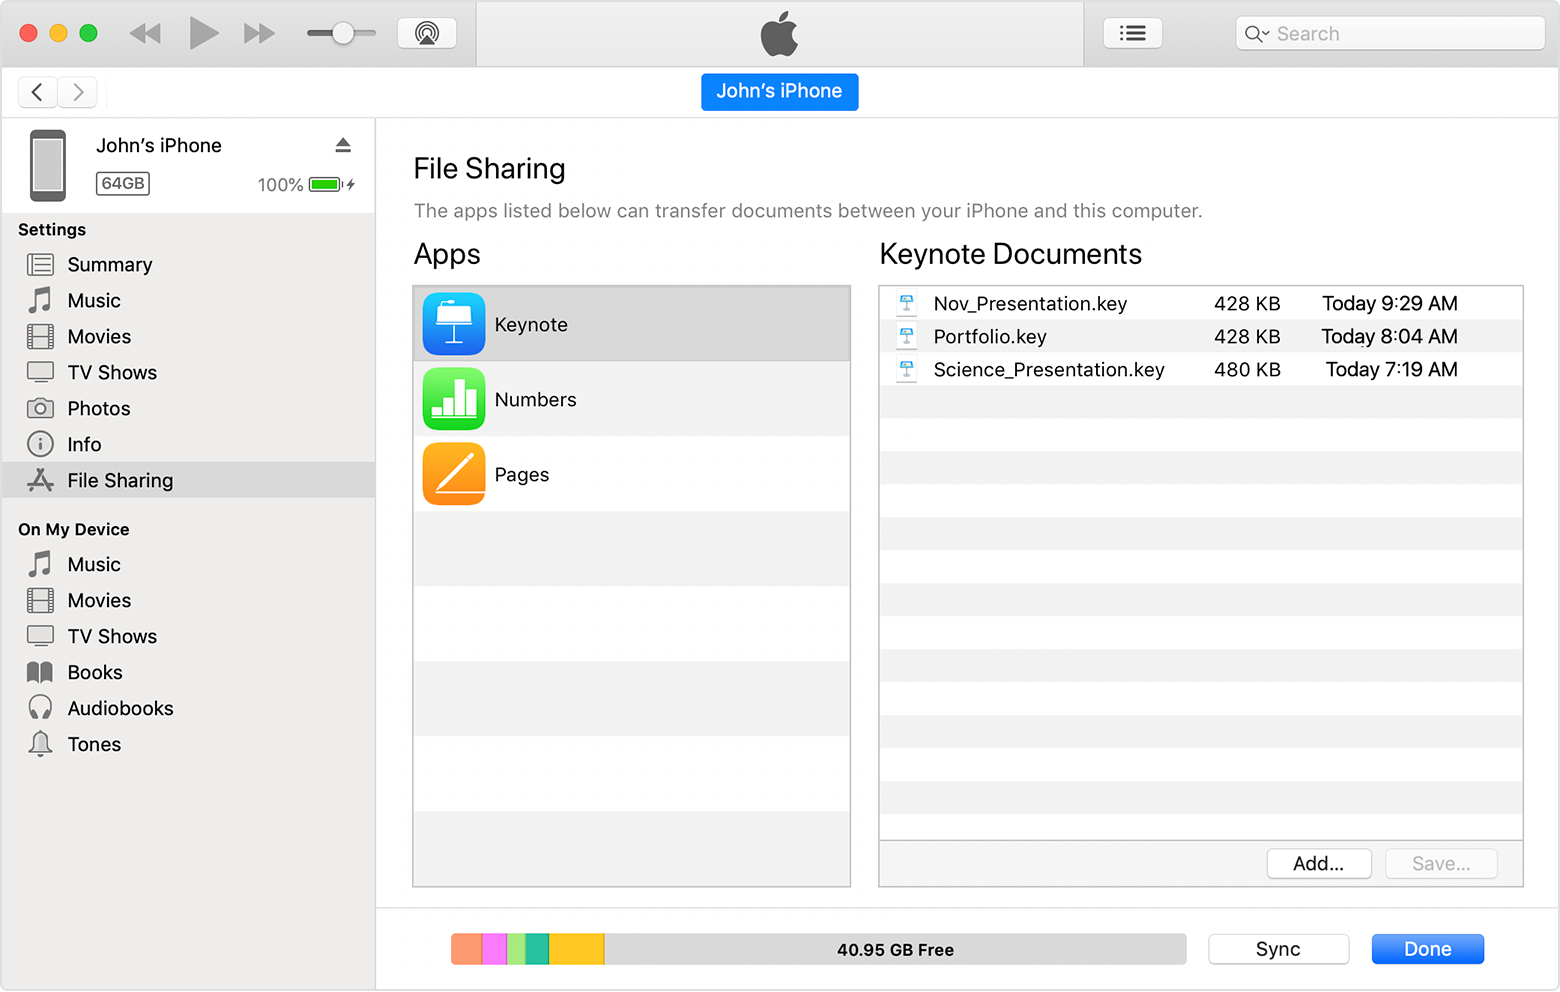
- In iTunes, select the app from the list in the File Sharing section.
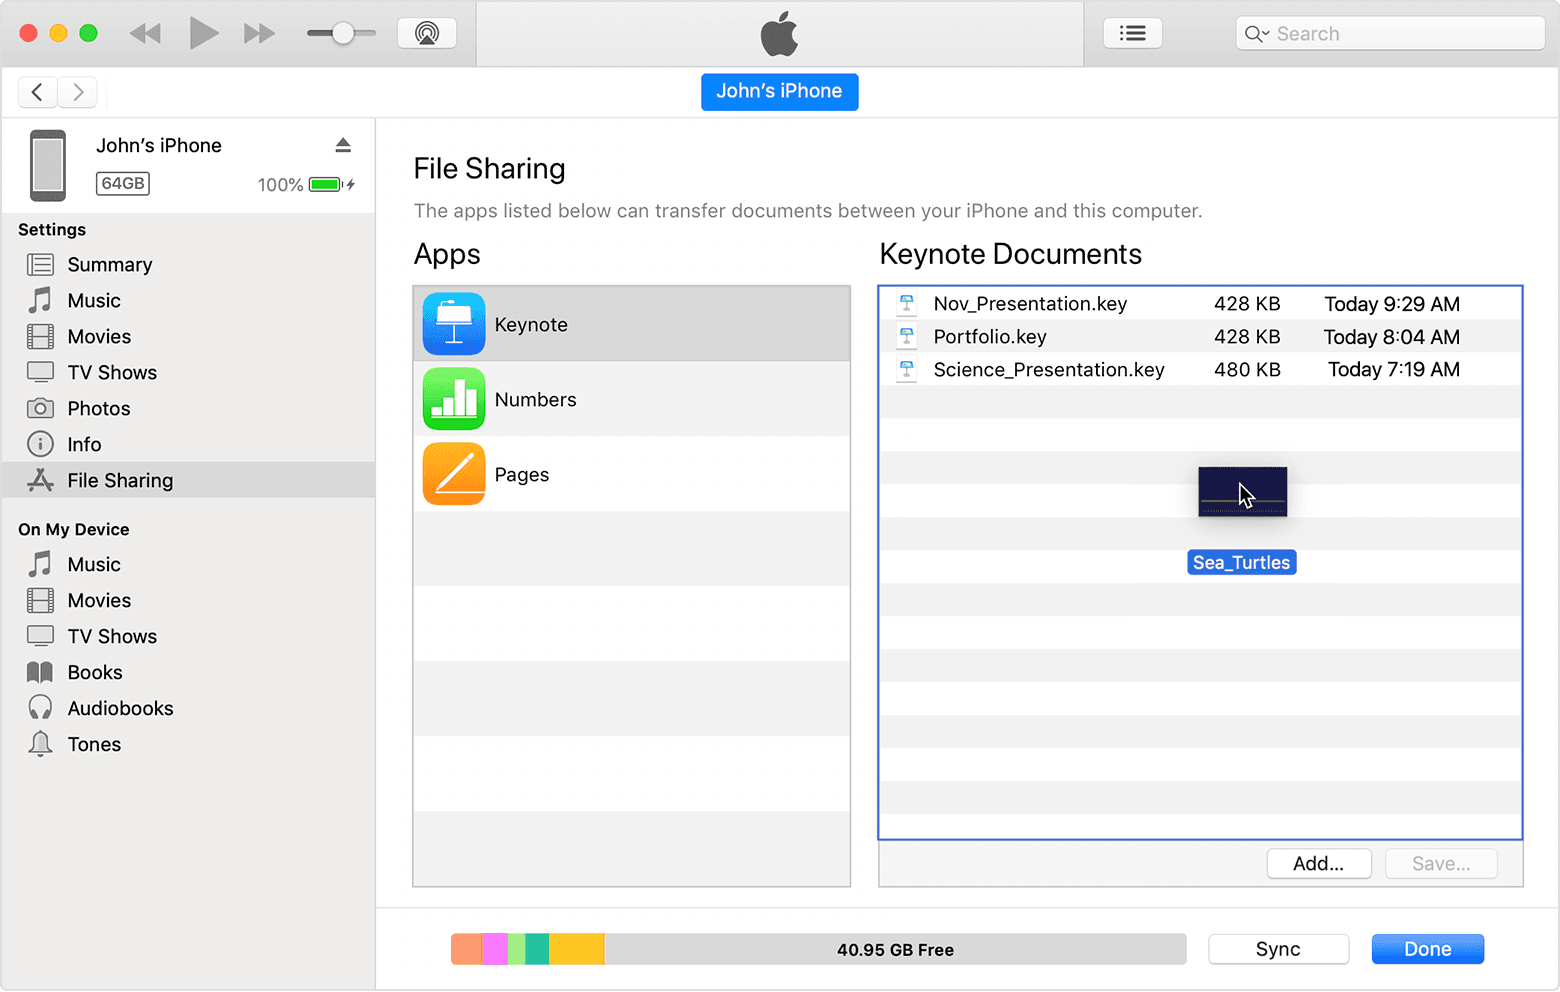
- Drag and drop files from a folder or window onto the Documents list to copy them to your device.
You can also click Add in the Documents list in iTunes, find the file or files you want to copy from your computer, and then click Add. iTunes copies these files to the app on your device. Choose only files that will work with the app. Check the app’s user guide to learn which kinds of files will work.
Copy files from an iOS or iPadOS app to your computer
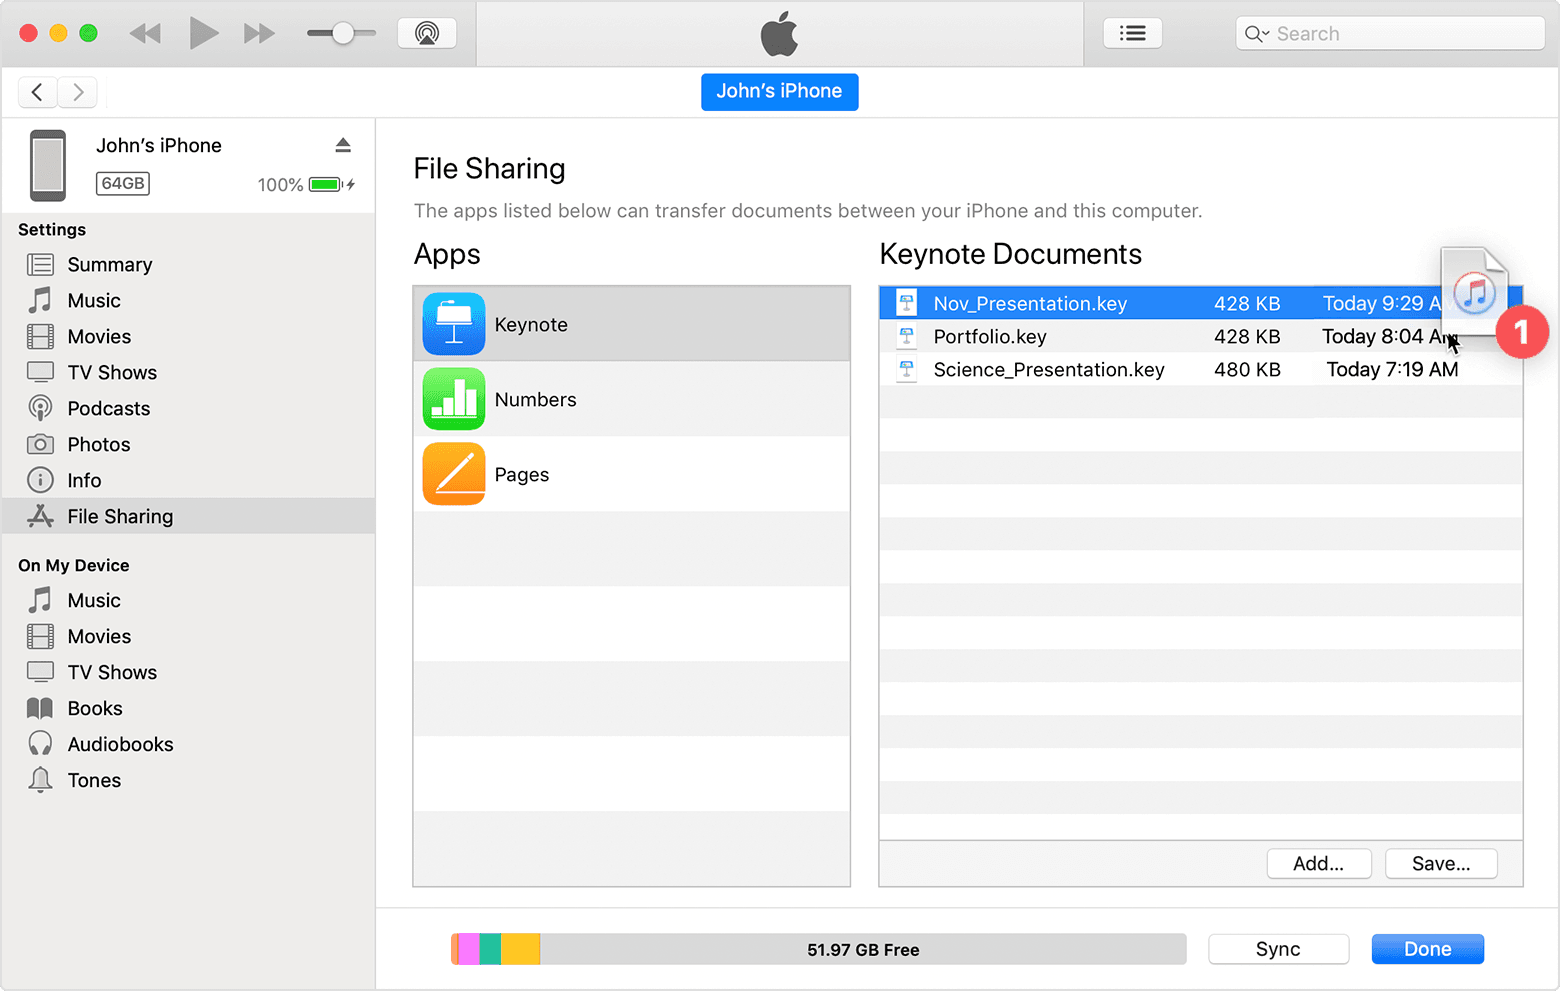
- In iTunes, select the app from the list in the File Sharing section.
- Drag and drop files from the Documents list to a folder or window on your computer to copy them to your computer.
You can also select the file or files that you want to copy to your computer from the Documents list and click «Save» then find the folder on your computer to which you want to copy the files and click Save.
Open shared files
On your iOS device, you can open the files from your computer with the app that you chose for File Sharing.
You can’t access these files from other apps or locations on your device. You can see the list of files in the File Sharing section of iTunes when your device is connected to your computer.
Back up shared files
When iCloud (or iTunes) backs up your device, it backs up your shared files as well.
If you delete an app with shared files from your iOS device, you also delete those shared files from your device and your iCloud or iTunes backup. To avoid losing shared files, copy the files to your computer before deleting the app from your iOS device.
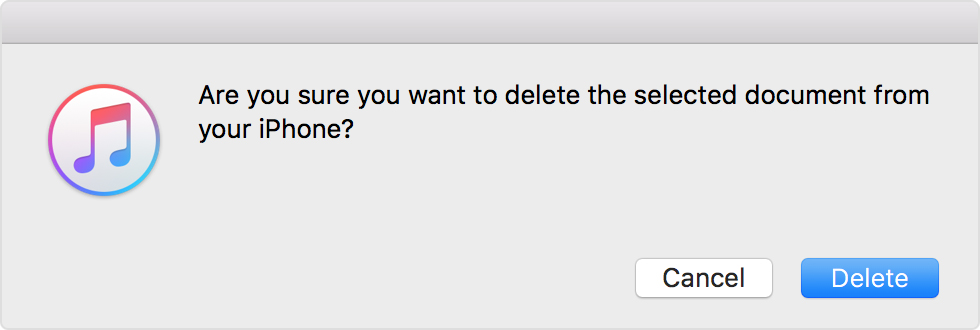
Delete a shared file from your iOS device
To delete a file you copied to an iOS or iPadOS app using File Sharing, follow these steps:
- Open iTunes on your Mac or PC.
- Connect your iPhone, iPad, or iPod touch to your computer using the USB cable that came with your device.
- Select your device in iTunes. Get help if you can’t find it.
- Select the app from the list in the File Sharing section.
- Select the file that you want to delete in the Documents list, then press the Delete key on your keyboard.
- When iTunes asks you to confirm, click Delete.
There might be other ways to delete files from an app. Read your app’s user guide to find out more.
Источник
Синхронизация контента iTunes на ПК с другими устройствами по сети Wi-Fi
Если Вы подключены к сети Wi-Fi и у Вас есть iPhone, iPad или iPod touch с iOS 5 (или новее), Вы можете выполнять синхронизацию устройства (добавлять на него объекты с компьютера), не подсоединяя устройство к компьютеру (если компьютер и устройство подключены к одной сети).
При автоматической синхронизации устройства по сети Wi-Fi используются те же настройки, которые Вы выбрали для синхронизации через кабель.
Включение синхронизации по сети Wi-Fi
Подключите устройство к компьютеру.
Для подключения устройства можно использовать кабель USB или USB-C, а также подключение к сети Wi-Fi. Чтобы подключить устройство с помощью кабеля, см. Синхронизация контента iTunes на ПК с другими устройствами.
В приложении iTunes  на ПК нажмите кнопку устройства в левой верхней части окна iTunes.

Установите флажок «Синхронизировать с этим [устройством] по Wi-Fi».
Нажмите кнопку «Применить».
При отсоединении устройства от компьютера значок устройства будет по-прежнему отображаться в iTunes, пока Вы не нажмете кнопку «Извлечь»  .
.
После нажатия кнопки «Извлечь» устройство исчезнет, но синхронизация по сети Wi-Fi останется включенной. Значок устройства снова появится при следующем запуске iTunes (если компьютер и устройство подключены к одной сети Wi-Fi).
Синхронизация устройства по сети Wi-Fi
Ниже описаны способы беспроводной синхронизации, когда устройство и компьютер подключены к одной сети Wi-Fi (компьютер должен быть включен).
Подключите свое устройство к источнику питания. Синхронизация начнется автоматически.
В приложении iTunes на ПК нажмите значок устройства, затем нажмите кнопку «Синхронизировать».
Примечание. Для восстановления программного обеспечения iOS или iPadOS устройства и восстановления заводских настроек необходимо подключить устройство к компьютеру.
Устройство можно синхронизировать по беспроводной сети с несколькими компьютерами, но содержимое каждого типа можно синхронизировать только с одним компьютером.
Синхронизация по сети Wi-Fi происходит медленнее, чем по кабелю. Если подключить устройство к компьютеру кабелем во время синхронизации по сети Wi-Fi, то синхронизация продолжится по кабелю. Если отключить кабель устройства от компьютера во время синхронизации, то синхронизация прекратится, даже если синхронизация по сети Wi-Fi включена на устройстве.
Источник
All Tips about «Connect iPhone to iTunes»
iTunes is a perfect solution to transfer music and videos if you are using iPhone as per apple because it is official software which allows you to manage your iPhone data and other idevices data as well. While using IOS devices you must know that how to connect iPhone to iTunes and fix some errors like iPhone can’t connect to iTunes. If you don’t know about these things then you can’t manage your IOS devices music and videos or other files by using iTunes. You need to go for other third party software like Wondershare TunesGo which enables you to manage IOS devices data very easily and quickly. So to overcome these all issues I am going to tell you about how to connect iPhone to iTunes and the best alternative of iTunes through this guide today.
Part 1. All Tips about Connect iPhone to iTunes
Tip #1. Upgrade the latest version of iTunes
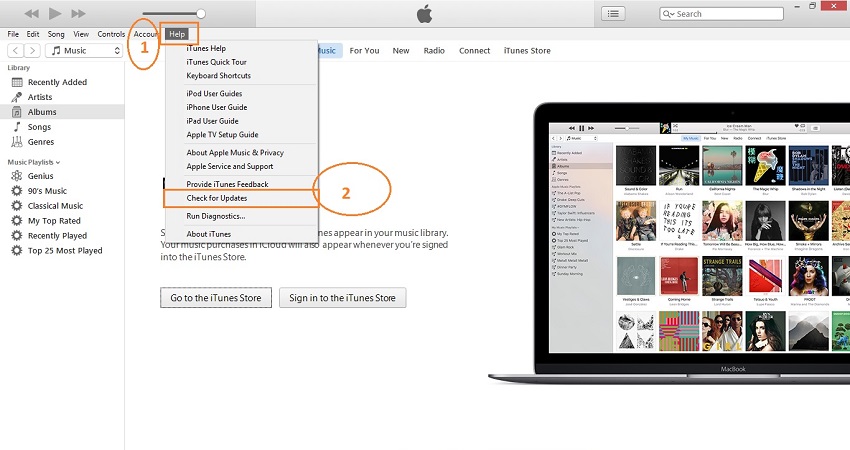
If you are trying to connect iPhone to iTunes and it is not connecting and you are getting errors, then the first thing you must check for the updates of the latest version of iTunes. Apple always update iTunes with new features so you must have latest iTunes installed on your computer or mac before connecting any IOS device.
To check the updates of iTunes click on Help > Check for updates. If updates are available then please download and install it on your computer.
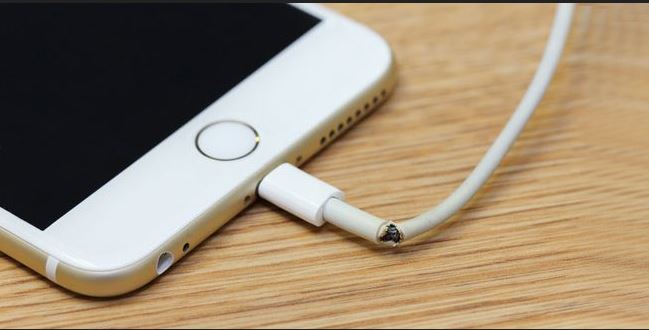
Tip #2. Check the USB cable
Sometimes there is a reason of getting error while connecting iPhone with iTunes is that your USB cable is not working properly. You must check that your USB cable is working or not. To check your USB cable you can replace the cable by other USB cable. If that USB cable is working and your iPhone is connecting to iTunes then problem is with your old USB cable.
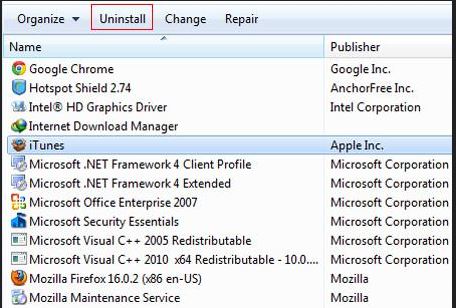
Tip #3. Remove the iTunes and re-install it
The possible reason of iPhone not connecting to iTunes is that any of the iTunes file is corrupted or it is not working properly. In that case you must uninstall your iTunes first from your computer and then visit the official apple page of iTunes and download and install iTunes again on your computer. After installing the iTunes again try to connect your iPhone. Chances are there that this time your iPhone will be connected.
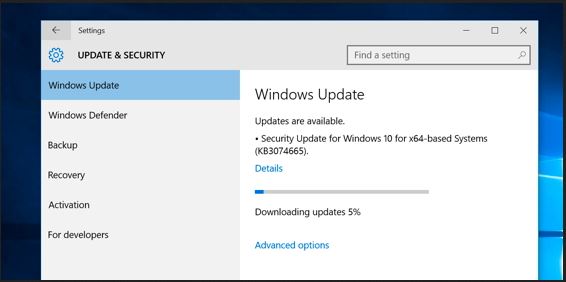
Tip #4. Update windows if you are using windows 10
Windows 10 is preferred operating system today because of its great features. Windows 10 automatically update system windows and install the latest updates. But if you facing problem in connecting iPhone to iTunes, then you have to check for the windows updates as well. Because this thing also can create problem for you. To check for updates go to: Setting > Update and Security > Windows update.
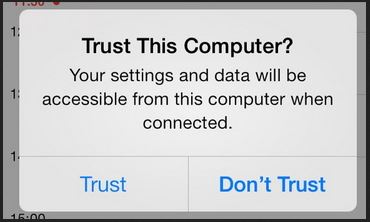
Tip #5. Trust your iPhone
If you are connecting your iPhone first time with iTunes using computer, you must tap on Trust this computer on your iPhone. When you connect iPhone to computer, you should tap on “Trust” button on iPhone when prompt windows ask you to “Trust This Computer?”
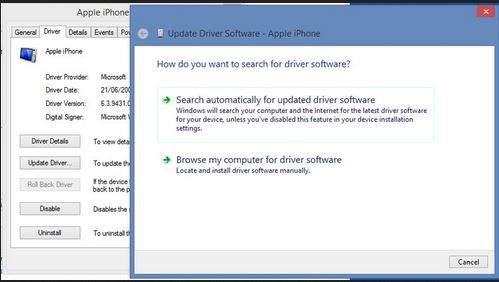
Tip #6. Update your iPhone driver
This one also can be one of the reason of iPhone not connecting to iTunes error. You can solve this problem by updating your iPhone driver in windows directly. To check for the updates of iPhone driver just open control Panel on windows and click on hardware and sound. In this tab you can see iPhone there under the “Unspecified” section. Right click on the iPhone and click on Properties.
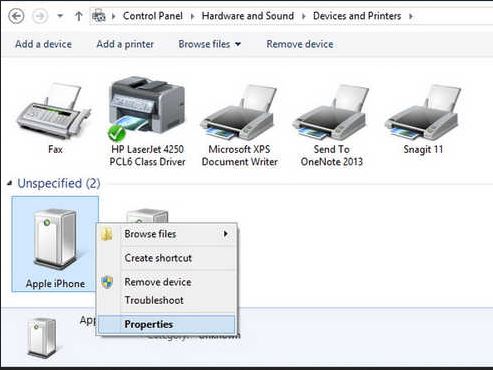
In the properties menu you need to click on the driver tab and then Update Driver. Here search for drive automatically or upload driver from your local computer and click on Next.
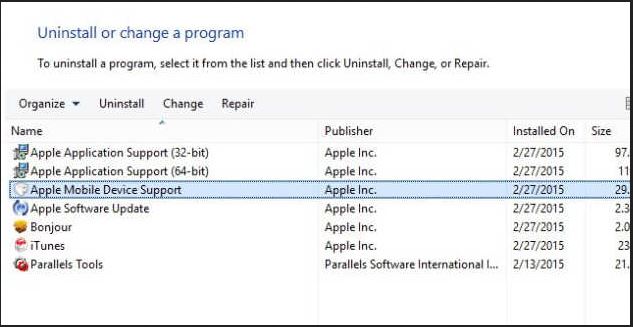
Tip #7. Check Apple mobile device
After trying all solution above if you can’t solve the problem then you can check that apple mobile device service is installed or not. Go to Control Panel > Uninstall a program.
Part 2: Connect iPhone to iTunes without launching iTunes itself
After trying all solutions in the above part if your iPhone is still not connecting to iTunes, you can go for this solution. It will connect your iPhone with computer without launching iTunes itself. This solution is available from Wondershare with name TunesGo. Wondershare TunesGo is able to connect your iPhone or any other idevice with computer without iTunes and manage anything on your idevices whatever you want. This software enables you to manage android devices as well.
Step 1 Download Wondershare TunesGo on your computer by visiting below URL and install it for windows or mac. Below screenshot is the welcome screen of the Wondershare TunesGo.
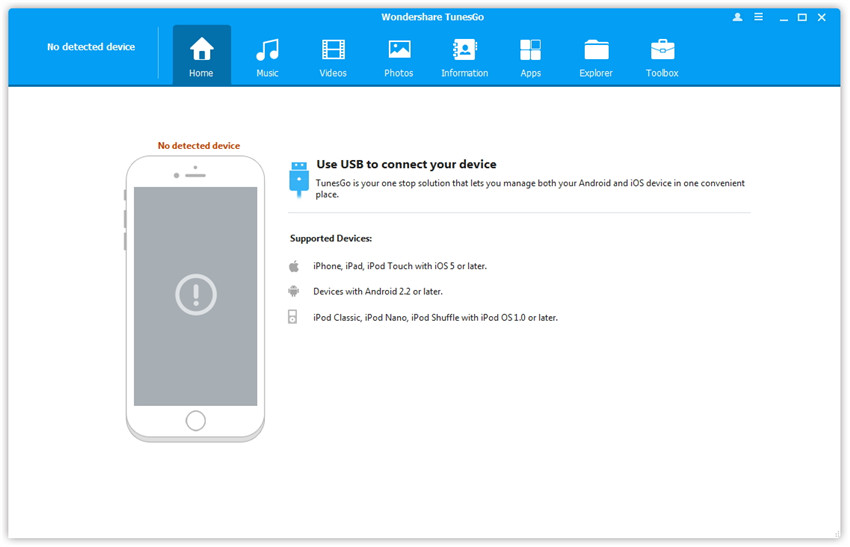
Step 2 Now you have to connect iPhone with computer by using cable which is came with your iPhone. TunesGo will detect and show your iPhone automatically in the TunesGo interface.

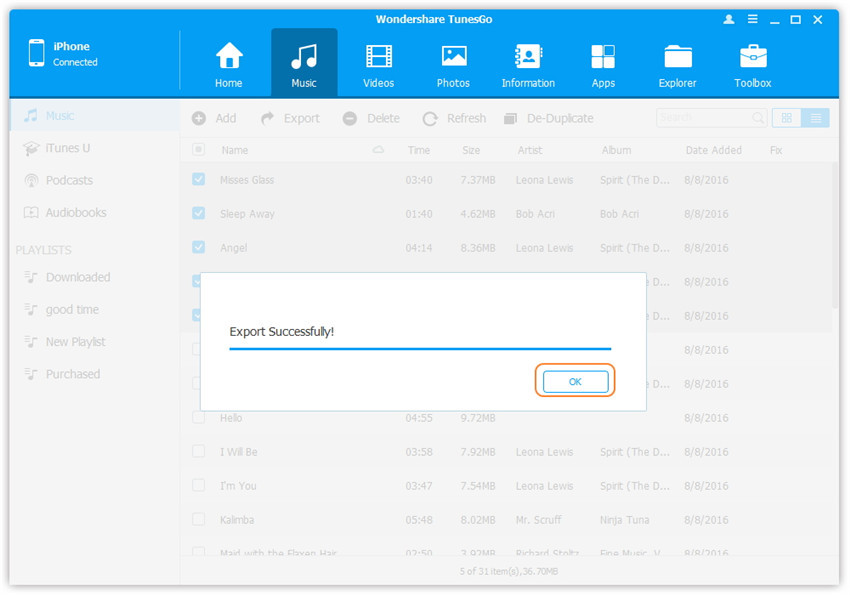
Step 3 Now click on the music tab and here you can see all available music files of your iPhone. Now just select the music which you want to transfer to iTunes. Once music is selected, click on Export button and then select “Export to iTunes”.

Step 4 That’s it your selected music files will be transferred to iTunes library automatically in some time.
Part 3. Comparison table
Above are some things which we have discussed in the part 1 and part 2. In the part 1 we told about the issue and solution while using iTunes to manage media files of your iPhone. in the second par we have told you about the Wondershare TunesGo software which is a management software for windows and mac devices. There are so many benefits while using Wondershare TunesGo to manage your IOS and android devices data. Wondershare TunesGo is a one click solution to all problems related to iPhone not connecting to iTunes. TunesGo allows you to do more than iTunes with your IOS devices.
Источник


