- If your iPhone, iPad or iPod touch is lost or stolen
- Look for your device on a map
- Mark as Lost
- Report your missing device to the police
- File a Theft and Loss claim
- Erase your device remotely
- Contact your wireless network provider
- Remove your missing device from your account
- Set up and use iCloud Contacts
- Set up iCloud Contacts
- On your iPhone, iPad, or iPod touch
- On your Mac
- On iCloud.com or iCloud for Windows
- Add Contacts from third-party accounts
- Use the Finder or iTunes to sync Contacts
- If you have trouble setting up iCloud Contacts
- Manage and delete contacts on your iPhone, iPad, or iPod touch
- Set up your contacts account
- Turn Contacts on or off for an account
- Choose a default account to add new contacts
- Change how you sort and display contacts
- Delete a contact
- If you forgot your iPhone passcode
- Step 1: Make sure that you have a computer (Mac or PC)
- Step 2: Turn off your iPhone
- Step 3: Put your iPhone in recovery mode
- Step 4: Restore your iPhone
- Need more help?
If your iPhone, iPad or iPod touch is lost or stolen
If you lose your iPhone, iPad or iPod touch or think it might have been stolen, use Find My and protect your data.
Look for your device on a map
To find your device, sign in to iCloud.com/find. Or use the Find My app on another Apple device that you own.
If your iPhone, iPad or iPod touch doesn’t appear in the list of devices, Find My was not turned on. But you can still protect your account if Find My was not turned on.
Mark as Lost
When you mark your device as lost, you lock it remotely with a passcode, keeping your information secure. This also disables Apple Pay on the missing device. And you can display a custom message with your contact information on the missing device.
Report your missing device to the police
The police might request the serial number of your device.
File a Theft and Loss claim
If your missing iPhone is covered by AppleCare+ with Theft and Loss, file a claim for an iPhone replacement.
Erase your device remotely
After you erase a device, you can’t track its location, so make sure you no longer need to search for the device. If you have AppleCare+ with Theft and Loss, do not erase your iPhone until your claim has been approved.
Contact your wireless network provider
If the missing device is an iPhone or an iPad with cellular, report your missing device to your wireless network provider. Ask the network provider to disable your account to prevent calls, texts and data use. And if your device is covered under your wireless network provider plan, file a claim.
Remove your missing device from your account
If you have AppleCare+ with Theft and Loss, do not remove your lost iPhone from your account until your claim has been approved.
Go to appleid.apple.com/uk to remove the missing device from your list of trusted devices.
AppleCare+ with Theft and Loss is not available in all countries and regions.
Information about products not manufactured by Apple, or independent websites not controlled or tested by Apple, is provided without recommendation or endorsement. Apple assumes no responsibility with regard to the selection, performance or use of third-party websites or products. Apple makes no representations regarding third-party website accuracy or reliability. Contact the vendor for additional information.
Источник
Set up and use iCloud Contacts
With iCloud, you can have your contacts in your pocket and on your desktop. When you add or update a contact, iCloud makes the change everywhere.
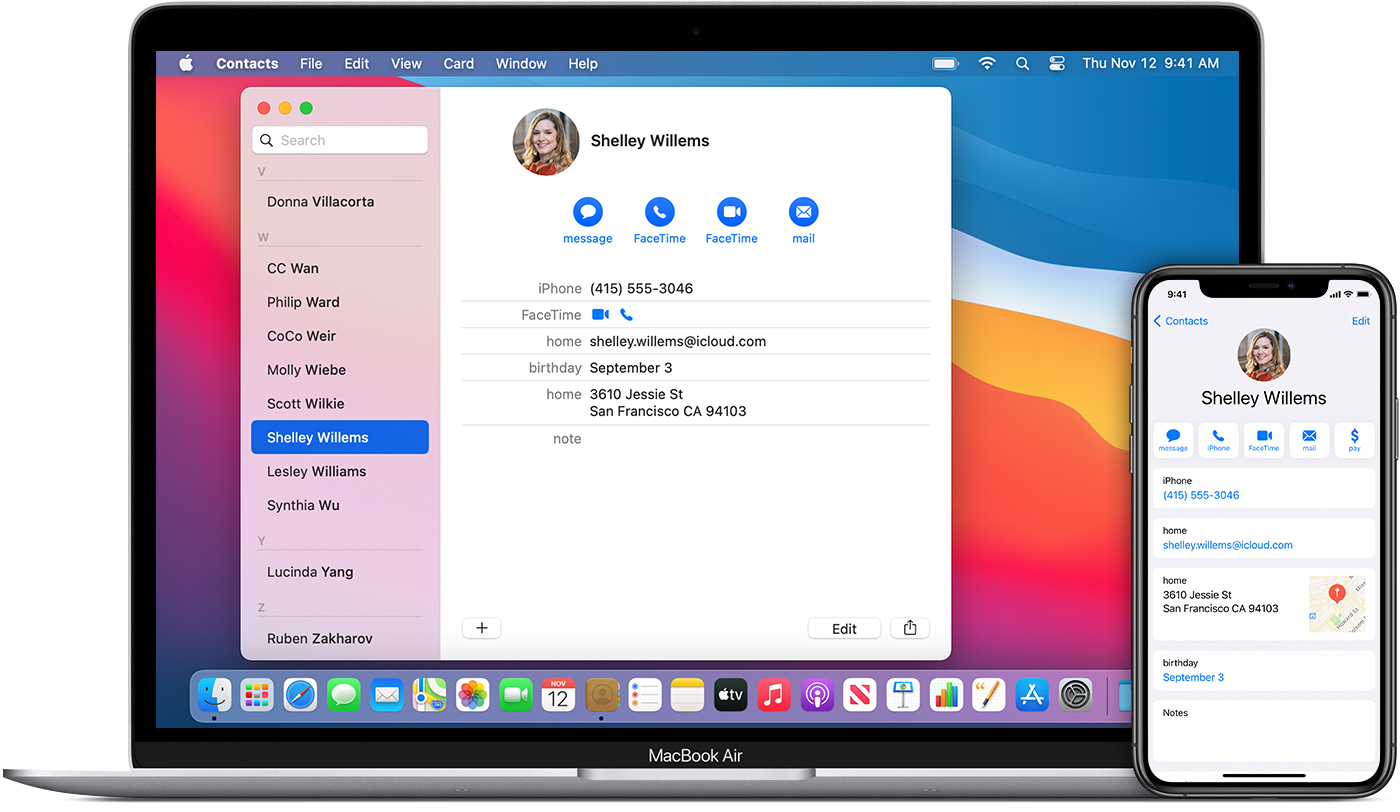
Set up iCloud Contacts
When you turn on iCloud Contacts, all of the information* stored on separate devices uploads to iCloud. If you turn off iCloud Contacts, your information won’t automatically move from iCloud back to your device.
On your iPhone, iPad, or iPod touch
- Go to Settings > [your name] > iCloud.
- Turn on Contacts.
- When you’re asked if you want to Merge or Cancel, tap Merge.
All of the information stored in Contacts uploads to iCloud.
On your Mac
- From the menu bar at the top of your computer screen, choose Apple menu > System Preferences, then click Apple ID. If you’re using macOS Mojave or earlier, you don’t need to click Apple ID.
- Click iCloud.
- Select Contacts.
All of the information* stored in Contacts uploads to iCloud.
* If you have contacts information stored On My Mac, that information will not automatically sync. In Contacts, drag a contact from On My Mac to All iCloud, or export your contacts as Vcards, then manually sync with the Finder.
On iCloud.com or iCloud for Windows
After you turn on iCloud Contacts on your iPhone, iPad, iPod touch, or Mac, your contacts upload to iCloud. You can find and edit your contacts on iCloud.com or in iCloud for Windows. Any changes that you make automatically update on your other devices.
If you turn off iCloud Contacts on your iPhone, iPad, iPod touch, or Mac, your contacts won’t delete from iCloud, they won’t update automatically, and any changes you make won’t update across your other devices.
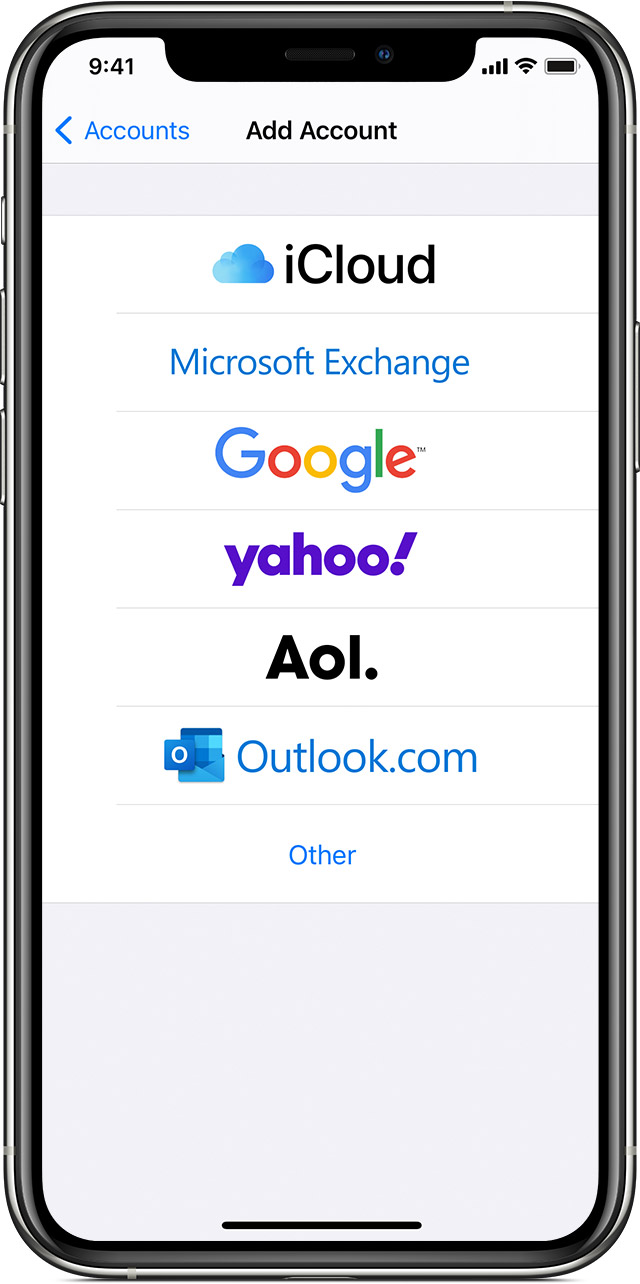
Add Contacts from third-party accounts
If you store contacts in a third-party email service, you can add the email account to your iPhone, iPad, or iPod touch. Then, check that Contacts is enabled.
If you experience sync-related issues, disable the account.
Use the Finder or iTunes to sync Contacts
If you don’t want to manage your contacts with iCloud, or if you want to do a one-time sync, sync your Contacts manually with the Finder or iTunes.
When you sync with the Finder or iTunes, your information stores locally on your devices. There can be differences in information if you update one of your devices in between syncs. For example, if you delete contacts from your computer after syncing with your iPhone, iPad, or iPod touch, the next time you sync with your computer, those contacts will delete from your iOS or iPadOS device, too.
If you have trouble setting up iCloud Contacts
- Update your iPhone, iPad, or iPod touch to the latest version of iOS and iPadOS, and your Mac to the latest version of macOS.
- Make sure that you’re signed in to iCloud with the same Apple ID on all of your devices.
- Set up iCloud on all of your devices. If you have a PC, download iCloud for Windows.
- Make sure that you’re connected to Wi-Fi or have an active Internet or cellular connection.
- Learn what to do if you see duplicate contacts after setting up iCloud Contacts.
- Get help if your iCloud Contacts won’t sync.
Information about products not manufactured by Apple, or independent websites not controlled or tested by Apple, is provided without recommendation or endorsement. Apple assumes no responsibility with regard to the selection, performance, or use of third-party websites or products. Apple makes no representations regarding third-party website accuracy or reliability. Contact the vendor for additional information.
Источник
Manage and delete contacts on your iPhone, iPad, or iPod touch
Learn how to set up and manage your contacts to change what shows up in the Contacts app, delete contacts, and more.
Set up your contacts account
You can set up your email accounts to share contacts with the Contacts app. If you have a contacts account, like a business or school directory, you can set that up too. Here’s how:
- Go to Settings > Contacts > Accounts.
- Tap Add Account.
- Tap the service that you have an account with. Or tap Other to set up a contacts account, like an LDAP or CardDAV account.
- Enter your information and password.
- Tap Next.
If you have multiple accounts set up in the Contacts app and want to see contacts for a specific one, open Contacts and tap Groups in the upper-left corner.

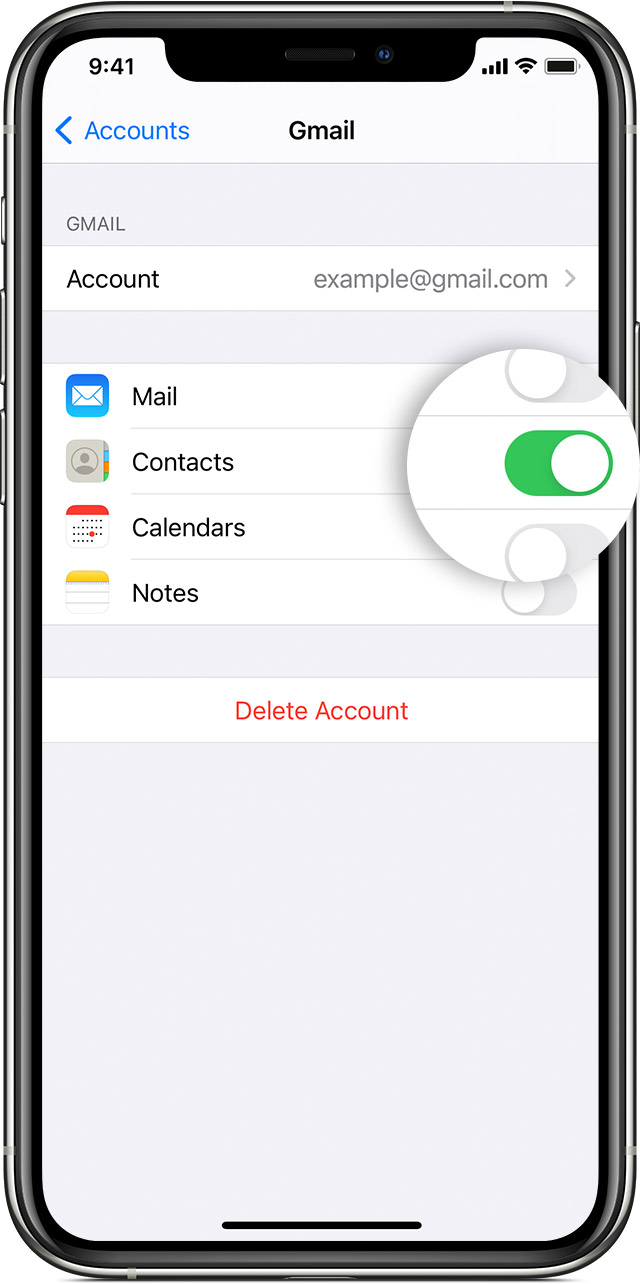
Turn Contacts on or off for an account
Want to add or remove all of the contacts from an account that you already set up? Just turn Contacts on or off for that account:
- Go to Settings > Contacts > Accounts.
- Tap the account that has contacts that you want to add or remove.
- To add contacts, turn on Contacts. To remove contacts, turn off Contacts, then tap Delete from My iPhone.
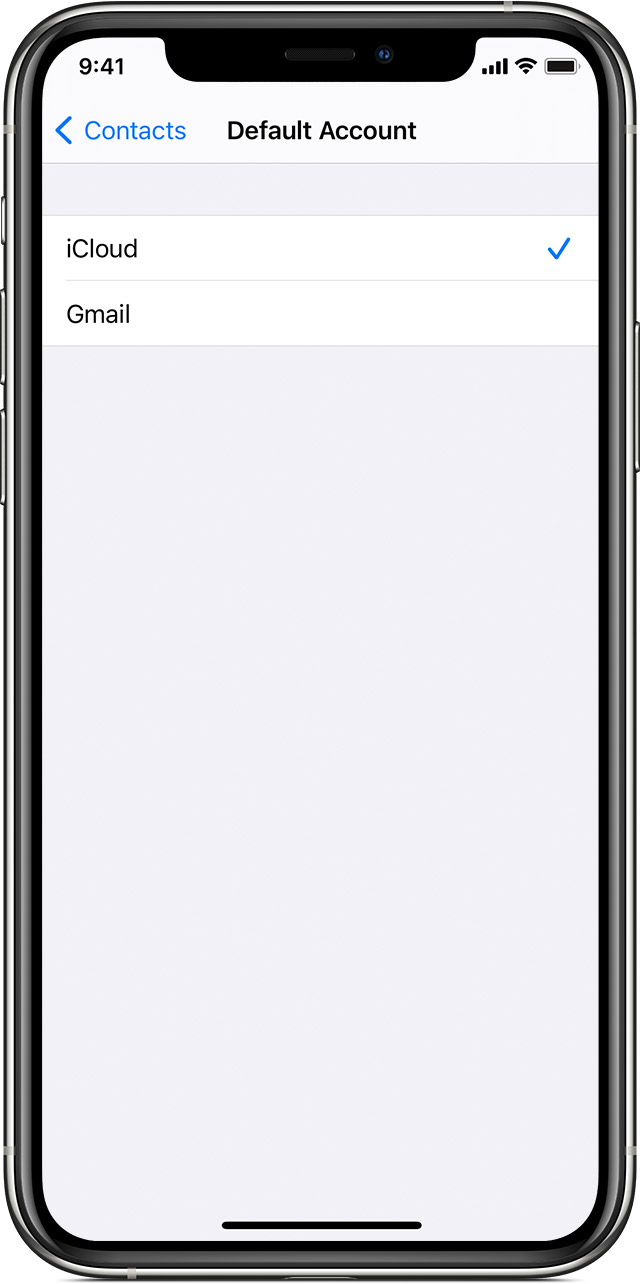
Choose a default account to add new contacts
If you set up multiple accounts in the Contacts app, you can choose a default account to add new contacts to. Just go to Settings > Contacts > Default Account and choose an account.
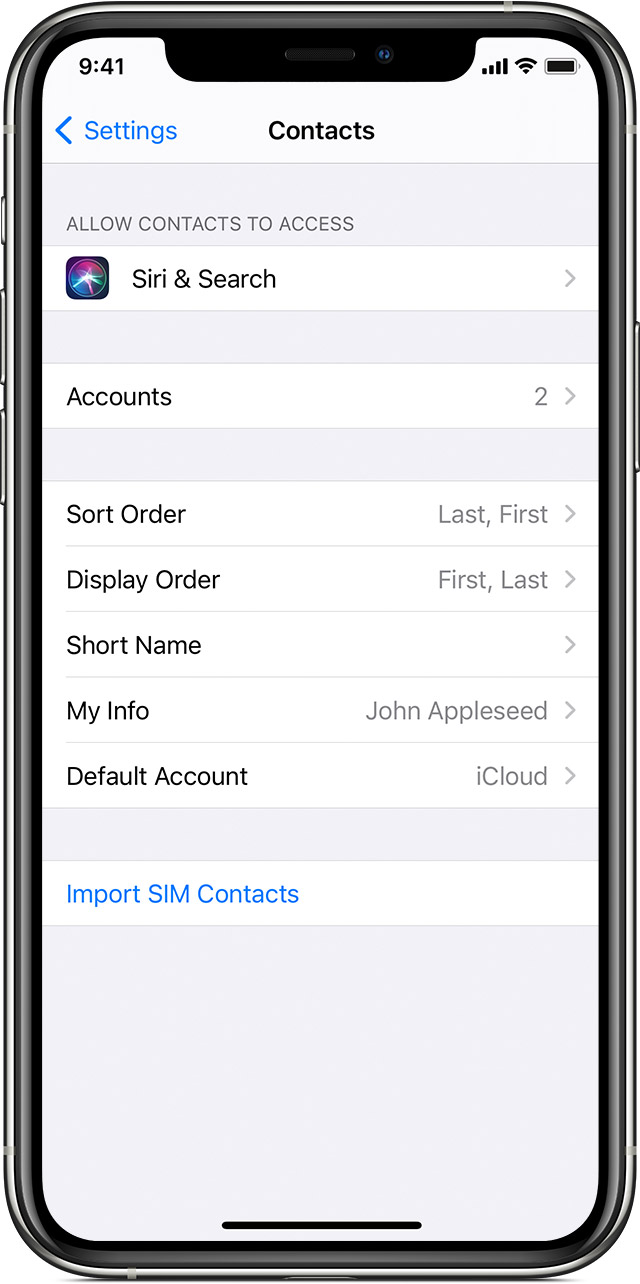
Change how you sort and display contacts
You can choose how to sort your contacts, like alphabetically by first or last name. Just go to Settings > Contacts and choose from the following:
- Sort Order: Sort your contacts alphabetically by first or last name.
- Display Order: Show contacts’ first names before or after last names.
- Short Name: Choose how your contact’s name appears in apps like Mail, Messages, Phone, and more.
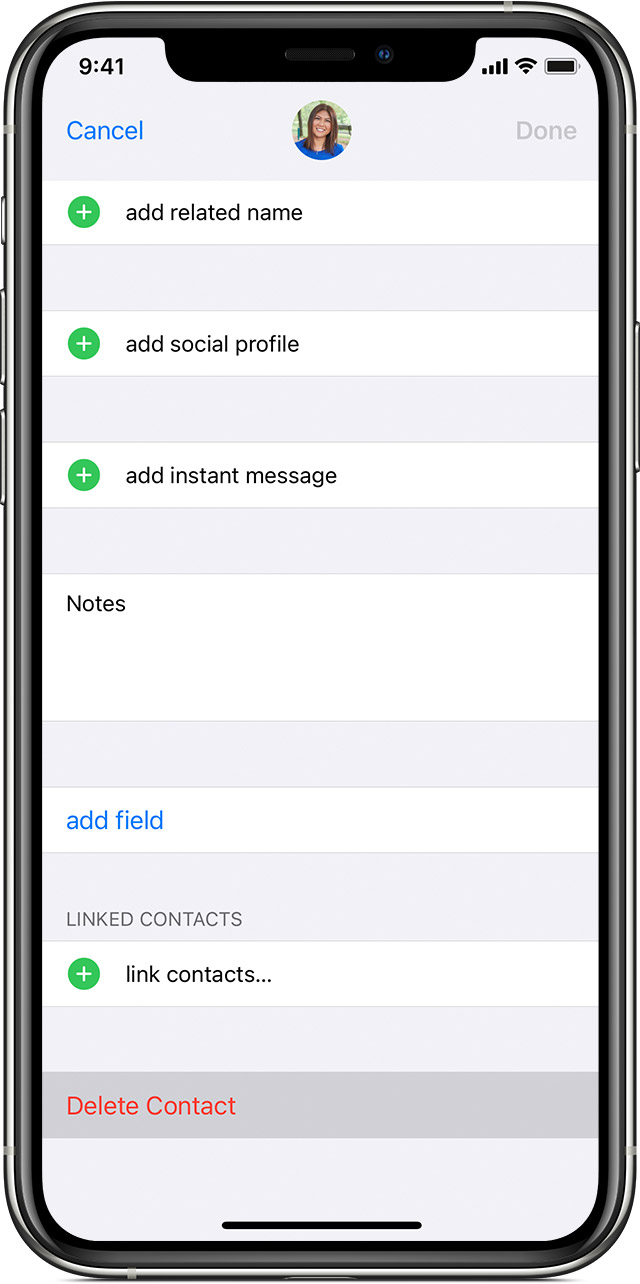
Delete a contact
When you delete a contact, it permanently deletes it from your device. And if you delete a contact from your email account, you also permanently delete the contact from all devices signed into that email account.
Here’s how to delete a contact:
- Open Contacts and tap the contact that you want to delete.
- Tap Edit.
- Scroll Down and tap Delete Contact then tap Delete Contact again to confirm.
Источник
If you forgot your iPhone passcode
Forgot your iPhone passcode? Learn how to get your iPhone into recovery mode so you can erase it and set it up again.
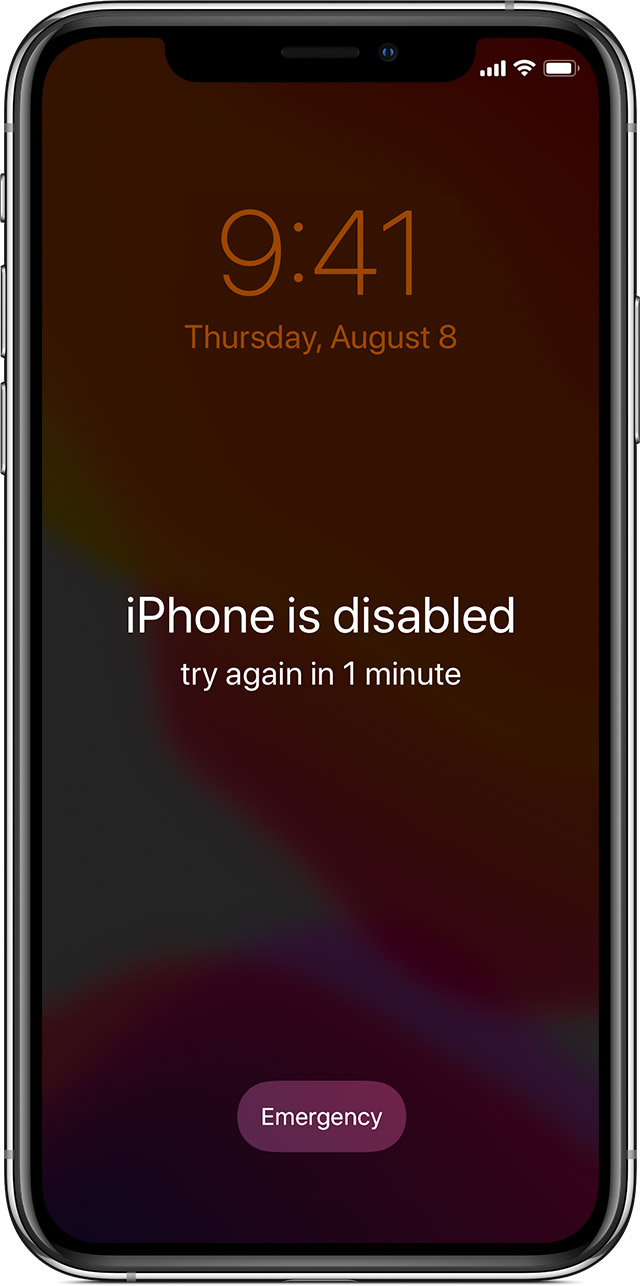
If you enter the wrong passcode on your iPhone Lock Screen too many times, an alert lets you know that your iPhone is disabled. If you can’t remember your passcode when you try again, you need to use a computer to put your iPhone in recovery mode. This process deletes your data and settings, including your passcode, giving you access to set up your iPhone again.
After you erase your iPhone, you can restore your data and settings from backup. If you didn’t back up your iPhone, you can set it up as a new device and then download any data that you have in iCloud.
![]()
Step 1: Make sure that you have a computer (Mac or PC)
This process requires a Mac or PC. If you’re using a PC, make sure that it has Windows 8 or later, and that iTunes is installed. You also need the cable that came with your iPhone, or another compatible cable, to connect your iPhone to the computer.
If you don’t have a computer and you can’t borrow one, you need to go to an Apple Retail Store or Apple Authorized Service Provider for help.
Step 2: Turn off your iPhone
- Unplug your iPhone from the computer if it’s connected.
- Turn off your iPhone using the method for your iPhone model:
- iPhone X or later, iPhone SE (2nd generation), iPhone 8, and iPhone 8 Plus: Press and hold both the Side button and the Volume down button until the power off slider appears.

- iPhone 7 and iPhone 7 Plus: Press and hold the Side button until the power off slider appears.
- iPhone SE (1st generation), and iPhone 6s and earlier: Press and hold the Side (or Top) button until the power off slider appears.
- iPhone X or later, iPhone SE (2nd generation), iPhone 8, and iPhone 8 Plus: Press and hold both the Side button and the Volume down button until the power off slider appears.
- Drag the slider to turn off your iPhone, then wait a minute to make sure that it turns off completely.
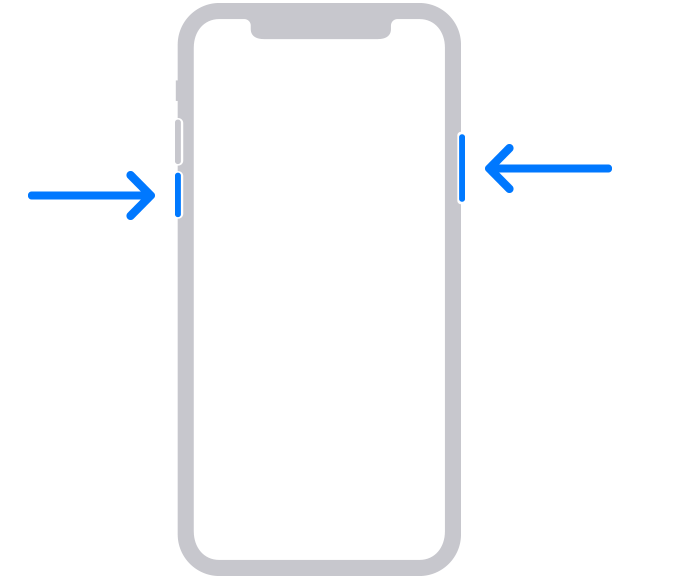

Step 3: Put your iPhone in recovery mode
- Get ready by finding the button on your iPhone that you’ll need to hold in the next step:
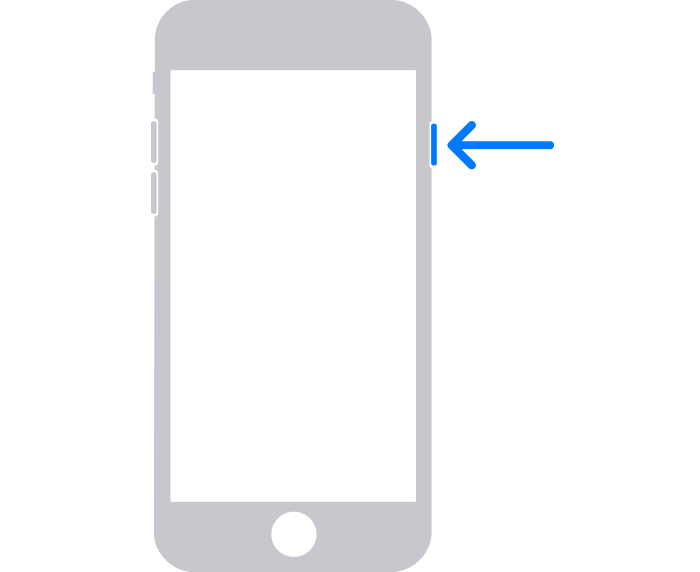
- iPhone X or later, iPhone SE (2nd generation), iPhone 8, and iPhone 8 Plus use the Side button.
- iPhone 7 and iPhone 7 Plus use the Volume down button.
- iPhone SE (1st generation), and iPhone 6s and earlier use the Home button.
- Press and hold the correct button for your iPhone while immediately connecting your iPhone to the computer. Don’t let go of the button.
- Keep holding the button until you see the recovery mode screen on your iPhone, then let go.
If you see the passcode screen, you need to turn off your iPhone and start again.
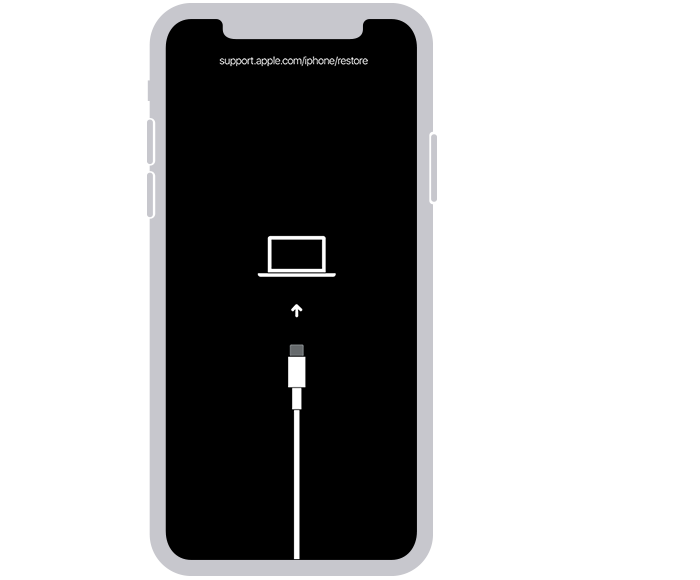
If you can’t get your iPhone to show the recovery mode screen and you need help, contact Apple Support.
Step 4: Restore your iPhone
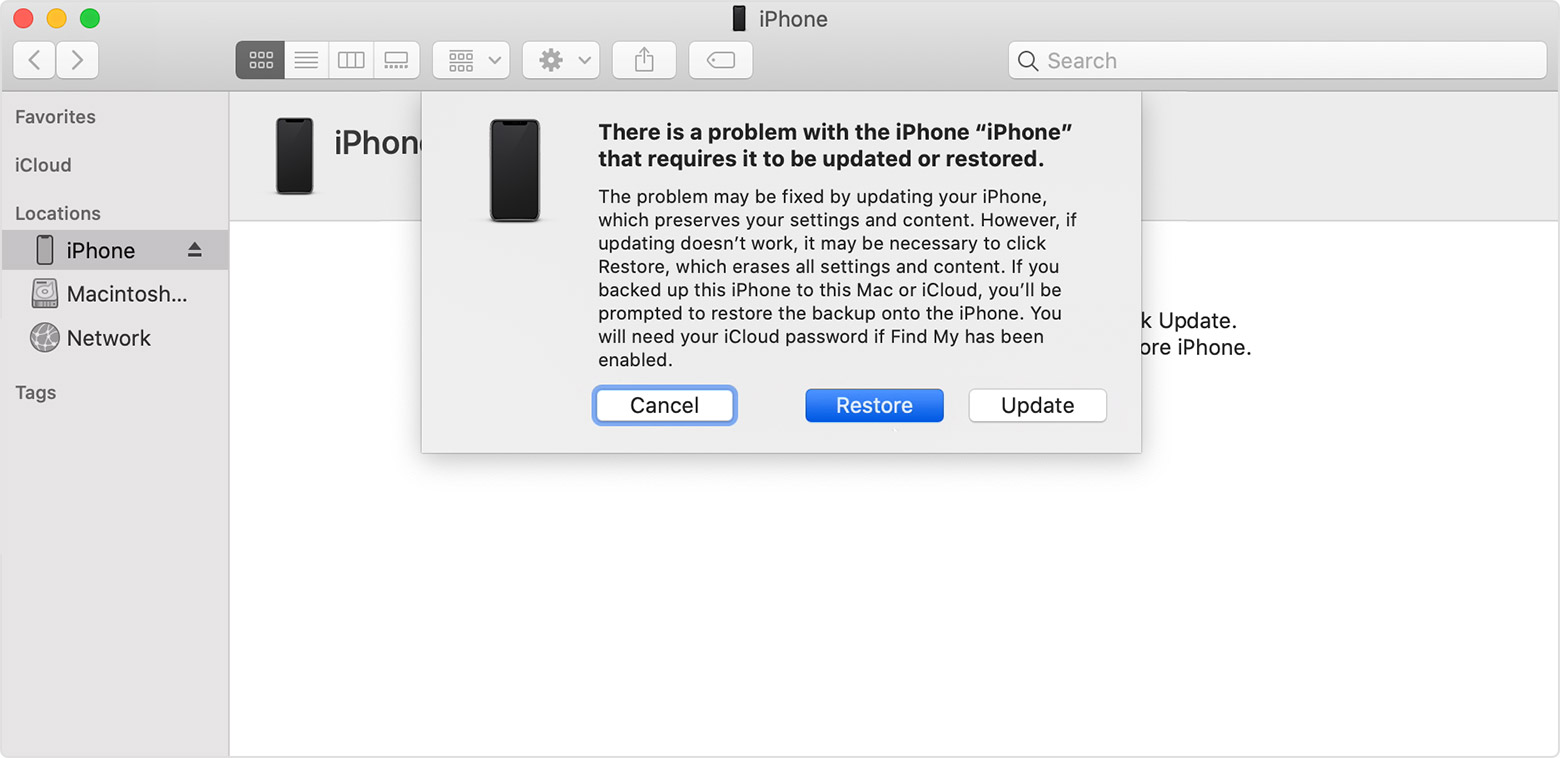
- Locate your iPhone in the Finder or in iTunes on the computer that it’s connected to. (Learn how to find your connected iPhone.)
- Choose Restore when you see the option to Restore or Update. Your computer downloads software for your iPhone and begins the restore process. If the download takes more than 15 minutes and your device exits the recovery mode screen, let the download finish, then turn off your iPhone and start again.
- Wait for the process to finish.
- Disconnect your iPhone from the computer, then set up and use your iPhone.
Need more help?
If you can’t complete any of these steps, if you’re still prompted for a passcode, or if you need any other assistance, contact Apple Support.
Источник


