- Content-aware scaling
- Resize images and protect content
- Изменение масштаба изображения с помощью Content-Aware Scale
- Выбор фото
- Изменение размера холста
- Защита от искажения
- Сохранение выделения
- Масштабирование изображения
- Content Aware Scaling Meme
- Content Aware Scaling
- About
- Origin
- Spread
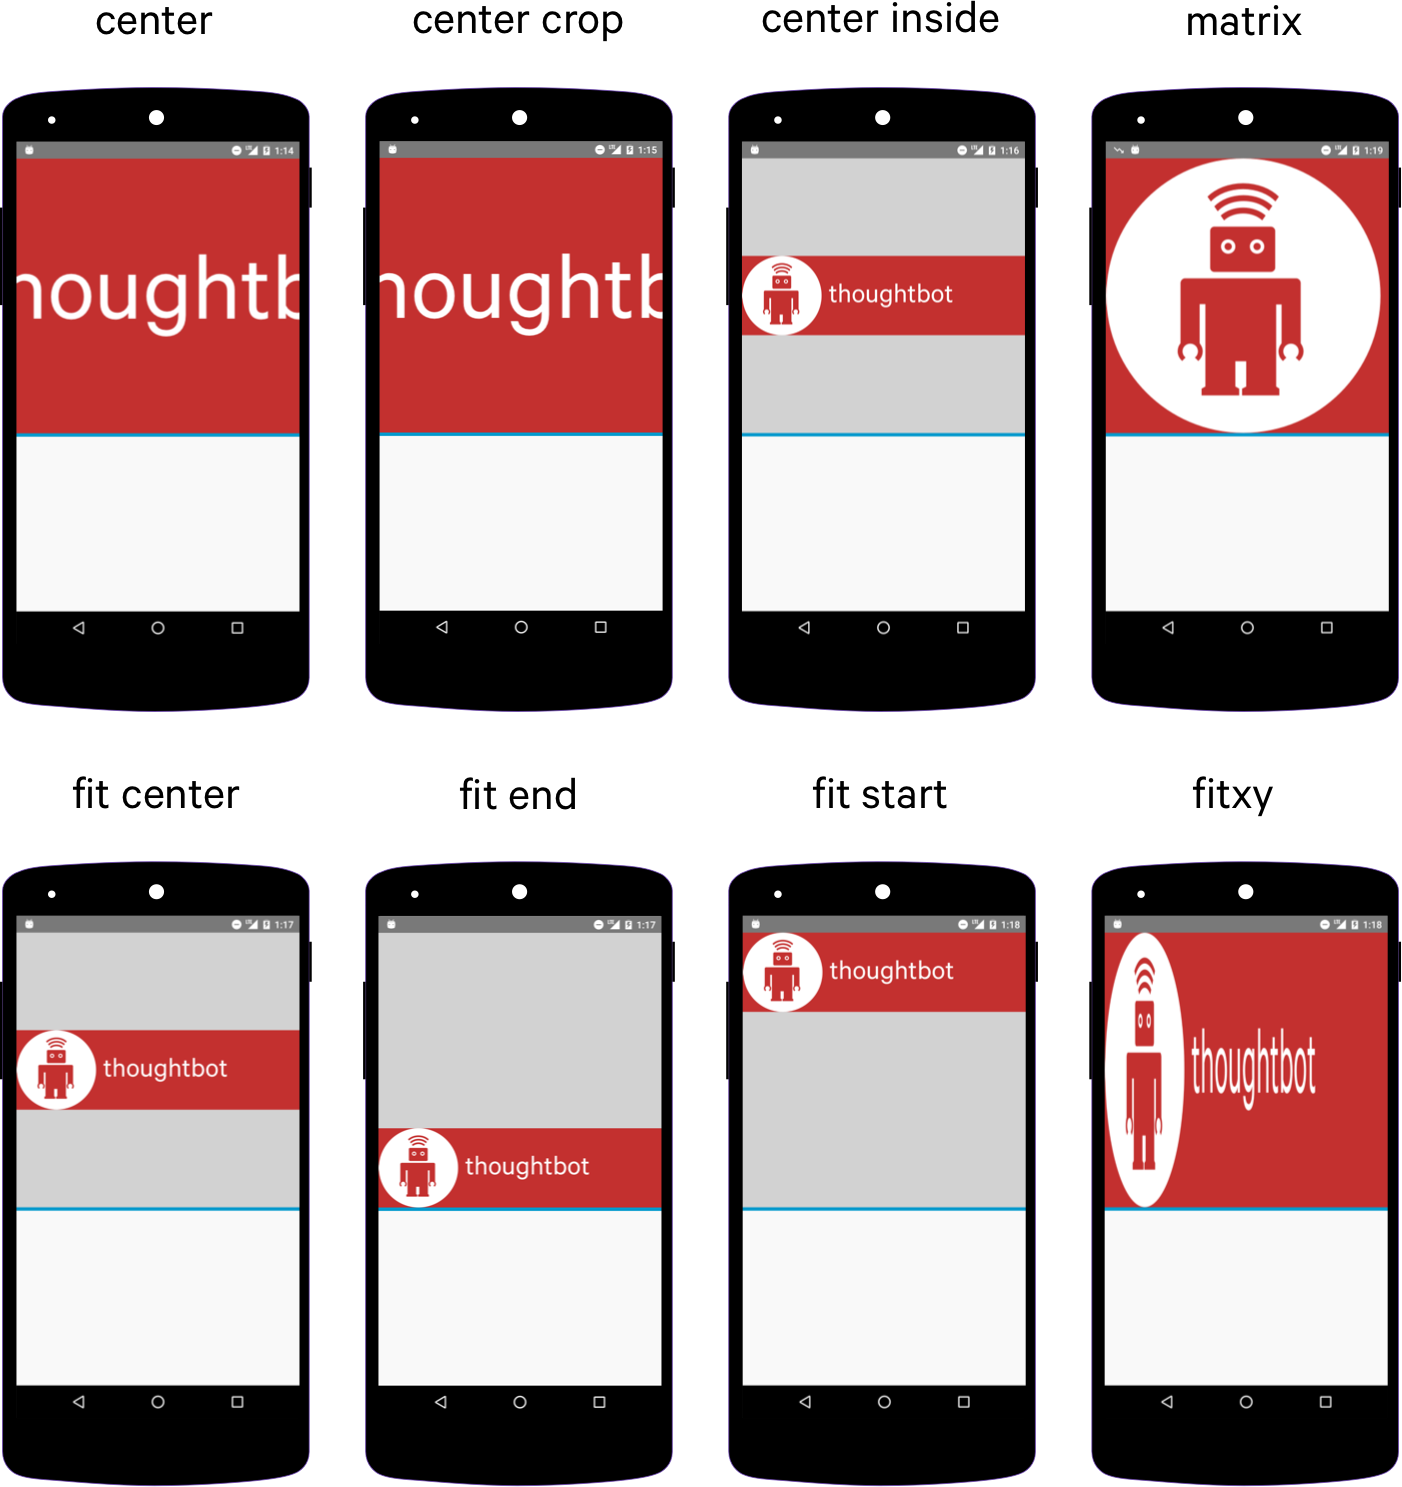
- Android ImageView ScaleType: A Visual Guide
- Scale Types
- CENTER
- CENTER_CROP
- CENTER_INSIDE
- FIT_CENTER
- FIT_END
- FIT_START
- FIT_XY
- MATRIX
- Adjust View Bounds
- If you enjoyed this post, you might also like:
- Mobile design and development services for every stage of your app
Content-aware scaling
Important: 
Photoshop’s 3D features will be removed in future updates. Users working with 3D are encouraged to explore Adobe’s new Substance 3D collection, which represents the next generation of 3D tools from Adobe.
Additional details on the discontinuation of Photoshop’s 3D features can be found here: Photoshop 3D | Common questions around discontinued 3D features.
Resize images and protect content
Content-Aware Scale resizes an image without changing important visual content such as people, buildings, animals, and so forth. While normal scaling affects all pixels uniformly when resizing an image, content-aware scaling mostly affects pixels in areas that don’t have important visual content. Content-Aware Scale lets you upscale or downscale images to improve a composition, fit a layout, or change the orientation. If you want to use some normal scaling when resizing your image, there is an option for specifying a ratio of content-aware scaling to normal scaling.
If you want to preserve specific areas when scaling an image, Content-Aware Scale lets you use an alpha channel to protect content during resizing.
Content-aware scaling works on layers and selections. Images can be in RGB, CMYK, Lab, and Grayscale color modes as well as all bit depths. Content-aware scaling doesn’t work on adjustment layers, layer masks, individual channels, Smart Objects, 3D layers, Video layers, multiple layers simultaneously, or layer groups.

A. Original image B. Scaled narrower C. Scaled narrower, using content-aware scaling
Источник
Изменение масштаба изображения с помощью Content-Aware Scale
Если вам хочется изменить размер какой-либо фотографии, которая была снята с использованием альбомной или портретной ориентации, я могу вам помочь. Adobe Photoshop предлагает вашему вниманию инструмент Content-Aware Scale (Масштабирование с учётом содержимого). Он имеет возможность не только растягивать или удлинять области изображения, но и защищать от искажения другие области, которые вы не хотите затрагивать. Данный инструмент может быть вам полезен, и я буду рад им с вами поделиться.
Прежде чем начать, я должен предупредить вас, что работа с этим инструментом подходит только для определённых типов фотографий. Так как в результате происходит небольшое искажение, поэтому не стоит использовать данный инструмент для фотографий с точными и детализированными краями. Если вы не совсем поняли, что я имею в виду, посмотрите на выбранное мною изображение ниже. Оно идеально подходит для такого вида работы.
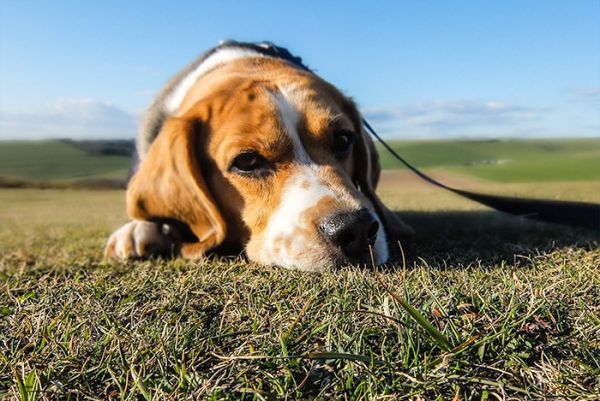
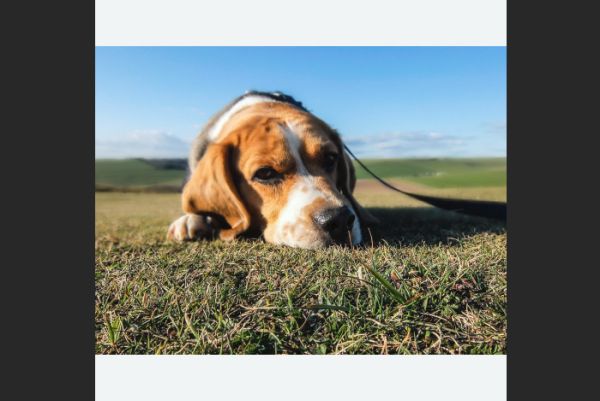
Выбор фото
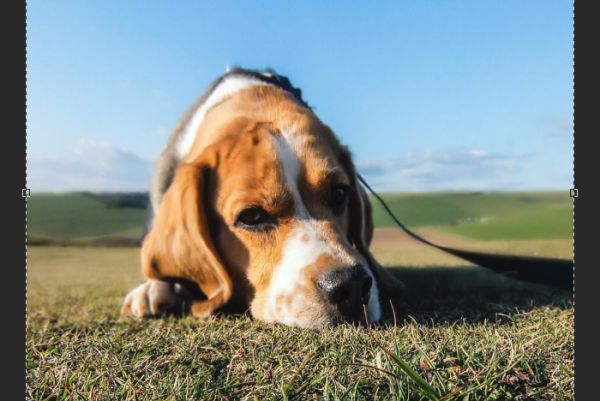
В качестве примера я буду использовать фото милого щенка. Обратите внимание на небо и траву. Обе эти области будут немного растянуты в процессе создания квадратного кадра. Имейте в виду, я не буду обрезать стороны, а добавлю дополнительные области сверху и снизу.
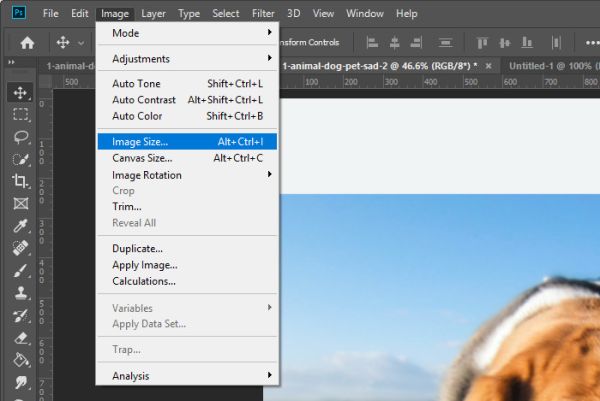
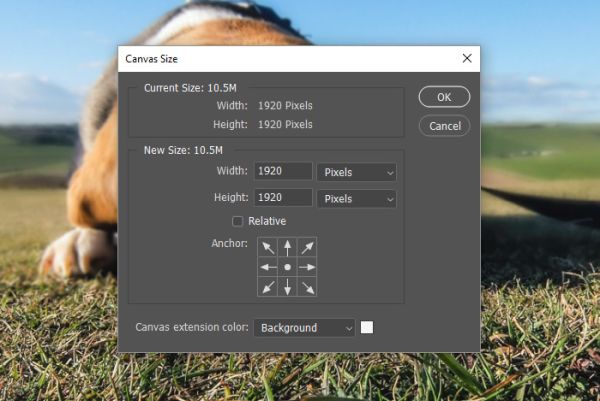
Изменение размера холста
Теперь необходимо изменить размер холста. Поскольку нам нужно сделать фотографию квадратной, перейдите в меню Image > Canvas Size (Изображение – Размер холста) и измените высоту. Для своего изображения я изменил значение высоты с 1440 до 1920 пикселей, чтобы она соответствовала ширине. Нажмите OK.
Вот как сейчас стало выглядеть изображение после того, как мы добавили дополнительные области сверху и снизу.
Защита от искажения
Метод, который я покажу вам в сегодняшнем уроке, фактически растягивает изображение, придавая ему новую форму. Если сравнить два инструмента Content-Aware Scale (Масштабирование с учётом содержимого) и Free Transform (Свободное трансформирование), то второй не защищает объекты или элементы, которые не нужно искажать. Здесь отсутствует «интеллект». Используя инструмент «Масштабирование с учётом содержимого», вы сможете защитить объекты на изображении, и они не будут искажены.
На моём изображении данным объектом является щенок, для защиты от искажений, его необходимо выделить. Для этого я буду использовать инструмент Quick Selection (W) (Быстрое выделение). Здесь не нужно скрупулёзно и идеально выделять объект, достаточно приблизительное выделение, чтобы щенок не искажался в последующих шагах.
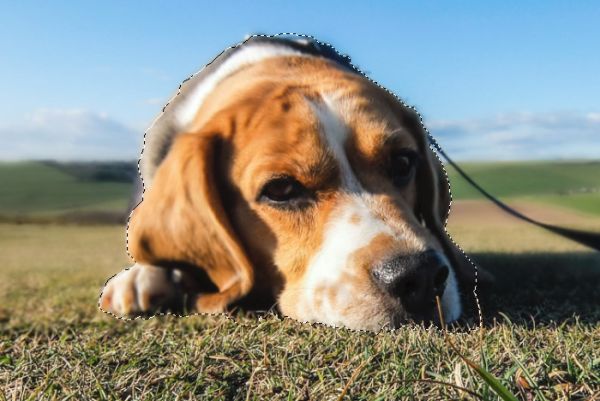
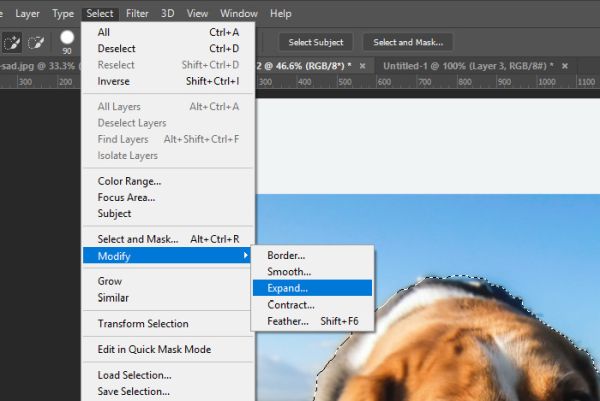
Чтобы быть уверенным, что я выделил всего щенка, я расширю выделение на 10 пикселей, используя меню Select > Modify > Expand (Выделение – Модификация — Расширить).
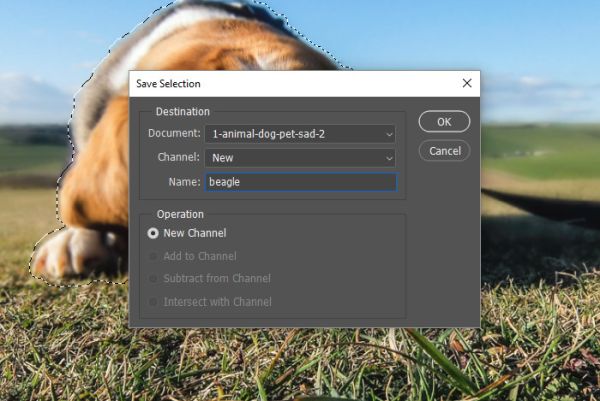
Сохранение выделения
Теперь необходимо сохранить выделенный объект. Для этого перейдите во вкладку Select > Save Selection (Выделение – Сохранить выделенную область).
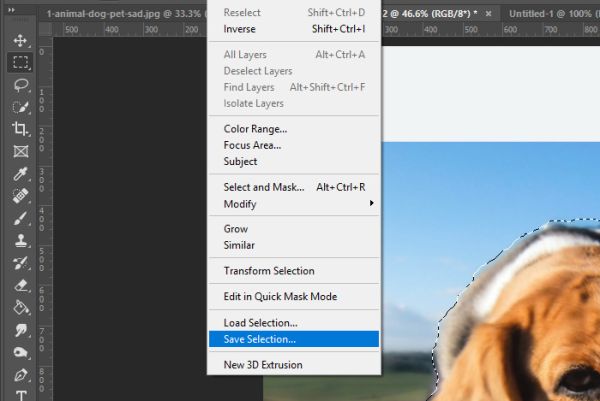
В диалоговом окне «Сохранить выделенную область» напишите название «Beagle» и нажмите OK, чтобы сохранить выделенную область на панели «Каналы».
Масштабирование изображения
Следующий шаг, который мне нужно сделать, — это изменить масштаб изображения. Я выделил щенка и сохранил его, теперь можно отменить выделение, перейдя в Select > Deselect (Выделение – Отменить выделение) или, нажав комбинацию клавиш Ctrl + D.
После этого я воспользуюсь инструментом Rectangular Marquee (Прямоугольная область), чтобы выбрать только область изображения (без дополнительных свободных областей). Далее перейдите в меню Edit > Content-Aware Scale (Редактирование – Масштабирование с учётом содержимого). Это активирует ограничивающую рамку трансформации. Я перетащу верхний центральный маркер к верхней части холста, а нижний центральный маркер к нижней части холста. Поскольку я использую последнюю версию Photoshop, мне не нужно удерживать клавишу Shift для сохранения пропорций. В этой версии Adobe полностью изменила эту маленькую особенность.
Растягивая изображение, я заметил, что щенок тоже деформируется, хотя я думал, что «защитил» его от всех изменений.
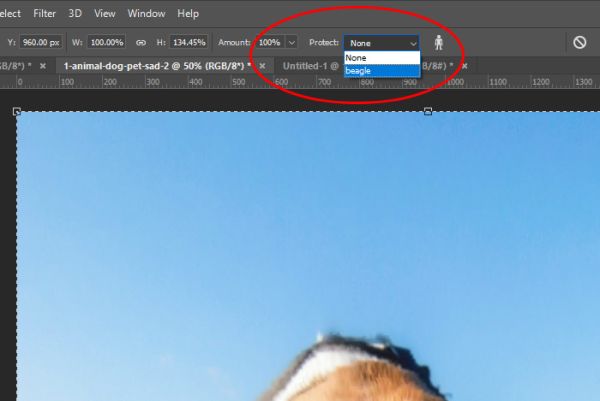
Причина заключается в том, что мы выделили щенка и сохранили, но не защитили. Чтобы это исправить перейдите на верхнюю панель параметров, кликните по раскрывающейся вкладке Protect (Защищать) и выберите название сохранённой выделенной области «beagle».
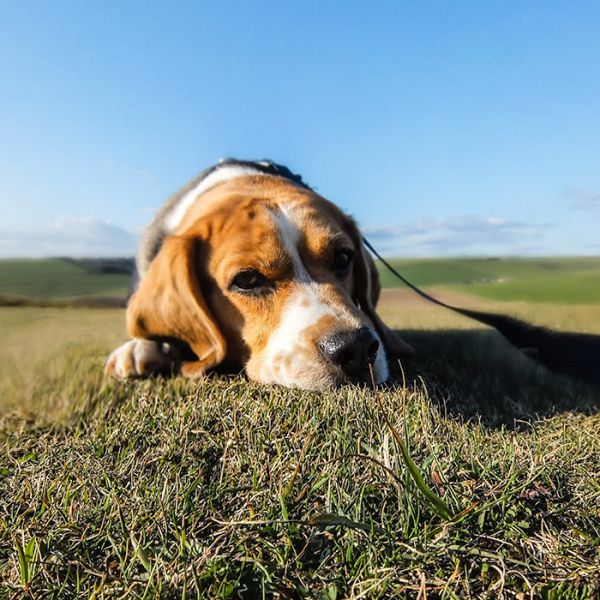
В результате область с щенком вернётся в исходное положение и всё будет выглядеть отлично. Нажмите Enter на клавиатуре, чтобы принять все изменения. Посмотрите на окончательное изображение.
Надеюсь, я доступно объяснил, как использовать инструмент Content-Aware Scale (Масштабирование с учётом содержимого) в Adobe Photoshop.
Источник
Content Aware Scaling Meme
Popular:
Content Aware Scaling
About
Content Aware Scaling is an Adobe Photoshop tool used to create animated GIFs in which the subject is warped and distorted within the frame.
Origin
Adobe Photoshop has included Content Aware Scaling as a tool since the release of Photoshop CS4 on October 15th, 2008. The main principle of content aware scaling is applying an algorthm to an image to detect paths of least importance. This paths can be deleted or added to change the image size without changing the important parts. [1]
| ||||||
On August 21st, 2007, Youtuber and businessman Siim Teller uploaded a demo video offering a step-by-step instruction of the process. SpreadOn Feb 28th, 2012, Something Awful user Grei Skuring started a new thread to state that he found a new way to messing around with pictures. It was basically turning stock photos into something funny with the content aware function. [6] Other users participate the thread with different edits of celebrities, stock photos and other random images.
On the same forum, another user Radock uploaded an animated version of the content aware scale(shown below left) and gif gain an attention by other users. One of the old user Everdraed uploaded a content aware scaling gif version of Steve Buscemi(shown below right). On the following days, it became a fad on Something Awful and featured on Photoshop Phriday [7] .
thx to the Grei Skuring himself for the information On March 4th, 2012, Tumblr user chickensnack [5] posted two animated GIFs made with Content Aware Scaling, including a Colgate toothpaste ad (shown below, left) and a part of the «garbage day» scene from the 1987 horror movie Silent Night, Deadly Night Part 2 (shown below, right).
On February 12th, 2013, animator Neil Cicierega [2] published an instructional guide and Adobe Photoshop script for making animated GIFs using Content Aware Scaling. On August 19th, Penny Arcade Forums [4] member Butters posted several Content Aware Scaling animations in an animated GIF thread. On October 2nd, Imgur [3] user strontium uploaded a gallery of animated GIFs created with Content Aware Scaling. On October 21st, YouTuber VicariousPotato uploaded a Content Aware Scaling parody of the video QualityTime2.avi by YouTubers El-Cid & Egoraptor (shown below). Источник Android ImageView ScaleType: A Visual GuideIf you’re anything like me, you are really, really, ridiculously good looking. But you’re also probably a tad forgetful. So when it comes time to scale an image in an ImageView , you cannot for the life of you remember what all the different ScaleType s actually look like on the screen. So, you spend the next 10-15 minutes building and rebuilding your app with each and every scale type to see what they all look like. Then you inevitably forget the difference between two of them and start the whole process all over again. As the kids say, “I gotchu fam”. Below are screenshots of all the different ScaleType s placed side-by-side. And below that are all the ScaleType definitions copy and pasted directly from the official Android docs. And even further below those is a helpful tip for those brave souls who make it to the end of this post 🙂
Scale TypesThe full descriptions of each ScaleType from the official Android documentation. CENTERCenter the image in the view, but perform no scaling. CENTER_CROPScale the image uniformly (maintain the image’s aspect ratio) so that both dimensions (width and height) of the image will be equal to or larger than the corresponding dimension of the view (minus padding). CENTER_INSIDEScale the image uniformly (maintain the image’s aspect ratio) so that both dimensions (width and height) of the image will be equal to or less than the corresponding dimension of the view (minus padding). FIT_CENTERScale the image using Matrix.ScaleToFit.CENTER Matrix.ScaleToFit.CENTER : Compute a scale that will maintain the original src aspect ratio, but will also ensure that src fits entirely inside dst. At least one axis (X or Y) will fit exactly. The result is centered inside dst. FIT_ENDScale the image using Matrix.ScaleToFit.END Matrix.ScaleToFit.END : Compute a scale that will maintain the original src aspect ratio, but will also ensure that src fits entirely inside dst. At least one axis (X or Y) will fit exactly. END aligns the result to the right and bottom edges of dst. FIT_STARTScale the image using Matrix.ScaleToFit.START Matrix.ScaleToFit.START : Compute a scale that will maintain the original src aspect ratio, but will also ensure that src fits entirely inside dst. At least one axis (X or Y) will fit exactly. START aligns the result to the left and top edges of dst. FIT_XYScale the image using Matrix.ScaleToFit.FILL Matrix.ScaleToFit.FILL : Scale in X and Y independently, so that src matches dst exactly. This may change the aspect ratio of the src. MATRIXScale using the image matrix when drawing. Adjust View BoundsWhile not technically an ImageView.ScaleType this will come in handy. If you notice with CENTER_INSIDE , FIT_CENTER , FIT_END and FIT_START the actual bounds of the ImageView are much larger than the scaled image. To set the bounds of the ImageView to the height of the image inside, use android:adjustViewBounds=»true” in your XML. It looks like this:
If you enjoyed this post, you might also like:
Mobile design and development services for every stage of your appWe design and build iOS, Android, and cross-platform React Native apps for startups and established businesses. © 2021 thoughtbot, inc. The design of a robot and thoughtbot are registered trademarks of thoughtbot, inc. Privacy Policy Источник  Когда к мобильному устройству присоединены наушники  ОС Google Android развивается, и по всему видимому |