- Studio One Remote
- Studio One Remote APPLICATION description
- PreSonus Blog
- Komplete Kontrol Integration in Studio One, Part 1/3
- How To: Create an Android App With Android Studio to Control LED
- Introduction: How To: Create an Android App With Android Studio to Control LED
- Step 1: Android Studio: New Project
- Step 2: Android: Layout Part 1.
- Step 3: Android: .Class Code Part 1.
- Step 4: Android: Class Code Part 1.
- Step 5: Android: Layout Part 2.
- Step 6: Android: .Class Code Part 2.
- Step 7: Android Manifest
- Step 8: Aruino Code
- Step 9: Download
- Attachments
- 5 People Made This Project!
- Recommendations
- Reclaimed Materials Contest
- Unusual Uses Contest
- Hour of Code Speed Challenge
- 196 Comments
Studio One Remote
Download Studio One Remote APK latest version Free for Android
| Version | 1.6.0.64088 |
| Update | 1 week ago |
| Size | 8.33 MB (8,731,789 bytes) |
| Developer | PreSonus Audio Electronics, Inc. |
| Category | Apps, Music & Audio |
| Package Name | com.presonus.dawremote |
| OS | 6.0 and up |
Studio One Remote APPLICATION description
Control surface application for Studio One Professional
PreSonus® Studio One® Remote is a free iPad® remote control app designed specifically for use with PreSonus Digital Audio Workstation Studio One 5 Artist and Professional on Mac® and Windows® computers. It’s the perfect companion, both as a “second screen” app in a workstation setup or as a flexible mobile remote for recording, mixing and editing when away from the computer.
Studio One Remote is based on the PreSonus software applications framework and utilizes the UCNET protocol for network connectivity and remote control. This is the same technology that powers PreSonus remote control apps such as UC-Surface, as well as the popular multitrack live recording software Capture™ (desktop) and Capture for iPad.
• Remote control of Studio One 5 transport and mix console
• Commands page for access to all Studio One factory and user commands and macros
• Control up to 28 plug-in parameters using Control Link
• PreSonus UCNET networking technology for ultra-fast connectivity
• Macro Control view for quick access to FX parameters
• Fast song navigation using scalable timeline, marker list and Arranger sections
• Control any Studio One system on the same network; control a single Studio One with multiple remote apps simultaneously
• Start Page with demo mode and integrated Quick Help
• Access multiple Cue Mixes with independent faders
• Access record modes, Pre-count and Metronome settings
Studio One Remote works with Studio One 3 Professional version 3.0.1 or newer and Studio One 5 Artist or newer.
Источник
PreSonus Blog
Komplete Kontrol Integration in Studio One, Part 1/3
January 17, 2020 by Craig Anderton
Studio One 4.53 introduced integration with Native Instruments’ Komplete series of keyboards, which is a big deal. Although these keyboards are theoretically dedicated to NKS-compatible plug-ins and mixer/transport hands-on control, with Windows systems (Mac fans, there’s more on this later) you can use the keyboard as a general-purpose, hands-on MIDI controller for non-NKS plug-ins, including all bundled PreSonus effects and instruments (as well as plug-ins from other manufacturers). Also, unlike standard NKS, you’ll be able to control effects, regardless of whether or not they’re inserted in an instrument track.
There’s a lot to cover, and since this is more like a tutorial than a tip, it’s split into three parts: DAW control with Studio One, creating custom templates for plug-ins, and how to apply the templates in your workflow.
INTEGRATING THE KEYBOARD
Choose Studio One > Options > External Devices, and click Add. Scroll to the entry for Native Instruments, unfold it, and select either your A/M or S series keyboard for Receive From and Send To. I’m using an S49 (Fig. 1).
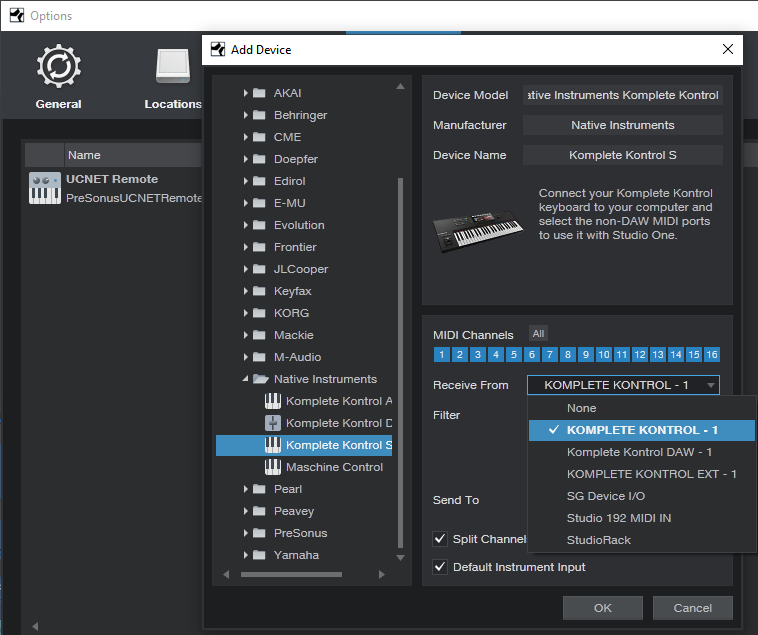
Figure 1: Komplete is selected as the keyboard, with Split Channel selected for more convenient use with multitimbral instruments, like IK Multimedia’s Syntronik.
INTEGRATING THE CONTROL SURFACE
Now let’s set up the Komplete keyboard as a new control surface. Again, choose Studio One > Options > External Devices, click Add, and scroll down to the entry for Native Instruments. Unfold it, and select Komplete Kontrol DAW – 1 for both Receive From and Send To (Fig. 2).
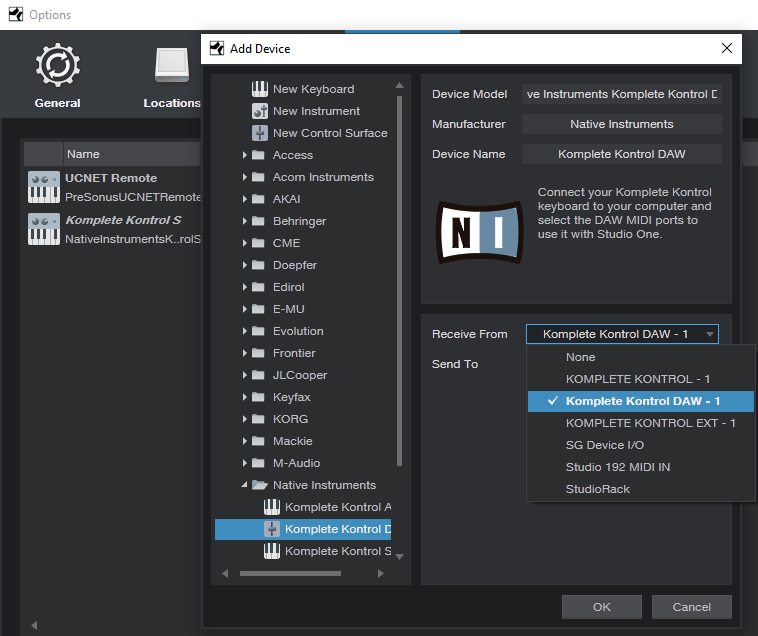
Figure 2: How to add the Komplete keyboard as a control surface for DAW integration.
CHOOSING THE MODE OF OPERATION
To edit NKS plug-ins, press the PLUG-IN mode button in the keyboard’s cluster of six buttons, toward the upper right. Controls that don’t relate to a synth or effect, such as the Transport, Metronome, Tape Tempo, and the like remain active. When it’s time to mix and you want full integration with Studio One’s mixer, press the MIXER button.
The following describes how the control surface for the current S-series Mk2 keyboards integrates currently with Studio One; click here for information from PreSonus on suitability with other NI keyboards, and updates.
Transport. The Play, Rec, and Stop buttons do what you’d expect, but there’s more to the story than that—there are several nuanced options. The following assumes you’re starting from a stopped transport.
- Press Play to begin from the Play Start marker. If there’s no Play Start marker, playback starts from the cursor’s current position. If you stop and re-initiate playback, playback re-starts from the cursor’s original position.
- Return to zero: When the transport is stopped, press Stop again to return to zero.
- Pushing on the big navigation knob toward the right initiates playback from the Play Start marker. (Note that this involves pushing downward into the knob, not left/right or up/down.) If there’s no Play Start marker, playback begins from the Loop Start, whether the loop is active or not.
- Push downward on the navigation knob during playback to jump to the Loop Start, which resumes playback automatically from there.
- Pressing Shift+Play operates the same way as using the navigation knob for playback control.
- With any scenarios involving the Play Start marker, it doesn’t matter if it’s before or after the Loop Start, or within the loop itself.
- Press Rec to initiate or punch-in recording. Press again to end or punch out recording. If you don’t record audio or MIDI while recording is active, there’s no blank event—it’s like nothing ever happened.
- Shift+Rec toggles the count-in between on and off. When you press Shift and count-in is enabled, the Rec button letters light bright red. Otherwise, the rec button letters are dimmed.
- Loop toggles the loop between on and off. To move the loop (whether enabled or not), hold the Loop button down, and rotate the navigation knob. For example, if the loop extends for four measures, moving the knob 1 click clockwise moves the loop forward to the next four measures. Moving the knob 1 click counter-clockwise moves the loop backward to the previous four measures.
- Metronome toggles between on and off.
Mixer
- The display for each visible channel shows the channel’s name, fader level, pan, metering (but not overloads), and status of a channel’s Record, Solo, and Mute buttons.
- Track select buttons. The eight buttons above the display select a track, however, moving the navigation dial left or right moves from one track to the adjacent track (left or right respectively).
- Hold Mute, and then select a channel with its track select button, to mute/unmute. The keyboard’s corresponding select button glows yellow.
- Hold Solo, and then select a channel with its track select button, to solo/unsolo. The keyboard’s corresponding select button glows blue.
- Shift+navigation knob move down (not push inward) selects level for the selected track. This mode remains selected until changed. Both the associated track knob, and the navigation knob, alter the selected track’s level. Holding Shift while moving either knob provides finer resolution. The individual track knobs provide the finest resolution.
- Shift+navigation knob move up (not push inward) selects pan for the selected track. This mode remains selected until changed. Similarly to level selection, both the track knob and navigation knob alter the selected track’s pan, and holding Shift while moving either knob provides finer resolution. The individual track knobs provide the finest resolution. Note: The Pan control for the Main channel is always shown panned full left. You can ignore this, because the Main channel doesn’t have a pan control anyway. The pan is centered properly.
- Auto toggles between Read and Touch (write) automation for the selected track. Be aware that you can’t choose automation off with Auto.
- Left/right arrow buttons select channels in groups of 8. However, if the last bank of eight has fewer than eight channels, the display will fill with the last eight channels. For example, if you expect the last bank to be channels 17-24 but only 22 channels are in use, the keyboard will display channels 15-22. This is by design, because it makes sure there aren’t any blank channels—you can always see eight channels at a time. If you hit the left arrow button, it won’t go back to channel 9, but be offset by the same amount as the previous bank. To “reset” the banks, hit the left arrow button until you’re back at the beginning.
Miscellaneous Functions
- Undo and Redo. For Redo, hold Shift and press Undo.
- Quantize. This quantizes whatever is selected, at the current quantize value.
- Tap this, even if not lit, for tap tempo. I love this feature when starting a song.
This takes care of the mixer and transport functions. Next week, we’ll cover how to create custom MIDI control setups using the Komplete Kontrol application, and that will prepare us for Part 3, which describes how to create “faux NKS” control surface capabilities for PreSonus instruments and effects. Yes, it really is possible…
Источник
How To: Create an Android App With Android Studio to Control LED

Introduction: How To: Create an Android App With Android Studio to Control LED


This is a step-by-step tutorial for making an android apk using bluetooth.
Before start coding,
- Download Android Studio IDE and update Java.
- Java and C programming skills will help.
- This tutorial will not explain Java Programming.
- If you want to code using Eclipse IDE, it is almost the same.
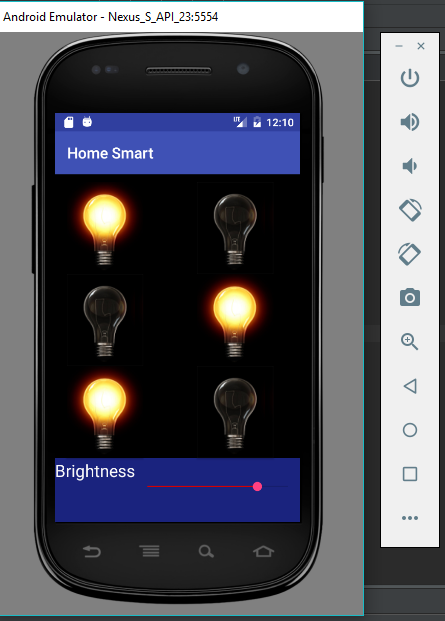
- The apk will send commands to turn on/turn off a LED and controls the brightness.
- You can download everything in the last step.
Step 1: Android Studio: New Project
- Open Android Studio and create a new Project: File > New Project.
- A pop up Windows will appear. Change the Application Name and Company Name.
- Click next to choose the target of the application. The default is Android 4.0 (IceCream Sandwich)
- Click next and choose a Blank Activity.
- Click next and rename the Activity Name to “DeviceList”.
- Now click “finish” and the Project will be create.
Step 2: Android: Layout Part 1.
When the build is finished, a “Hello world!” screen will be open. To create the layout of the apk, we need to add:
- TextView to display some hint to the user;
Click twice the TextView to change the text. A box will appear:
Text = The text to be displayed.
id of this widget
- Button to show the paired devices.
Click twice the Button to change the text. A box will appear:
Text = The text to be displayed.
id of this widget.
- ListView to show the paired devices;
Now the main activity is finished, you can see that all widget used are shown on Components Tree.
Step 3: Android: .Class Code Part 1.
On the left side there’s a folder called “app “, open it and you’ll see other folder called “java”.
Java folder contains the package of the apk (com.led.led), and all the source code.
Import the followings packages:
Create widgets variables to “call” the widgets used to create the layout:
Initialize the variables.
Import the following packages:
Create variables to control bluetooth:
Writing a stable code avoids weird erros, so it’s good to check if the device has bluetooth adapter and whether it’s activated.
According to Android documents, an Intent is a messaging object you can use to request an action from another app component. Although intents facilitate communication between components in several ways, there are three fundamental use-cases:
An Activity represents a single screen in an app. You can start a new instance of an Activity by passing an Intent to startActivity(). The Intent describes the activity to start and carries any necessary data.
A Service is a component that performs operations in the background without a user interface. You can start a service to perform a one-time operation (such as download a file) by passing an Intent to startService(). The Intent describes the service to start and carries any necessary data.
A broadcast is a message that any app can receive. The system delivers various broadcasts for system events, such as when the system boots up or the device starts charging. You can deliver a broadcast to other apps by passing an Intent to sendBroadcast(), sendOrderedBroadcast(), or sendStickyBroadcast().
We need to “listen” when the button is clicked to show paired devices. So OnClickListener Api will handle it
The PairedDevicesList method:
Step 4: Android: Class Code Part 1.
There is other method called myListClickListener. It allow the ListView to be clicked.
Step 5: Android: Layout Part 2.
Go to app > java > com.led.led, Right click, New Activity > Blank Activity
Name it to ledControl and finish. A “Hello world!” screen will be seen.
This second layout will have three buttons, one TextView and a seekbar:
- Turn On = Turns the LED On;
- Turn Off = Turns the LED Off;
- Disconnect = Closes Bluetooth Connection;
- Indicator;
- Brightness = control the brightness.
Step 6: Android: .Class Code Part 2.
Open ledControl class and import the following packages:
Create the following widget variables:
We have to initialize the variables and retrieve the bluetooth device address got in DeviceList class.
Let’s create a class to start the connection:
We need to “listen” when the button is clicked to write a command to turn on/turn off the led, disconnect and the control of the brightness.
There is a method called msg(); This method calls Toast.maketext(); There’s the method Called Disconnect(); turnOffLed(); and turnOnLed();
Step 7: Android Manifest
Every application must have an AndroidManifest.xml file (with precisely that name) in its root directory.
The manifest file presents essential information about your app to the Android system, information the system must have before it can run any of the app’s code.
This apk uses Bluetooth Adapter and it is not available in emulator, you must test it in a running device, but before you have to add some users-permissions, otherwise the apk will crash.
In App folder, open manifests > AndroidManifest.xml
- Add the following code to allow user-permision to use Bluetooth Device
- Rebuild the project at: Build Menu > Rebuild Project
Now you can run it in your device.
Step 8: Aruino Code
The arduino C code is very simple, no need to explain it:
Step 9: Download
The .rar file:
- Android Studio Project;
- Arduino .ino;
- Android Bluetooth Control LED .pdf;
If there’s some error, please comment.
Attachments
5 People Made This Project!


Did you make this project? Share it with us!
Recommendations


Reclaimed Materials Contest

Unusual Uses Contest

Hour of Code Speed Challenge

196 Comments

I can provide the source code to work on latest Android studio version without any errors. Project will be crystal clear from any errors. Contact me: jkmlt727374@gmail.com.

Hi. Great tutorial. do you have any plans to update this for Android Studio 3.0+? the user interface for the later versions of AS is quite different. That said, I went through the «getting started» tutorial in AS, and I think I can now make this work in the new version.

Reply 7 weeks ago
Hi, were you able to make it work? I am trying to make it work an newer Android Studio, without luck so far.
Источник


