- Use Switch Control on your device to control another Apple device
- Use your iPhone, iPad, or iPod touch to control another device
- Use your Mac to control another device
- Stop controlling another device
- Stop controlling a Mac
- Stop controlling an iPhone, iPad, or iPod touch
- Turn off Switch Control
- Turn off Switch Control on an iPhone, iPad, or iPod touch
- Turn off Switch Control on a Mac
- Use Switch Control to navigate your iPhone, iPad, or iPod touch
- Add a new switch
- Turn Switch Control on or off
- Use Switch Control
- Use item scanning
- Use point scanning
- Use Head Tracking on devices with a TrueDepth camera
- Use manual scanning
- Choose an action after you select an item
- Tap an item
- Use a gesture
- Exit the control menu
- Scroll up or down
- Press a button or flip a switch
- Change your settings and adjust how each switch works
- Fine tune Switch Control
- How to use Switch Control on iPhone and iPad
- How to enable Switch Control
- How to add a new switch
- How to delete a switch
- How to create a new recipe
- How to change scanning style
- How to change Auto Scanning Time
- How to enable Pause on First Item
- How to change the number of loops
- How to enable Move Repeat
- How to enable and change the duration of Long Press
- How to change tap behavior
- How to change which item is focused after tapping
- How to enable Always Tap Keyboard Keys
- How to enable Extended Predictions
- How to enable and change hold duration
- How to enable Ignore Repeat
- How to change Gliding Cursor Speed
- How to enable Head Tracking
- How to enable Sound Effects
- How to enable speech in Switch Control
- How to change the speech voice in Switch Control
- How to change menu items in Switch Control
- How to enable/disable Group Items
- How to enable the large cursor
- How to change cursor color
- How to create a new gesture
- Questions?
- Report: Apple allowing ‘much looser interpretation’ of ad tracking policy
- How the new Nintendo Switch OLED compares to previous Switch consoles
- Facebook, Ring, Alexa, Disney+, and more are all down right now
- Keep your new Switch OLED model’s screen scratch-free with these protectors
Use Switch Control on your device to control another Apple device
With Use Other Devices for Switch Control, you can control your other Apple devices remotely on the same Wi-Fi network without adjusting any switch connections. This enables you to navigate your Mac or Apple TV with the same switch setup that you use to control your iPhone.
Use your iPhone, iPad, or iPod touch to control another device
- Connect your devices to the same Wi-Fi network.
- Sign in to iCloud with the same Apple ID on both devices.
- If you want to control a Mac, choose Apple menu > System Preferences on your computer.
- Select Accessibility. In the sidebar, choose Switch Control.
- Check the checkbox next to «Allow platform switching to control your computer.»
- If you haven’t already, turn on Switch Control on your iPhone, iPad, or iPod touch.
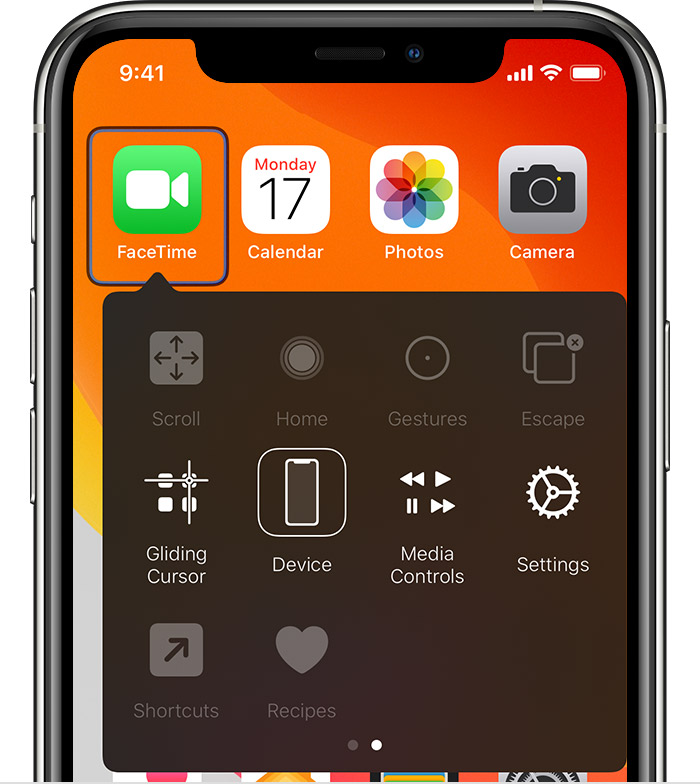
- Use your switch to navigate the Switch Control menu. Select Device.

- Select Use Other Device.
- Select the device that you want to control, then select Connect. Now you can use the switch connected to your iPhone, iPad, or iPod touch to control the other device.

Use your Mac to control another device
- Connect your devices to the same Wi-Fi network.
- Sign in to iCloud with the same Apple ID on both devices.
- If you haven’t already, turn on Switch Control on your Mac.
- Use your switch to navigate the Switch Control Home panel. Choose Devices.
- Select the device that you want to control, then select Connect. Now you can use the switch connected to your Mac to control the other device.

Stop controlling another device
To stop controlling another device, press and hold your switch for ten seconds. Your switch will control the original device again.
You can also follow these steps:
Stop controlling a Mac
- Use your switch to navigate the Switch Control Home panel. Choose Devices.
- Select Disconnect. Your switch will control the original device again.
Stop controlling an iPhone, iPad, or iPod touch
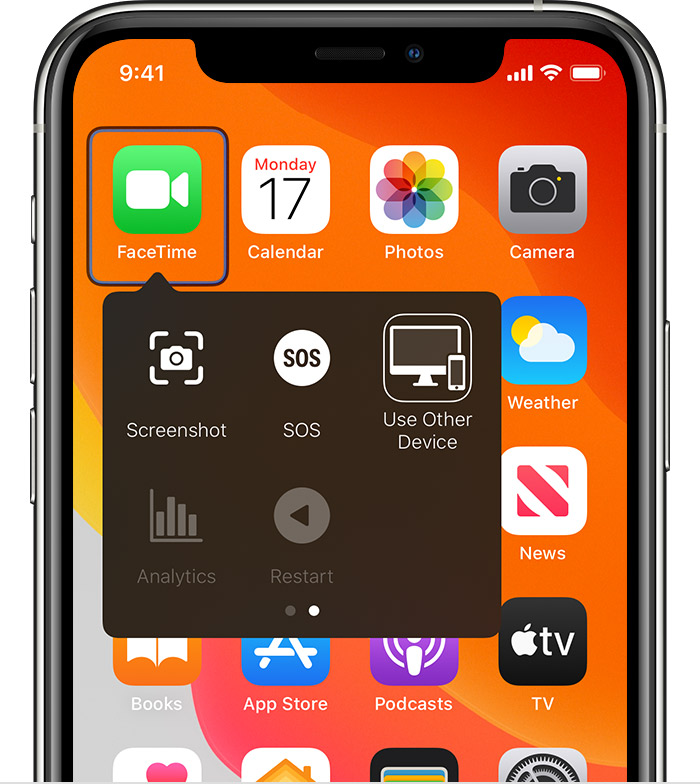
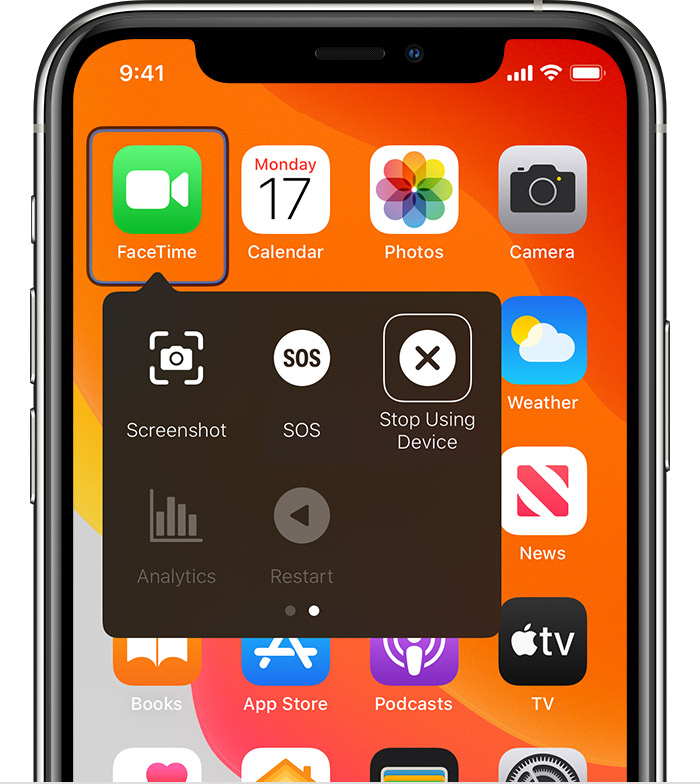
- Use your switch to navigate the Switch Control menu. Select Device.
- Select Stop Using Device. Your switch will control the original device again.
Turn off Switch Control
If you’d like to turn off Switch Control entirely, follow these steps for your device:
Turn off Switch Control on an iPhone, iPad, or iPod touch
Use your switch to navigate to Settings > Accessibility > Switch Control, and turn the setting off.
You can also triple-click the Home button or the Side button on certain models at any time to exit Switch Control.
Turn off Switch Control on a Mac
Use your switch to navigate to System Preferences > Accessibility > Switch Control, and deselect Enable Switch Control.
Источник
Use Switch Control to navigate your iPhone, iPad, or iPod touch
Use Switch Control to control your iPhone, iPad, or iPod touch using a single switch or multiple switches.
With Switch Control, you can use switches to select, tap, or drag items, type, and even freehand draw. Just use a switch to select an item or location on the screen, then use the switch to choose an action.
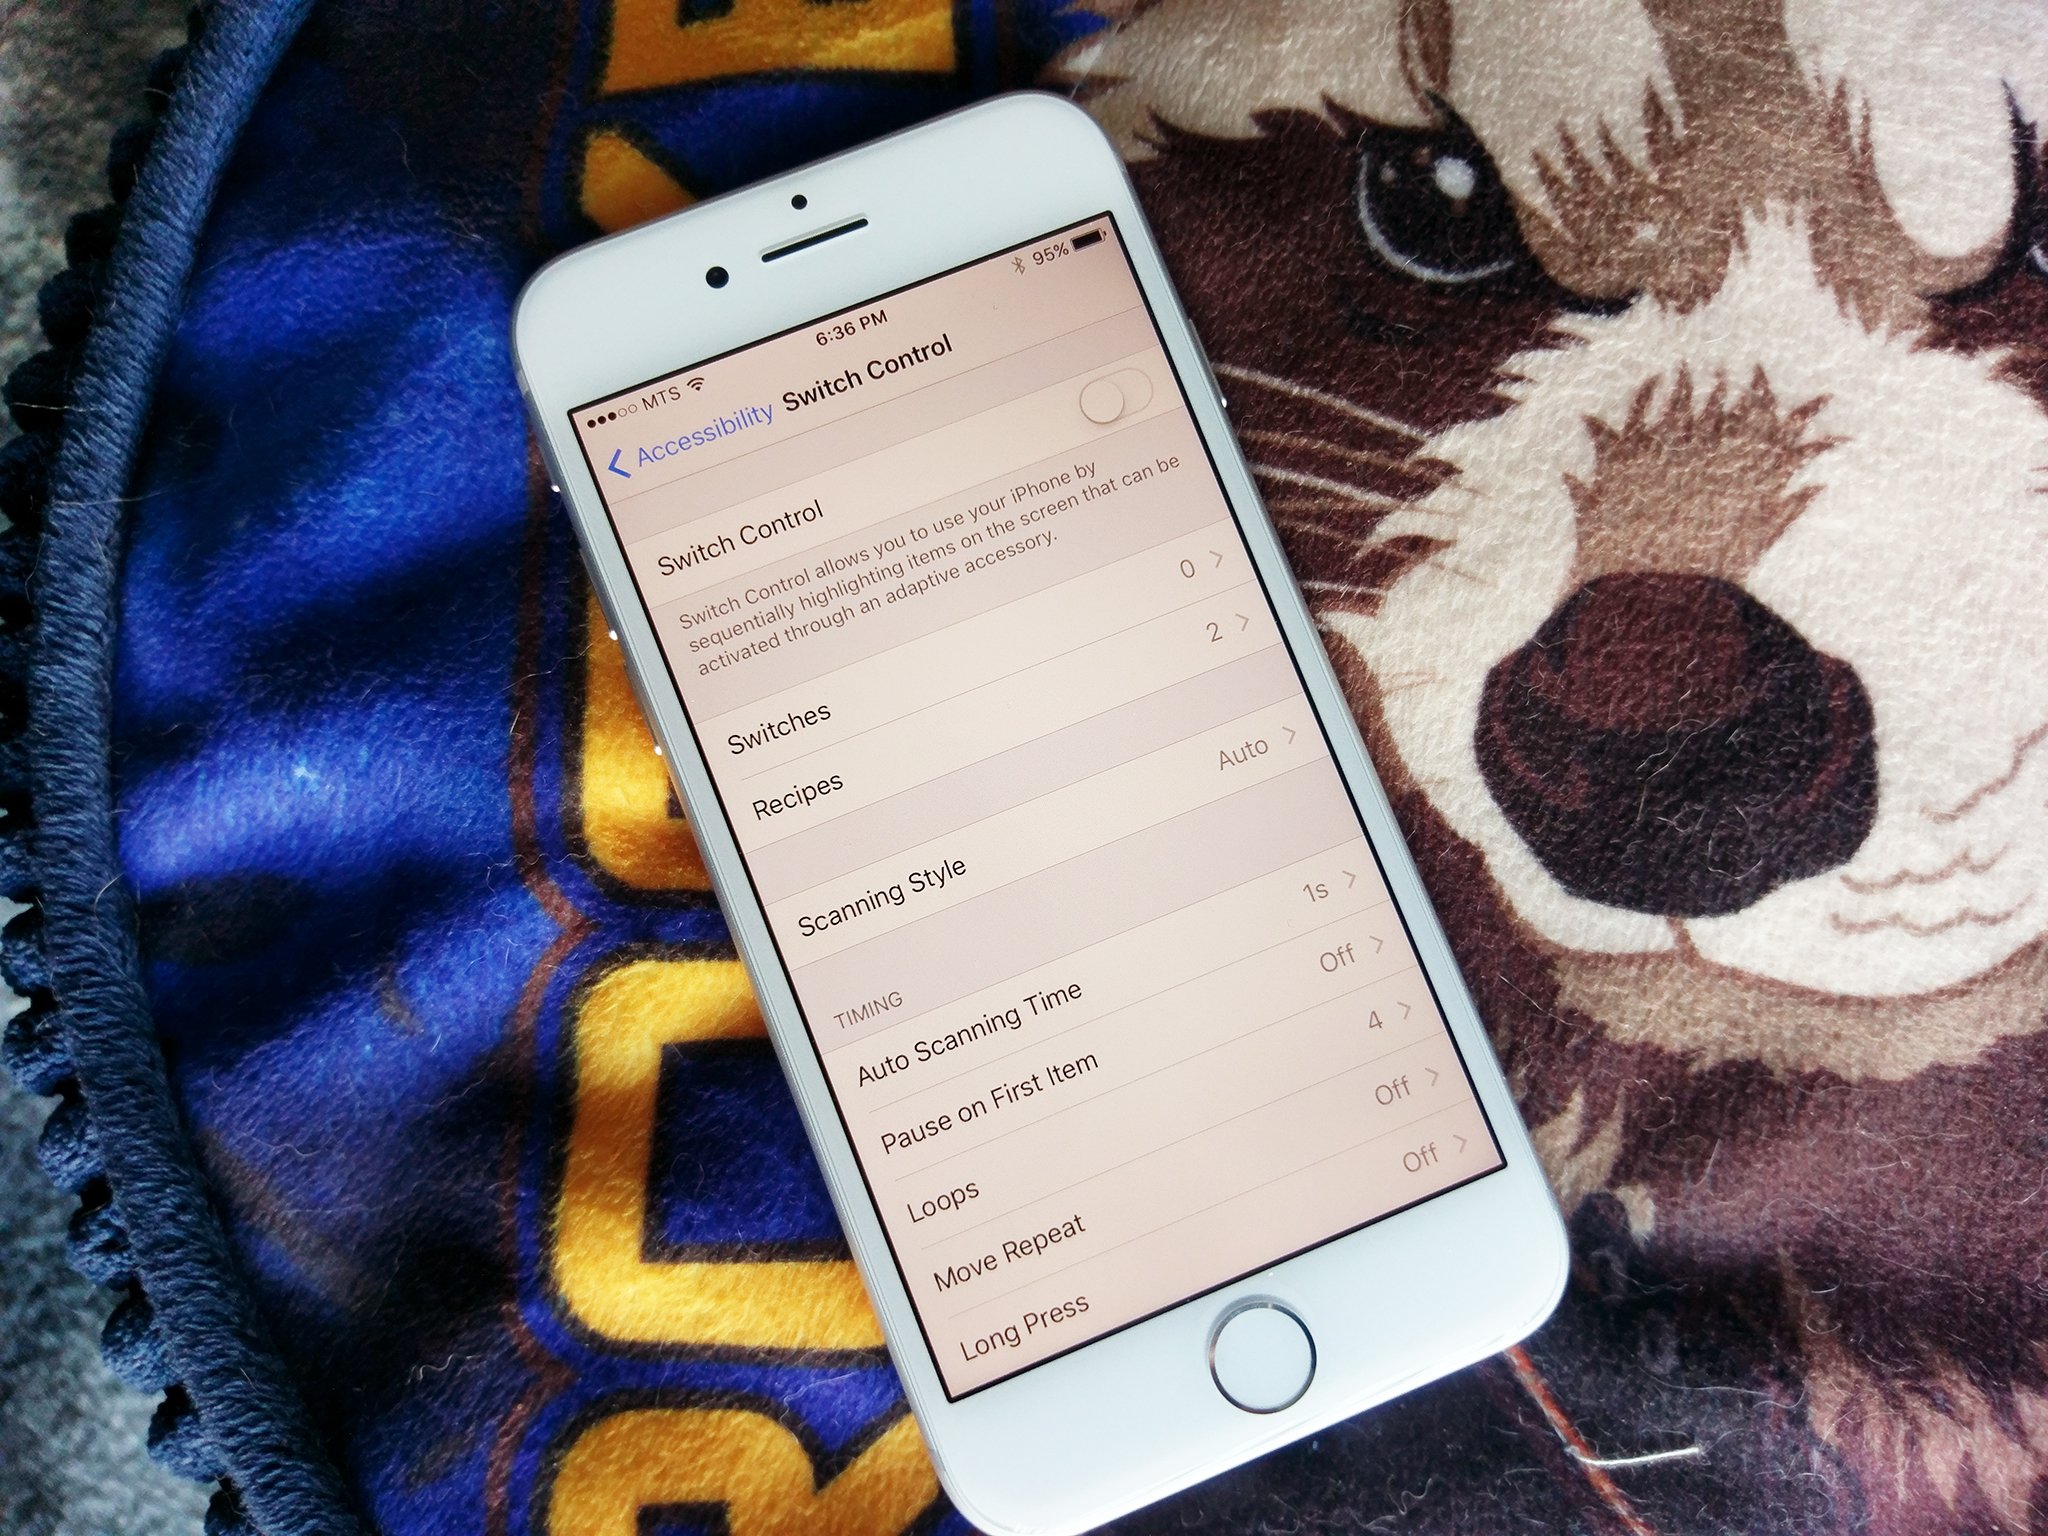
Add a new switch
Before you add an external switch, you need to connect it to your device before it will show in the list of switches. You can use any of these options as a switch:
- External: Choose a Bluetooth switch or Made for iPhone switch.
- Screen: Tap the screen to use a switch or press and hold.
- Camera: Move your head to use the iPhone front-facing camera as a switch. You can use the camera as two switches: One when you move your head to the left, and the other when you move your head to the right.
Add a switch and choose its action:
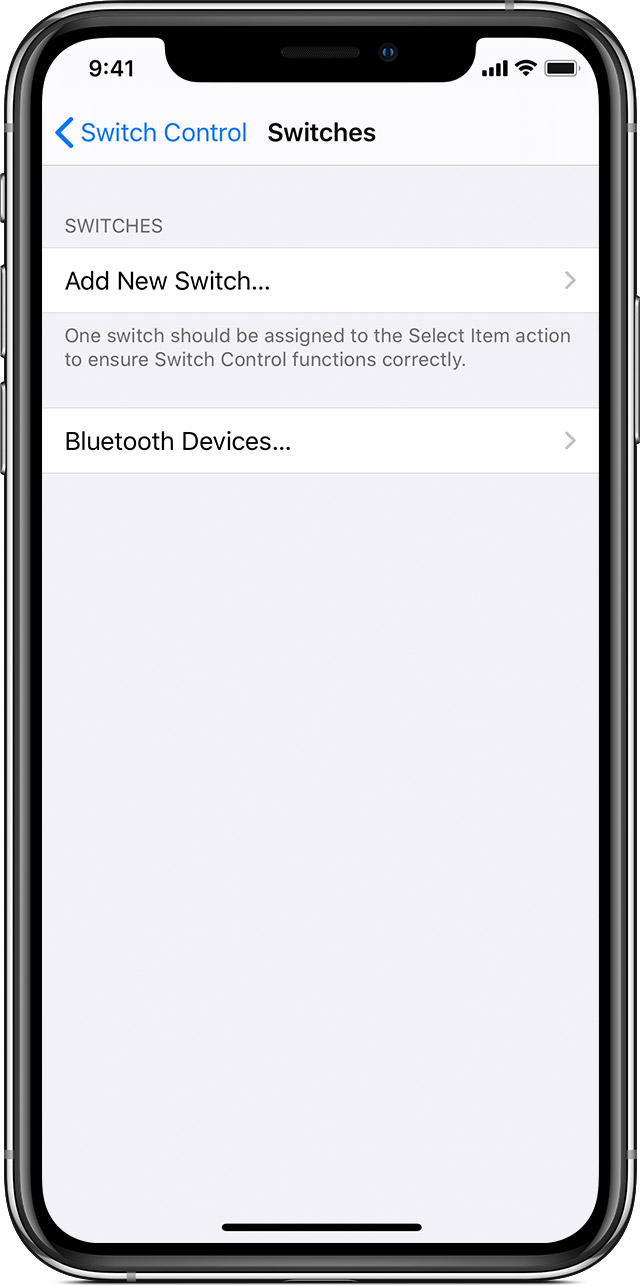
- Go to Settings > Accessibility > Switch Control > Switches.
- Tap Add New Switch and choose a source.
- Follow the onscreen steps to choose how you want the switch to work.
- Remember to turn on Switch Control, so you can use your new switch.
Turn Switch Control on or off
Go to Settings > Accessibility > Switch Control and turn the setting on or off. You can also triple-click the Home button or the Side button on certain models at any time to exit Switch Control.
Use Switch Control
There are three ways to select items on the screen: Item scanning, point scanning, and manual selection. Item scanning is the default when you turn on Switch Control.
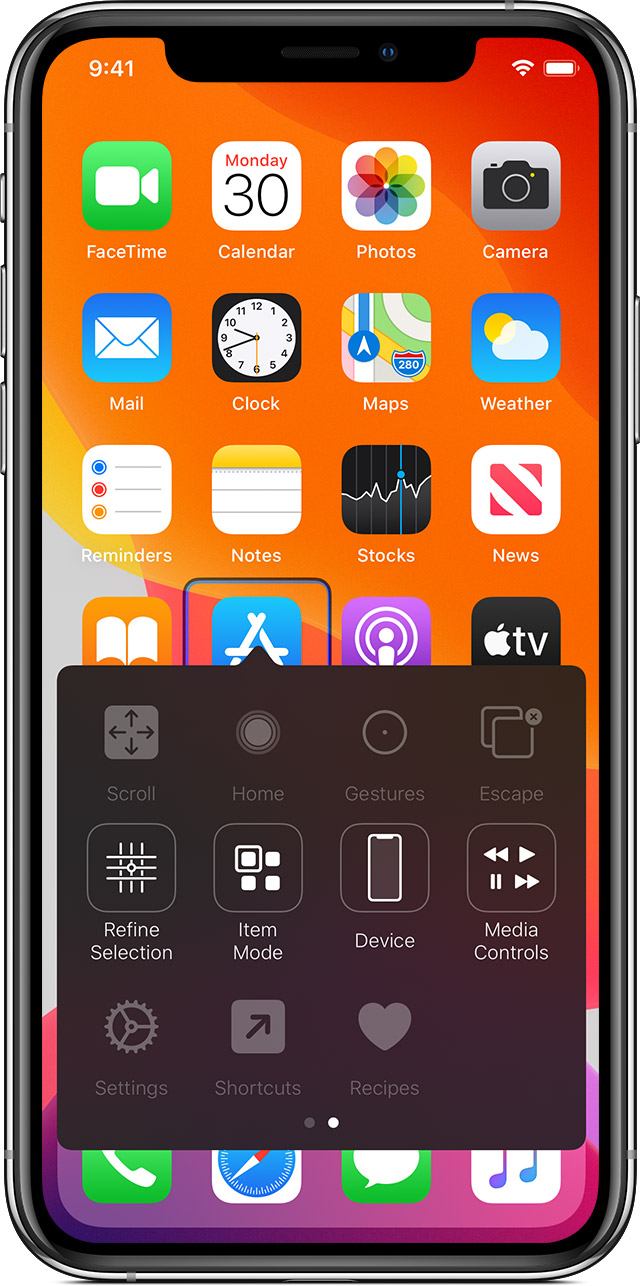
After you select an item, a menu appears that lets you choose an action.
Use item scanning
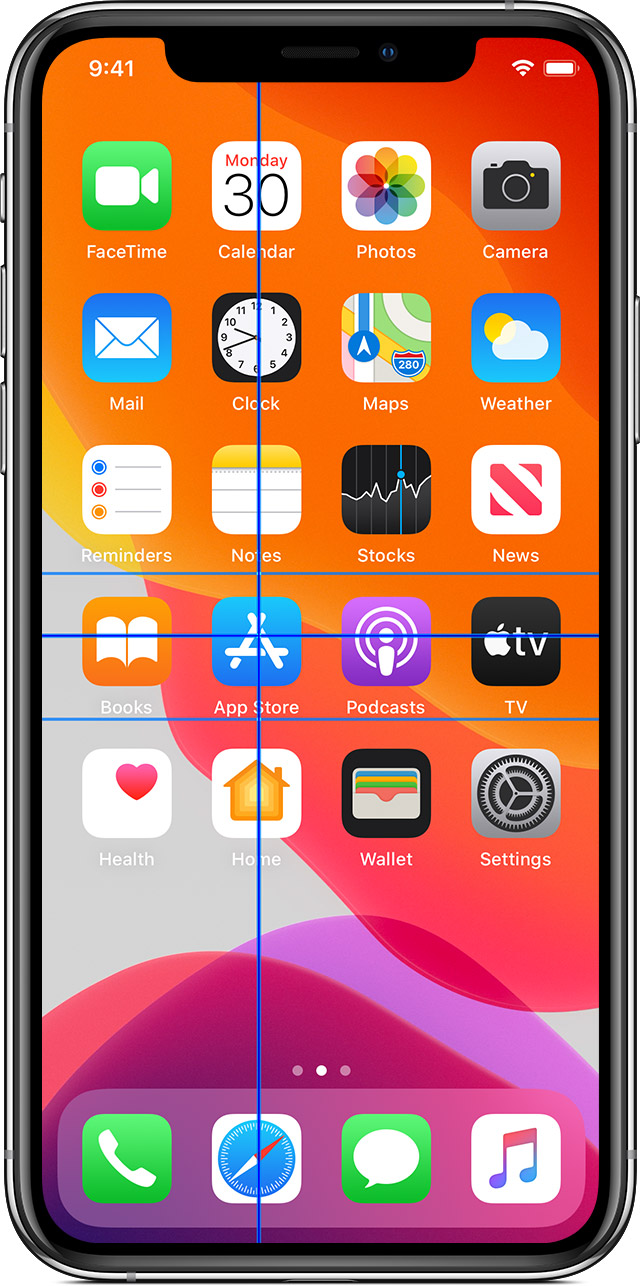
Item scanning highlights items or groups on the screen one at a time. Here’s how to use item scanning:
- To select an item or a group, watch (or listen) as items are highlighted. While an item is highlighted, choose it with the switch that you set up as your Select Item switch. When you select a group, highlighting continues with the items in the group.
- To exit a group, use your switch when the dashed highlight around the group or item appears.
Use point scanning
Point scanning lets you select an item on the screen by pinpointing it with scanning crosshairs. To turn on point scanning:
- Use item scanning to select an item.
- Wait for the menu to appear.
- Select Point Mode. The wide vertical crosshairs appear when you close the menu.
To select an item with point scanning:
- Use your select switch to stop the wide vertical crosshairs. The fine vertical crosshair appears.
- Use your select switch again to stop the fine vertical crosshair. The fine scanning line will appear next.
- Repeat to stop and refine the vertical crosshairs.
To turn off point scanning:
- Use point scanning to select an item.
- Wait for the menu to appear.
- Select Item Mode.
Use Head Tracking on devices with a TrueDepth camera
Head Tracking uses the camera on your device to track the movement of your head to control a pointer on your screen, and tracks your facial movements to perform actions. You can use Head Tracking on devices with a front-facing TrueDepth camera. * Here’s how to turn it on:
- Go to Settings > Accessibility, and select Switch Control.
- Tap to turn on Head Tracking. From here, you can select certain actions, pointer speed, and your tracking mode.
The TrueDepth camera is supported on iPhone X and later, and iPad Pro 12-inch (3rd generation) and iPad Pro 11 inch.
Use manual scanning
If you use multiple switches, you can set up each switch to perform a specific action and customize how you select items. For example, instead of automatically scanning items, you can set up switches to move to the next or previous item on demand. If you just have one switch, keep using Auto Scanning.
To use manual scanning:
- Go to Settings > Accessibility > Switch Control.
- Tap Scanning Style, then select Manual Scanning.
Choose an action after you select an item
After you select an item with your switch, the possible actions for that item appear in a new menu. Select the dots at the bottom of the menu to see more options.
Tap an item
You can tap an item three different ways:
- Choose Tap from the menu that appears when you select the item.
- Turn on Auto Tap at Settings > Accessibility > Switch Control > Tap Behavior > Auto Tap. After you turn on Auto Tap, you can select an item and wait for the Auto Tap interval to finish.
- Set up a switch to perform the tap gesture at Settings > Accessibility > Switch Control > Switches.
Use a gesture
Select the gesture or action from the menu that appears when you select the item. If you turned on Auto Tap, use your switch within the Auto Tap interval, then select the gesture. If more than one page of actions is available, select the dots at the bottom of the menu to go to another page.
Exit the control menu
Use your switch while all the icons in the menu are dimmed.
Scroll up or down
Select any item on the screen, then choose Scroll from the menu.
Press a button or flip a switch
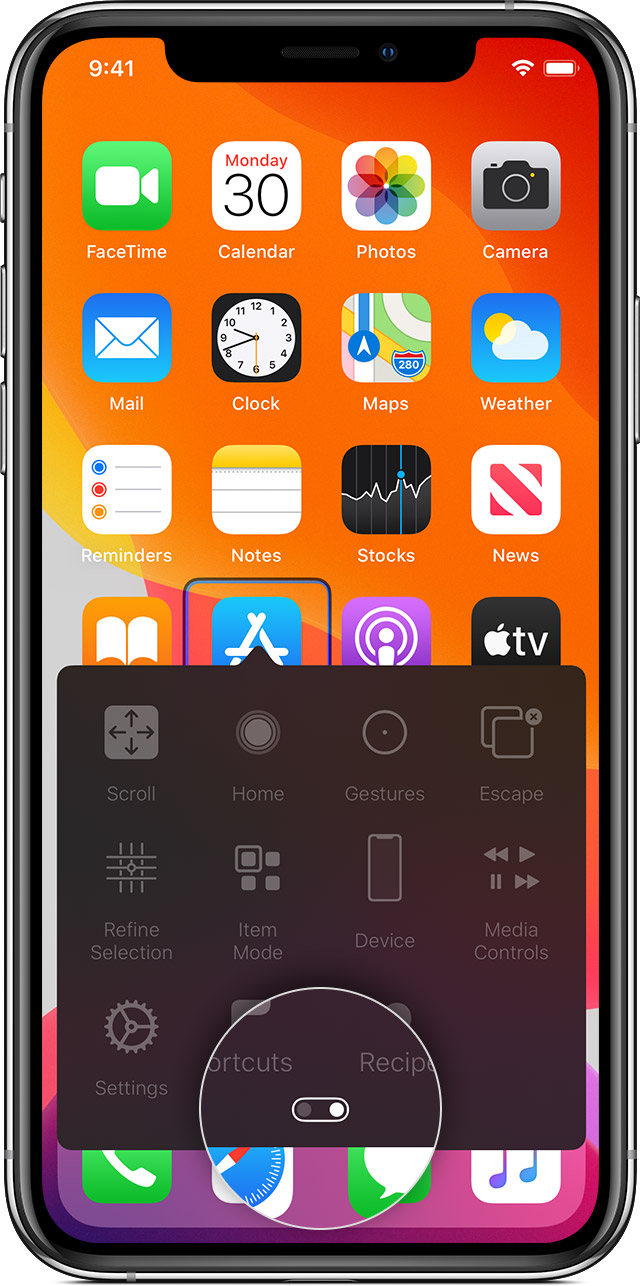
Select any item, select the dots at the bottom of the menu, then select Device from the menu that appears. You can use the menu to mimic these actions:
- Click the Home button.
- Double-click the Home button for multitasking.
- Open Notification Center or Control Center.
- Press the Sleep/Wake button to lock the device.
- Rotate the device.
- Flip the Mute switch.
- Press the volume buttons.
- Hold down the Home button to open Siri.
- Triple-click the Home button.
- Shake the device.
- Press Home and Sleep/Wake buttons simultaneously to take a screenshot.
Change your settings and adjust how each switch works
To change your settings, go to Settings > Accessibility > Switch Control. Then make your changes:
- Add switches and specify their function
- Choose, create, and edit recipes
- Choose a scanning style
- Adjust how rapidly items are scanned
- Turn off auto scanning (only if you’ve added a Move to Next Item switch)
- Set scanning to pause on the first item in a group
- Choose how many times to cycle through the screen before hiding Switch Control
- Choose a tap behavior and set the interval for performing a second switch action to show the control menu
- Choose whether Switch Control resumes scanning at an item you tap or from the beginning
- Set whether a movement action is repeated when you press and hold a switch, and how long to wait before repeating
- Add another action to a switch by pressing and holding the switch for a long duration
- Choose which items appear in menus and the order in which they appear
- Set whether and how long you need to hold a switch down before it’s accepted as a switch action
- Have Switch Control ignore accidental repeated switch triggers
- Adjust the point scanning speed
- Turn on sound effects or have items read aloud as they are scanned
- Choose what to include in the Switch Control menu
- Set whether items should be grouped while item scanning
- Make the selection cursor larger or a different color
- Save custom gestures to the control menu (in Gestures > Saved)
FaceTime isn’t available in all countries or regions.
Fine tune Switch Control
Choose Settings from the control menu to:
- Adjust scanning speed
- Change the location of the control menu
- Turn sound or speech accompaniment on or off
- Turn off groups to scan items one at a time
Источник
How to use Switch Control on iPhone and iPad
 Source: iMore
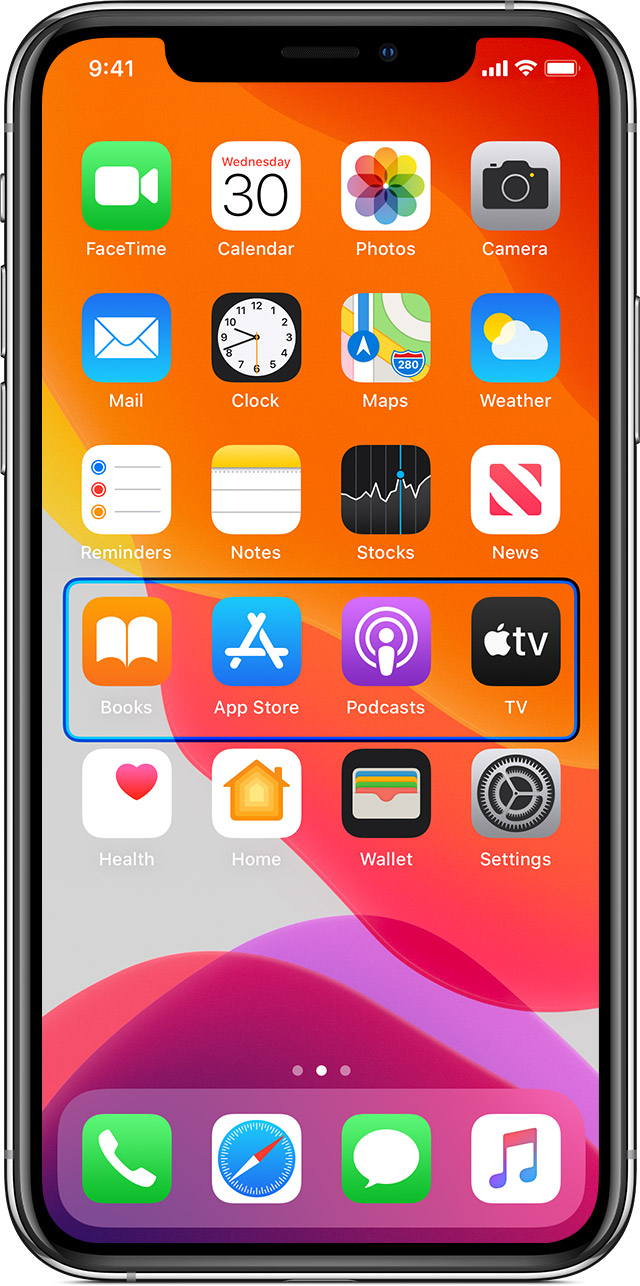
Switch Control is an accessibility feature in iOS 14 that allows folks with limited mobility to have full use of their device with the help of ability switches and other adaptive devices. When Apple makes the iPhone more accessible, it helps make the iPhone the best iPhone it can be, and Switch Control is a very robust feature.
Items on the screen are sequentially highlighted and can be activated by tapping, moving your head in front of the selfie camera, or pressing adaptive switches. You can also use point scanning and gestures, like pinching to zoom. Plus, you can even use multiple switches. Here’s how to use Switch Control on iPhone and iPad
Note: Switch Control is easiest to set up if you pair your adaptive device first in your iPhone or iPad’s Bluetooth menu.
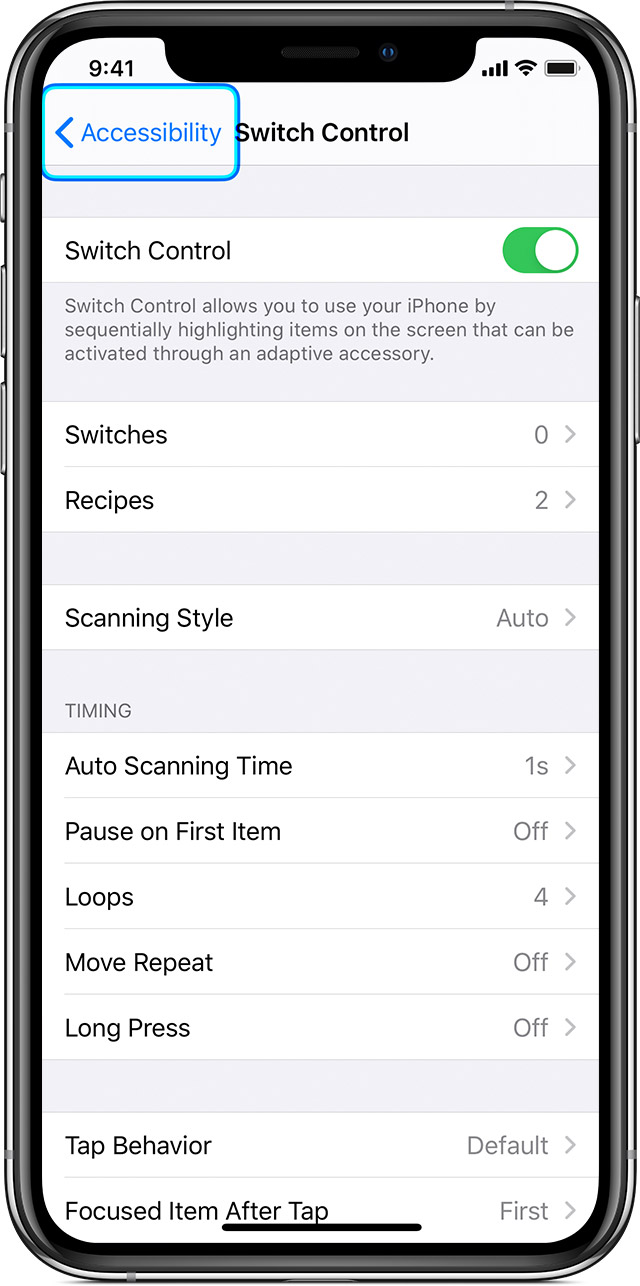
How to enable Switch Control
- Launch Settings from your Home screen.
Tap Accessibility.
![]() Source: iMore
Source: iMore
Tap Switch Control.
Tap the Switch Control On/Off switch. It will be green when the feature is enabled.
 Source: iMore
You can turn off Switch Control whenever you want by following the same steps above.
How to add a new switch
- Launch Settings from your Home screen.
- Tap Accessibility.
Tap Switch Control.
 Source: iMore
Tap a source.
- External: You’ll have to activate your external switch.
- Screen: You’ll have to select Full Screen afterward.
Camera: If you choose the camera, you’ll also have to select actions for Left Head Movement and Right Head Movement.
Source: iMore
Tap Long Press to set up a long press switch action. This is optional.
![]() Source: iMore
Source: iMore
How to delete a switch
- Launch Settings from your Home screen.
- Tap Accessibility.
Tap Switch Control.
Source: iMore
Tap Delete.
Source: iMore
How to create a new recipe
A recipe is a set of actions that you can temporarily assign to switches in place of their normal actions. You can use recipes to perform frequently repeated or complex actions, like turning pages in iBooks. You’ll need to have an adaptive switch connected to your device, but to get into the new recipe section, do the following:
- Launch Settings from your Home screen.
- Tap Accessibility.
Tap Switch Control.
Source: iMore
Tap Recipes.
Tap Create New Recipe.
![]() Source: iMore
Source: iMore
From there, you’ll be able to name your recipe and configure it with your adaptive switch or other assistive devices.
How to change scanning style
Changing the scanning style will change how you move through items on the screen. Auto Scanning is the default, but you have options if you would prefer to be in control.
- Launch Settings from your Home screen.
- Tap Accessibility.
Tap Switch Control.
Source: iMore
Tap a scanning style:
- Auto Scanning: Moves focus automatically after a specified duration
- Manual Scanning: Requires a switch to be engaged to move focus and a second to activate items
Single Switch Step Scanning: Requires a switch to be engaged to move focus, and if no action is taken within a certain amount of time, the item in focus will automatically be activated.
![]() Source: iMore
Source: iMore
How to change Auto Scanning Time
This will change how long it takes for Switch Control to automatically scan through items on a screen.
- Launch Settings from your Home screen.
- Tap Accessibility.
Tap Switch Control.
Source: iMore
Tap the plus and minus buttons to increase or decrease time.
Source: iMore
How to enable Pause on First Item
If you get to a screen but need a second to get your bearings, you can enable Pause on First Item, and scanning won’t start until you say so.
- Launch Settings from your Home screen.
- Tap Accessibility.
Tap Switch Control.
Source: iMore
Tap Pause on First Item.
Tap the Pause on First Item On/Off switch. When the switch is green, the feature is enabled.
![]() Source: iMore
Source: iMore
How to change the number of loops
After each item on the screen has been visited a certain number of times, the cursor will become hidden. Here’s how to change how many times the scan loops.
- Launch Settings from your Home screen.
- Tap Accessibility.
Tap Switch Control.
Source: iMore
Tap a number. You can loop from 1 to 10 times.
![]() Source: iMore
Source: iMore
How to enable Move Repeat
If you need a little more time, Move Repeat will repeat the delay before «Move To Next/Previous Item» while a switch is pressed.
- Launch Settings from your Home screen.
- Tap Accessibility.
Tap Switch Control.
Source: iMore
Tap Move Repeat.
Tap the Move Repeat On/Off switch. When the switch is green, the feature is enabled.
![]() Source: iMore
Source: iMore
How to enable and change the duration of Long Press
You can use Long Press to add another action to a switch that is activated when you hold it for a certain length of time. Here’s how to enable it and change its duration.
- Launch Settings from your Home screen.
- Tap Accessibility.
Tap Switch Control.
Source: iMore
Tap Long Press.
Tap the plus or minus button to increase or decrease the length of time you have to press before Long Press is engaged.
Source: iMore
How to change tap behavior
Tap behavior is what happens when the Select action is activated. It displays the Scanner Menu by default.
- Launch Settings from your Home screen.
- Tap Accessibility.
Tap Switch Control.
Source: iMore
Tap Tap Behavior.
Tap an option:
- Default
- Auto Tap: You change the Auto Tap duration when it’s enabled. Just tap the plus and minus buttons that appear.
Always Tap
![]() Source: iMore
Source: iMore
How to change which item is focused after tapping
You can change the item that Switch Control scans after an item is tapped. Here’s how:
- Launch Settings from your Home screen.
- Tap Accessibility.
Tap Switch Control.
Source: iMore
Tap Focused Item After Tap.
Tap either First Item or Current Item.
![]() Source: iMore
Source: iMore
How to enable Always Tap Keyboard Keys
- Launch Settings from your Home screen.
- Tap Accessibility.
- Tap Switch Control.
Tap the Always Tap Keyboard Keys On/Off switch. When the switch is green, the feature is enabled.
Source: iMore
How to enable Extended Predictions
- Launch Settings from your Home screen.
- Tap Accessibility.
- Tap Switch Control.
Tap the Extended Predictions On/Off Switch. When the switch is green, the feature is enabled.
Source: iMore
How to enable and change hold duration
You can enable and modify a hold duration so that your adaptive device must be held for a certain amount of time before a press is recognized. Here’s how:
- Launch Settings from your Home screen.
- Tap Accessibility.
Tap Switch Control.
Source: iMore
Tap Hold Duration.
Tap the plus and minus buttons to lengthen or shorten the duration.
Source: iMore
How to enable Ignore Repeat
Ignore Repeat is the time in which multiple presses are treated as a single input. This duration has to be less than the Auto Tap duration so that a double input press can be used.
- Launch Settings from your Home screen.
- Tap Accessibility.
Tap Switch Control.
Source: iMore
Tap Ignore Repeat.
Tap the plus and minus buttons to change the duration.
Source: iMore
How to change Gliding Cursor Speed
You can change the speed at which the Gliding Cursor moves across the screen. Here’s how:
- Launch Settings from your Home screen.
- Tap Accessibility.
Tap Switch Control.
Source: iMore
Tap Gliding Cursor Speed.
Tap the plus or minus button to increase or decrease the speed.
Source: iMore
How to enable Head Tracking
When you enable Head Tracking, it uses the camera to track the movement of your head to control the pointer on the screen. Here’s how you turn it on.
- Launch Settings from your Home screen.
- Tap Accessibility.
Tap Switch Control.
Source: iMore
Tap Head Tracking.
Tap the Head Tracking On/Off switch. The switch will turn green when enabled.
![]() Source: iMore
Source: iMore
How to enable Sound Effects
- Launch Settings from your Home screen.
- Tap Accessibility.
- Tap Switch Control.
Tap the Sound Effects On/Off Switch. When the switch is green, the feature is enabled.
Source: iMore
How to enable speech in Switch Control
- Launch Settings from your Home screen.
- Tap Accessibility.
Tap Switch Control.
Source: iMore
Tap Speech.
Tap and drag the slider left or right to change the speaking rate. The right is faster; the left is slower.
Source: iMore
How to change the speech voice in Switch Control
- Launch Settings from your Home screen.
- Tap Accessibility.
Tap Switch Control.
Source: iMore
Tap Speech.
Tap the voice you want to use.
Source: iMore
From here, you’ll be able to hear what the voice sounds like. Note: You may have to download some of the voices before you can use them.
How to change menu items in Switch Control
- Launch Settings from your Home screen.
- Tap Accessibility.
Tap Switch Control.
Source: iMore
Tap Menu Items.
Tap a menu:
![]() Source: iMore
Source: iMore
Tap a menu item to disable/enable it.
Tap the switch next to Show Streamlined First Page to enable/disable it. Having it enabled will make only the most important menu items be shown on the menu’s first page.
 Source: iMore
How to enable/disable Group Items
Grouping items allows for faster navigation.
- Launch Settings from your Home screen.
- Tap Accessibility.
- Tap Switch Control.
Tap the Group Items On/Off switch. When the switch is green, the feature is enabled.
Source: iMore
How to enable the large cursor
- Launch Settings from your Home screen.
- Tap Accessibility.
- Tap Switch Control.
Tap the Larger Cursor On/Off switch. When the switch is green, the feature is enabled.
Source: iMore
How to change cursor color
- Launch Settings from your Home screen.
- Tap Accessibility.
Tap Switch Control.
Source: iMore
Tap a color:
![]() Source: iMore
Source: iMore
How to create a new gesture
- Launch Settings from your Home screen.
- Tap Accessibility.
Tap Switch Control.
Source: iMore
Tap Saved Gestures.
Tap Stop in the bottom right corner when you have finished making your gesture.
Source: iMore
Tap Save in the top right corner of your screen when you’re finished.
Tap Save.
Source: iMore
Remember, you can tap Record if you want to re-do your gesture before saving. Any new gestures will now appear as an item under Saved Gestures.
Questions?
Any questions about Switch Control? Let us know in the comments, and we’ll do our best to answer!
Updated May 2021: Updated for the newest version of iOS 14.
![]()
Report: Apple allowing ‘much looser interpretation’ of ad tracking policy
A new report from the Financial Times claims Apple is allowing developers to follow a «much looser interpretation» of its iOS 14 App Tracking Transparency measures.
![]()
How the new Nintendo Switch OLED compares to previous Switch consoles
The Nintendo Switch OLED has several improvements over previous Switch iterations. The titular OLED screen stands out incredibly well in person.
![]()
Facebook, Ring, Alexa, Disney+, and more are all down right now
A number of web services are down right now and it’s all thanks to Amazon’s AWS own outage.
![]()
Keep your new Switch OLED model’s screen scratch-free with these protectors
The Nintendo Switch OLED model has a larger screen than the original Switch, so it needs a larger screen protector to keep it safe. These are the best options out there.
Источник


