- Convert JAR to APK in bulk. Large JAR files are supported.
- You can convert JAR Learn more about JAR
- How to convert JAR to APK?
- About the formats
- Description
- Description
- Common questions about converting JAR to APK
- How to Convert Java Code to Kotlin Code in Android Studio?
- Code Conversion
- Method 1: Converting a Complete Class/File into Kotlin
- Kotlin
- Method 2: Adding a Separate Kotlin File into the Project
- Advantages of Kotlin Over Java
- Converting Java (J2ME) Applications to Android .apk Format
- Android .apk Files – Can they Really be Decompiled?
- How to Convert .jar/.jad (J2ME/MIDP 2.0) Applications to Android .apk Format
- Converting a Java Program into an Android App
- Like this article? We recommend
- Like this article? We recommend
- Like this article? We recommend
- Example: A Simple Java Program
- Listing 1 Code in WelcomeMsg.java.
- Creating an Android Project Similar to the Java Program
- Interested in more on this topic? You might like these:
- Organizing Controls in the Layout Container
- Listing 2 Code for activity_main.xml file.
- Writing Java Code to Load the Layout File
- Listing 3 Code in WelcomeMsgActivity.java file.
- Creating an Android Virtual Device (AVD)
- Summary
Convert JAR to APK in bulk.
Large JAR files are supported.
You can convert JAR Learn more about JAR
Your files are automatically deleted from our servers after 24 hours.
ADD FILES Cancel
CANCEL ALL Download
How to convert JAR to APK?
About the formats
| Extension | jar |
|---|---|
| Category | Archive/Compression file formats |
| Developed by | Sun Microsystems, now Oracle Corporation |
| Mime type | application/java-archive |
Description
JAR, or Java Archives, are executable Java programs by the Java Runtime Environment (JRE).
Please note that MConverter cannot create an executable program if the provided source archive file was not a compiled program for the same platform. When converting from JAR to another format, MConverter only extracts the contents of the JAR file. It does not make it installable in another format.
| Extension | apk |
|---|---|
| Category | Archive/Compression file formats |
| Developed by | |
| Mime type | application/vnd.android.package-archive |
Description
An APK file is an installer for an Android app. It can be used for distributing apps outside the Google Play Store, though Google Play also uses them internally.
You can convert it to another archive format in order to see the contents of the app, albeit compiled.
Note: MConverter can only extract the contents of the APK file. No converter can make it into another installable format.
Common questions about converting JAR to APK
Can I convert JAR to APK in bulk?
Can I convert a JAR file to APK, if its size is 1 GB?
Is converting JARs to APK safe with MConverter?
How long does it take to convert JAR to APK?
Made with 💙 in 🇧🇬 Bulgaria
This site attempted to download multiple files automatically
Источник
How to Convert Java Code to Kotlin Code in Android Studio?
In Google I/O 2017, Kotlin has been declared as an official language for Android app development. This language gains popularity among developers very quickly because of its similarities as well as interoperable with Javalanguage. One can mix code of Java and Kotlin while designing an Android project. Some of the major challenges faced by developers like avoiding null pointer exceptions are easily handled by Kotlin. Because of all these reasons, it became essential to learn Kotlin. However, Android Studio takes care of this need. Developers can easily convert their Java code into Kotlin in Android Studio. There can be 2 scenarios in front of developers:
- Converting a complete Java File/Class into Kotlin File/Class
- Add a new Kotlin file/class in the project and convert a piece of Java code.
This article broadly describes the steps involved in performing code conversion in both cases.

Code Conversion
Method 1: Converting a Complete Class/File into Kotlin
Step 1: Open source code file
Open the java source code file that is to be converted. Consider the given code of the MainActivity file that is to be converted into Kotlin.
Step 2: Select the option
From the left-hand side Option menu, select Android Project and right-click on the source code file. Select the option “Convert Java File to Kotlin File”. One can also use the shortcut command “Ctrl+Alt+Shift+K” while the file is opened in Android Studio.
A dialog box will appear that asks permission to configure Kotlin in Project. To carry out the code conversion it is necessary to grant this permission. Further, select the “All modules” option and choose the latest Kotlin compiler installed on the computer. After clicking “OK”, Android Studio will make some changes in the app module build.gradle file to perform code conversion successfully.
Step 3: Produce Kotlin file
Again select the “Convert Java File to Kotlin File” option by right click on the java class/file. This time the required conversion will happen and the file extension will get changed from .java to .kt. Below is the equivalent Kotlin code produced on converting the above mentioned MainActivity.java file.
Kotlin
Method 2: Adding a Separate Kotlin File into the Project
Android Studio allows the mixing of Java and Kotlin code in a project. If there is a requirement to reuse a piece of Java code by writing it in Kotlin, one can follow the below-mentioned steps.
Step 1: Create a Kotlin Class/File
Create a new Class/File of Kotlin extension inside the java folder of the application’s project file. Give it a desired name. Once the file is created, Android Studio will show an alert message that “Kotlin is not configured”.
Step 2: Configure Kotlin into the Project
Click on the “configure” option present on the alert message. A dialog box will appear, select “All modules” and choose the latest Kotlin compiler installed on the computer. Click “OK” and let the changes take place in build.gradle files.
Step 3: Copy and Paste
Once Android Studio finished the build of project files, open the created Kotlin Class/File. Copy the Java code which is to be converted. Paste that code in the created file/class having Kotlin extension. That Java code will get converted automatically into Kotlin by the Android Studio.
Advantages of Kotlin Over Java
- Kotlin codes are more concise than Java.
- It is interoperable(compatible) with Java.
- Kotlin resolves nullability issues by placing “Null” in its type system.
- Cleaner and safer code.
Источник
Converting Java (J2ME) Applications to Android .apk Format
If you just got a new android phone, running java applicatons in .jar format can be a real challenge but there are lots of ways out. I previously wrote a post on how to run java applicatons on Android smartphones using an emulator but what I’m posting here is totlally different. Yes, you can convert .jar files to Android’s .apk format. Sounds impossible? Well, it can be done easily with the service of a couple of websites but I need to make a few things clear about Android applications.

Android .apk Files – Can they Really be Decompiled?
You’re probably not an Android developer but just an ordinary guy like me, so I’m going to keep this simple and straight. At first, the extension Google uses for Android applications (.apk) may look complicated but it actually isn’t. Basically, an apk file is nothing but a zip archive disguised in a different extension. You think I’m joking? Just rename the .apk extension to .zip and extract the content to see exactly what I’m trying to say. Inside this zipped archive is a file named classes.dex which is the most important file in there containing all the java files. This file is encrypted but it can still be disassembled. The java classes are compiled differently so there’s need to go through some special steps to decompile them. You’re going to need these two files:
- Dex2Jar from http://code.google.com/p/dex2jar/
- A regular Java decompiler, such as JD from http://java.decompiler.free.fr
-In dex2jar directory, paste your classes.dex file.
-Open CMD, go to dex2jar durectory using cd, and type dex2jar YourApp .apk
-You will automatically get a .jar. Use jd gui to decompile it.
How to Convert .jar/.jad (J2ME/MIDP 2.0) Applications to Android .apk Format
Everything I’ve been ranting about is not the real thing you’re looking, huh? Anyways, I found two sites where you can easily convert .jar applications to .apk format and run it smoothly on your Android smartphone.
1. Netmite
This offers this service free of charge and I can tell you that their service is quite cool. You can check them out and, of course, it’s very easy to use. Just upload your java application and the jad format to get the android version! You can use JADMaker to get the .jad version of your java application.
2. Upontek
These guys too offer the same service but hey, it’s not for free. If you’re a developer, you may want to check out their service and some extras they’ve got for you.
That’s all I’ve got on converting .jar applications to Android .apk format. There may be other websites offering the same service though.
Источник
Converting a Java Program into an Android App
Like this article? We recommend
Like this article? We recommend
Like this article? We recommend
Example: A Simple Java Program
The code shown in Listing 1 is a simple Java program called WelcomeMsg.java that asks the user to enter a name. After entering the name, when the user presses Enter, a welcome message appears, including the name the user typed. For example, if the user enters the name «Kelly,» the message, «Welcome Kelly!» appears on the screen.
Listing 1 Code in WelcomeMsg.java.
In WelcomeMsg.java, statement #1 imports the packages required for input/output operations. Statement #2 creates a reader called istream. The reader will read from the standard input stream (System.in); that is, from the keyboard. The entered text is stored in the form of Unicode characters. Statement #3 uses the istream reader to convert the data into string form. Statement #4 defines a try..catch block to check for any errors that might have occurred while the reader entered the text. Statements #5 and #6 ask the user to enter a name that is then assigned to the string name. The entered name is then displayed on the screen by statement #8.
When the program is run, it asks the user to enter a name. After the user types a name and presses Enter, the welcome message is displayed with the entered name, as shown in Figure 1.
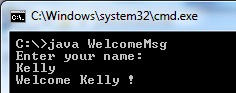
Figure 1 Output of the Java program
Creating an Android Project Similar to the Java Program
Now let’s create the same application in Android. Assuming that the Java Development Kit (JDK) is installed on your machine, download Android Studio. Then follow these steps:
- Double-click the downloaded executable file to install Android Studio.
- After the installation completes successfully, launch Android Studio. The first screen that opens is a welcome screen, displaying icons such as New Project, Import Project, Open Project, and so on. Click the New Project icon to create a new Android project.
- In the New Project dialog, enter information for the new project, as shown in Figure 2.
- In the Application Name box, enter the name of the Android project. Let’s name the application WelcomeMsg. The Module Name entry is assigned automatically; by default, it’s the same as the application name. To make it a unique identifier, the Package Name assigned is com.yourname.welcomemsg. The location to store the Android project is specified in Project Location box.
- Select API 8: Android 2.2 (Froyo) from the Minimum Required SDK drop-down list, to indicate that the application requires at least API level 8 to run. Select API 17: Android 4.2 (Jelly Bean) as the Target Platform, as we expect this to be the version commonly used by your target audience. Select API 17: Android 4.2 (Jelly Bean) as the platform to compile the project. The default Theme assigned to the project is Holo Light with Dark Action Bar.
- The Create Custom Launcher Icon checkbox is checked by default. This feature allows you to configure the launcher icon for the application. Because we want to create a blank activity, click the Create Activity checkbox and then click the Next button.
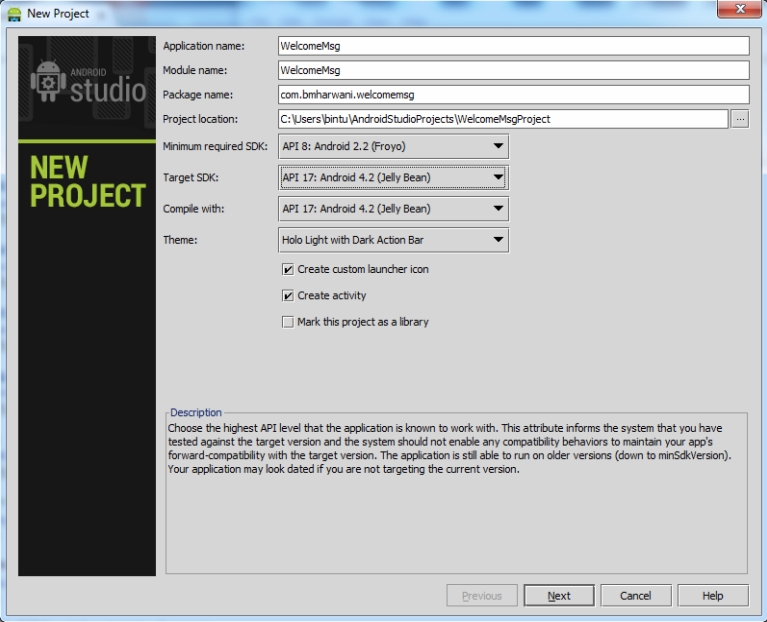
Figure 2 Creating a new Android project
Android Studio will automatically create several files and folders for our new Android project (see Figure 3). To customize our new project, we just need to work with two files:
- activity_main.xml. This file is shown at right in Figure 3, in the node WelcomeMsg > src > main > res > layout. It’s an XML file in which we’ll define the controls (TextView, EditText, Button, etc.) for our Android app’s graphical user interface. Through this file, the user interacts with the Android project.
- WelcomeMsgActivity.java. This file is in the node WelcomeMsg > src > main > java > com.yourname.welcomemsg. This Java file loads the controls defined in the layout file activity_main.xml, listens for various events, and runs the required code if any of those events occur.
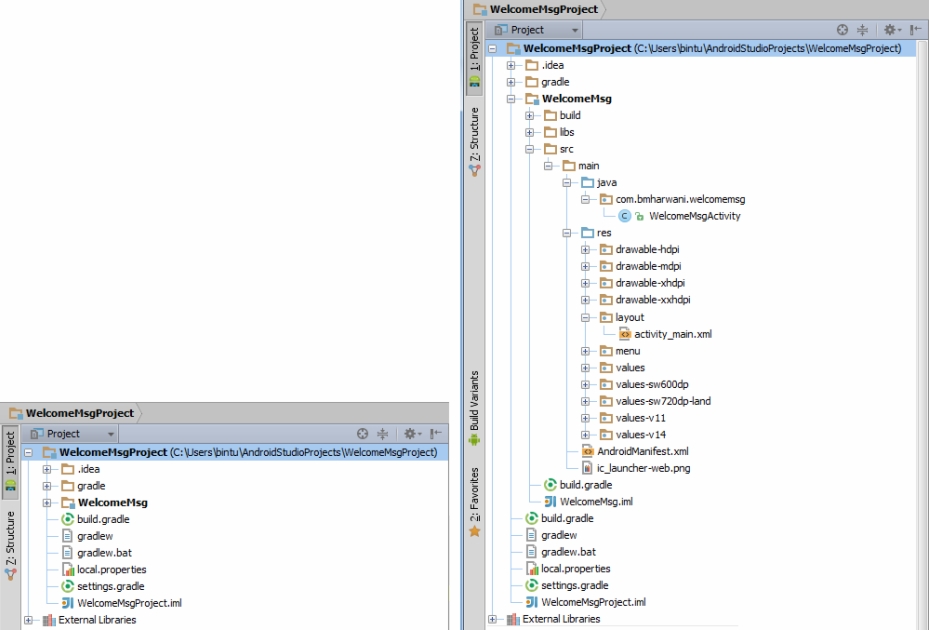
Figure 3 Project Explorer windows showing files and folders of our new Android project in collapsed mode (left) and expanded mode (right)
Interested in more on this topic? You might like these:

By Carmen Delessio, Lauren Darcey, Shane Conder
Organizing Controls in the Layout Container
The most popular approach for creating an Android user interface is via an XML file. The controls or views defined in the XML file for use in the Android app are laid out or organized in a layout container. Android provides several layout containers: RelativeLayout, LinearLayout, GridLayout, FrameLayout, and so on. The default arrangement is RelativeLayout. The simplest is LinearLayout, which displays the controls linearly, one below the other. (The default orientation of LinearLayout is vertical.)
To define the controls for your new Android project, open the activity_main.xml file (also known as the activity layout file) by double-clicking it in the Project window; then replace the default content with the code shown in Listing 2.
Listing 2 Code for activity_main.xml file.
The layout file in Listing 2 uses TextView, EditText, and Button controls:
- The TextView control displays a text message on the screen in the specified font, size, and color.
- The EditText control displays a blank textbox to accept data from the user.
- The Button control in most applications displays a button which, when clicked, initiates the desired action. The caption displayed on this Button control is «Click Me.»
Because controls are created by hand in XML, there’s no default caption for a Button. If you don’t assign a caption, the button will appear with no text on it.
In Listing 2, the EditText, Button, and the second TextView controls are assigned the IDs user_name, click_btn, and response, respectively. These IDs will be used to identify and access the corresponding controls in the Java code file. The last TextView control in Listing 2 displays a welcome message to the user.
When laid out in a LinearLayout container, these controls would appear as shown in Figure 4.
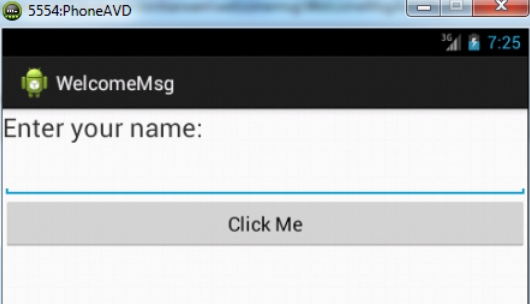
Figure 4 TextView, EditText, and Button controls arranged in a LinearLayout container
The title 5554:PhoneAVD in Figure 4 refers to the Android Virtual Device (AVD) in which we’ll run our Android app. Android Virtual Devices are explained later in this article.
Writing Java Code to Load the Layout File
The controls defined in the activity layout file need to be loaded to display them on the screen. In addition to loading the controls, we want to perform certain tasks such as associating events to controls, listening for events, and taking action when events occur. To do all these tasks, write the Java code shown in Listing 3 in the Java activity file WelcomeMsgActivity.java.
Listing 3 Code in WelcomeMsgActivity.java file.
In this Java activity file, the following tasks are performed:
- Loading the controls that are laid in the activity layout file activity_main.xml through statement #1.
- Accessing the Button control from the activity layout file using its ID, (click_btn) and mapping it to the Button object b (statement #2).
- Associating a click event with the Button control and listening for the occurrence of the click event (statement #3).
- Accessing the TextView control from the activity layout file using its ID, response, and mapping it to the TextView object resp (statement #4).
- Accessing the EditText control from the activity layout file using its ID, user_name, and mapping it to the EditText object name (statement #5).
- Creating a String, str, that contains a welcome message along with the user name entered in the EditText control (statement #6).
- Displaying the string in str through the TextView object resp (statement #7).
We can run the Android project on a physical device as well on a virtual device. For this example, we’ll run the Android project by creating an Android Virtual Device (AVD) as described in the next section.
Creating an Android Virtual Device (AVD)
There are many Android devices, each with its own configuration. To test whether your Android application is compatible with a set of Android devices, we’ll create an Android Virtual Device to represent that device configuration.
- To create an AVD, select Tools > Android > AVD Manager. An Android Virtual Device Manager dialog opens, displaying a list of existing AVDs. You can use this dialog to work with an existing AVD or create a new AVD.
- Click the New button to create a new AVD. The Create New Android Virtual Device (AVD) dialog box appears.
- Fill in the dialog box as shown in Figure 5.
- AVD Name. Specify the name of the AVD. For this example, use the name PhoneAVD.
- Device. Specify the device for which the application has to be tested. For this example, select the device 5.1” WVGA (480 × 800: mdpi).
- Target. Specify the target API level. Our application will be tested against the specified API, so let’s set the target to the latest API, Android 4.2.2 — API Level 17.
- CPU/ABI. Indicates the processor that we want to emulate on our device. Select the ARM (armeabi-v7a) option.
- Keyboard. To use the physical keyboard on the computer along with the one displayed on the emulator screen, check the Hardware Keyboard Present checkbox.
- Skin. Select the Display a Skin with Hardware Controls checkbox. The emulator will be displayed along with physical device buttons on the right side. The controls include basics such as speaker and on/off buttons, Home, Menu, Back, and Search buttons.
- Front Camera/Back Camera. If a webcam is attached to your computer and you want to use it in your application, select webcam0 from the drop-down menu. Choose an emulated option if you don’t have a webcam. Leave the default None if the application doesn’t require a camera.
- Memory Options. Define the device RAM and VM Heap settings. Leave the default values here.
- Internal Storage. Define the internal storage of the device. Leave the default value (200 MiB).
- SD Card. Extends the storage capacity of the device. Large data files, such as audio and video (for which the built-in flash memory is insufficient), are stored on the SD Card. Let’s set the size of the SD card to 128 MiB. The larger the allocated SD card space, the longer the AVD will take to create. Unless it’s really required, keep the SD card space as low as possible.
- Snapshot. Enable this option to avoid booting the emulator and start from the last saved snapshot. This option is used to start the Android emulator quickly.
- Use Host GPU. This option enables GPU emulation, which improves the emulator’s performance.
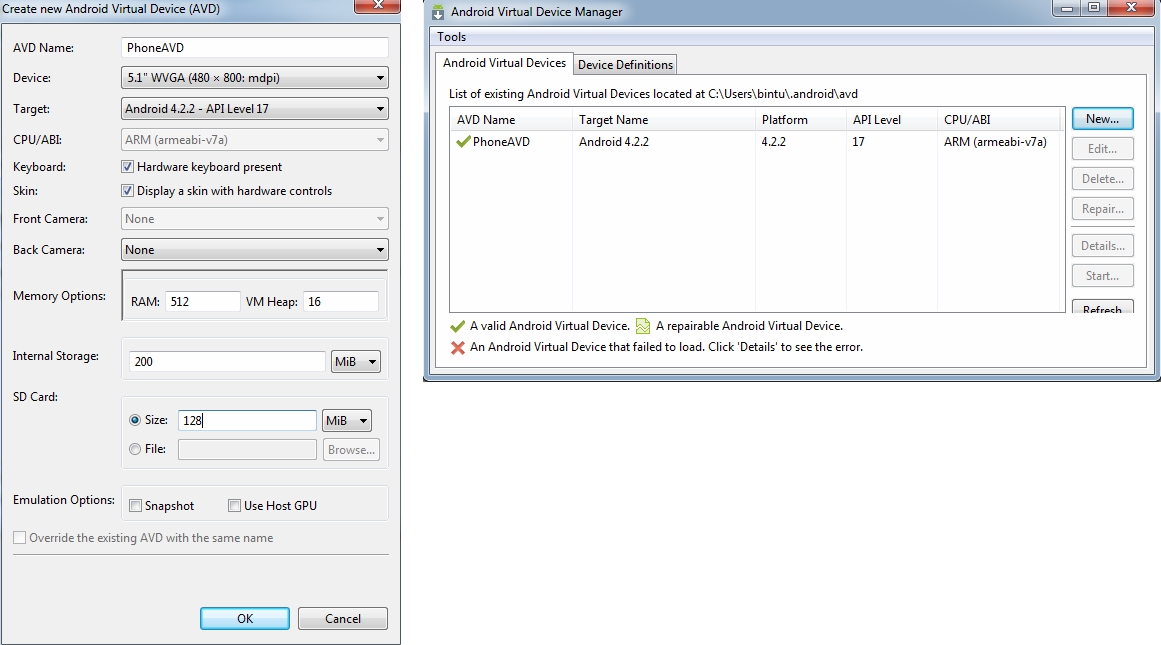
Figure 5 Creating a new Android Virtual Device (left). The newly created AVD is displayed in the Android Virtual Device Manager (right)
Our new application is ready to run! Click the Run icon on the toolbar, press Shift-F10, or select Run > Run. You’ll be prompted to select the device or AVD on which to show the output. Select the PhoneAVD from the Android virtual device drop-down list, and then click OK. The Android project will run, asking you to enter a name. After typing a name, click the Click Me button, and the new welcome message will be displayed (see Figure 6).

Figure 6 Select the device or AVD to show the project output (left) and enter a name in response to the prompt. Your new Android project shows the welcome message (right)
Summary
You’ve learned how easily you can convert any Java application into an Android application. Just define the user interface in XML; then access and process the data entered in the user interface controls through the Java code written in the Activity file.
If you want to learn Android programming step by step, check out my book Android Programming Unleashed, and explore the features provided by this great smartphone platform.
Источник


