- Archive or make copies of the information you store in iCloud
- iCloud Drive files
- Copy files from iCloud Drive to your Mac
- Copy files from the Files app on your iPhone, iPad, or iPod touch
- Copy files from iCloud.com
- Copy files from Windows
- Photos and videos
- Download copies of your photos and videos from your device
- Download copies of your photos and videos from iCloud.com
- Copy photos from Shared Albums
- Copy photos from Shared Albums on your iPhone, iPad, or iPod touch
- Copy photos and videos from Shared Albums on your Mac
- Copy photos and videos from Shared Albums in Windows
- Download photos from My Photo Stream on your iPhone, iPad, or iPod touch
- Transfer photos and videos from your iPhone, iPad, or iPod touch
- Use iCloud Photos
- Import to your Mac
- Import to your Windows PC
- Download iCloud photos and videos
- How to download photos and videos from iCloud.com
- On your iPhone, iPad, or iPod touch
- On your Mac or PC
- What happens when you delete photos or videos
- How to download photos and videos from the Photos app
- On your iPhone, iPad, or iPod touch
- On your Mac
- On your PC
- How to download photos and videos from Shared Albums
- On your iPhone, iPad, or iPod touch
- On your Mac
- On your PC
- iOS 15 Update: 6 Easy Ways to Transfer Photos from iPhone to PC or Mac
- Learn how to get photos off iPhone and onto a computer without the frustration!
- Jump To:
- How to Transfer Photos from iPhone to Computer (Mac)
- How to Transfer Photos from iPhone to Mac in MacOS Catalina & Later
- How To Import Photos from iPhone to Mac in MacOS Mojave
- How to Transfer Photos from iPhone to PC
- How to Upload Photos from iPhone to Computer in Windows 8
- How to Import Photos from iPhone to PC in Windows 10
- How to Transfer Pictures from iPhone to Computer with a Cable (Alternative Method)
- How to Import Photos from iPhone to MacBook or Mac with iCloud Photo Stream
- How to Set Photo Stream Images to Automatically Download to Mac or PC
- How to Download Pictures from iPhone to Computer with iCloud Photos (Also Works on iPad)
- How to Download Photos from iPhone to Mac with AirDrop
- Topics
- Author Details
- Author Details
Archive or make copies of the information you store in iCloud
Learn how to make copies of the information that you use with iCloud.
You might want to make a copy of the information you keep in iCloud. If you accidentally delete an important contact, email, or document, you can restore it from iCloud or from another copy that you have.
iCloud Drive files
Use these steps to copy documents from your Mac, iPhone, iPad, iPod touch, iCloud.com, or PC. If you copy a file from a shared folder in iCloud Drive to another folder, it does not also copy sharing access. Learn more about folder sharing.
Copy files from iCloud Drive to your Mac
- Click iCloud Drive in the sidebar of any Finder window.
- Press and hold the Option key and drag the file to a new location.
Copy files from the Files app on your iPhone, iPad, or iPod touch
Use these steps to send copies of files stored in iCloud Drive:
- Open the Files app and tap iCloud Drive.
- Tap the folder that you want to open, then tap the file to open it.
- Tap Share in the lower-left corner.
- Choose how you want to send a copy of the file.
For documents, spreadsheets, or presentations, tap More in the upper right, select Export, and choose how you want to export the file. You can also save a copy of your file locally.
Copy files from iCloud.com
Use these steps to download files stored in iCloud Drive, or files that are accessible from iWork apps on iCloud.com:
- Sign in to iCloud.com.
- Open iCloud Drive.
- Find and select the file.
- Click Download at the top of the page or double-click the file. The document downloads to your default downloads location.
Copy files from Windows
If you turned on iCloud Drive using iCloud for Windows on a PC, you can copy your files from the iCloud Drive folder in File Explorer. You can also copy your files from iCloud.com.
If you need help with any third-party data that is stored on iCloud, contact the app developer directly. Third-party data might use your iCloud storage, even if you can’t see the details.

Photos and videos
If you use iCloud Photos, your photos and videos are automatically uploaded to iCloud at full resolution.
Download copies of your photos and videos from your device
- On your iPhone, iPad, or iPod touch, tap Settings > [your name] > iCloud > Photos. Then select Download and Keep Originals and import the photos to your computer.
- On your Mac, open the Photos app. Select the photos and videos you want to copy. Choose File > Export.
- On your PC, make sure that you set up iCloud for Windows and turn on iCloud Photos. Open File Explorer. In the Navigation pane, click iCloud Photos, then select the images you want to keep on your PC. Right-click the selection and choose «Always keep on this device.» If you use iCloud for Windows 10 or earlier, learn how to download your photos. After the items download, copy them to another folder on your computer. To do this, press and hold the Ctrl key and drag the items to the folder. Include this folder if you back up your computer.
Download copies of your photos and videos from iCloud.com
If you want to download a few photos or videos, use iCloud.com to download the most recent version of photos and videos.
- On your iPhone, iPad, or iPod touch, go to iCloud.com, tap Photos, and tap Select. Then select the photos and videos you want to download, and tap More . Select Download, and your photos and videos will download as a .zip file to iCloud Drive.
- On your Mac or PC, just go to iCloud.com and click Photos. Then select the photos and videos you want to download and click Download .
Copy photos from Shared Albums
You can also use the steps below to manually copy photos and videos. Comments or likes connected to a shared photo aren’t saved, and photos and videos saved from shared albums aren’t full resolution.
Copy photos from Shared Albums on your iPhone, iPad, or iPod touch
- Open Photos and tap Albums.
- Find Shared Albums, then tap the name of the album that you want. You might need to swipe left to find the shared album.
- Save photos from the album using one of these methods:
- Tap an image to open it, then tap Share . To select more images, scroll the images left or right and tap the ones you want to save. Tap Save Image.
- Tap Select, then tap the images you want to save. Tap Share , then tap Save Image.
- Import the photos to your computer.
Copy photos and videos from Shared Albums on your Mac
Follow these steps to manually import photos and videos in shared albums to your Photos library:
- Open Photos and select Shared Albums.
- Double-click a shared album.
- Control click (or right-click) a photo and choose Import.
After you import your photos, you might want to back up your library. You can store them as a separate library on your computer or on a different drive.
Copy photos and videos from Shared Albums in Windows
Saved photos are available even if you turn off Photos in iCloud for Windows. To save photos and videos from a shared album, you must save them to another folder on your hard drive:
- Open iCloud for Windows.
- Click Options next to Photos. Note the path listed under iCloud Photos location.
- Open a File Explorer window (Windows 8 or later) or Windows Explorer window (Windows 7).
- Go to the iCloud Photos folder using the above path. Open the Shared folder.
- Select the photos you want to save, then copy them to another folder on your computer. To do this, press and hold the Ctrl key and drag the items to your folder. Include this folder if you back up your computer.
For information on backing up your Windows computer, see Microsoft Support.
Download photos from My Photo Stream on your iPhone, iPad, or iPod touch
Photos in My Photo Stream download to your Mac automatically. Use these steps to download them to your iPhone, iPad, or iPod touch.
- Tap Photos, then tap the Albums tab.
- Tap My Photo Stream.
- Tap Select, then tap all the photos you want to save.
- Tap Share , then tap Save Image.
Источник
Transfer photos and videos from your iPhone, iPad, or iPod touch
Learn how to transfer photos and videos from your iPhone, iPad, or iPod touch to your Mac or PC. You can also make your photos available on all your devices with iCloud Photos.
Use iCloud Photos
iCloud Photos keeps your photos and videos safe, up to date, and available automatically on all of your Apple devices, on iCloud.com, and even your PC. When you use iCloud Photos, you don’t need to import photos from one iCloud device to another. iCloud Photos always uploads and stores your original, full-resolution photos. You can keep full-resolution originals on each of your devices, or save space with device-optimized versions instead. Either way, you can download your originals whenever you need them. Any organizational changes or edits you make are always kept up to date across all your Apple devices. Learn how to set up and use iCloud Photos.
The photos and videos that you keep in iCloud Photos use your iCloud storage. Before you turn on iCloud Photos, make sure that you have enough space in iCloud to store your entire collection. You can see how much space you need and then upgrade your storage plan if necessary.
Import to your Mac
You can use the Photos app to import photos from your iPhone, iPad, or iPod touch to your Mac.
- Connect your iPhone, iPad, or iPod touch to your Mac with a USB cable.
- Open the Photos app on your computer.
- The Photos app shows an Import screen with all the photos and videos that are on your connected device. If the Import screen doesn’t automatically appear, click the device’s name in the Photos sidebar.
- If asked, unlock your iOS or iPadOS device using your passcode. If you see a prompt on your iOS or iPadOS device asking you to Trust This Computer, tap Trust to continue.
- Choose where you want to import your photos. Next to «Import to,» you can choose an existing album or create a new one.
- Select the photos you want to import and click Import Selected, or click Import All New Photos.

- Wait for the process to finish, then disconnect your device from your Mac.
Import to your Windows PC
You can import photos to your PC by connecting your device to your computer and using the Windows Photos app:
- Make sure that you have the latest version of iTunes on your PC. Importing photos to your PC requires iTunes 12.5.1 or later.
- Connect your iPhone, iPad, or iPod touch to your PC with a USB cable.
- If asked, unlock your iOS or iPadOS device using your passcode.
- If you see a prompt on your iOS or iPadOS device asking you to Trust This Computer, tap Trust or Allow to continue.
If you have iCloud Photos turned on, you need to download the original, full resolution versions of your photos to your iPhone before you import to your PC. Find out how.
When you import videos from your iOS or iPadOS device to your PC, some might be rotated incorrectly in the Windows Photos app. You can add these videos to iTunes to play them in the correct orientation.
If you’re having trouble importing photos from your iOS or iPadOS device to Windows 10, try these steps:
- On your iOS or iPadOS device, open the Settings app. Tap Camera, then tap Formats.
- Tap Most Compatible. From now on, your camera will create photos and videos in JPEG and H.264 formats.
Источник
Download iCloud photos and videos
With iCloud Photos, you can download a copy of your photos and videos on any device.
How to download photos and videos from iCloud.com
If you want to save copies of your photos and videos from iCloud.com to your iPhone, iPad, iPod touch, or your Mac or PC, follow these steps.
On your iPhone, iPad, or iPod touch
- On iCloud.com, tap Photos.
- Tap Select, then tap a photo or video. To select multiple photos or videos, tap more than one. To select your entire library, tap Select All.
- Tap the more button .
- Choose Download, then tap Download to confirm.
If your photos download as a ZIP archive, learn how to uncompress the folder on your iPhone, iPad, or iPod touch.
On your Mac or PC
- On iCloud.com, click Photos and select a photo or video. Hold the command key on your Mac or control key on your PC to select multiple photos or videos.
- Click and hold the download button in the upper corner of the window. If you want to download your photo or video as it was originally captured or imported, choose Unmodified Original. For JPEG or H.264 format — including edits, and even if it was originally in HEIF or HEVC format — choose Most Compatible.*
- Click Download.
If your photos download as a ZIP archive, learn how to uncompress the folder on your Mac or your PC.
What happens when you delete photos or videos
Remember, when you delete a photo from iCloud Photos, it also deletes from iCloud and any other device where you’re signed in with the same Apple ID — even if you turned on Download and Keep Originals or Download Originals to this Mac. If you choose to download your originals, this also impacts your device storage. Learn more about how to manage your device storage. You can also learn how to AirDrop your photos and videos to another device.
How to download photos and videos from the Photos app
If you want to download a full-size copy of your photos and videos from the Photos app to your iPhone, iPad or iPod touch with iOS 10.3 or later or iPadOS, or your Mac with OS X Yosemite 10.10.3 or later, follow these steps.
On your iPhone, iPad, or iPod touch
- Go to Settings > [your name].
- Tap iCloud, then tap Photos.
- Select Download and Keep Originals.
On your Mac
- Open the Photos app.
- Choose Photos > Preferences.
- Select iCloud, then click Download Originals to this Mac.
On your PC
If you’re using a PC, you can set up iCloud for Windows and download a copy of your photos and videos from iCloud Photos.
How to download photos and videos from Shared Albums
You can download copies of photos and videos in Shared Albums to your own library. Learn more about how to use Shared Albums.
On your iPhone, iPad, or iPod touch
- Open the Photos app, then go to the Albums tab.
- Scroll down to Shared Albums and select an album.
- Tap the photo or video, then tap .
- Choose Save Image or Save Video.
On your Mac
- Open Photos, then select a Shared Album from the left-hand menu.
- Select the photo or video.
- Control-click a photo, then choose Import.
On your PC
In iCloud for Windows 11.1:
- Choose Start menu > iCloud Shared Albums.
- Double-click the shared album that you want to download photos or videos from.
- Double-click a photo or video, then copy it to another folder on your computer.
In iCloud for Windows 7.x:
- Open a Windows Explorer window.
- Click iCloud Photos in the Navigation pane.
- Double-click the Shared folder.
- Double-click the shared album that you want to download photos or videos from.
- Double-click a photo or video, then copy it to another folder on your computer.
To download the full album, open a File Explorer window or Windows Explorer window (Windows 7), open the Pictures folder, then open the iCloud Photos folder. Copy the Shared Album folder to another location on your computer.
Источник
iOS 15 Update: 6 Easy Ways to Transfer Photos from iPhone to PC or Mac
Learn how to get photos off iPhone and onto a computer without the frustration!

If you’re wanting to know how to transfer photos from iPhone to PC or Mac, you have lots of options. There are more ways to move photos from iPhone to Mac simply because they’re both Apple devices, but the transfer of iPhone photos to PC is not as complex as you might think. We’ll show you how to get photos off iPhone and onto a computer easily!
Jump To:
- How to Transfer Photos from iPhone to Computer (Mac)
- How to Transfer Photos from iPhone to Mac in MacOS Catalina & Later
- How To Import Photos from iPhone to Mac in MacOS Mojave
- How to Transfer Photos from iPhone to PC
- How to Import Photos from iPhone to PC (Alternative Method)
- How to Import Photos from iPhone to Mac with iCloud Photo Stream
- How to Download Pictures from iPhone to Computer with iCloud Photos
- How to Import Photos Using AirDrop on Mac
How to Transfer Photos from iPhone to Computer (Mac)
The classic way to transfer photos from iPhone to Mac is to use the photo transfer feature in the Photos app that both Mac and PC offer. It’s important to note that the import Photos from iPhone to Mac process has changed a little since MacOS Catalina, Big Sur,and soon macOS Monterey, so if you’re using a newer operating system you’ll want to use the method shown next. If you use Mojave or earlier, you can skip to the next section.
How to Transfer Photos from iPhone to Mac in MacOS Catalina & Later
- Connect your iPhone to your Mac with the USB cable and unlock your iPhone.
- Open the Photos app on your Mac. You can find it with Spotlight search, in your Dock, or by opening the Applications folder and selecting the Photos app.
- Your iPhone should already be selected in the browser on the left of the Photos page. If it isn’t, then select your iPhone.
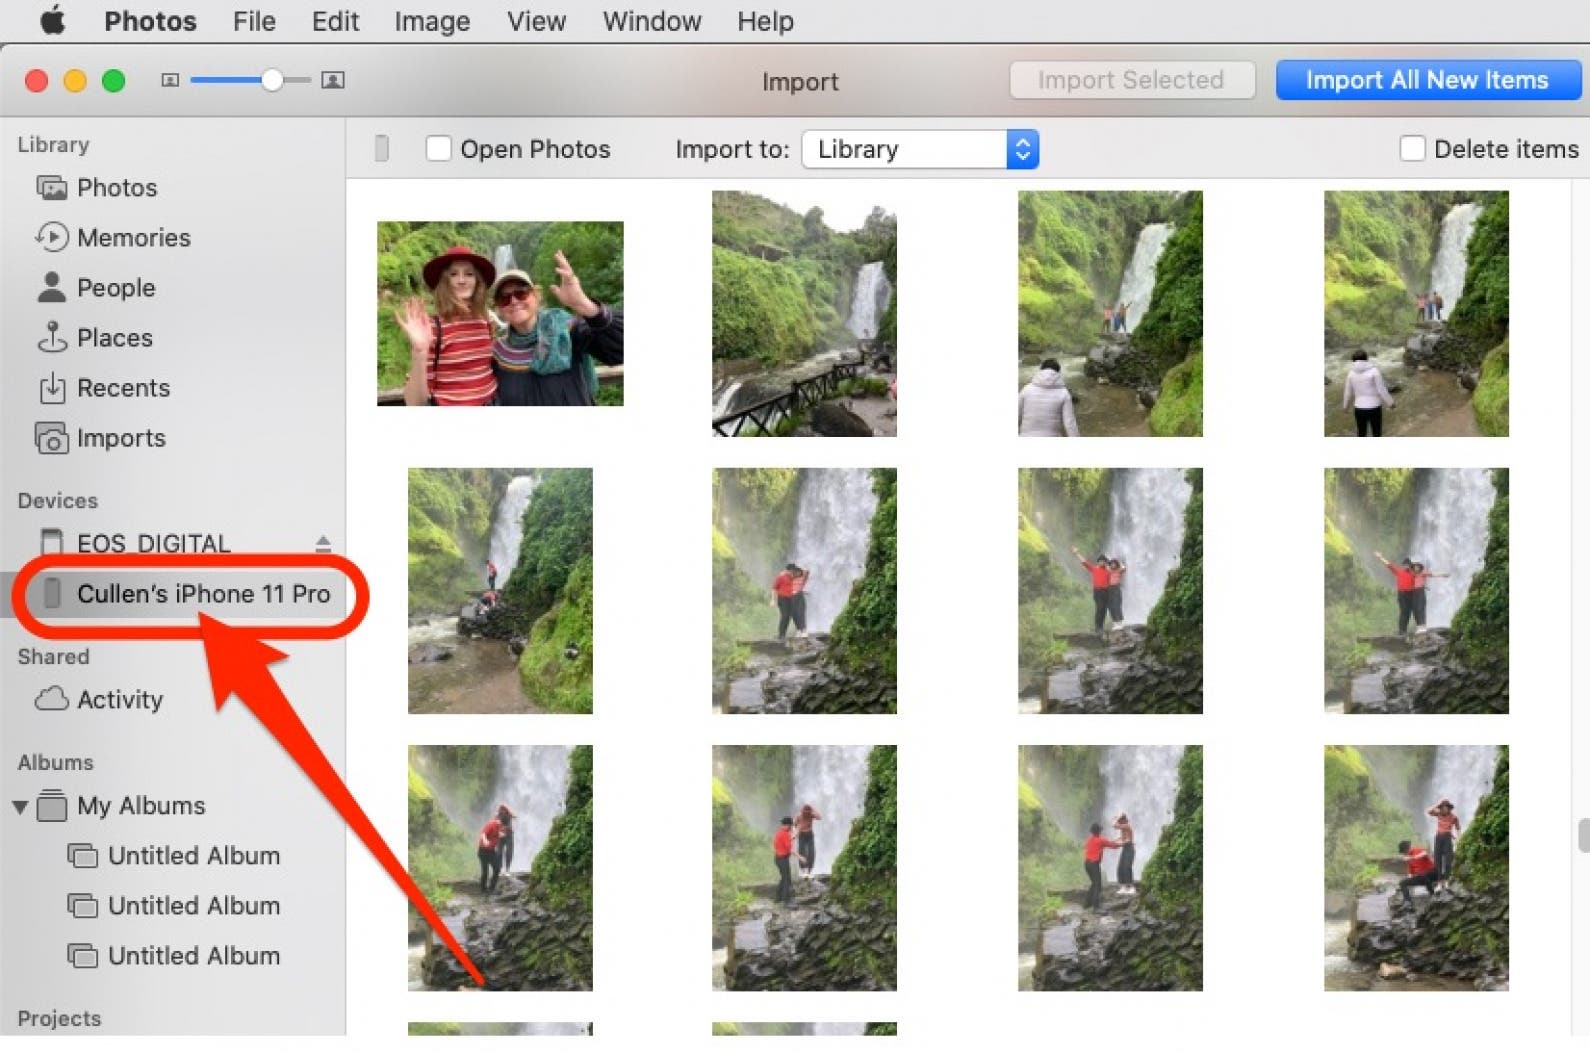

That’s it; Finder has made this process easy! If you’d rather move photos from iPhone to Mac without a USB cable, you can also learn how to transfer photos from iPhone to Mac using AirDrop or iCloud Photo Stream. These methods are especially helpful if you own a MacBook that doesn’t have USB-A ports built in!
How To Import Photos from iPhone to Mac in MacOS Mojave
This method will help you transfer iPhone photos to a Mac or MacBook if you use the macOS Mojave operating system. If your device is compatible with the newest macOS version, we always recommend keeping your device updated! This ensures that bug fixes, privacy updates, and new features are always available to you.
- Connect your iPhone to your computer with the USB cable.
- Open the Photosapp on your Mac. You can find it with Spotlight search, in your Dock, or by opening the Applications folder and selecting the Photos app.
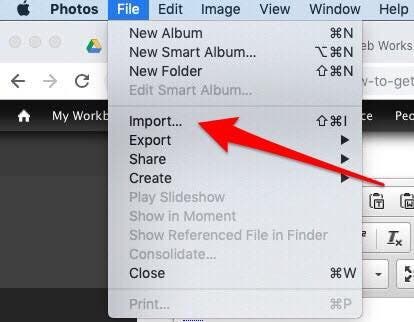
- Select File from the top menu, then select Import.
You can download select photos by holding down the command key (cmd) on your keyboard while clicking all the photos you want to transfer, then click Review for Import.

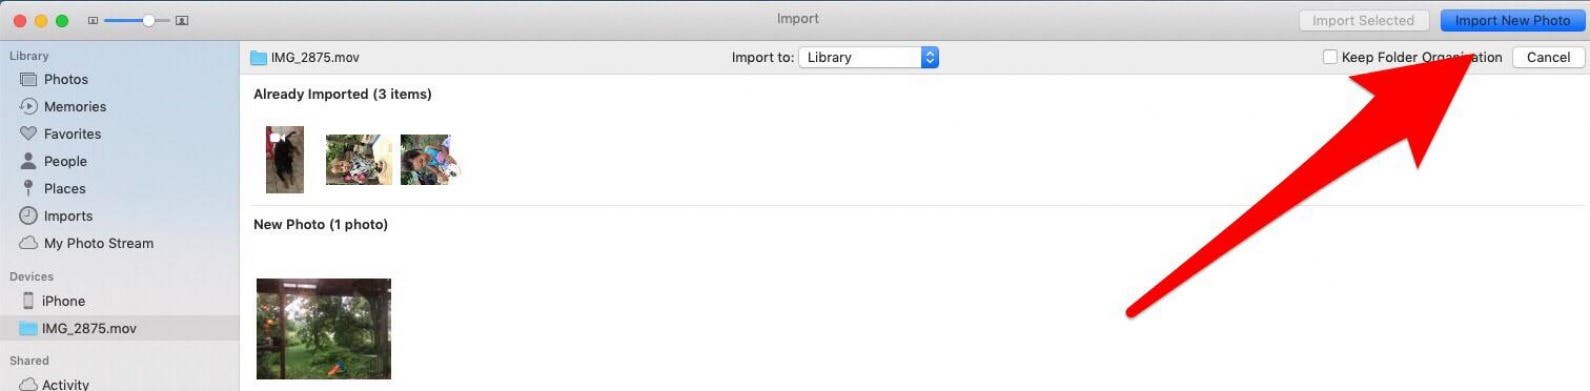
If you’ve already imported some or all of your selected photos, your Mac will let you know and then give you the option to import the remaining photo(s) by clicking Import New Photo.
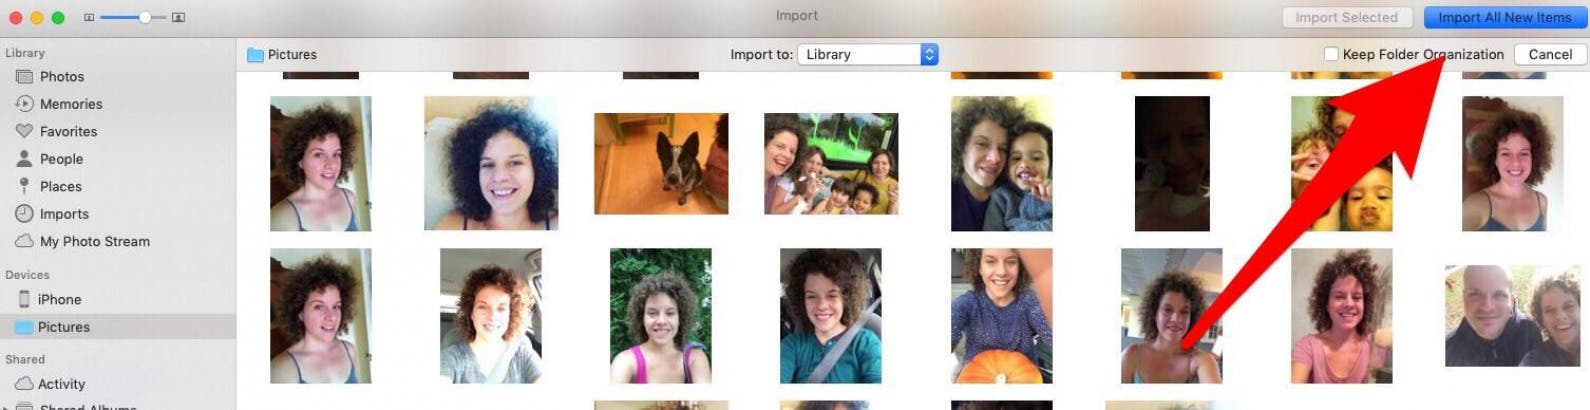
If you’d rather import all the photos on your iPhone that you haven’t previously backed up, click Import All New Items.
And you’re done! If you’d rather transfer iPhone photos to Mac without a USB cable, you can also learn how to import photos from iPhone to MacBook or Mac using AirDrop or iCloud Photo Stream. These methods are especially helpful if you own a MacBook that doesn’t have USB-A ports built in!
How to Transfer Photos from iPhone to PC
How to Upload Photos from iPhone to Computer in Windows 8
If you have a PC with an older version of Windows, Auto Play will pop up when your iPhone is connected to your computer with a USB cable. On a PC with Windows 8, your computer will detect the device and provide a pop-up that says «Tap to choose what happens to this device.» When you click on that pop-up, you’ll see the Import Photos and Videos option to allow you to move photos and videos from iPhone to PC. The rest of the process should be pretty similar to what is demonstrated below for Windows 10. When in doubt, look for the Import button!
How to Import Photos from iPhone to PC in Windows 10
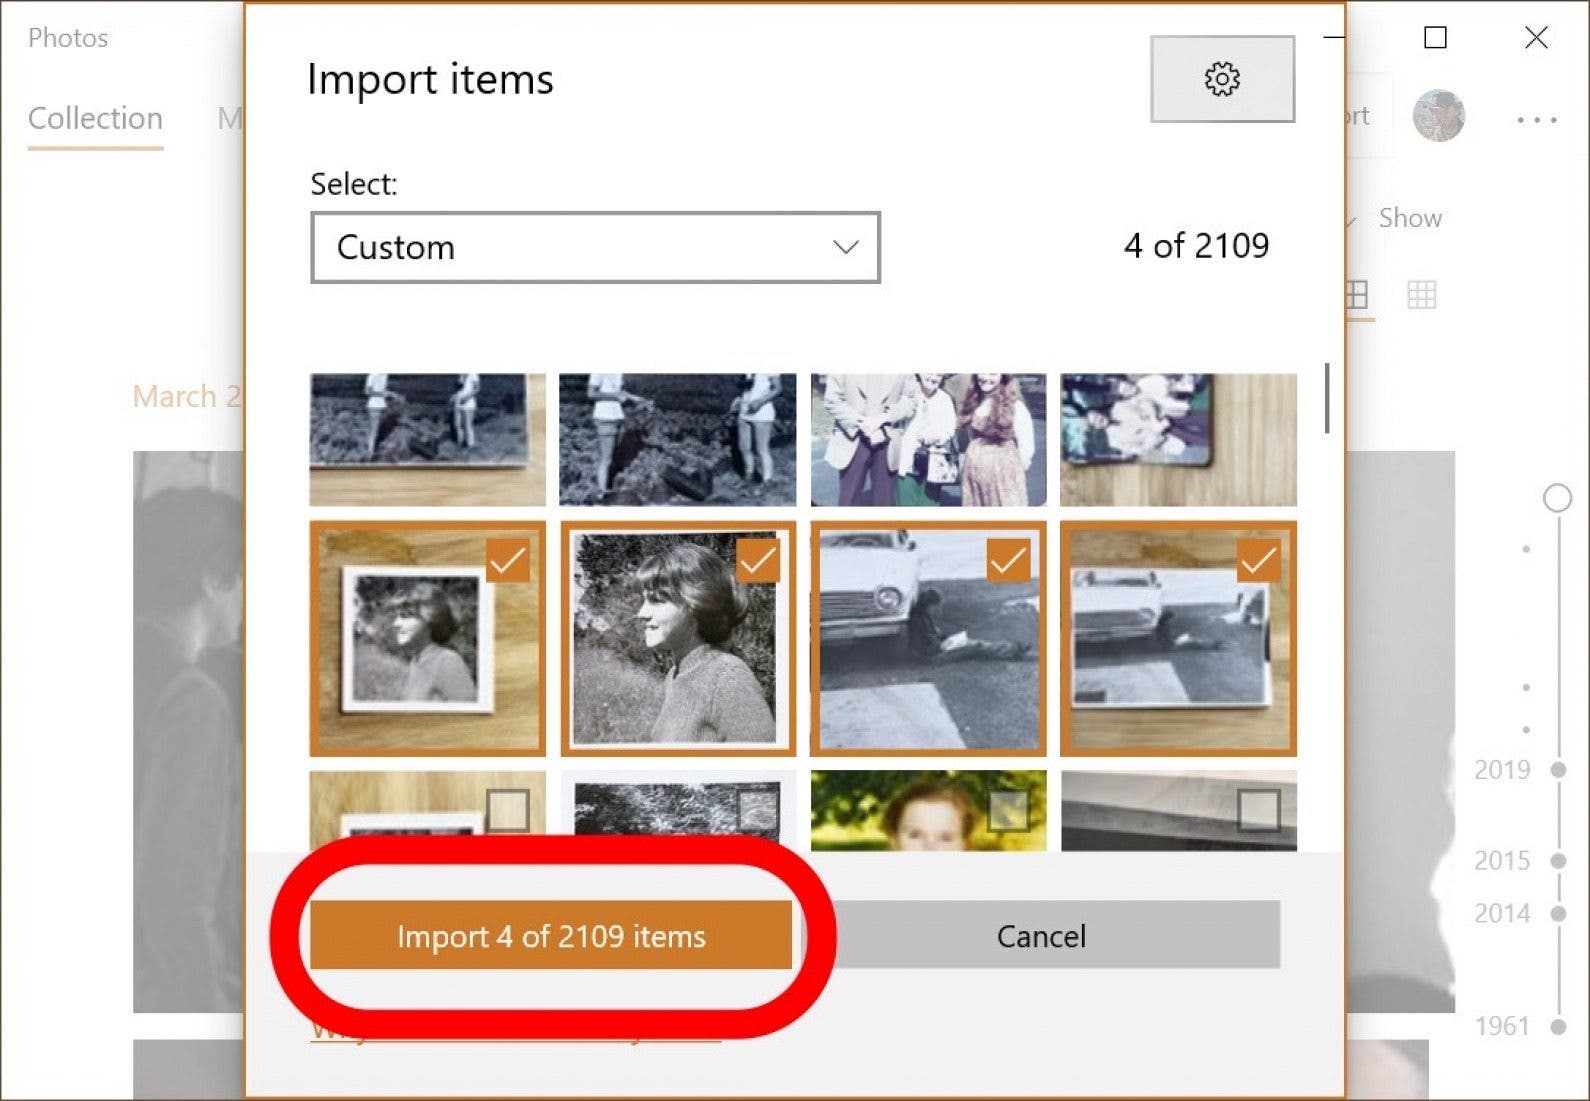
Below we’ll show you how to transfer selected photos from iPhone to PC, or all photos.
- Plug your iPhone into your Windows computer with the USB cable.
- On your iPhone, a pop-up will ask if you would like to allow the computer to access the iPhone. Tap Allow.
- On your Windows computer, the Photos application may automatically launch. If it doesn’t, launch the Photos program using the Windows Start menu or search bar.
- Click the Import button in the upper-right corner of the Photos app.

In the drop-down menu, select From a USB device.


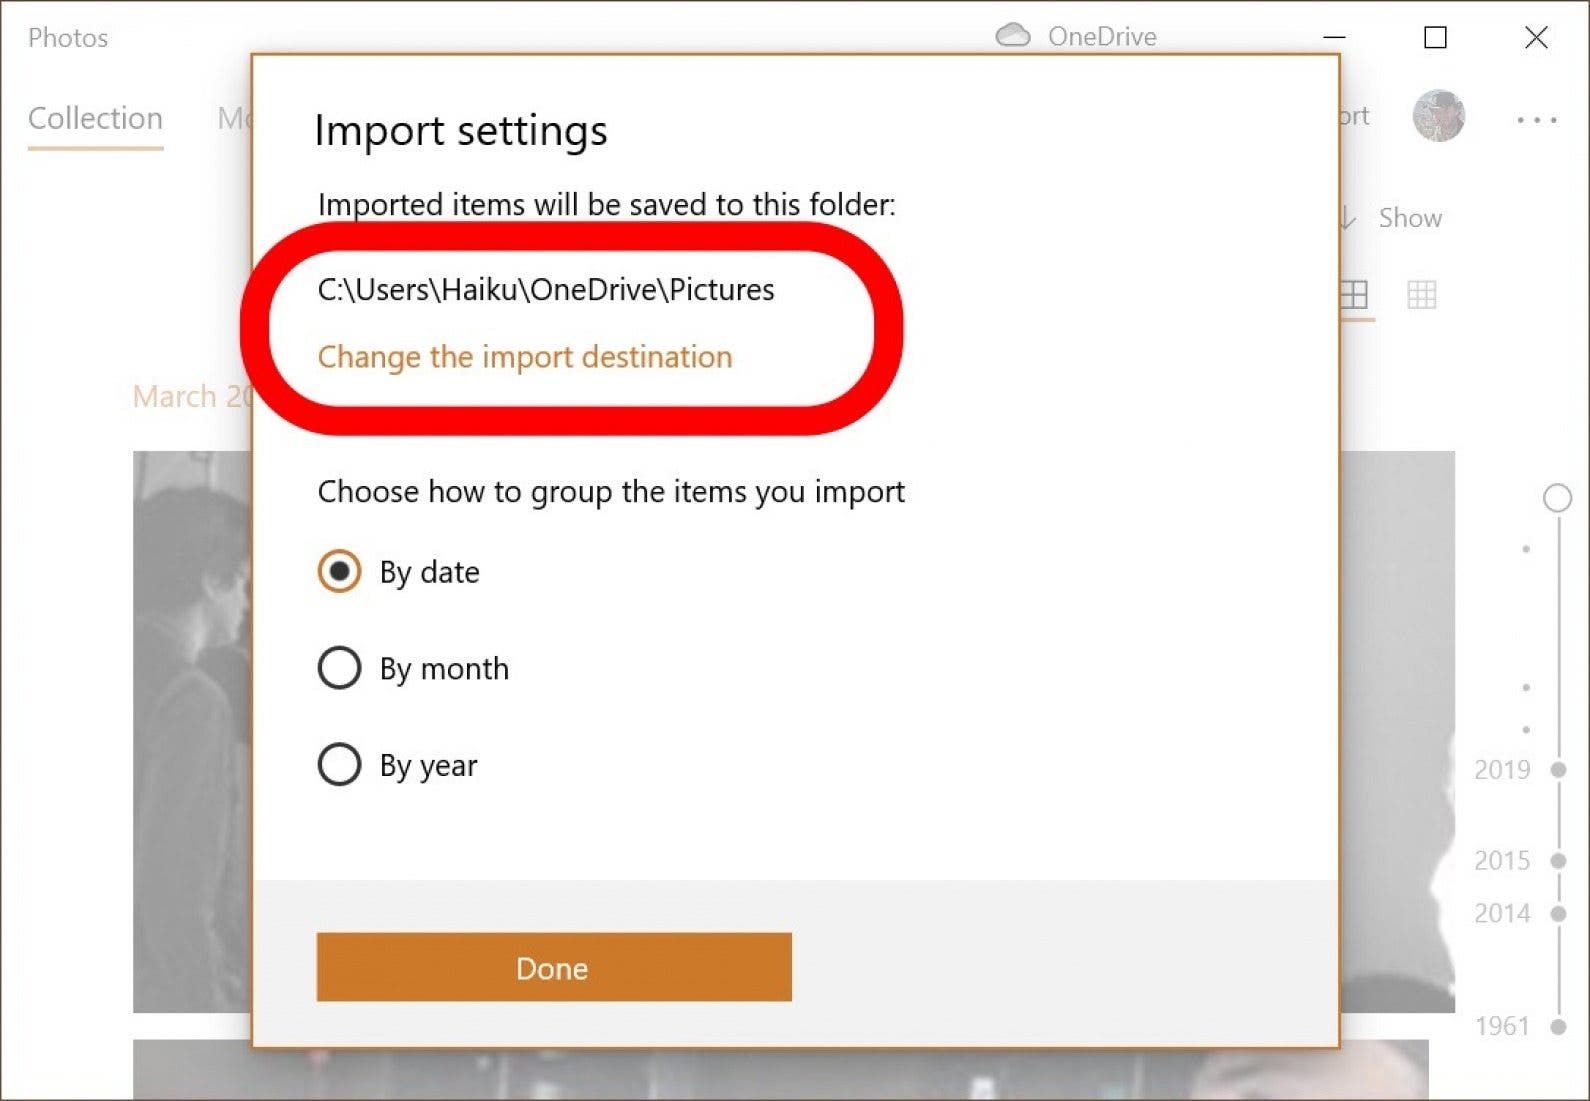
To see where the photos will be saved and to change that location, click settings, represented by a gear icon.

In the import settings menu, you will see the location where the photos will be saved plus a Change the import destination link in case you want to change where imported iPhone photos are saved to your PC.
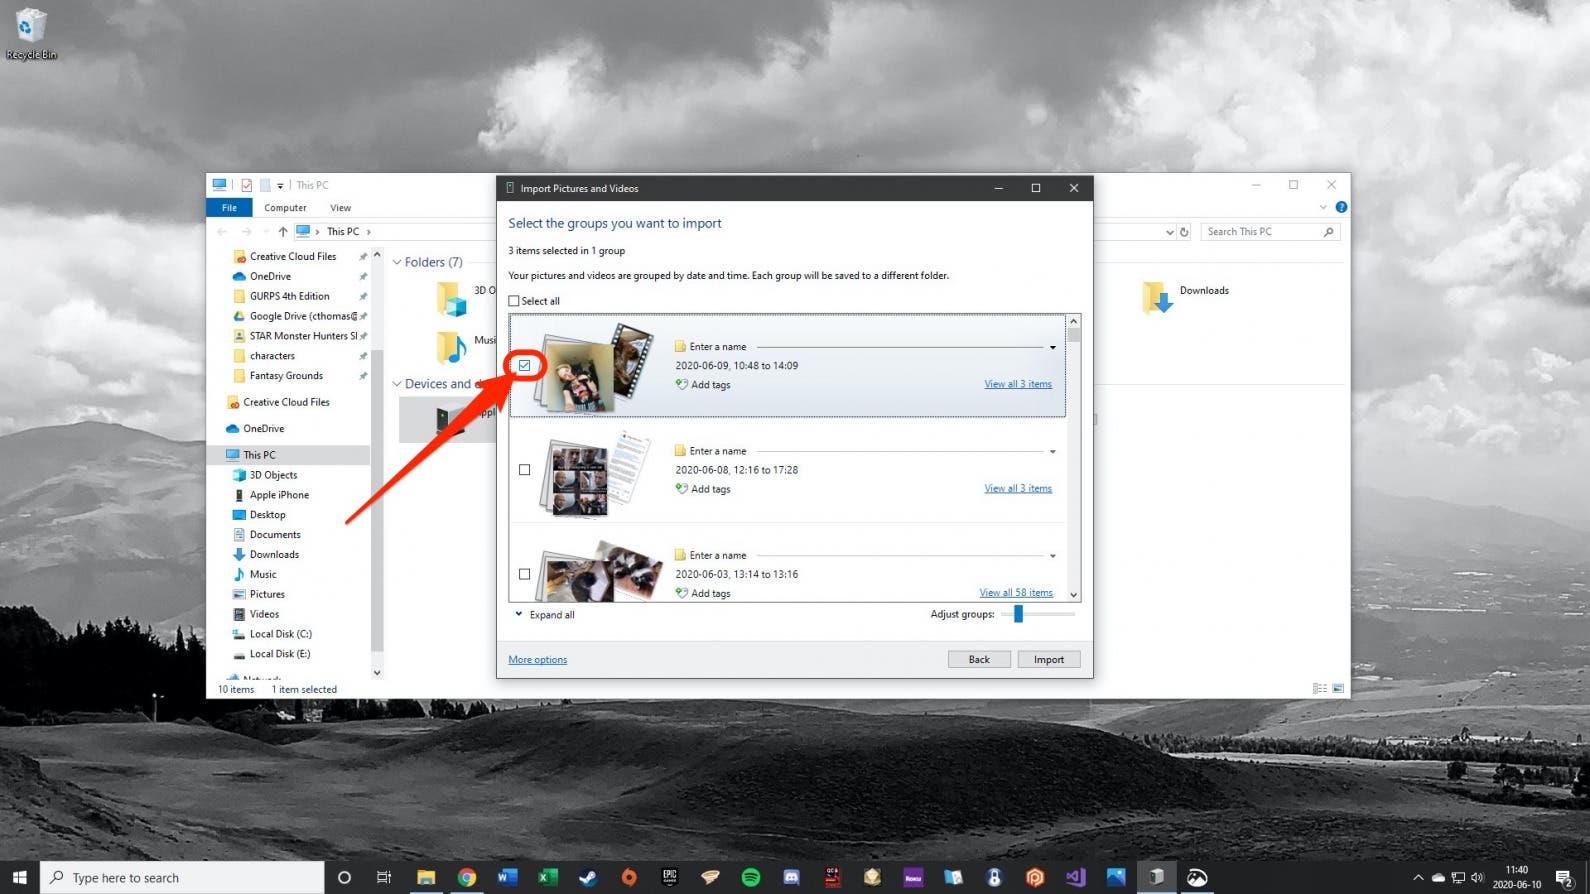
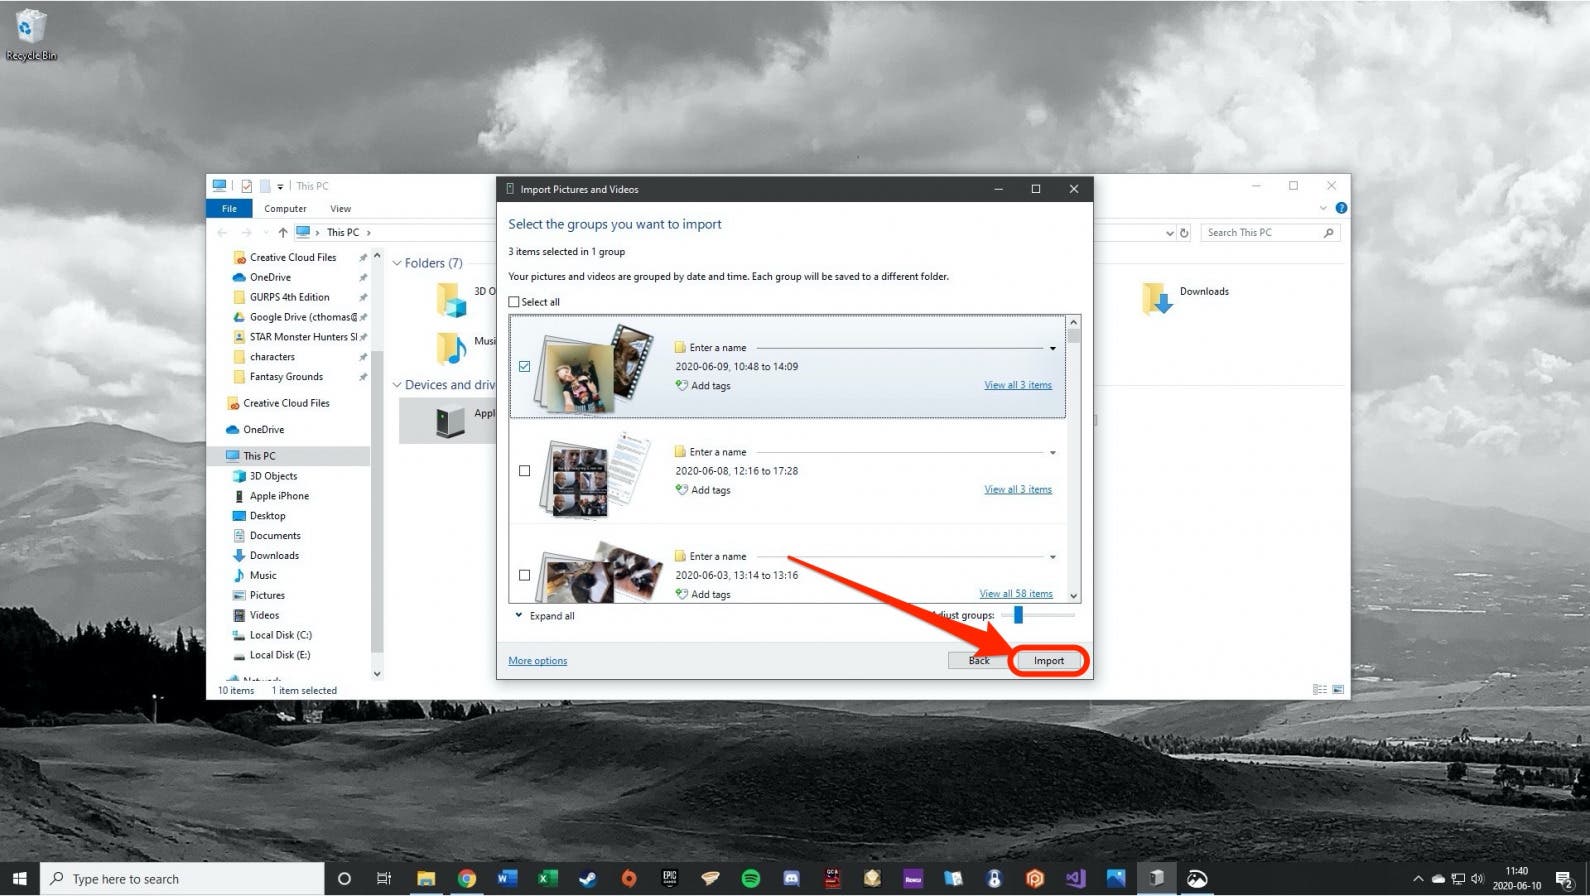
How to Transfer Pictures from iPhone to Computer with a Cable (Alternative Method)
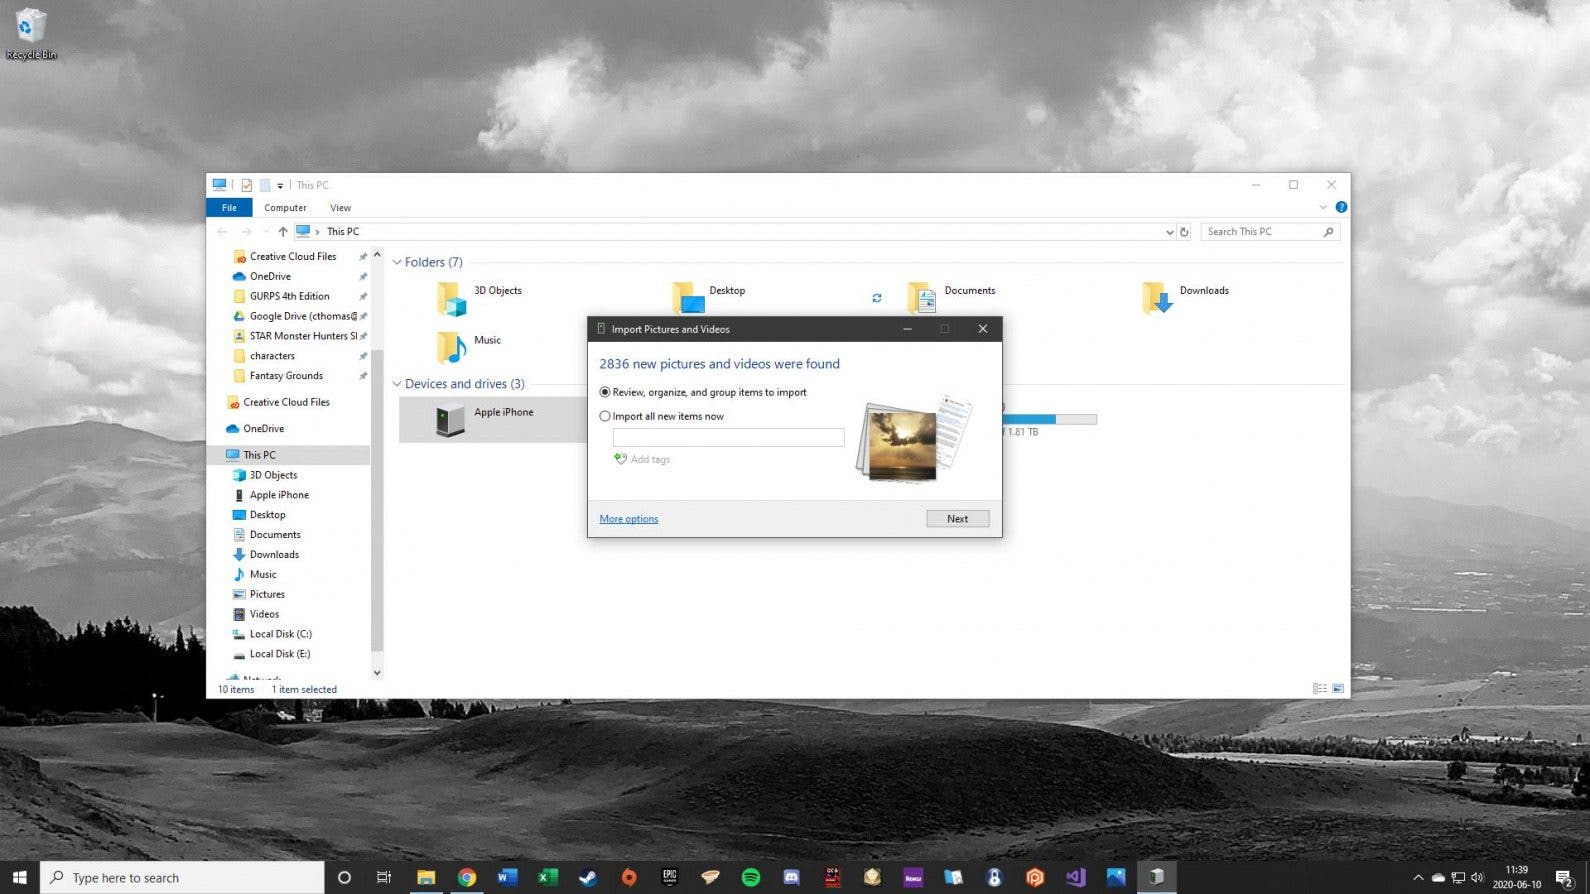
Some users encounter bugs with the built-in Windows Photos application. If you can’t get it to work and need another solution, try this.
- Plug your iPhone into your Windows computer with the cable, unlock the iPhone, and tap Allow, as above.
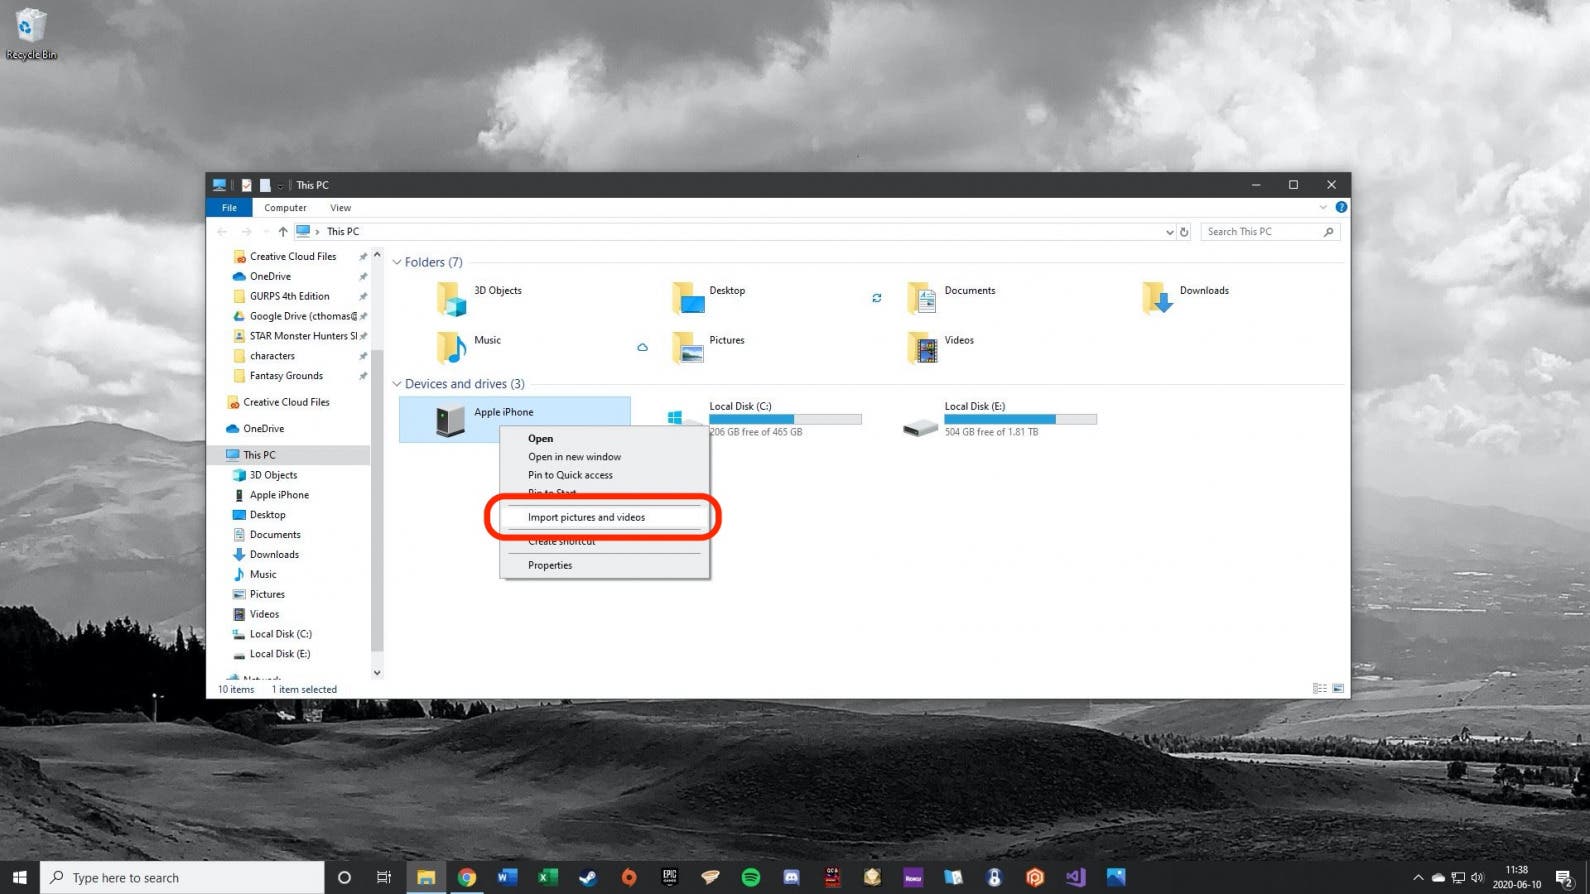
- On your Windows computer navigate to This PC. You should see your iPhone listed under Devices and Drives.
- Right-click on your iPhone and in the context menu select Import pictures and videos.
Next, we’re going to delve into the two different ways to import pictures from iPhone to Mac with iCloud: Photo Stream and iCloud Photo Library. There are some important distinctions between the two that we’ll go over; my best recommendation is to enable both .
How to Import Photos from iPhone to MacBook or Mac with iCloud Photo Stream
Photo Stream does not take up any of your iCloud Storage package. However, photos will appear in Photo Stream for only 30 days (we share a solution to this below). Photo Stream also doesn’t upload your videos, but you can view your pictures across your devices easily. For both methods, Photos will automatically transfer when your device is connected to Wi-Fi unless you have enabled the option to transfer over cellular data. To set up Photo Stream, you’ll need to enable it on both your iPhone (or iPad) and your Mac.
- On your iPhone, open the Settingsapp.
![]()
Tap your Apple ID profile at the top of the screen.
![]()
Tap iCloud.
![]()
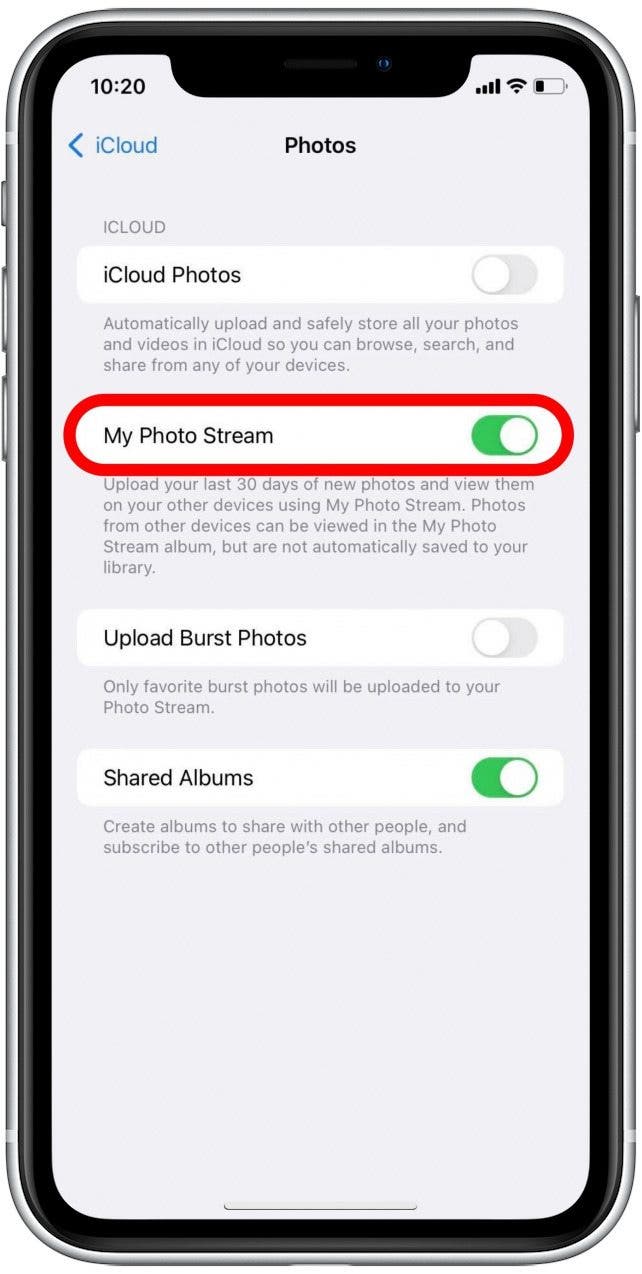
Choose Photos.
![]()
Toggle on My Photo Stream.

Note: In MacOS Mojave and earlier the same setting is found in System Preferences > iCloud > the Options button next to Photos.
How to Set Photo Stream Images to Automatically Download to Mac or PC
In MacOS Catalina you don’t have to do anything special. The Photos app on your Mac automatically saves your Photo Stream to your photo library.
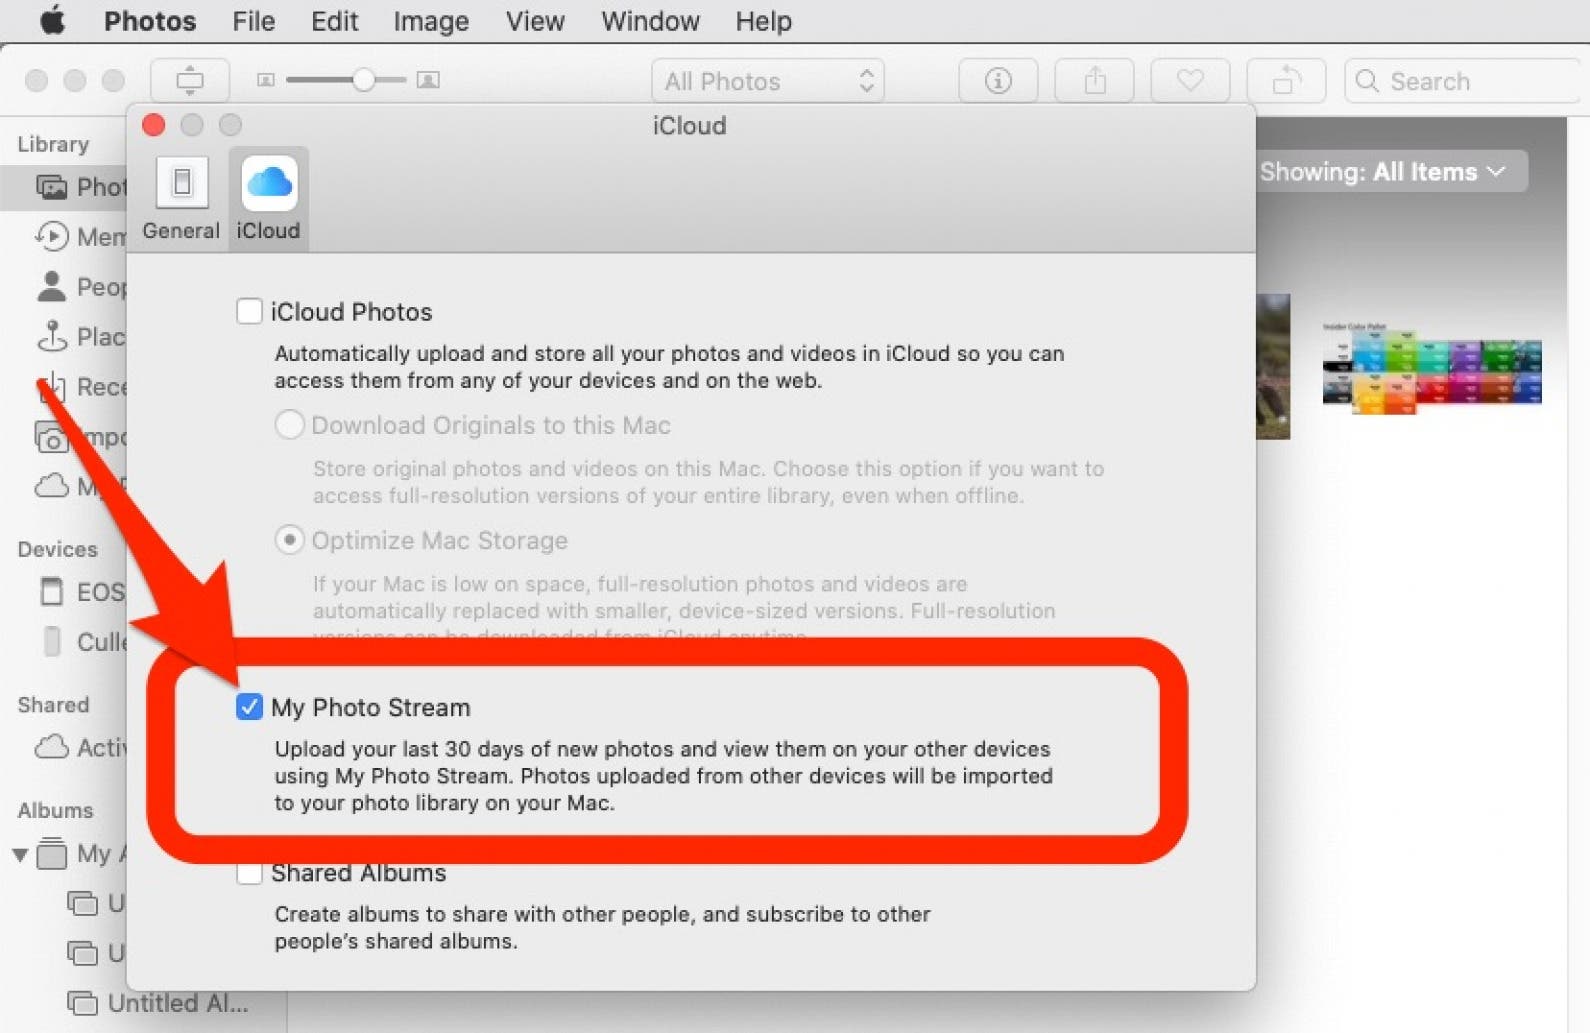
In MacOS Mojave or earlier, follow these steps:
- Open the Photos app.
- Select Preferences at the very top, under Photos.
- Choose General.
- Check the box next to Importing: Copy Items to the Photo Library.

This way, even once photos leave your Photo Stream, they will be saved to your computer. You can also enable iCloud Photo Library on iPhone and computer if you pay for iCloud storage. Doing so will allow you to store your Photos in the Cloud, making them accessible online as well as on your computer.
How to Download Pictures from iPhone to Computer with iCloud Photos (Also Works on iPad)
The process for setting up iCloud Photos is similar to Photo Stream. Enabling iCloud Photos will store all of your photos in your iCloud account, not merely the most recent. This can rapidly use up your iCloud storage space unless you pay Apple for more. On the other hand, your photos from your computer and your iPhone will all be safely backed up in the cloud, and the process for how to transfer photos from iPhone to computer will be practically effortless, since iCloud will keep the two libraries in perfect sync.
On your iPhone:
- Open the Settingsapp.
![]()
Select your Apple ID profile at the top.
![]()
Tap iCloud.
![]()
Choose Photos.
![]()
Toggle on iCloud Photos.

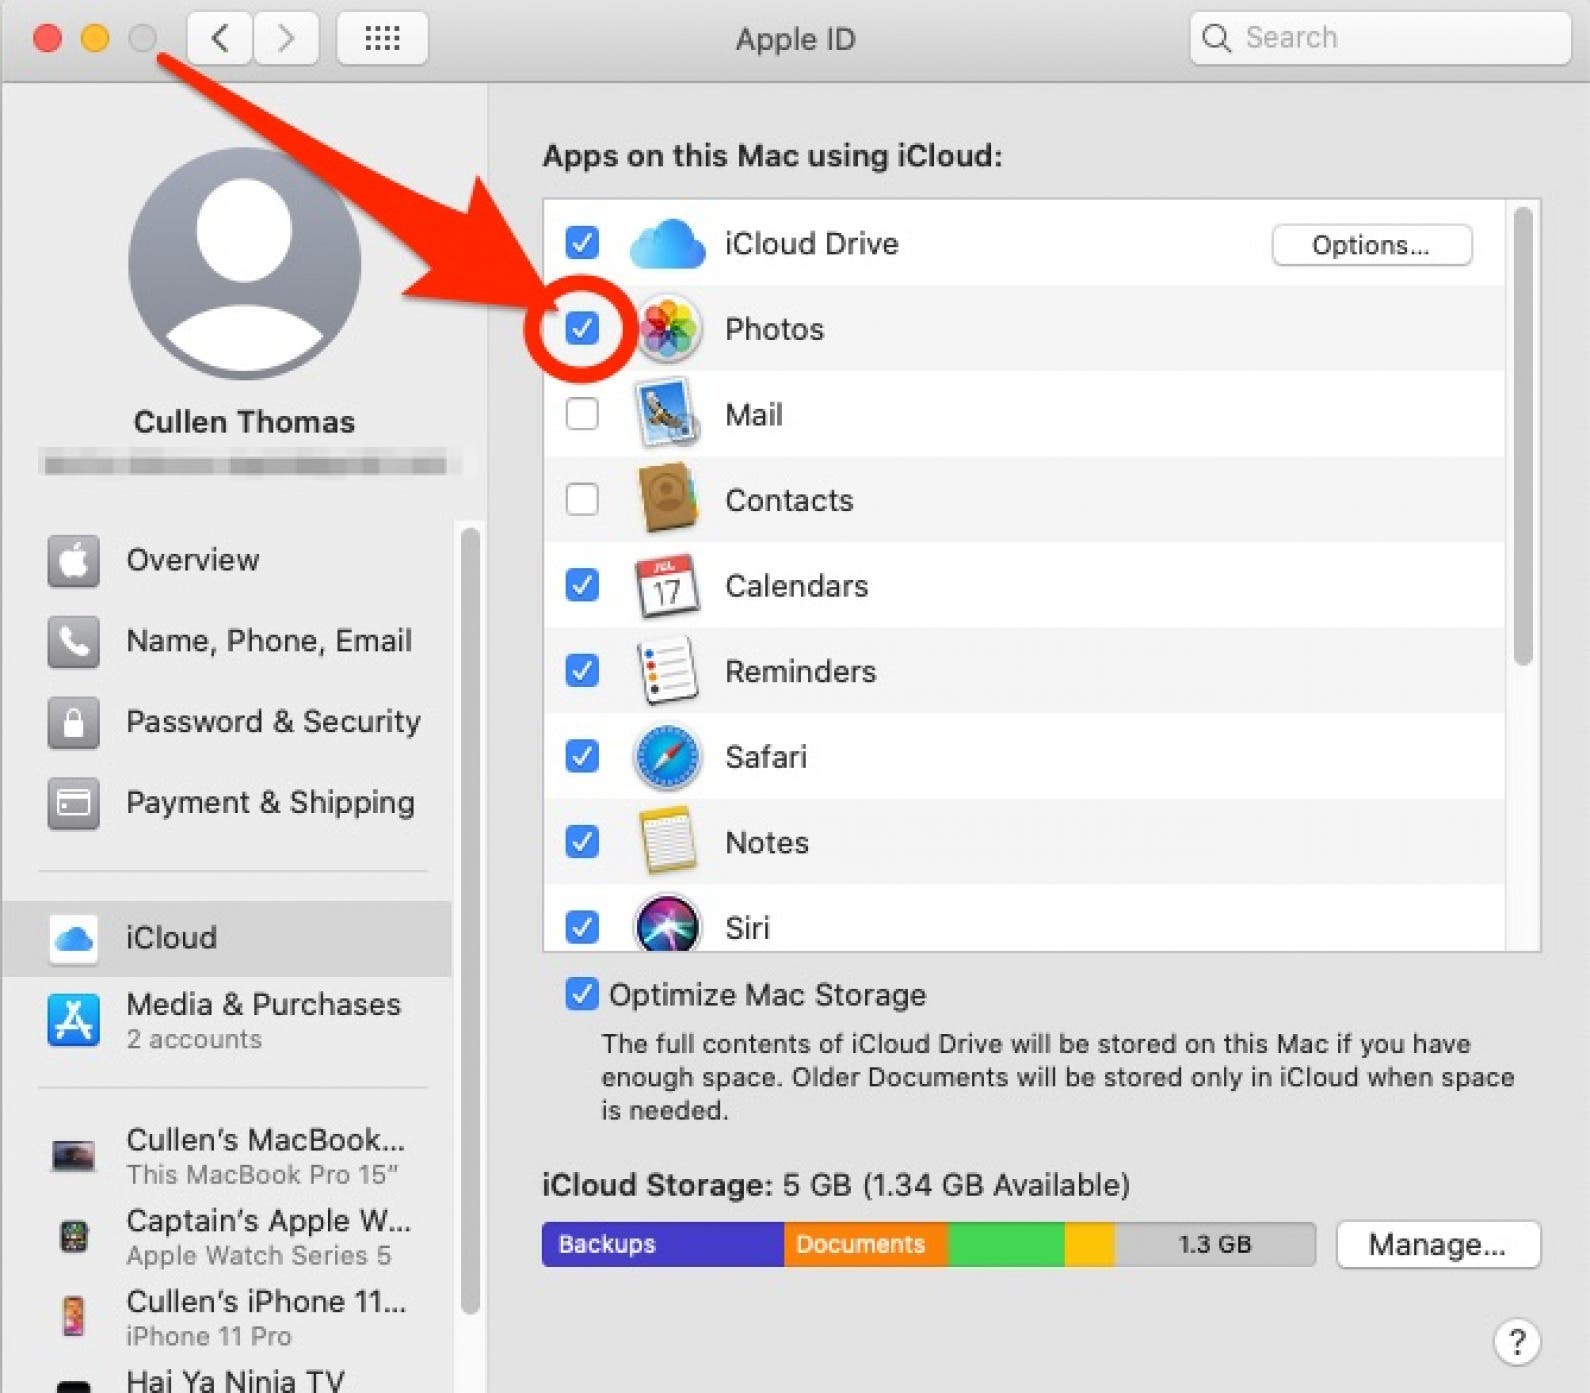
On your Mac:
- Open System Preferences from the Apple menu in the top-left corner of your screen.
![]()
Choose Apple ID and sign in.
![]()
How to Download Photos from iPhone to Mac with AirDrop
AirDrop uses Wi-Fi to transfer files from iPhone to Mac and vice versa (and can be used for other files as well), which means first you need to be sure both your iPhone or iPad and computer are connected to Wi-Fi. Remember that AirDrop also requires a 2012 or later Mac model running OS X Yosemite or later to transfer photos from iPhone to Mac. To use AirDrop to export photos from iPhone:
- Open the Photos app on your iPhone.
![]()
Select the photos you want to transfer to the computer, then tap the Share icon.
![]()
Select AirDrop in the Share menu.
![]()
Choose your computer.
![]()
If successful, it will say Sent below your computer’s icon.
![]()
Tap Done in the upper-right corner to leave the AirDrop screen.
![]()
Need more methods to download pictures to a computer? Here’s three more you can use to transfer photos from iPhone to computer.
Topics
Author Details

Author Details
Cullen Thomas
Cullen Thomas is a Writer and Producer at iPhone Life, creating tips and guides to help users unlock the full potential of their iOS and iPhone. In addition to writing countless tip-of-the-day articles and many detailed guides, Cullen has spent nine years as an instructor in media and communications at Maharishi University, lecturing on technical and artistic subjects ranging from camera and audio hardware to story-plotting to how to manage a film crew. Cullen answers questions daily about iPhones and iOS as part of the Ask an Editor insider service, and designs curriculum for iPhone Life’s online classes. As a frequent contributor to iPhone Life magazine and occasional guest on the iPhone Life podcast, Cullen likes to talk about security and privacy news, tech, gadgets, and apps, even if nobody asked.
Cullen holds a master’s degree in Cinematic Arts from the David Lynch School of Cinematic Arts. Cullen also holds two Bachelor’s degrees from Maharishi University, one in literature with an emphasis in writing and the other in Communications and Media. Cullen’s short fiction has been featured in anthologies from Amphibian Press and TANSTAAFL, and Cullen co-owns a game design company, Thoughtspike games, which builds thought-provoking puzzle games. Cullen is a sci-fi author, a coffee connoisseur, and an iPhone expert.
Источник


