- How to Transfer Files Between Your Mac and Your iPhone and iPad
- How to Copy Files From Mac to iPhone and iPad
- How to Copy Files From iPhone and iPad to Mac
- How to Delete files on your iPhone and iPad.
- How to Transfer Files Between iPhone and Mac in 7 Ways
- Transfer Files between iPhone and Mac with iPhone Transfer Software
- Transfer Files Between Mac and iPhone Using iTunes File Sharing
- Transfer Files from Mac to iPhone or Vice Versa with AirDrop
- Send Files from Mac to iPhone or iPhone to Mac via Email
- Sync Files Between iPhone and Mac via iCloud Drive
- В Transfer Files from Mac to iPhone or Conversely with Dropbox
- Transfer Files from Mac to iPhone via Syncing
- The Bottom Line
How to Transfer Files Between Your Mac and Your iPhone and iPad
This article shows you how to share files between your Mac and your iPhone and iPad using the new route in Catalina.
With the release of macOS Catalina, Apple said goodbye to iTunes and broke it up into separate Mac apps for Music, Podcasts, and Apple TV, meaning the functions for managing a connected iPhone, iPad or iPod touch needed a new home.
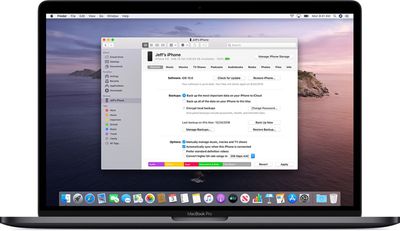
It’s not immediately obvious, but Apple chose to integrate these device functions into the Finder, so now you can choose transfer files, manage iCloud and local backups, and restore or update your iOS device without even opening another application on your Mac.
How to Copy Files From Mac to iPhone and iPad
- Plug your iPhone, iPad, or iPod touch into your Mac using the supplied cable. If you have a USB-C Mac, you may need an adapter.
- Open a Finder window by clicking the Finder icon in the Dock.
- Click your iOS device’s name in the sidebar.

If this is the first time connecting your device to your Mac, click Trust in the Finder window.![]()
Finder will automatically copy them across to your iOS device. Depending on the size of the file(s), you may have to wait a while for the transfer to complete.
How to Copy Files From iPhone and iPad to Mac
- Plug your iPhone, iPad, or iPod touch into your Mac using the supplied cable.
- Open a Finder window by clicking the Finder icon in the Dock.
- Click your iOS device’s name in the sidebar.
If this is the first time connecting your device to your Mac, click Trust in the Finder window.![]()
Finder will automatically copy the files to your Mac. Depending on the size of the file(s), you may have to wait a while for the transfer to complete.
How to Delete files on your iPhone and iPad.
- Plug your iPhone, iPad, or iPod touch into your Mac using the supplied cable.
- Open a Finder window by clicking the Finder icon in the Dock.
- Click your iOS device’s name in the sidebar.
Click the Files tab to see a list of apps that contain files. If you don’t see a Files section, your device doesn’t have any apps that can share files.![]()
There are often other ways to delete files from an app. See the app’s user guide to find out more.
Источник
How to Transfer Files Between iPhone and Mac in 7 Ways
In our daily lives, it’s quite common for us to share files between our devices.В Among these data transfer needs, the urgency to learn how to transfer files from Mac to iPhone or iPhone to Mac seems to take the priority over others. That’s probably because it’s less familiar and comparatively more difficult. Given that, here we provide SEVEN ways for you to transfer files between an iPhone and Mac. Whether you want to transfer files from Mac to iPhone or send files from iPhone to Mac, these ways will help.
Transfer Files between iPhone and Mac with iPhone Transfer Software
Supported Files: Photos, Videos, Audio Files (Music, Ringtones, Voice Memos, Audiobooks), Books, Contacts (in HTML), Messages (from iPhone to Mac)
If you want to transfer media like photos, videos, or music from Mac to your iPhone or from iPhone to Mac, you can use the reliable iOS data transfer software — EaseUS MobiMover. With it, you can share files between a Mac and an iOS device (iPhone/iPad in iOS 8 or later) or transfer data from one iPhone to another. For example, you are able to send a single file, multiple files, or all of these files with different types between your iPhone and Mac at once.
To transfer files from Mac to iPhone:
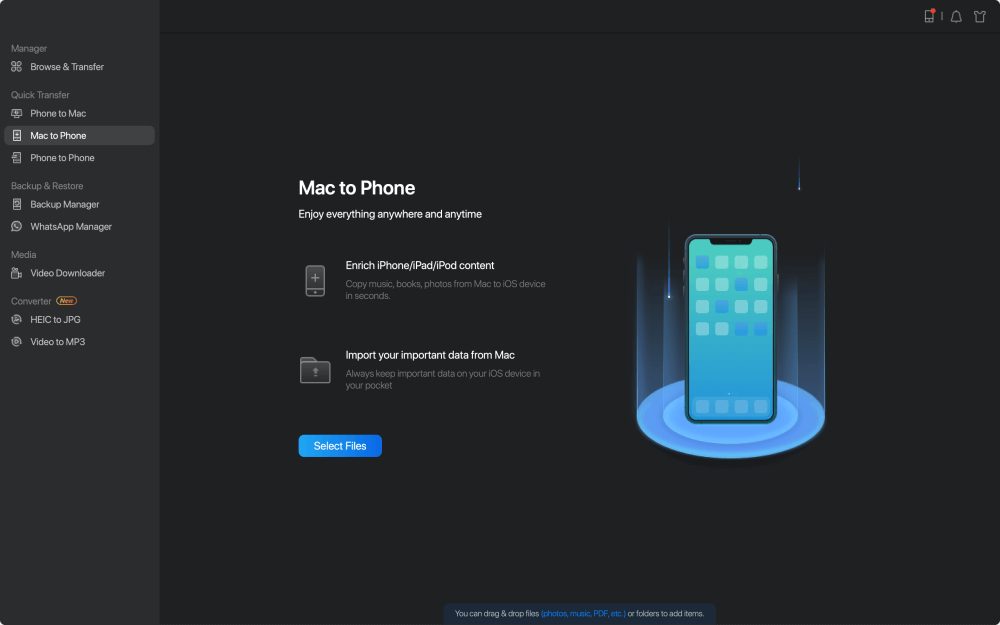
Step 1.В Connect your new iPhone toВ your Mac via a USB cable and tap «TrustВ This Computer» on your device if a pop-up appears. Launch EaseUS MobiMoverВ and navigate to «Mac to Phone» on the main interface like the sample image below. Click «Select Files» to start the process of transferring files from Mac to iDevice.
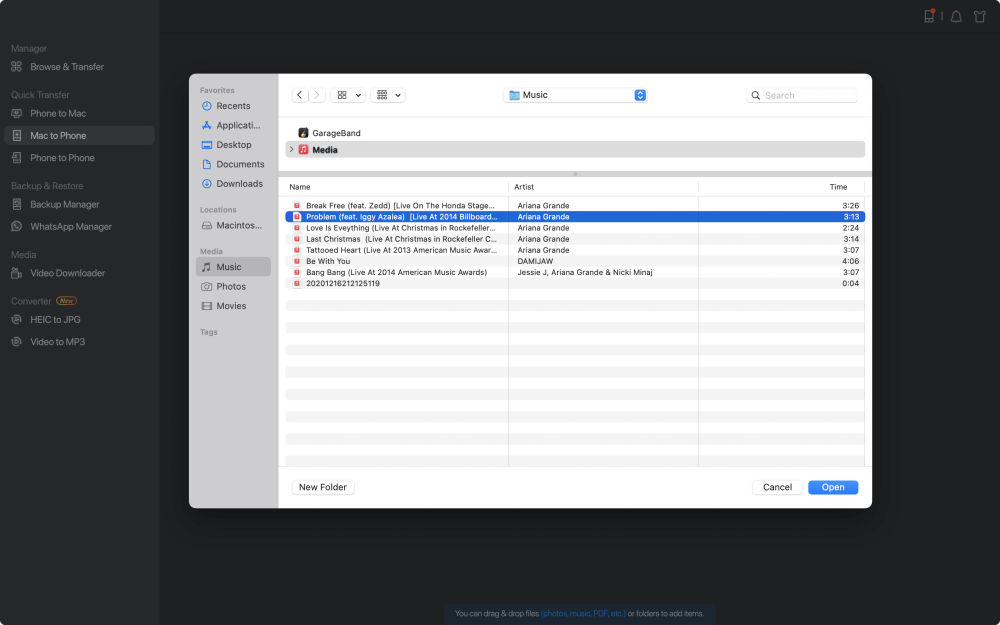
Step 2. You can browse files on your Mac and choose the items you want to transfer. After that, click «Open.»
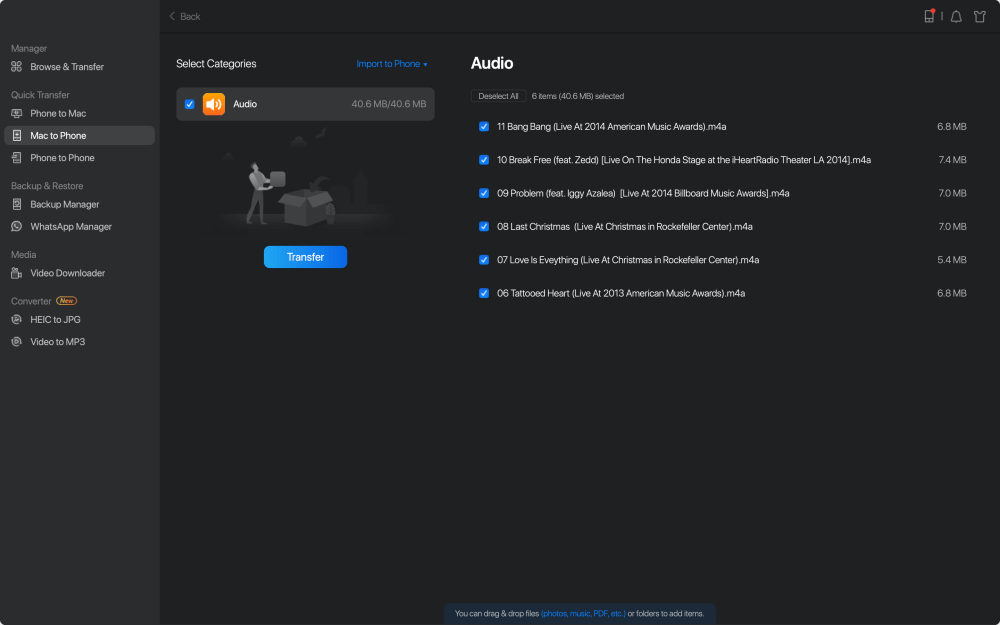
Step 3. You can preview the selected files on the right panel. If you want to add new items to transfer at this step, click «Add File» or directly drag files and drop to the appointed area. Finally, click «Transfer» to start transferring data from your Mac to iPhone at once.В Don’t disconnect your iPhone while transferring. When the process finished, go to the corresponding location on your iPhone and open the right application to check the synced data.В
Other than the case of sharing files between the Mac and your iPhone/iPad, EaseUS MobiMover can also help when you:
- Transfer files between PC and iPhone
- Copy data from iPhone to iPhone
- Download videos from YouTube and many other sitesВ to a computer or iPhone/iPad
- View iPhone content on a computer
Thus, you can also download Twitch clips if you need to.В Get EaseUS MobiMover right now and let it be your good helper.
Transfer Files Between Mac and iPhone Using iTunes File Sharing
Supported Files: Files created by Keynote, Numbers, Pages
You can share files between your Mac and iPhone via apps that support file sharing. To check whether an app supports this feature, go to see the documentation of it.
Step 1. Connect your iPhone to your computer.
Step 2. In the iTunes app on your Mac, click the «Device» button above the sidebar of the iTunes window.
Step 3. Choose «File Sharing».
Step 4. Select the app you want to transfer a file to or from the list on the left.
Step 5. Start transferring files between the iPhone and Mac.
- To copy files from Mac to iPhone: Click «Add», select the file you want to transfer, then click «Add».
- To send files from iPhone to Mac: Select the file you want to transfer in the list on the right, click «Save to» and select where you want to save the file. Then click «Save To» again.
![]()
When it has done, you can check the files in the corresponding app or location.
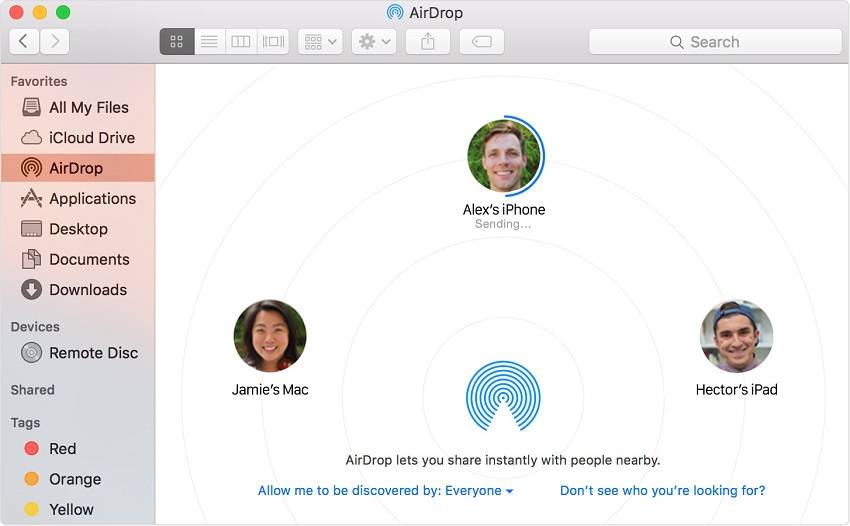
Transfer Files from Mac to iPhone or Vice Versa with AirDrop
Supported Files: Photos, Videos, Websites, Locations, and More
AirDrop is the built-in file-sharing utility on iOS devices and Macs. With AirDrop enabled, you are allowed to send files between two iOS devices or between an iOS device and Mac over Bluetooth and Wi-Fi connections. You can AirDrop contacts from iPhone to iPhone, transfer photos from Mac to iPhone via AirDrop, and more. Therefore, when you want to transfer files between iPhone and Mac, using AirDrop is practical.
To transfer files between iPhone and Mac via AirDrop:
Step 1. Turn on AirDrop on iPhone/iPad.
- Open «Control Center» on your iOS device.В
- Make sure both «Bluetooth» and «Wi-Fi» are on, tap on «AirDrop» and set your iPhone to be discovered by «Contacts Only» or «Everyone».
Step 2. Turn on AirDrop on Mac.
- Go to «Finder» > «Go» > «AirDrop» and switch on «Bluetooth» and «WiFi» to turn on AirDrop on your Mac.
- Set the option «Allow to be discovered by» as «Everyone» or «Contacts Only».
Step 3. Use AirDrop to share files between Mac and iPhone/iPad.
Now you can send files from Mac to iPhone or iPad using AirDrop freely. There are two ways to transfer files from Mac to your iPhone with AirDrop. (Here transferring photos from Mac to iPhone/iPad is set as an example.)
Drag the photos you want to send from Mac to iPhone to the image of the recipient and click «Send».
Or you can click the «Share» button in an App, choose «AirDrop», choose the recipient and then click «Done».
Send Files from Mac to iPhone or iPhone to Mac via Email
Supported Files: Photos, Videos, Documents.
Any file that you can add to your email as an attachment can be transferred between your Mac and iPhone.В
If you want to transfer files from Mac to iPhone, create a new email on your computer and add the files you intend to send as the email attachments and then send the email to your own account. Afterward, check the email on the iPhone and then download the items to your iOS device. Similarly, if you want to send files from an iPhone to Mac, create an email and send it to the Mac via the Email app.
Ways like using AirDrop or email may take you a long time to transfer files, depending on the size of the files and the quality of the network connection. You are recommended to try these methods if you just have several files in a small size to transfer. If not, try other solutions that will save you lots of time instead.
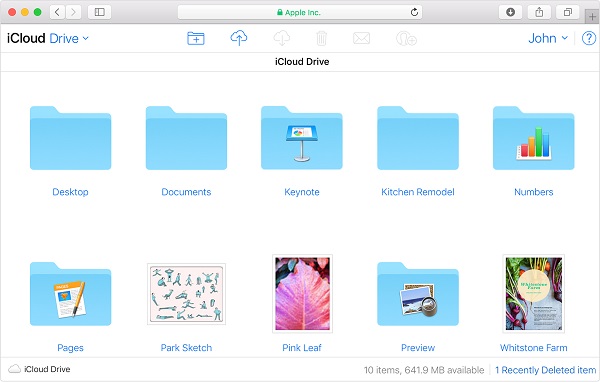
Sync Files Between iPhone and Mac via iCloud Drive
Supported Files: Word Documents, PPTs, Excel Files, and More
iCloud Drive enables users to store files in iCloud and access these items from iCloud.com, Macs, PCs, and iOS devices. You can decide what folders and files to be saved in iCloud Drive. With iCloud Drive on, you can access these files on all of your devices that have the same Apple ID. (IfВ iCloud Drive is not syncing, learn how to fix it first from the article.)
To sync files between iPhone and Mac via iCloud Drive:
Step 1. Turn on iCloud Drive on your iPhone and Mac.
- On iPhone: Go to «Settings» > [your name] > «iCloud» and scroll down to turn on «iCloud Drive».
- On Mac: Go to the Apple menu > «System Preferences» > «iCloud» and then select «iCloud Drive».
Step 2. Upload the files you’d like to transfer in iCloud Drive from the source device.
Step 3. Download the files in iCloud Drive in the target device.
If you don’t know how to upload files to or download files from iCloud Drive, read the user guideВ from Apple Support to get the details.
В Transfer Files from Mac to iPhone or Conversely with Dropbox
Supported Files: Photos, Videos, Word Documents, Excel Files, PPTs, Text Files, Zip Files, Audio Files.
Other than iCloud, other cloud storage services like Dropbox and Google Drive also allow you to transfer files between an iPhone and Mac. Let’s take Dropbox as an example.
To share files between iPhone and Mac via Dropbox:
Step 1. Download and install Dropbox on both your Mac and iPhone. And log in to the app with the same Dropbox account.
Step 2. To transfer files from Mac to iPhone, upload the items to Dropbox from the Mac; To send files from iPhone to Mac, upload the data from iPhone to Dropbox.
Step 3. Go to the Dropbox app on the target device to check and download the files. (Ensure the devices are under stable network connections.)

Transfer Files from Mac to iPhone via Syncing
Supported Files: Music, Movies, TV Shows, Podcasts, Audiobook, Books, Photos, Documents.
If you are using the latest macOS Catalina on your Mac, you can directly transfer files between the Mac and iPhone via USB cable or over the same Wi-Fi connection by syncing.
To share files between iPhone and Mac via a USB cable:
Step 1. Use a USB cable to connect the devices.
Step 2. Go to «Finder» and select your iDevice.
Step 3. Select the types you want to share, including Music, Movies, Files, and more and then you will see a list of apps.
Step 4. Drag a file or files from a Finder window onto the app to start transfer files from Mac to iPhone.
To send files between Mac and iPhone over Wi-Fi connection:
Step 1. Set up Wi-Fi syncing.
- Connect the iPhone to the Mac via a USB cable.
- Go to Finder and select your iDevice in the sidebar.
- Switch to the «General» tab and check the option «Show this [device] when on Wi-Fi».
Step 2. Set the syncing settings based on your needs and click «Apply».
Step 3. When your iPhone and Mac are connected over Wi-Fi, you can select the iPhone in the sidebar and sync it.В
![]()
The Bottom Line
Among the seven solutions, there must be one that perfectly satisfies your need to transfer a file between Mac and iPhone. It’s necessary to stress that if you decide to transfer files by syncing, then synced files may replace the existing files on the target device. Besides, if you share files via cloud storage services, the files you delete from one device will also be deleted from another. If that’s undesired for you, try other ways instead.
When you choose the way to send files from Mac to iPhone or from iPhone to Mac, you should take the specific file type(s) that you want to transfer into consideration, since each of the methods below has its own supported file types. With this in mind, select the aptest way to transfer documents, photos, or other data between your Mac and iPhone within minutes.
о™љо™љо™љо™љо™љ
4.5 out of 5 stars, based on 10 votes
EaseUS MobiMover allows you to easily transfer all data from your iPhone to your PC. The app is available for both Windows and Macs so irrespective of which platform you use, you are covered.

EaseUs MobiMover solves this problem as it allows you to transfer data from an iPhone to a Mac, Mac to an iPhone, or from one iPhone to another iPhone fast.

EaseUS MobiMover is a program that allows you to share files between your iOS device and your PC in an easy manner. This is very useful, since both operative systems are not compatible.

EaseUS MobiMover for Mac and PC is a powerful tool for transferring data from your Apple mobile device to your computer, managing the variety of files that you create, and moving those huge videos quickly.

Related Articles — ALSO ON EaseUS SOFTWARE
Источник


