- [Советы] Удаление клонов системных приложений.
- Xiaomi Comm APP
- Рекомендации
- Fix: The Audio Service is not running
- Solution 1: Simply increase or decrease your computer’s volume
- Solution 2: Restart the Windows Audio service and all of its dependencies
- Solution 3: Changing Log-On Settings
- Solution 4: Scanning for Changes
- Solution 5: Troubleshooting Audio
- Solution 6: Running Some Commands
- Как отключить предупреждение о вреде долгого прослушивания аудио (Android)
- Почему оно возникает
- Реализация
- Как отключить предупреждение
- Как отключить предупреждение без root
- Итоги
[Советы] Удаление клонов системных приложений.
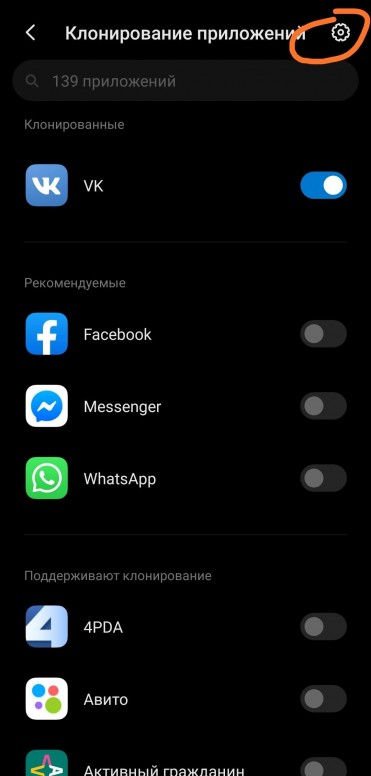
Недавно увидел что у меня появилась иконка с клонированным хромом ( а это вроде системное приложение и по идее не клонируется) как это произошло я не понял. В общем второй хром мне не нужен, а обычным способом он не удаляется. Начал рыть. Набрал в поисковике вопрос , внятный ответ не нашел ни на 4pda ни здесь на форуме. Пришлось самому покапаться , благо что решение вопроса оказалось не сложным.  |
avatar.png (74.33 KB, Downloads: 0)
2020-04-17 22:14:03 Upload
avatar.png (198.46 KB, Downloads: 0)
2020-04-17 22:14:07 Upload

avatar.png (196.48 KB, Downloads: 0)
2020-04-17 22:14:11 Upload
avatar.png (219.93 KB, Downloads: 0)
2020-04-17 22:14:15 Upload

Монтано | из Redmi Note 8T
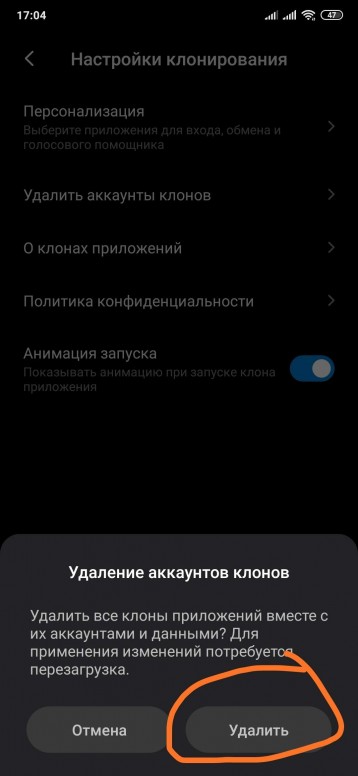
| Безопасность/клонирование/шестерёнка/удалить все данные клонов |

‘RZL | из приложения


Xiaomi Comm APP
Получайте новости о Mi продукции и MIUI
Рекомендации
* Рекомендуется загружать изображения для обложки с разрешением 720*312
Изменения необратимы после отправки
Cookies Preference Center
We use cookies on this website. To learn in detail about how we use cookies, please read our full Cookies Notice. To reject all non-essential cookies simply click «Save and Close» below. To accept or reject cookies by category please simply click on the tabs to the left. You can revisit and change your settings at any time. read more
These cookies are necessary for the website to function and cannot be switched off in our systems. They are usually only set in response to actions made by you which amount to a request for services such as setting your privacy preferences, logging in or filling in formsYou can set your browser to block or alert you about these cookies, but some parts of thesite will not then work. These cookies do not store any personally identifiable information.
These cookies are necessary for the website to function and cannot be switched off in our systems. They are usually only set in response to actions made by you which amount to a request for services such as setting your privacy preferences, logging in or filling in formsYou can set your browser to block or alert you about these cookies, but some parts of thesite will not then work. These cookies do not store any personally identifiable information.
These cookies are necessary for the website to function and cannot be switched off in our systems. They are usually only set in response to actions made by you which amount to a request for services such as setting your privacy preferences, logging in or filling in formsYou can set your browser to block or alert you about these cookies, but some parts of thesite will not then work. These cookies do not store any personally identifiable information.
Источник
Fix: The Audio Service is not running
The Audio Service is not running is a warning message from Windows which indicates that the service responsible for delivering sound is stopped and cannot be started automatically.
Many Windows users have experienced and continue to be affected by a certain issue where the Sound icon in their taskbar – the one that opens a little volume slider when clicked on – gets a little red X on its bottom-right side. When a Windows user affected by this issue places their mouse pointer over the Sound icon (which is basically just an icon depicting a speaker) in their taskbar, they see a message that states:
This issue is most common in Windows 7, one of the most successful iterations of the Windows Operating System to have ever been created, but there is nothing standing in the way of this problem occasionally affecting other versions of the Windows OS. Almost all of the Windows users who are affected by this issue are able to successfully play audio on their computer through any and all connected speakers/headphones even though there is a red X on the Sound icon in their taskbar and their computer’s audio service – known as the Windows Audio service – is not running.
The root of this problem, in almost all cases, is the Windows Audio service – or one or more of its dependencies (services that need to be running in order for it to run) – either stopping spontaneously for some reason or failing to start automatically when you initially boot your computer up and this has also been known to trigger the Audio Services not responding Error. Many users affected by this problem are able to alleviate it by simply restarting their computer. However, that isn’t a concrete solution to this problem and having to restart your computer every time you encounter this issue on your computer is inconvenient, to say the least. Thankfully, though, there exist more permanent ways to fix this problem and get rid of the “The Audio Service is not running” message, and the following are two of the most effective ones:
Solution 1: Simply increase or decrease your computer’s volume
For a problem that stumps even the most avid users of Windows computers, hordes of Windows users who have been affected by this issue have been able to resolve it by applying an ironically simple fix – adjusting their computer’s volume by even the slightest of margins. Many, many people who have been affected by this problem in the past have had success in fixing it by simply increasing or decreasing their computer’s volume. In order to use this solution to fix this issue, you need to:
- Click on the Sound icon in your taskbar – yes, this is the one that has the red X on it as a result of this issue. Doing so will display a little volume slider that you can use to adjust your computer’s volume.
- Using the volume slider that consequently appears, either increases or decreases your computer’s volume, even if you do so by a small amount.
- Doing so should immediately get rid of the red X on the Sound icon in your taskbar and you should no longer see the “The Audio Service is not running” message when you hover your mouse pointer over it.
Solution 2: Restart the Windows Audio service and all of its dependencies
Another highly effective solution to this problem is restarting the Windows Audio service and two of its three dependencies, and making sure that all three of these services are set to automatically start when your computer boots up. In order to do so, you need to:
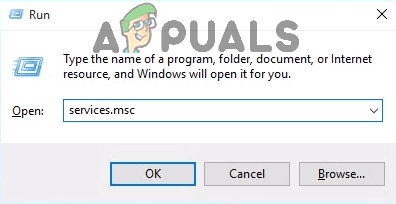
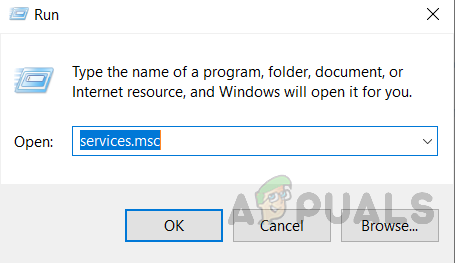
- Hold the Windows Key and Press R. Type services.msc in the run dialog.
 Type “services.msc” into the Run dialog and press Enter
 - One by one, locate and double-click on the following services, and then set their Startup type to Automatic. Changing Startup to Automatic
- Right-click on the following services, and then click on Restart in the resulting context menus:
 Type “services.msc” into the Run dialog and press Enter
 Changing Startup to Automatic
As soon as all three of the services listed above have been restarted, the red X on the Sound icon in your taskbar should disappear, your computer’s Windows Audio service should be running and you should no longer see the “The Audio Service is not running” message.
Solution 3: Changing Log-On Settings
In some cases, the services might be allowed to log on to a particular account on the computer but they might not be configured to log on for your particular user account. Therefore, in this step, we will be changing the log-on settings. For that:
- Press “Windows” + “R” to open the Run prompt.
- Type in “Services.msc” and press “enter”.Opening services by typing “services.msc” in the RUN command.
- Navigate down and right-click on the “Windows Audio” service.
- Click on the “Log on” tab and select the “Local System Account” option instead of the “This Account” option. Choosing the “Local System Account” option
- Check to see if the issue persists.
- If it does, check the “This Account” option and type in “Local Service” in the text box.
- After that, type any password in the password and confirm password fields as it really doesn’t matter.
- Click on “Apply” and then on “OK”.
- Check to see if the issue persists.
 Opening services by typing “services.msc” in the RUN command.
 Choosing the “Local System Account” option
Solution 4: Scanning for Changes
In certain cases, the sound drivers might have acquired some corrupt configurations or files due to which it is causing this glitch and preventing effective communication between the driver and the hardware. Therefore, in this step, we will be first uninstalling the driver and then reinstall it from the device manager. In order to do so:
- Press “Windows’ + “R” to open the Run prompt.
- In the Run prompt, type in “Devmgmt.msc” and press “Enter”.Running the Device Manager
- In the device manager, expand the “Sound, Video and Game Controllers” option. Navigating to Sound, video and game Controllers
- Right-click on the audio driver that you are using and select “Uninstall”.
- After the driver finishes uninstalling, click on the “Scan for Hardware Changes” option and the device manager will automatically reinstall this driver.
- Check to see if the issue still persists.
- If it still persists, right-click on the driver and select “Properties”.
- Click on the “Driver Details” tab and then select “Rollback Driver”.
- Check to see if that fixes your issue and if it doesn’t repeat the above steps and select “Update Driver”.
 Running the Device Manager
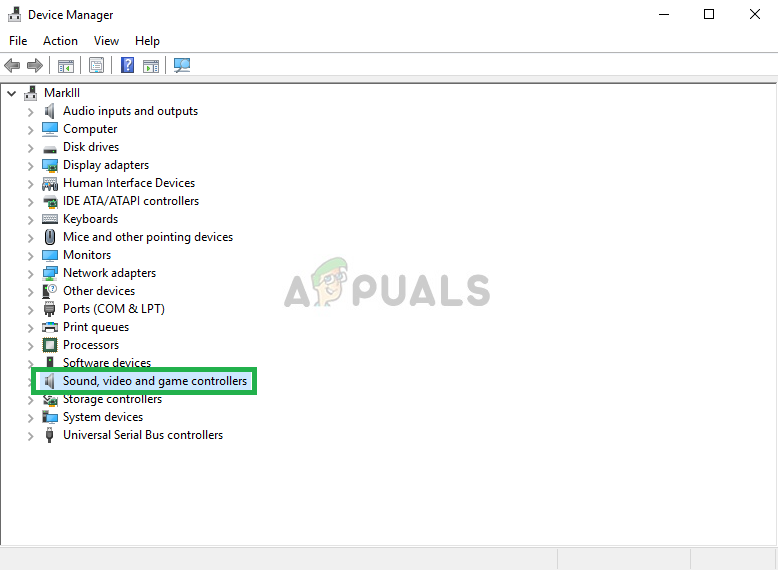 Navigating to Sound, video and game Controllers
Solution 5: Troubleshooting Audio
It is possible that the audio configurations on the computer have been messed up either by manual or automatic changes. In certain cases, this can also occur after the installation of an application. Therefore in this step, we will be troubleshooting the audio. For that:
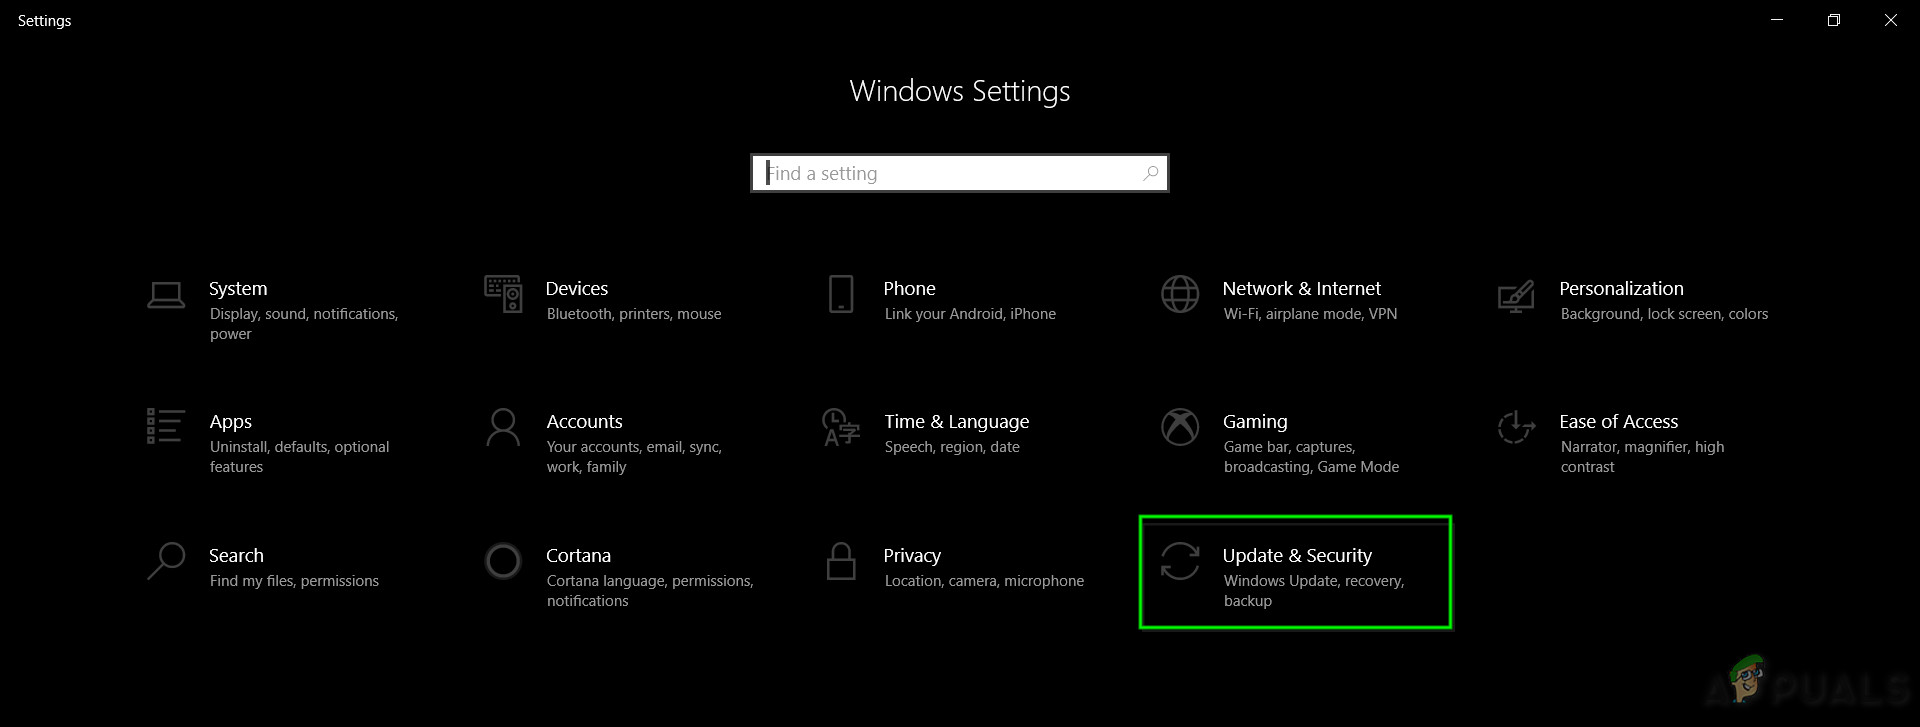
- Press “Windows” + “I” to open the settings.
- Click on the “Update& Security” button and then select “Troubleshoot” from the left pane. Update & Security.in Windows Settings
- In the Troubleshoot window, click on the “Playing Audio” and select the “Run the Troubleshooter” option.
- Check to see if the issue still persists after the troubleshooter runs.
 Update & Security.in Windows Settings
Solution 6: Running Some Commands
In some cases, the issue might be triggered if you have messed up with some local account configurations therefore, in this step, we will be executing some commands in the elevated command prompt to get rid of this issue. For that:
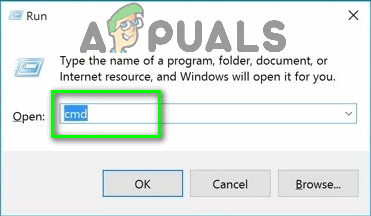
- Press “Windows” + “R’ to open the Run prompt.
- Type in “Cmd” and press “Shift” + “Ctrl” + “Enter” to provide administrative privileges. Type “cmd” into the Run dialog
- In the command prompt, type in the following commands one by one and press “Enter” to execute them.
- Check to see if the issue persists after completing these steps.
 Type “cmd” into the Run dialog
Note: Also make sure to check if the sound works fine in safe mode to rule out any third party interference in the audio services. In addition to that, try to reinstall the sound drivers.
Источник
Как отключить предупреждение о вреде долгого прослушивания аудио (Android)
Наверное, многие, кто слушает музыку (и не только) с Android-устройства, сталкивались с таким предупреждением:

В этой статье мы рассмотрим, почему и когда возникает данное предупреждение, и как сделать так, чтобы оно больше не возникало.
Появляется оно только при прослушивании аудио через внешнее устройство (наушники/колонки). Для тех, кто не встречался с таким, небольшое пояснение: представьте, что вы слушаете музыку в наушниках, довольно громкую. Внезапно звук становится тише. Вы пытаетесь прибавить громкость, используя кнопки на корпусе, но не выходит. Достав устройство из кармана и сняв блокировку, вы и увидите такое предупреждение. Только после согласия с ним можно будет прибавить громкость обратно.
Да, предупреждение разумное, но появляется оно в непредсказуемый момент, иногда самый неподходящий: когда вы в общественном транспорте/за рулём/зимой на улице/когда у вас грязные руки и т.д. Доставать устройство, снимать блокировку, соглашаться с предупреждением, класть устройство обратно в этих случаях неудобно. А в случае, если подключены колонки, а не наушники, сообщение не совсем уместно.
Почему оно возникает
Данное предупреждение — не собственная инициатива авторов платформы. Всё дело в том, что существует WHO-ETU стандарт “безопасного прослушивания” (safe listening). В европейских и некоторых других странах его выполнение обязательно. В стандарте описывается, как долго можно прослушивать аудио в зависимости от громкости с минимальным риском снижения слуха. Например, для взрослого человека безопасная недельная “доза” звука — 1.6 Pa 2 h, что эквивалентно 20 часам прослушивания на громкости 83 dB.
Реализация
В зависимости от mcc (mobile country code), режим safe listening может быть включен или выключен. Определяется это значением ресурса R.bool.config_safe_media_volume_enabled .
Если режим включен, то система считает время прослушивания на небезопасной громкости (выше 85 dB), и периодически сохраняет значение в переменную Settings.Secure.UNSAFE_VOLUME_MUSIC_ACTIVE_MS . Когда значение достигает 20 часов, выводится предупреждение. После согласия с предупреждением значение сбрасывается, и подсчёт начинается заново.
Такая реализация довольно простая и не учитывает, например, в течение какого времени пользователь прослушал эти 20 часов: возможно, за пару дней, а, может, слушал по 6-7 минут в течение полугода (в соответствии со стандартом это не является угрозой для слуха).
Логика safe listening сосредоточена в классе классе AudioService.java, в нём можно увидеть соответствующие поля:
Поле mMusicActiveMs содержит число миллисекунд, прослушанных пользователем на небезопасной громкости со времени последнего подтверждения диалога. Начальное значение загружается из переменной Settings.Secure.UNSAFE_VOLUME_MUSIC_ACTIVE_MS . В эту же переменную каждую минуту записывается новое значение mMusicActiveMs.
Также есть поле mSafeMediaVolumeState , оно содержит текущее состояние системы safe listening:
- DISABLED : отключена
- ACTIVE : включена, и при этом лимит прослушивания достигнут, а значит нельзя разрешать пользователю увеличивать громкость, пока он не согласится с предупреждением
- INACTIVE : включена, лимит пока не достигнут
Метод проверки превышения лимита выглядит так:
Как отключить предупреждение
Чтобы выключить safe listening, нужно добиться того, чтобы переменной mSafeMediaVolumeState на этапе конфигурации было присвоено значение DISABLED .
Посмотрим, где изначально задаётся значение:
Видим, что помимо значения ресурса R.bool.config_safe_media_volume_enabled , есть два свойства, позволяющих включать/выключать систему safe listening: audio.safemedia.force и audio.safemedia.bypass.
Чтобы отключить предупреждение, нужно установить значение audio.safemedia.bypass=true в файле system/build.properties. Но для этого нужны root-права. Если их нет, то нужно разбираться дальше и искать другой способ.
Как отключить предупреждение без root
Давайте посмотрим, что происходит при закрытии диалога с предупреждением по нажатию ОК, и попробуем это воспроизвести:
Вызывается метод disableSafeMediaVolume у инстанса AudioManager .
Он помечен аннотацией @hide . Это означает, что метод не будет включён в public API несмотря на модификатор public. До Android 9 это легко можно было обойти используя рефлекшн. Теперь же такой метод по-прежнему можно вызывать, но уже с помощью трюка под названием double-reflection:
Вызов заканчивается исключением
java.lang.SecurityException: Only SystemUI can disable the safe media volume: Neither user 10307 nor current process has android.permission.STATUS_BAR_SERVICE.
Разрешение STATUS_BAR_SERVICE имеет protectionLevel=«signature|privileged», получить его не получится.
Что ж, тогда попробуем так. Мы будем следить за переменной Settings.Secure.UNSAFE_VOLUME_MUSIC_ACTIVE_MS , в которую периодически сохраняется текущее значение mMusicActiveMs . Когда значение начнёт приближаться к 20 часам, будем его сбрасывать. Затем нужно будет сделать так, чтобы AudioService прочитал новое значение из настроек.
Прочитать значение Settings.Secure.UNSAFE_VOLUME_MUSIC_ACTIVE_MS можно так:
То же самое, используя adb:
А чтобы записать значение, приложению потребуется разрешение android.permission.WRITE_SECURE_SETTINGS .
Оно имеет protectionLevel=«signature|privileged|development», а значит его можно выдать приложению используя adb:
Само значение записать можно так:
То же самое можно сделать с помощью adb:
Сбрасывать лучше в 1, как это сделано в AudioManager, а не в 0. Так как 0 соответствует состоянию ACTIVE.
Теперь нужно, чтобы AudioService прочитал новое значение, и обновил значение локальной переменной mMusicActiveMs .
Есть подходящий метод в AudioManager.java
Он инициирует вызов метода readAudioSettings в AudioService , где происходит загрузка mMusicActiveMs из настроек.
Метод помечен аннотацией @hide . Его вызов с помощью double-reflection вызывает исключение:
java.lang.SecurityException: Permission Denial: get/set setting for user asks to run as user -2 but is calling from user 0; this requires android.permission.INTERACT_ACROSS_USERS_FULL
Да, аннотация @hide здесь тоже неспроста. Получить данное разрешение мы, конечно не можем. Оно имеет protectionLevel=«signature|installer».
Остаётся один способ заставить AudioService прочитать новое значение — его перезапуск. Просто так перезапустить системный сервис нельзя. Нужно или перезагрузить устройство, или переключиться на другого пользователя, а затем вернуться обратно.
Теперь настало время проверить теорию.
Устанавливаем unsafe_volume_music_active_ms = 71 990 000 (останется 10 секунд, в течение которых можно прослушивать музыку на высокой громкости)
Перезапускаем устройство (можно вместо этого переключиться на другого пользователя, а потом вернуться):
Подключаем наушники, включаем музыку погромче. В течение минуты появляется диалог.
Теперь повторяем те же действия, но присваиваем unsafe_volume_music_active_ms = 1. Включаем музыку, ждём минуту. Диалог не появляется.
Итоги
Чтобы отключить предупреждение, можно сделать следующее:
При наличии root-прав
Установить значение audio.safemedia.bypass=true в файле system/build.properties
Нужно следить за значением Settings.Secure.UNSAFE_VOLUME_MUSIC_ACTIVE_MS , и не давать ему подниматься выше 72 000 000 (20 часов). После сброса значения нужно перезапускать устройство (или переключаться на другого пользователя, а затем возвращаться обратно).
Я написала код простого приложения, которое делает эту работу, и напоминает о необходимости перезагрузить устройство/перелогиниться.
Источник


