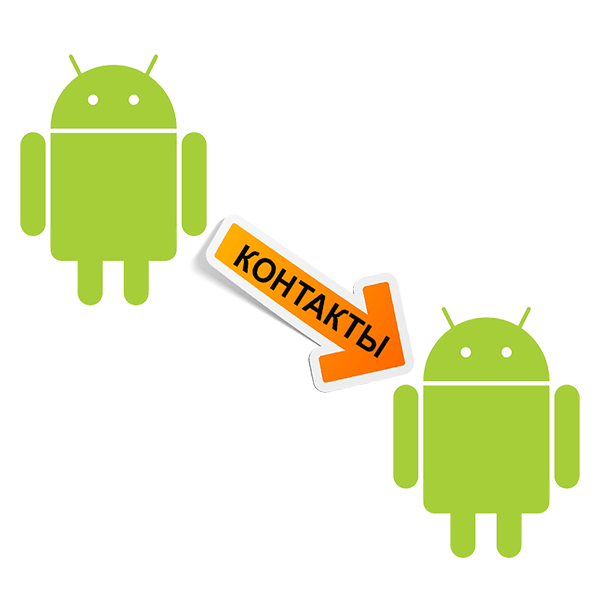
- Перенос контактов с Android на Android
- Переносим контакты с Андроида на Андроид
- Способ 1: Программа MOBILedit
- Способ 2: Синхронизация через Google-аккаунт
- Способ 3: Перенос контактов с помощью SD карты.
- Способ 4: Отправка по Bluetooth
- Способ 5: Копирование номеров на СИМ карту
- How to transfer data from your old Android phone to your new one
- How to back up data on your old Android phone
- How to transfer photos and videos to your new Android phone
- How to restore data and settings to your new Android phone
- Mid-range camera king
- Google Pixel 4a
- These are the best rugged Android phones
- The Google Pixel 5 is the best phone for taking photos, period
- The Xperia 1 III is our favorite phone for shooting video
- Harish Jonnalagadda
Перенос контактов с Android на Android
Смартфон является постоянным хранилищем данных в кармане. Однако же, если фотографии и видео, записанные на него, вы периодически переносите на компьютер, то контакты редко кто сохраняет куда-либо кроме телефонной книги на своем гаджете. Поэтому в любой момент можно потерять их все или же, например, при смене вашего устройства их придется как-то переносить.
Переносим контакты с Андроида на Андроид
Далее рассмотрим несколько способов, как скопировать номера телефонов с одного Android-устройства на другое.
Способ 1: Программа MOBILedit
MOBILedit отличается большим спектром возможностей при работе с многочисленными брендами смартфонов. В рамках данной статьи рассмотрим только копирование контактов с одного телефона с ОS Android на другой.
- Для работы с программой потребуется включение на смартфоне «Отладки по USB». Для этого перейдите в «Настройки», следом в «Параметры разработчика» и включите нужный вам пункт.
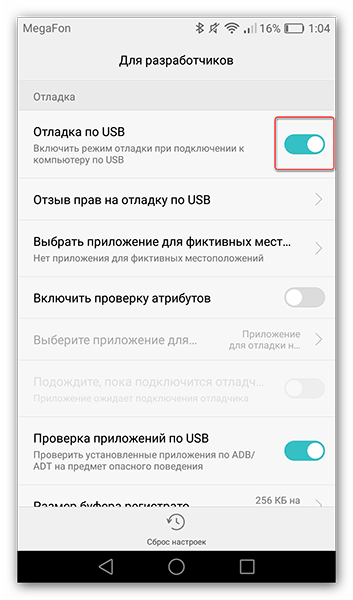
Если же вы не можете найти «Параметры разработчика», то для начала необходимо получить «Права разработчика». Для этого в настройках смартфона перейдите в пункт «О телефоне» и несколько раз подряд нажмите на «Номер сборки». После этого легко найдете нужную вам «Отладку по USB».

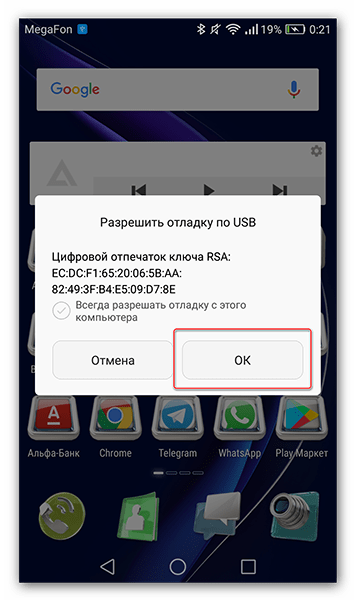
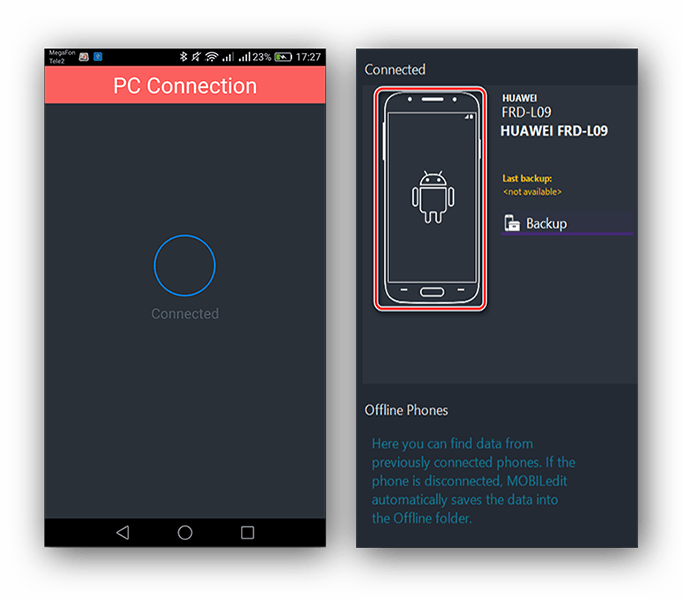
Теперь зайдите в программу МОБАЙЛедит и подключите телефон по USB-кабелю к компьютеру. В левом верхнем углу окна программы вы увидите информацию о том, что устройство подключено и для продолжения работы с ним вам необходимо нажать «ОК».
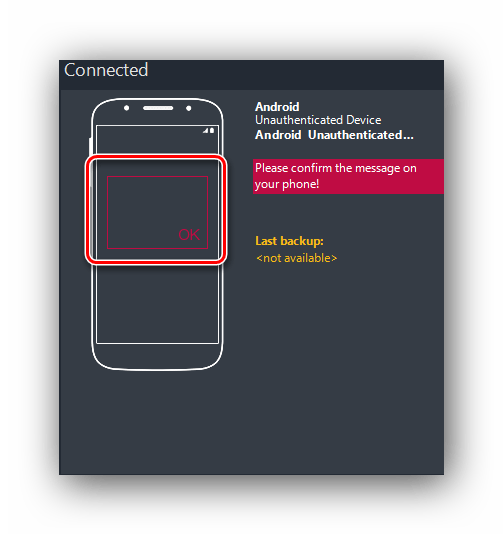
Далее на компьютере вы увидите отображение процесса подключения.

После успешного подключения программа отобразит название вашего девайса, а на его экране будет гореть круг с надписью «Connected».
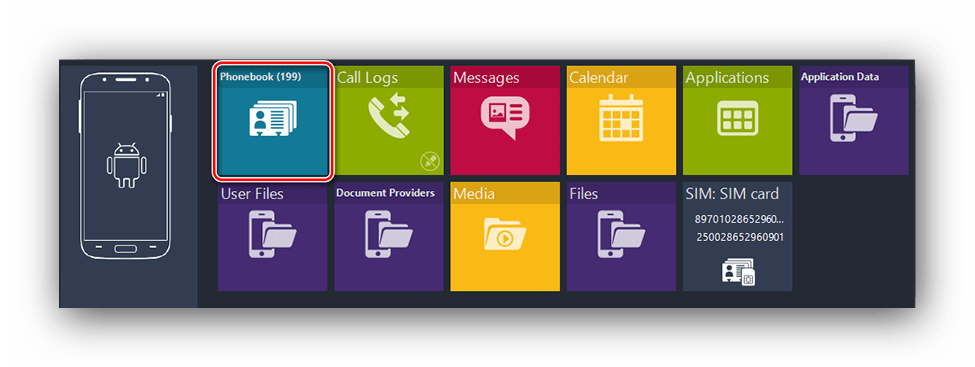
Теперь, чтобы перейти к контактам, нажмите на образ смартфона. Следом кликните по первой вкладке под названием «Phonebook».

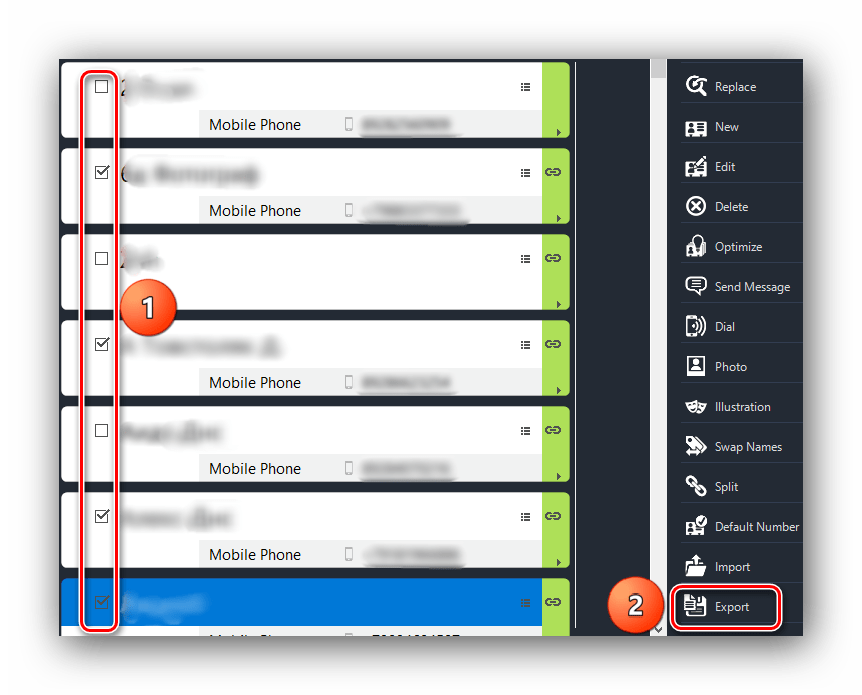
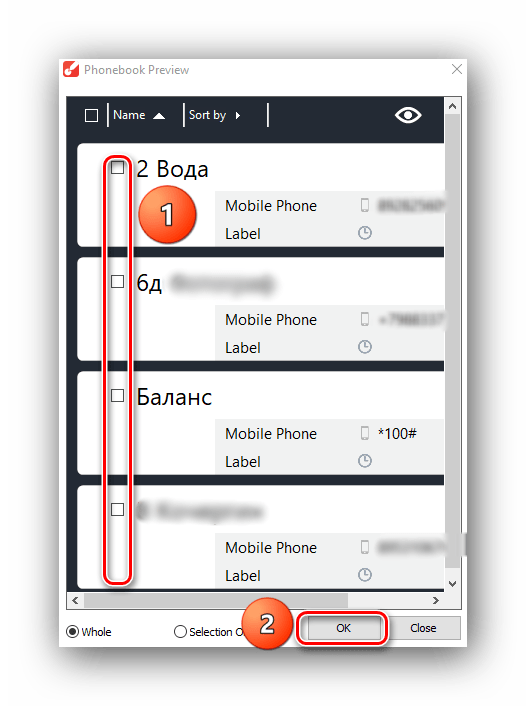
Следующим шагом выбираете номера, которые нужно перенести. Для этого поставьте галочки в квадратики рядом с каждым и нажмите «Export».
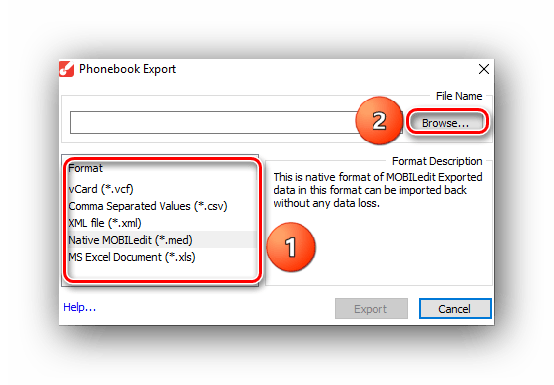
В открывшемся окне вам необходимо будет выбрать формат, в котором вы хотели бы сохранить контакты на компьютер. По умолчанию здесь сразу выбран формат, непосредственно с которым работает эта программа. Нажмите на «Browse», чтобы выбрать место для загрузки.
В следующем окне найдите нужную вам папку, укажите имя файла и нажмите «Сохранить».
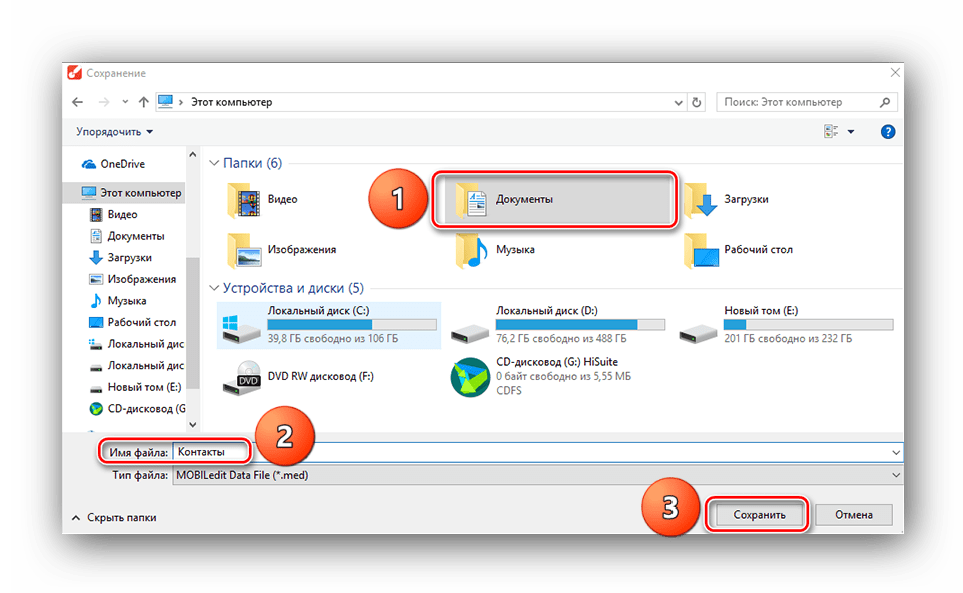

Далее отобразится окно, где нужно выбрать папку, в которую вы перед этим сохраняли контакты со старого устройства. Программа запоминает последние действия и требуемая папка сразу будет указана в поле «Browse». Кликните по кнопке «Import».

На этом копирование с помощью MOBILedit заканчивается. Также, в этой программе вы можете изменять номера, удалять их или отправлять СМС.
Способ 2: Синхронизация через Google-аккаунт
Для следующего способа вам необходимо знать логин и пароль вашего Google-аккаунта.
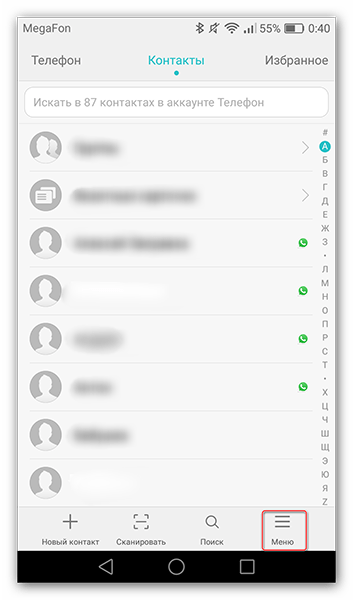
- Чтобы провести синхронизацию с одного телефона на другой, перейдите в «Контакты» и далее в графу «Меню» или в значок, ведущий в настройки для управления ими.
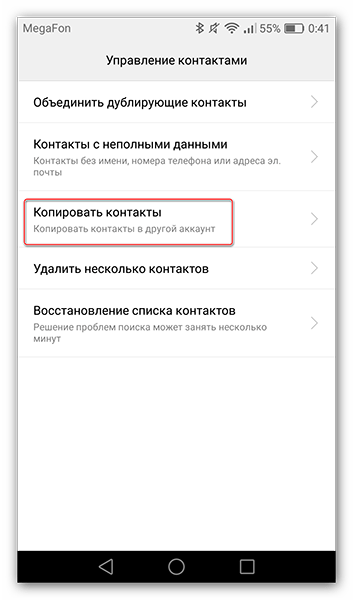
Далее перейдите в пункт «Управление контактами».
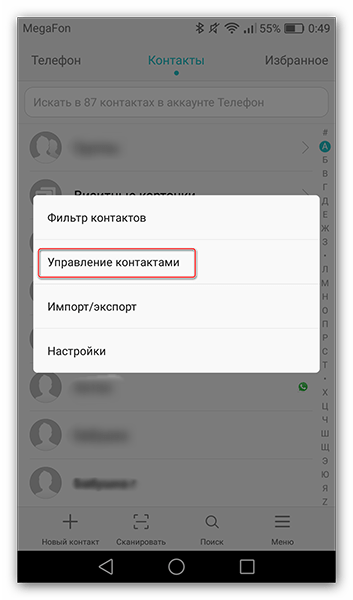
Следом нажмите на «Копировать контакты».
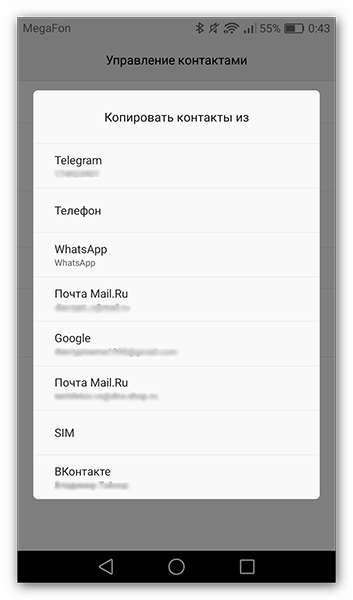
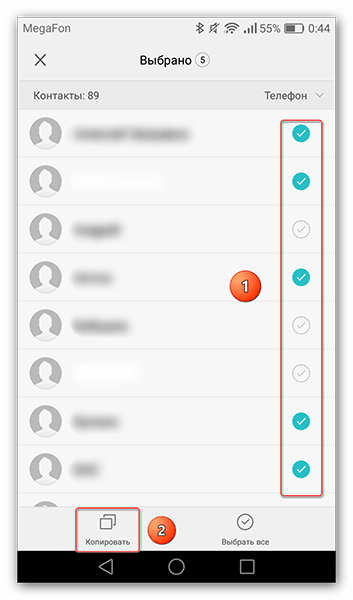
После этого появляется список контактов. Отметьте нужные вам и тапните по «Копировать».
В отобразившемся окне нажмите на строку с вашим Google-аккаунтом и номера тут же перенесутся туда.

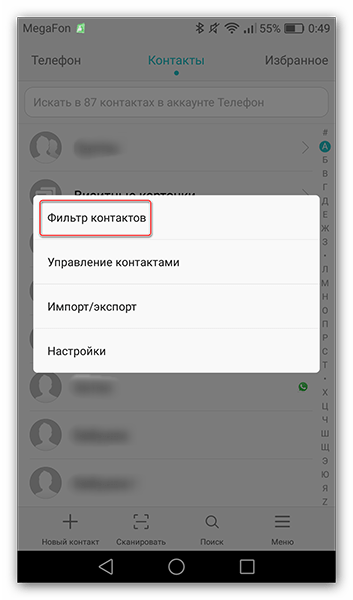
Теперь для синхронизации зайдите на новом Android-устройстве в свой Гугл-аккаунт и вновь перейдите в меню контактов. Нажмите на «Фильтр контактов» или на ту графу, где выбирается источник отображающихся номеров в вашей телефонной книге.
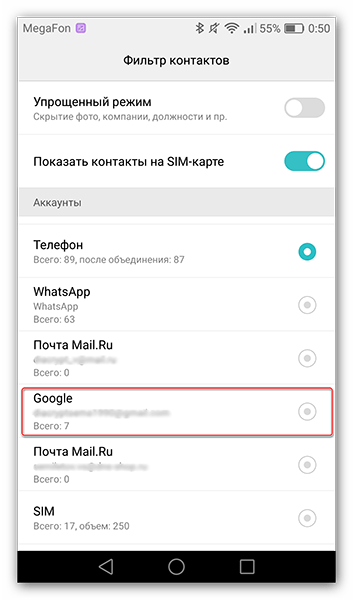
На этом шаге синхронизация данных с Гугл-аккаунтом завершается. После этого вы уже можете перенести их на сим-карту или телефон, чтобы к ним был доступ из нескольких источников.
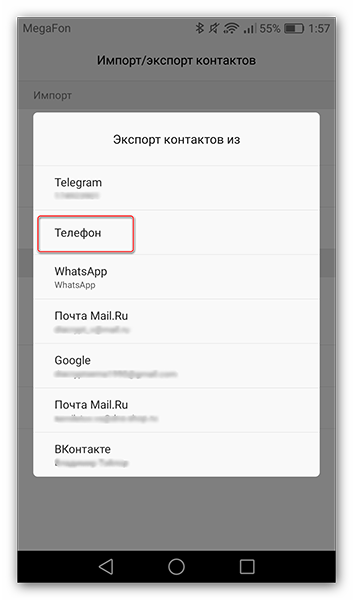
Способ 3: Перенос контактов с помощью SD карты.
Для этого способа вам потребуется рабочая флеш-карта формата micro SD, которая сейчас имеется практически у каждого пользователя смартфона.
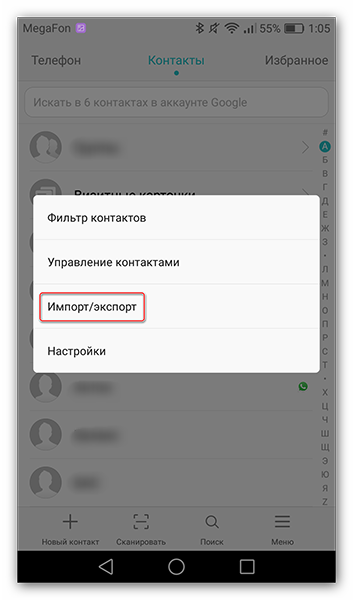
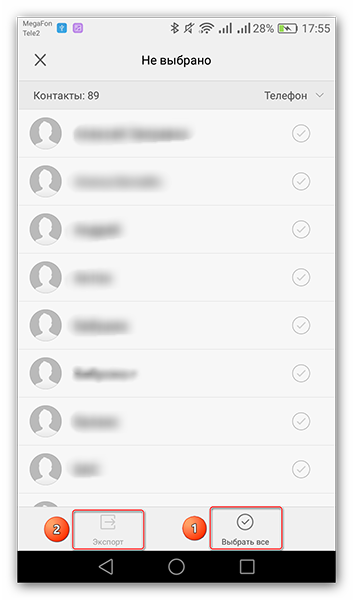
- Чтобы скинуть номера на флешку, перейдите на вашем старом Android-устройстве в меню контактов и выберите «Импорт/экспорт».
На следующем этапе выберите «Экспорт на накопитель».
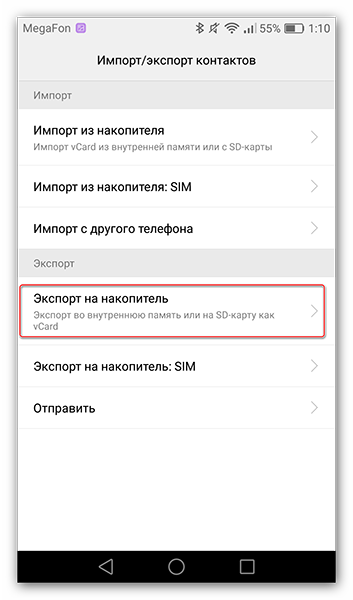
Далее всплывет окно, в котором будет указано, куда скопируется файл и его название. Здесь вам необходимо кликнуть на кнопку «Экспорт».

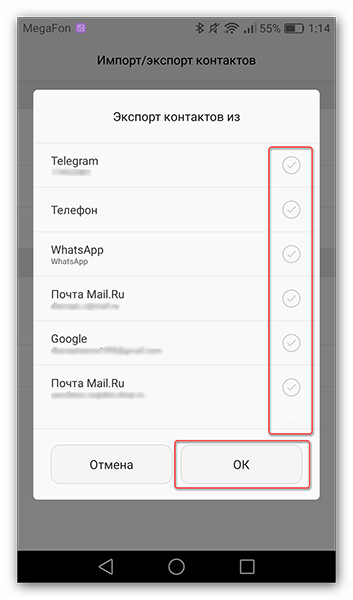
После этого выберите источник, откуда нужно скопировать, и жмите «ОК».
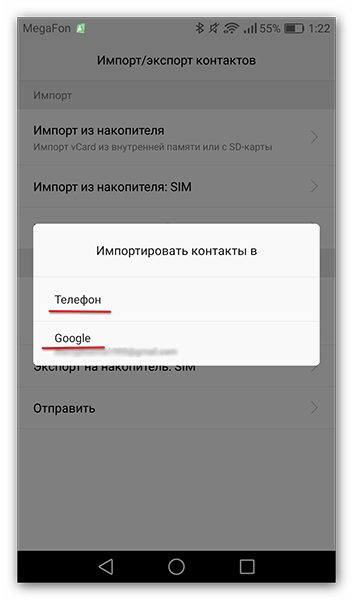
Теперь, чтобы восстановить номера с накопителя, снова зайдите в «Импорт/Экспорт» и выберете пункт «Импорт из накопителя».
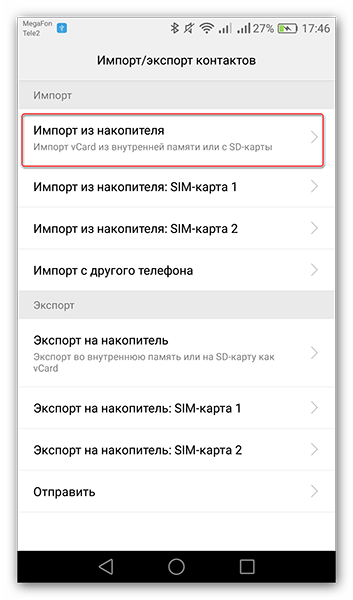
В отобразившемся окошке выберете место, куда нужно импортировать контакты.

Через несколько секунд все ваши данные будут перенесены на новый смартфон.
Способ 4: Отправка по Bluetooth
Простой и быстрый способ переноса телефонных номеров.
- Для этого на старом устройстве включите Блютус, перейдите в настройки контактов в пункт «Импорт/экспорт» и выберете «Отправить».
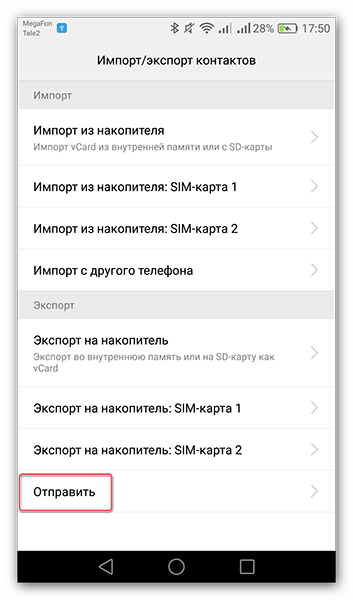
Следом откроется список контактов. Выберите нужные вам и нажмите на значок «Отправить».

Далее появится окно, где вы можете выбрать варианты передачи телефонных номеров. Найдите и выберите способ «Bluetooth».

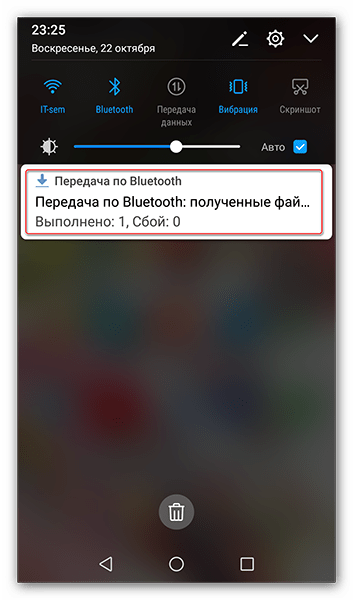
После этого откроется меню настроек Bluetooth, где будет идти поиск доступных устройств. В это время на втором смартфоне включите Блютус для обнаружения. Когда на экране появится название другого устройства, нажмите на него и данные начнут передаваться.

В это время на втором телефоне в панели уведомлений появится строка о передаче файлов, для начала которой вам необходимо нажать «Принять».

Когда закончится передача, в уведомлениях будет информация об успешно завершенной процедуре, по которому вам необходимо кликнуть.
Далее вы увидите принятый файл. Тапните по нему, на дисплее появится вопрос об импортировании контактов. Нажмите на «ОК».

Способ 5: Копирование номеров на СИМ карту
И напоследок еще один способ копирования. Если вы при пользовании смартфоном сохраняли все номера телефонов на него, то с перестановкой СИМ карты телефонная книга нового устройства будет пуста. Поэтому перед этим вам нужно их все переместить.
- Для этого перейдите в настройки контактов во вкладку «Импорт/экспорт» и нажмите на «Экспорт на накопитель SIM-карта».

Далее выберите пункт «Телефон», так как ваши номера хранятся в этом месте.
Следом выберите все контакты и нажмите на «Экспорт».
Теперь вы знаете несколько методов переноса ваших контактов с одного Android-устройства на другое. Выберите удобный для в и избавьте себя от долгого переписывания вручную.
Помимо этой статьи, на сайте еще 12473 инструкций.
Добавьте сайт Lumpics.ru в закладки (CTRL+D) и мы точно еще пригодимся вам.
Отблагодарите автора, поделитесь статьей в социальных сетях.
Источник
How to transfer data from your old Android phone to your new one
![]() Source: Alex Dobie / Android Central
Source: Alex Dobie / Android Central
When it’s time to switch from your older Android phone to a new one, you’ll want to make sure all of your data makes it way across safely. Thankfully, Google makes it extremely convenient to migrate your texts, call logs, contacts, music, and photos over to your new phone seamlessly.
How to back up data on your old Android phone
You’ll need to make sure that all the relevant data on your old phone is backed up to the cloud before you make the switch to your new phone. Google automatically backs up contacts, call logs, texts, and settings — including Do Not Disturb details — to Drive, so you’ll be able to restore all that data to your new phone just by logging in with your Google account during initial configuration.
Best of all, the data that’s automatically backed up by Google doesn’t count toward your storage quota, so you don’t have to worry about running out of storage. The feature backs up call history, app data, contacts, device and home screen settings, and text messages. So before you switch to a new phone, it makes sense to see if this data is already on the cloud.
Note: I’m using a OnePlus 7T for reference, but the steps outlined below will be the same for all Android phones running Android 7.0 Nougat and above. You can always search for backup in the settings search bar to find the option.
- Open Settings from the app drawer or home screen.
- Scroll down to the bottom of the page.
Go to the System menu.
 Source: Android Central
Hit Back up now to sync the latest data on the phone with Google Drive.
Source: Android Central
Pro tip: Go to contacts.google.com to see if all the contacts from your previous phone migrated to your Google account. The contacts that you see on this page will be the ones that will show up on your new phone.
Once the data is backed up, you can get started with setting up your new phone. Before we do that, however, let’s make sure your photos and videos are being backed up to Google Photos.
How to transfer photos and videos to your new Android phone
Google Photos is an outstanding service for backing up photos and videos. It seamlessly backs up data, has granular sharing controls, and uses on-device machine learning to automatically group faces. However, the best feature is the unlimited storage at high quality. You can save your photos and videos at Original quality — the quality at which they were taken — or select High quality, which retains the same level of detail while cutting down on the size.
You don’t have to worry about running out of storage if you select the High-quality option, and this particular feature makes Photos a fantastic service for storing your photos and videos. As the data is backed up to a cloud, you’ll be able to access your photos and videos from your new phone as well as on the web. If you haven’t set up Photos yet, here’s how to get started.
- Open Photos from the app drawer or home screen.
- Select the hamburger menu (three horizontal lines) from the top left of the screen.
Tap Settings.
Source: Android Central
Ensure that the Backup mode is set to High quality.
Source: Android Central
That’s all there is to it. Once your photos and videos are safely backed up to Google Photos, you can get started with setting up your new phone.
How to restore data and settings to your new Android phone
You’ve unboxed your new phone and are ready to set it up. There are a few ways to restore data from your older device, and here I’m highlighting the option that has worked best for me over the years (I switch phones once every two weeks, so I know what I’m talking about). You’ll need your old phone for this, so make sure you don’t reset the data just yet. At this point, you should switch the SIM card over to the new phone. Let’s get started.
- Select your device language and hit Start on the welcome page.
- Select your home Wi-Fi network and sign in.
Hit Next at the Copy apps & data screen to begin migrating data from your old phone.
Source: Android Central
Hit Next once again here. I’ll have detailed instructions on how to set things up on your old phone down below.
Source: Android Central
You’ll see your phone’s model number highlighted on the Verify your phone page. Stay at this page and grab your old phone. You’ll now need to authorize data transfer from your old phone so that texts, calls, and relevant data can migrate seamlessly to the new device. Here’s what you need to do on the old phone:
- Open Settings from the app drawer or home screen.
- Navigate to the Google tab.
Select Set up & restore.
Source: Android Central
Your phone will now search for nearby devices. You can then verify the patterns on both devices to make sure the connection is established.
Source: Android Central
You’ll see a Copying your account progress bar at this point. Once you see this, switch back to your new phone.
Source: Android Central
You’ll be able to see a sign-in window for all the Google accounts registered on your older device. Because you set up direct data transfer, you won’t need to enter two-factor authentication when signing in using this method. Don’t fret if you do not see the two-factor dialog box; that is normal behavior. Should both phones lose connectivity at any point during the restore, just start over and you’ll be able to set it up.
- Sign in to your Google account.
- Confirm the screen lock of your old phone to authenticate the data transfer.
You’ll now arrive at the Choose what to restore page. If you want everything from your old phone transferred to the new one, leave all the settings as is and select Restore.
Source: Android Central
Hit Restore to start installing data on your new phone. You should see a confirmation message of the same.
Source: Android Central
After selecting the restore options, you’ll be able to choose whether to back up data and use location automatically at the Google services page. After selecting the services, you can set up a PIN to use face unlock and fingerprint authentication.
The rest of the options after configuring biometric authentication will vary by manufacturer, and you can easily follow along with the on-screen instructions. The best part with a cloud restore is that even your home screen is preserved. That includes the background as well as the app layout, so you can get started on your new phone without any additional setup.
That’s all there is to it. Once setup is finished and you get to the home screen, you’ll see the Play Store running in the background and restoring data from your old phone. This may take up to an hour based on the amount of content installed on your old phone and your internet connection, so you can let that run while configuring the rest of the options on your new phone.
Mid-range camera king
![]()
Google Pixel 4a
Flagship camera for a lot less
The Pixel 4a takes the outstanding camera from the Pixel 4 and makes it much more accessible. This is the best camera you’ll find on a mid-range phone by some margin, and you also get 6GB of RAM and 128GB of storage, a minimalist design, and robust internal hardware with all-day battery life.
We may earn a commission for purchases using our links. Learn more.
![]()
These are the best rugged Android phones
Living the rough and tumble life? Get yourself a smartphone that can handle everything you throw at it — or throw your phone at.
![]()
The Google Pixel 5 is the best phone for taking photos, period
If you want the best Android camera, you should go with the Google Pixel 5. Many great options get close, though. So we’ve gathered a solid list to get you started.
![]()
The Xperia 1 III is our favorite phone for shooting video
If video recording is your thing, look no further than the Sony Xperia 1 III. It offers a large screen, three great cameras, and extremely robust manual video controls.

Harish Jonnalagadda
Harish Jonnalagadda is the Asia Editor at Android Central. A reformed hardware modder, he now spends his time writing about India’s technology revolution. Previously, he used to ponder the meaning of life at IBM. Contact him on Twitter at @chunkynerd.
Источник


