- Android Platform Guide
- Requirements and Support
- Install Cordova Shell Tools
- Open a New Project in the SDK
- Build the Project
- Configure an Emulator
- Deploy to Emulator
- Deploy to Device
- Other Commands
- Android Platform Guide
- Requirements and Support
- Install Cordova Shell Tools
- Install the Java Development Kit (JDK)
- Install the Android SDK
- Install SDK Packages
- Configure an Emulator
- Create a New Project
- Build the Project
- Deploy the app
- Other Commands
- Open a New Project in the SDK
Android Platform Guide
This guide shows how to set up your SDK environment to deploy Cordova apps for Android devices, and how to optionally use Android-centered command-line tools in your development workflow. You need to install the Android SDK regardless of whether you want to use these platform-centered shell tools or cross-platform Cordova CLI for development. For a comparison of the two development paths, see the Overview. For details on the CLI, see The Command-Line Interface.
Requirements and Support
Cordova for Android requires the Android SDK. See the Android SDK’s System Requirements.
Cordova supports Android 2.3.x (Gingerbread, starting with Android API level 10) and 4.x. As a general rule, Android versions become unsupported by Cordova as they dip below 5% on Google’s distribution dashboard. Android versions earlier than API level 10, and the 3.x versions (Honeycomb, API levels 11-13) fall significantly below that 5% threshold.
Install Cordova Shell Tools
If you want to use Cordova’s Android-centered shell tools in conjunction with the SDK, download Cordova from cordova.apache.org. Otherwise ignore this section if you plan to use the cross-platform CLI tool described in The Command-Line Interface.
The Cordova download contains separate archives for each platform. Be sure to expand the appropriate archive, android in this case, within an empty directory. The relevant executible utilities are available in the top-level bin directory. (Consult the README file if necessary for more detailed directions.)
These shell tools allow you to create, build, and run Android apps. For information on the additional command-line interface that enables plugin features across all platforms, see Using Plugman to Manage Plugins. See Application Plugins for details on how to develop plugins.
For Cordova command-line tools to work, or the CLI that is based upon them, you need to include the SDK’s tools and platform-tools directories in your PATH . On a Mac, you can use a text editor to create or modify the
/.bash_profile file, adding a line such as the following, depending on where the SDK installs:
Add the paths for java and ant if needed. This line in
/.bash_profile exposes these tools in newly opened terminal windows. If your terminal window is already open in OSX, or to avoid a logout/login on Linux, run this to make them available in the current terminal window:
To modify the PATH environment on Windows 7:
Click on the Start menu in the lower-left corner of the desktop, right-click on Computer, then select Properties.
Select Advanced System Settings in the column on the left.
In the resulting dialog box, press Environment Variables.
Select the PATH variable and press Edit.
Append the following to the PATH based on where you installed the SDK, for example:
Save the value and close both dialog boxes.
You may also need to enable Java and Ant. Open a command prompt and type java , and also type ant . Append to the PATH whichever of these fails to run:
Open a New Project in the SDK
At this point, to create a new project you can choose between the cross-platform CLI tool described in The Command-Line Interface, or the set of Android-specific shell tools. From within a source-code directory, here’s the CLI approach:
Here’s the corresponding lower-level shell-tool approach for both Unix and Windows:
Here’s how to use the SDK to modify it:
Launch the Eclipse application.
Select the New Project menu item.
Choose Android Project from Existing Code from the resulting dialog box, and press Next:
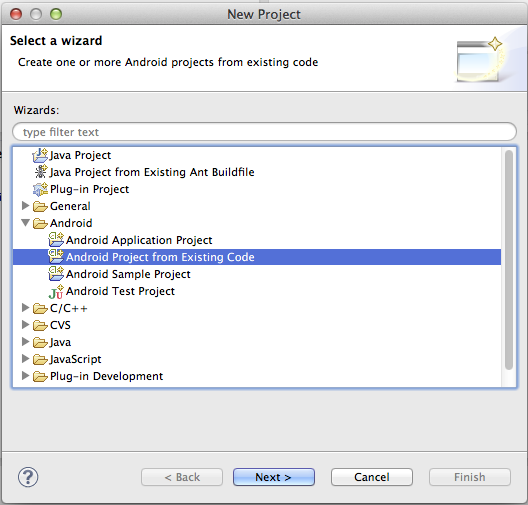
If you’re using the CLI, navigate to the hello directory you created for the project, then to the platforms/android subdirectory. Alternately, if you use the create shell utility, simply navigate to the hello directory.
Press Finish.
Once the Eclipse window opens, a red X may appear to indicate unresolved problems. If so, follow these additional steps:
Right-click on the project directory.
In the resulting Properties dialog, select Android from the navigation pane.
For the project build target, select the highest Android API level you have installed.
Click OK.
Select Clean from the Project menu. This should correct all the errors in the project.
Build the Project
If you are using the CLI in development, the project directory’s top-level www directory contains the source files. Run either of these within the project directory to rebuild the app:
If you are using the Android-specific shell tools in development, there is a different approach. Once you generate the project, the default app’s source is available in the assets/www subdirectory. Subsequent commands are available in its cordova subdirectory.
The build command cleans project files and rebuilds the app. Here is the syntax for both Mac and Windows. The first pair of examples generate debugging information, and the second signs the apps for release:
Configure an Emulator
You can use either the cordova CLI utility or Cordova’s Android-centered shell tools to run an app in an emulator. Either way, the SDK must first be configured to display at least one device. To do so, use the Android SDK Manager, a Java application that runs separately from Eclipse. There are two ways to open it:
Run android on the command line.
From within Eclipse, press this toolbar icon:
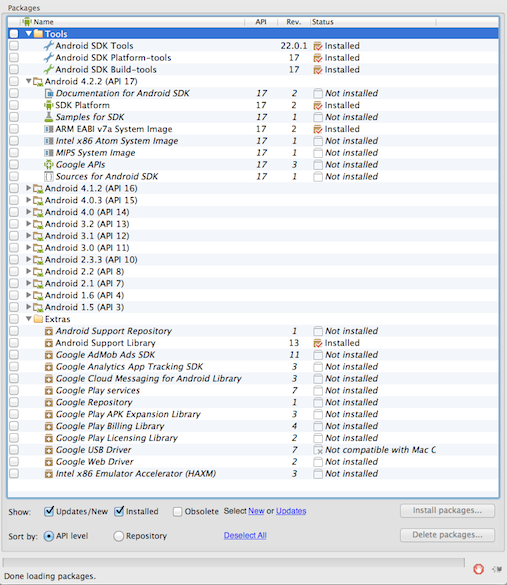
Once open, the Android SDK Manager displays various runtime libraries:
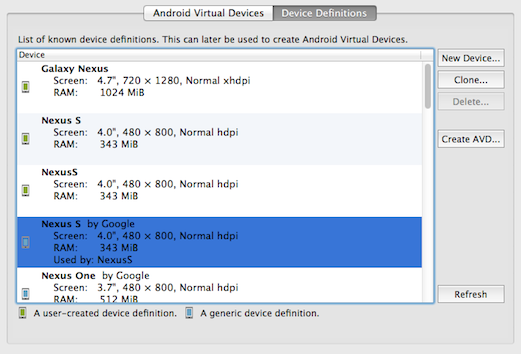
Choose Tools → Manage AVDs (Android Virtual Devices), then choose any item from Device Definitions in the resulting dialog box:
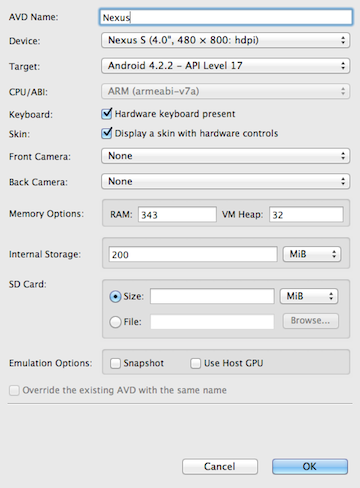
Press Create AVD, optionally modifying the name, then press OK to accept the changes:
The AVD then appears in the Android Virtual Devices list:

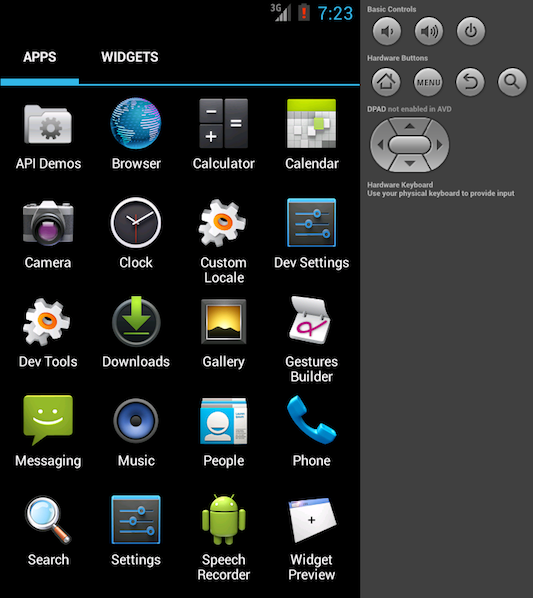
To open the emulator as a separate application, select the AVD and press Start. It launches much as it would on the device, with additional controls available for hardware buttons:
Deploy to Emulator
At this point you can use the cordova CLI utility to deploy the application to the emulator from the command line:
Otherwise use the alternate shell interface:
Instead of relying on whichever emulator is currently enabled within the SDK, you can refer to each by the names you supply:
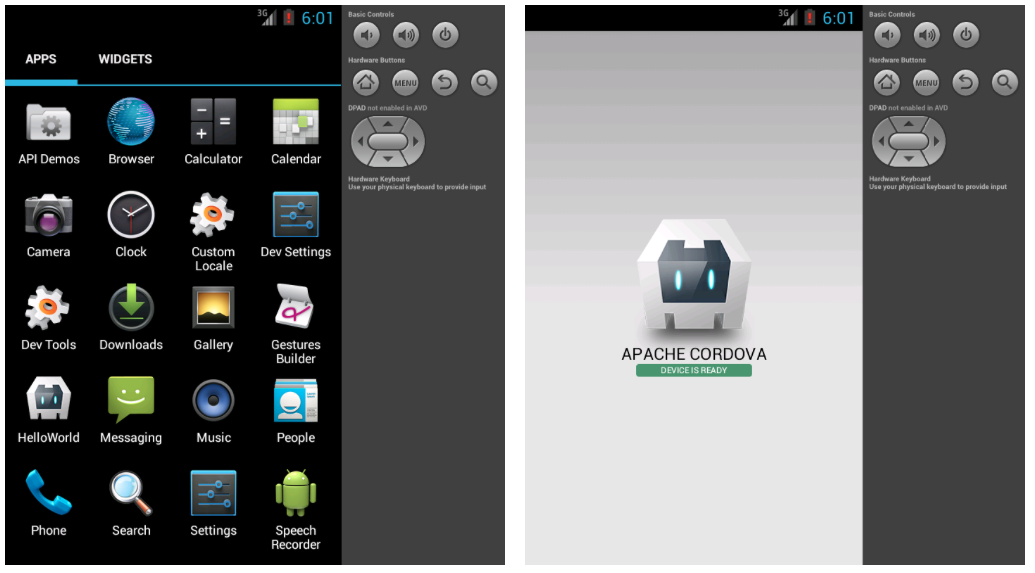
This pushes the app to the home screen and launches it:
When you run the app, you also build it. You can append additional —debug , —release , and —nobuild flags to control how it is built, or even whether a rebuild is necessary:
If instead you are working within Eclipse, right-click the project and choose Run As → Android Application. You may be asked to specify an AVD if none are already open.
For a faster experience, you can use the Virtual Machine Acceleration to improve the execution speed. Many modern CPUs provide extensions to execute Virtual Machines more efficiently. Before attempting to use this type of acceleration, you need to determine if your current development system’s CPU, supports one the following virtualization technologies:
- Intel Virtualization Technology (VT-x, vmx) → Intel VT-x supported processor list
- AMD Virtualization (AMD-V, SVM), only supported for Linux (Since May 2006, all CPUs AMD include AMD-V, except Sempron).
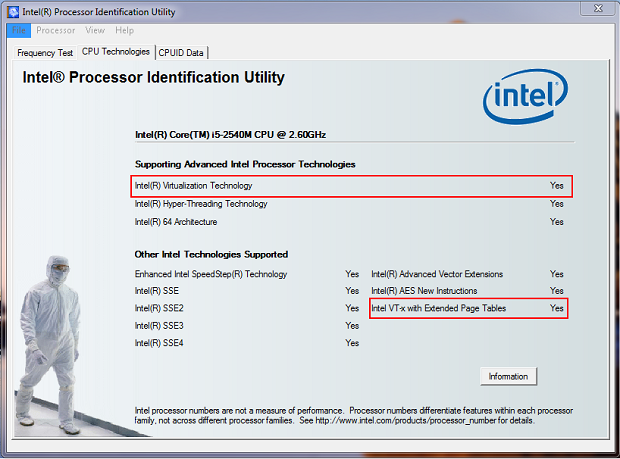
Another way to find out if your Intel processor supports VT-x Technology, it’s by executing the Intel Processor Identification Utility , for Windows you can download it from the Intel Download Center, or you can use the booteable utility, which is OS Independent .
After install and execute the Intel Processor Identification Utility over Windows, you will get the following window, in order to check if your CPU supports the Virtualization Technologies:
In order to speed up the emulator, you need to download and install one or more Intel x86 Atom System Images, as well as the Intel Hardware Accelerated Execution Manager (HAXM) .
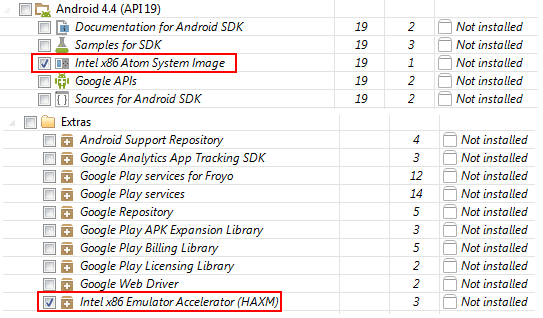
Open your Android SDK Manager, and select the Intel x86 Atom System Image, for whichever version that you want to test. Then go to Extras and select Intel x86 Emulator Accelerator (HAXM) , and install those packages:
After download, run the Intel installer, which is available within your Android SDK at extras/intel/Hardware_Accelerated_Execution_Manager . Note: If you have any problems installing the package, you can find more information and step by step guidance check this Intel Article.
Install one or more Intel x86 Atom System Images as well as the Intel Hardware Accelerated Execution Manager , available under Extras.
Run the Intel installer, which is available within your Android SDK at extras/intel/Hardware_Accelerated_Execution_Manager .
Create a new AVD with the target set to an Intel image.
When starting the emulator, ensure there are no error messages indicating a failure to load HAX modules.
Deploy to Device
To push an app directly to the device, make sure USB debugging is enabled on your device as described on the Android Developer Site, and use a mini USB cable to plug it into your system.
You can use this CLI command to push the app to the device:
…or use this Android-centered shell interface:
With no flags specified, the run command detects a connected device, or a currently running emulator if no device is found, otherwise it prompts to specify an emulator.
To run the app from within Eclipse, right-click the project and choose Run As → Android Application.
Other Commands
The following generates a detailed log of the app as it runs:
Источник
Android Platform Guide
This guide shows how to set up your SDK environment to deploy Cordova apps for Android devices, and how to optionally use Android-centered command-line tools in your development workflow. You need to install the Android SDK regardless of whether you want to use these platform-centered shell tools or cross-platform Cordova CLI for development. For a comparison of the two development paths, see the Overview. For details on the CLI, see The Command-Line Interface.
Requirements and Support
Cordova for Android requires the Android SDK which could be installed on OS X, Linux or Windows operation system. See the Android SDK’s System Requirements.
Cordova supports Android 4.0.x (starting with Android API level 14) and higher. As a general rule, Android versions become unsupported by Cordova as they dip below 5% on Google’s distribution dashboard. Android versions earlier than API level 10, and the 3.x versions (Honeycomb, API levels 11-13) fall significantly below that 5% threshold.
Install Cordova Shell Tools
If you want to use Cordova’s Android-centered shell tools in conjunction with the SDK, download Cordova from cordova.apache.org. Otherwise ignore this section if you plan to use the cross-platform CLI tool described in The Command-Line Interface.
The Cordova download contains separate archives for each platform. Be sure to expand the appropriate archive, android in this case, within an empty directory. The relevant executible utilities are available in the top-level bin directory. (Consult the README file if necessary for more detailed directions.)
These shell tools allow you to create, build, and run Android apps. For information on the additional command-line interface that enables plugin features across all platforms, see Using Plugman to Manage Plugins. See Application Plugins for details on how to develop plugins.
Install the Java Development Kit (JDK)
When installing on Windows you also need to set JAVA_HOME Environment Variable according to JDK installation path (for example, C:\Program Files\Java\jdk1.7.0_75).
Install the Android SDK
Install the Android Stand-alone SDK Tools or Android Studio. Procceed with Android Studio if you plan developing new Cordova for Android plugins or using native tools to run and debug Android platform. Otherwise, Android Stand-alone SDK Tools are enough to build and deploy Android application.
Detailed installation instructions are available as part of installation links above.
For Cordova command-line tools to work, or the CLI that is based upon them, you need to include the SDK’s tools and platform-tools directories in your PATH . On a Mac, you can use a text editor to create or modify the
/.bash_profile file, adding a line such as the following, depending on where the SDK installs:
/.bash_profile exposes these tools in newly opened terminal windows. If your terminal window is already open in OSX, or to avoid a logout/login on Linux, run this to make them available in the current terminal window:
To modify the PATH environment on Windows:
Click on the Start menu in the lower-left corner of the desktop, right-click on Computer, then select Properties.
Select Advanced System Settings in the column on the left.
In the resulting dialog box, press Environment Variables.
Select the PATH variable and press Edit.
Append the following to the PATH based on where you installed the SDK, for example:
Save the value and close both dialog boxes.
Install SDK Packages
Open Android SDK Manager (for example, via terminal: android ) and install:
- Android 5.1.1 (API 22) platform SDK
- Android SDK Build-tools version 19.1.0 or higher
- Android Support Repository (Extras)
Configure an Emulator
Android sdk doesn’t provide any default emulator instance by default. You can create a new one by running android on the command line. The press Tools → Manage AVDs (Android Virtual Devices), then choose any item from Device Definitions in the resulting dialog box:
Press Create AVD, optionally modifying the name, then press OK to accept the changes:
The AVD then appears in the Android Virtual Devices list:
To open the emulator as a separate application, select the AVD and press Start. It launches much as it would on the device, with additional controls available for hardware buttons:
For a faster experience, you can use the Virtual Machine Acceleration to improve the execution speed. Many modern CPUs provide extensions to execute Virtual Machines more efficiently. Before attempting to use this type of acceleration, you need to determine if your current development system’s CPU, supports one the following virtualization technologies:
- Intel Virtualization Technology (VT-x, vmx) → Intel VT-x supported processor list
- AMD Virtualization (AMD-V, SVM), only supported for Linux (Since May 2006, all CPUs AMD include AMD-V, except Sempron).
Another way to find out if your Intel processor supports VT-x Technology, it’s by executing the Intel Processor Identification Utility , for Windows you can download it from the Intel Download Center, or you can use the booteable utility, which is OS Independent .
After install and execute the Intel Processor Identification Utility over Windows, you will get the following window, in order to check if your CPU supports the Virtualization Technologies:
In order to speed up the emulator, you need to download and install one or more Intel x86 Atom System Images, as well as the Intel Hardware Accelerated Execution Manager (HAXM) .
Open your Android SDK Manager, and select the Intel x86 Atom System Image, for whichever version that you want to test. Then go to Extras and select Intel x86 Emulator Accelerator (HAXM) , and install those packages:
After download, run the Intel installer, which is available within your Android SDK at extras/intel/Hardware_Accelerated_Execution_Manager . Note: If you have any problems installing the package, you can find more information and step by step guidance check this Intel Article.
Install one or more Intel x86 Atom System Images as well as the Intel Hardware Accelerated Execution Manager , available under Extras.
Run the Intel installer, which is available within your Android SDK at extras/intel/Hardware_Accelerated_Execution_Manager .
Create a new AVD with the target set to an Intel image.
When starting the emulator, ensure there are no error messages indicating a failure to load HAX modules.
Create a New Project
At this point, to create a new project you can choose between the cross-platform CLI tool described in The Command-Line Interface, or the set of Android-specific shell tools. From within a source-code directory, here’s the CLI approach:
Here’s the corresponding lower-level shell-tool approach for both Unix and Windows:
Build the Project
If you are using the CLI in development, the project directory’s top-level www directory contains the source files. Run any of these within the project directory to rebuild the app:
If you are using the Android-specific shell tools in development, there is a different approach. Once you generate the project, the default app’s source is available in the assets/www subdirectory. Subsequent commands are available in its cordova subdirectory.
The build command cleans project files and rebuilds the app. Here is the syntax for both Mac and Windows. The first pair of examples generate debugging information, and the second builds the apps for release:
Deploy the app
You can use the cordova CLI utility to deploy the application to the emulator or the device from the command line:
Otherwise, use the alternate shell interface:
You can use cordova run android —list to see all available targets and cordova run android —target=target_name to run application on a specific device or emulator (for example, cordova run android —target=»Nexus4_emulator» ).
You can also use cordova run —help to see additional build and run options.
This pushes the app to the home screen and launches it:
When you run the app, you also build it. You can append additional —debug , —release , and —nobuild flags to control how it is built, or even whether a rebuild is necessary:
Other Commands
The following generates a detailed log of the app as it runs:
The following cleans the project files:
Open a New Project in the SDK
Once android platform is added to your project, you can open it from within Android Studio:
Launch the Android Studio application.
Select Import Project (Eclipse ADT, Gradle, etc).
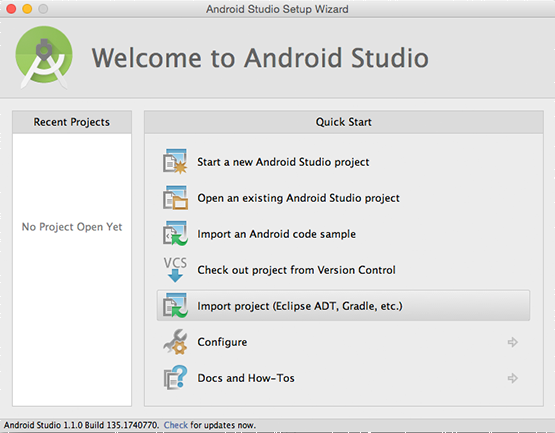
- Select location where android platform is stored ( your/project/platforms/android ).
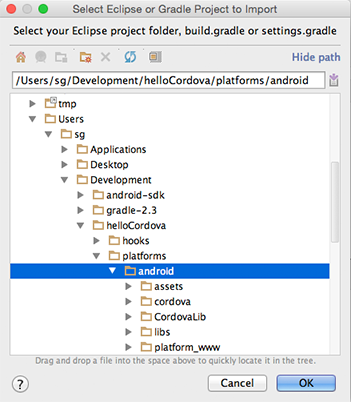
- For the Gradle Sync question you can simply answer Yes.
You are all set now and can build and run the app directly from Android Studio .
Источник


