- How to create a new Apple ID
- Create an Apple ID on your iPhone, iPad, or iPod touch
- Create an Apple ID when you set up your device
- Create an Apple ID using the App Store on your device
- Create an Apple ID on your Mac
- Create an Apple ID on your Windows PC
- Create an Apple ID on another device
- Create an Apple ID on the web
- If you see a message that you need to sign in to iTunes
- Learn more
- Sign in with your Apple ID
- Sign in on your iPhone, iPad, or iPod touch
- Sign in on your Mac
- Sign in on Apple TV
- Sign in on apps and other devices
- Sign in to use Apple Music, the Apple TV app, and more on your other devices
- Sign in to use iCloud on your other devices
- Use Sign in with Apple on third-party apps and websites
- Learn more
- The fast, easy way to sign in to apps and websites.
- Respect for privacy.
- Security built in.
- Antifraud.
- Works everywhere.
- Get Started
- Enrolling and Verifying Your Identity with the Apple Developer App
- Enrolling in the Apple Developer Program as an individual
- Start enrollment
- Enter your personal information
- Complete purchase
- Enrolling in the Apple Developer Program as an organization
- Start enrollment
- Enter your information as the Account Holder
- Enter your organization’s information
- Complete enrollment and purchase
- Verifying your identity
- Verify your identity
- Complete the process
- Renewing your annual membership subscription
- Cancelling and resubscribing
How to create a new Apple ID
Use the same Apple ID to enjoy all Apple services. All you need is your full name, date of birth, an email address, and phone number.
Not sure if you have an Apple ID, or forgot what it is? To find your Apple ID, enter your name and email address at iforgot.apple.com.
Create an Apple ID on your iPhone, iPad, or iPod touch
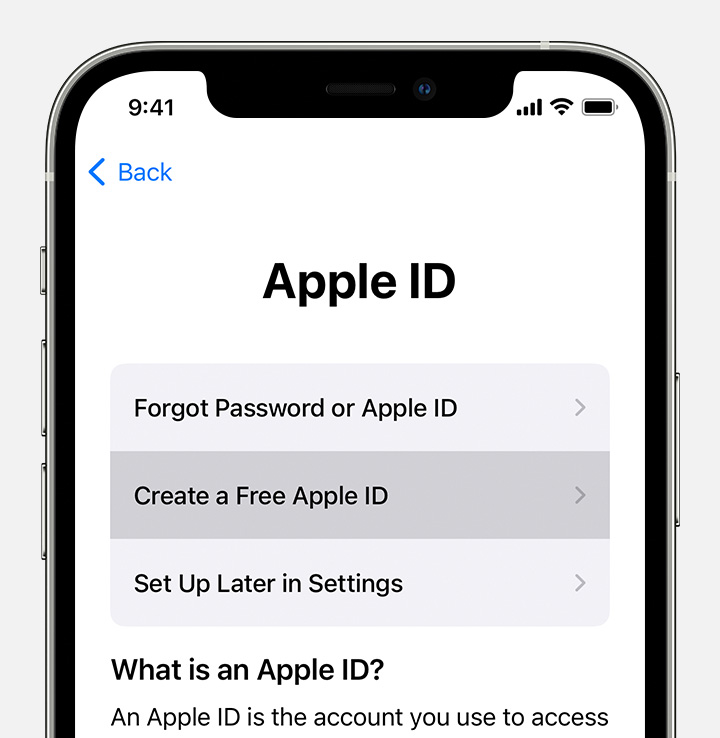
Create an Apple ID when you set up your device
- Tap «Forgot password or don’t have an Apple ID?».
- Tap Create a Free Apple ID.

- Select your birthday and enter your name. Tap Next.
- Tap «Use your current email address», or tap «Get a free iCloud email address.»
- When prompted, follow the onscreen steps to verify your email address and set up two-factor authentication. If you choose to skip this step, you’ll be prompted to do this later in Settings.
Create an Apple ID using the App Store on your device
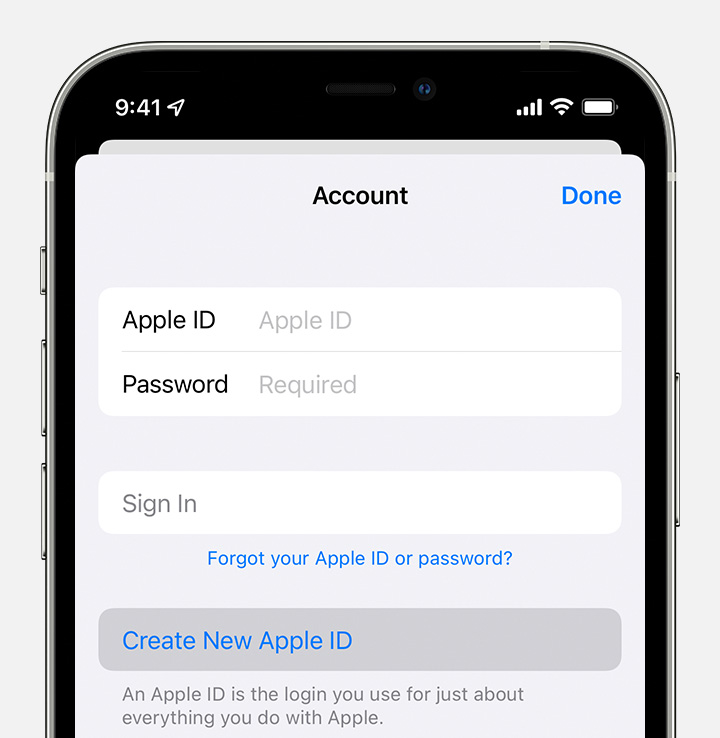
- Open the App Store and tap the sign-in button .
- Tap Create New Apple ID. If you don’t see this option, make sure that you’re signed out of iCloud.
- Follow the onscreen steps. The email address that you provide will be your new Apple ID.*
- Enter your credit card and billing information, then tap Next. You can also choose None. Learn what to do if None isn’t showing or you can’t select it. You won’t be charged until you make a purchase.
- Confirm your phone number. This can help to verify your identity and recover your account if needed. Tap Next.
- Check your email for a verification email from Apple and verify your email address.
After you verify your email address, you can use your Apple ID to sign in to the iTunes Store, App Store, and other Apple services such as iCloud.
* In China mainland, you might be required to provide a +86 phone number for your Apple ID. You can change the number later, or change your country or region to a location that doesn’t require it. This number is only used for verification purposes.
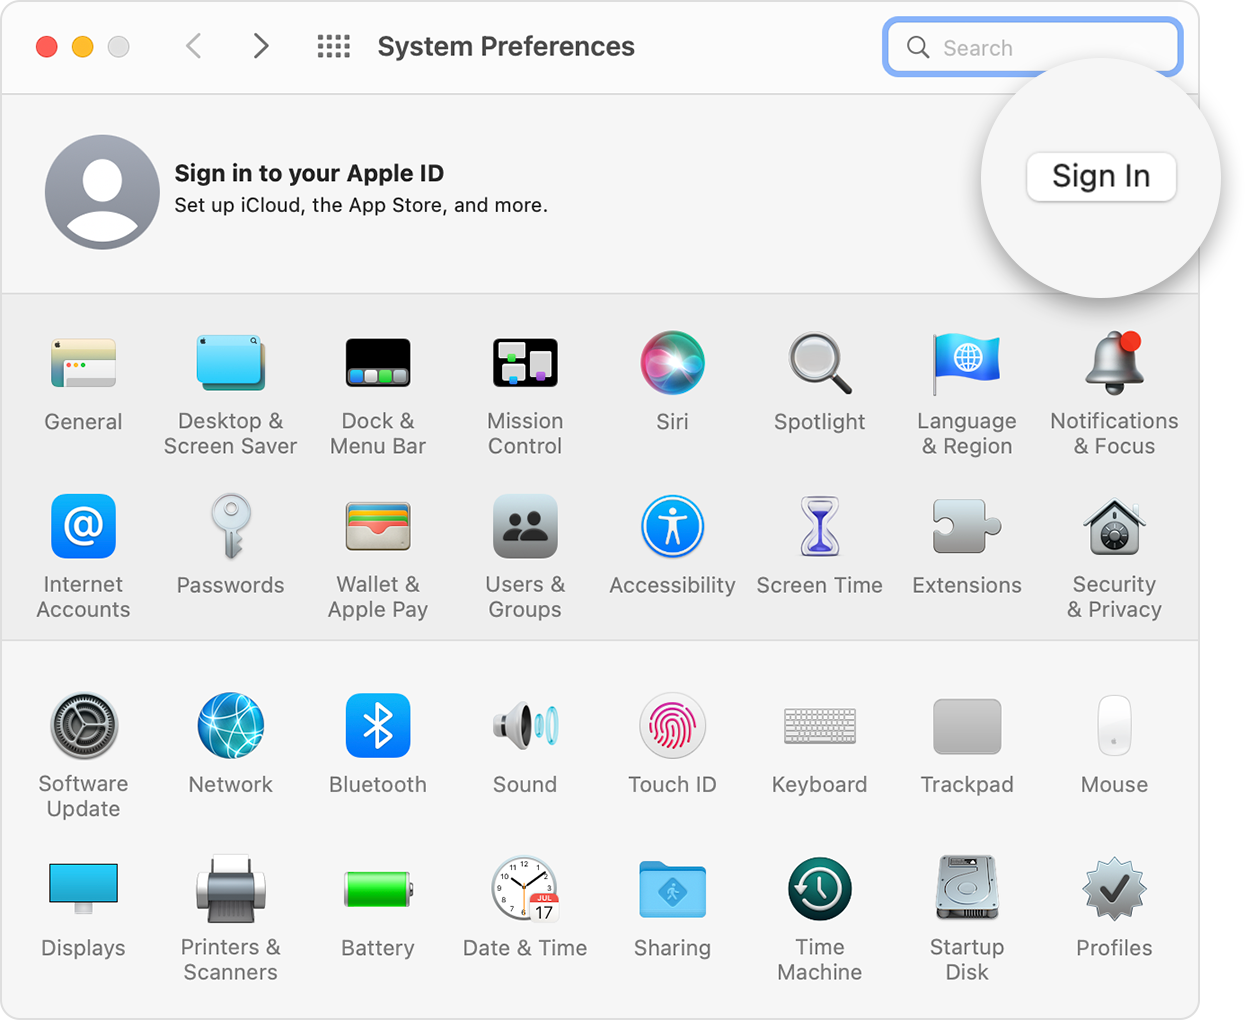
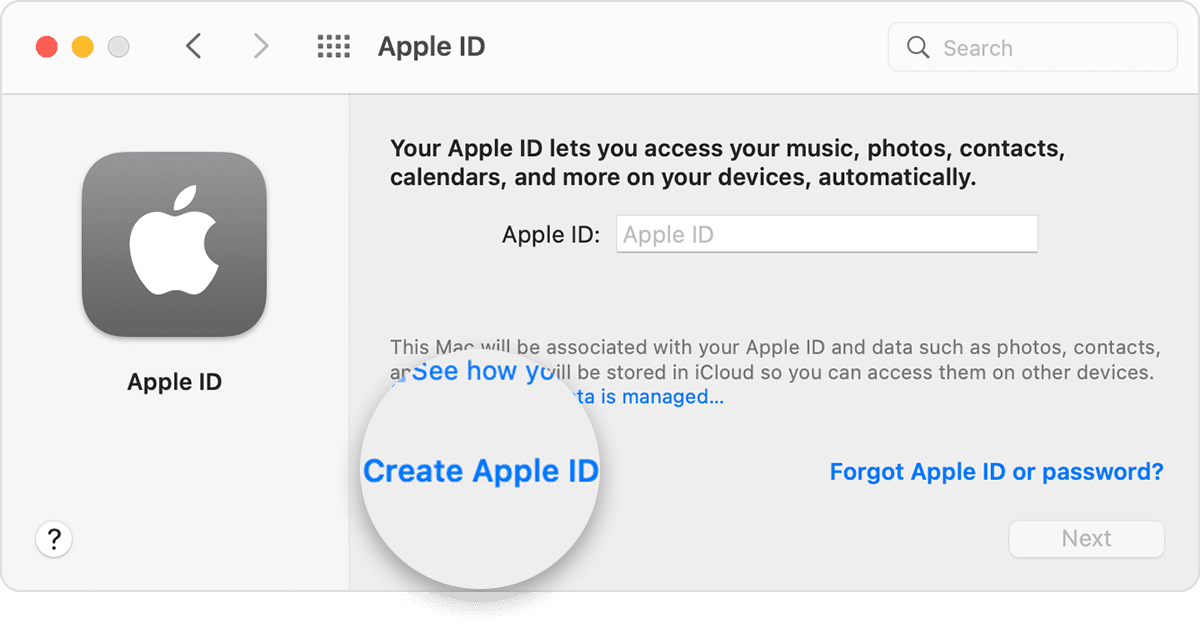
Create an Apple ID on your Mac
- Choose Apple menu > System Preferences.
- Click Sign In.
- Click Create Apple ID, then follow the onscreen steps. The email address that you provide will be your new Apple ID.*
- Enter your credit card and billing information, then click Continue. You can also choose None. Learn what to do if None isn’t showing or you can’t select it. You won’t be charged until you make a purchase.
- Check your email for a verification email from Apple and verify your email address.
After you verify your email address, you can use your new Apple ID to sign in to the App Store and other Apple services such as iCloud.
* In China mainland, you might be required to provide a +86 phone number for your Apple ID. You can change the number later, or change your country or region to a location that doesn’t require it. This number is only used for verification purposes.
Create an Apple ID on your Windows PC
- Open iTunes for Windows. Make sure that you have the latest version.
- From the menu bar at the top of your computer screen or at the top of the iTunes window, choose Account > Sign In. Then click Create New Apple ID.
- Follow the onscreen steps. The email address that you provide will be your new Apple ID.*
- Enter your credit card and billing information, then click Continue. You can also choose None, and learn what to do if None isn’t showing or you can’t select it. We’ll charge you only when you make a purchase.
- Check your email for a verification email from Apple and verify your email address.
* In China mainland, you might be required to provide a +86 phone number for your Apple ID. You can change the number later, or change your country or region to a location that doesn’t require it. This number is only used for verification purposes.
Create an Apple ID on another device
To create an Apple ID on an Apple TV, Android device, smart TV, or streaming device, you can usually follow the steps provided onscreen and enter your full name, date of birth, an email address or phone number, and a payment method. If you set up the Apple TV app on your smart TV, you might be redirected to activate.apple.com to create your Apple ID. You can also use the steps below to create your Apple ID on the web.
Create an Apple ID on the web
- Go to appleid.apple.com and click Create Your Apple ID.
- Follow the onscreen steps. The email address that you provide will be your new Apple ID.*
- Enter a phone number that you can always access.
- Check the boxes to subscribe to Apple Updates if you’d like. This keeps you up to date on the latest news, software, products, and services from Apple.
- Click Continue.
- Follow the onscreen steps to verify your email address and phone number.

After you verify your email address, you can use your new Apple ID to sign in to the iTunes Store and other Apple services such as iCloud.
* In China mainland, you might be required to provide a +86 phone number for your Apple ID. You can change the number later, or change your country or region to a location that doesn’t require it. This number is only used for verification purposes.
If you see a message that you need to sign in to iTunes
If you created a new Apple ID on the web and see a message that you need to sign in to iTunes, follow the steps below for your device:
- On an iPhone, iPad, or iPod touch: Open Settings, then tap «Sign into device» and sign in with your Apple ID.
- On a Mac: Choose Apple menu > System Preferences, then select Apple ID and sign in with your Apple ID.
- On an Apple TV: Sign in to the App Store, iTunes Store, or Apple Music with your Apple ID.
- On a PC: Sign in to iTunes with your Apple ID.
- On an Android device: Sign in to Apple Music on Android with your Apple ID.
Learn more
- An Apple ID is the account you use to access Apple services like iCloud, the App Store, the iTunes Store, Apple Music, and more.
- If you see a message that says that the email address that you entered is already associated with an Apple ID, you might have already created an Apple ID. Try signing in with that email address. If you don’t remember your password, you can reset your password to regain access to your account.
- Already have an Apple ID? Sign in to all Apple services on your device.
- Learn how to change or remove your Apple ID payment information.
- Learn about how two-factor authentication protects your Apple ID.
Store availability and features might vary by country or region.
Источник
Sign in with your Apple ID
Your Apple ID is the account that you use to access all Apple services and make all of your devices work together seamlessly. After you log in, you can use the App Store, iCloud, iMessage, Apple Music, Apple TV+, and more.
Want to use Sign in with Apple on third-party apps or websites? Learn how to use Sign in with Apple.
Sign in on your iPhone, iPad, or iPod touch
Sign in on your Mac
Sign in on your Apple TV
Sign in on apps and other devices
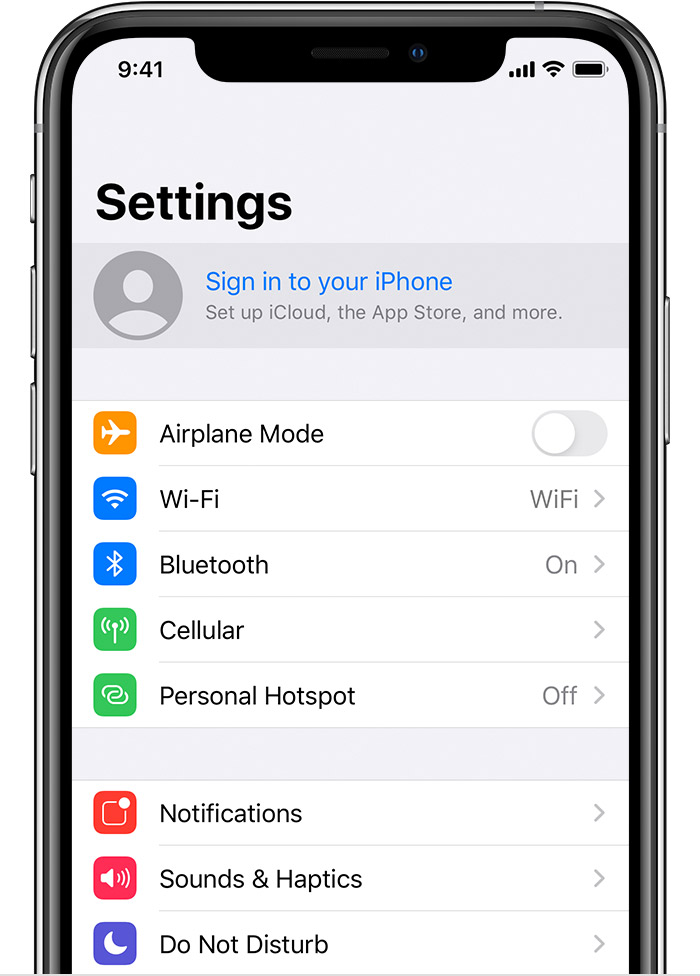
Sign in on your iPhone, iPad, or iPod touch
- Open the Settings app.
- Tap Sign in to your [device].
- Enter your Apple ID and password.
- If prompted, enter the six-digit verification code sent to your trusted device or phone number and complete sign in.
If you’re already signed in to iCloud on the iPhone paired with your Apple Watch, you will automatically be signed in to that Apple ID. Learn more about how to set up and sign in to your Apple Watch.
Sign in on your Mac
- Choose Apple menu > System Preferences.
- Click Sign In.
- Enter your Apple ID and password.
- If prompted, enter the six-digit verification code sent to your trusted device or phone number and complete sign in.
Sign in on Apple TV
- From the Home screen, choose Settings.
- Then choose Users and Accounts and select Add New User…
- Select Enter New…, then follow the on screen instructions.
If you use two-factor authentication on an Apple TV (2nd or 3rd generation), you might need to enter a verification code with your password. Learn how to get a verification code on your trusted device or sent to your trusted phone number.
Sign in on apps and other devices
You can use your Apple ID on some third-party devices to sign in to Apple services like Apple Music, the Apple TV app, and more.
Depending on your device, you might need to use an app-specific password.
Sign in to use Apple Music, the Apple TV app, and more on your other devices
You can sign in to Apple Music on Android, or sign in to the Apple TV app on your smart TV or streaming device.
On your Windows PC, you can sign in to iTunes for Windows to buy movies and TV shows, or listen to songs on Apple Music.
Sign in to use iCloud on your other devices
On your Windows PC, you can set up and sign in to iCloud for Windows to access photos, documents, and more.
You can also sign in to iCloud.com from your browser. Learn which iCloud.com features are available on your device.
Use Sign in with Apple on third-party apps and websites
If you see a Sign in with Apple button on a participating third-party app or website, you can use your existing Apple ID to quickly set up an account and sign in. Learn how to use Sign in with Apple.
When you sign in to the App Store and other media services for the first time, you might need to add a credit card or other payment information. You can’t sign in to the App Store and other media services with more than one Apple ID at the same time, or update the content you buy with a different Apple ID. Depending on how you created your Apple ID, you might be prompted to upgrade to two-factor authentication on an eligible device.
Learn more
- To view and manage your Apple ID account details on the web, sign in to appleid.apple.com.
- Learn more about where you can use your Apple ID.
- Learn how to manage your subscriptions to services like Apple Music or Apple TV+.
- If you have multiple Apple IDs, you can’t merge them.
Information about products not manufactured by Apple, or independent websites not controlled or tested by Apple, is provided without recommendation or endorsement. Apple assumes no responsibility with regard to the selection, performance, or use of third-party websites or products. Apple makes no representations regarding third-party website accuracy or reliability. Contact the vendor for additional information.
Источник
The fast, easy way to sign in to apps and websites.
Sign in with Apple makes it easy for users to sign in to your apps and websites using their Apple ID. Instead of filling out forms, verifying email addresses, and choosing new passwords, they can use Sign in with Apple to set up an account and start using your app right away. All accounts are protected with two-factor authentication for superior security, and Apple will not track users’ activity in your app or website.
Respect for privacy.
Sign in with Apple was built from the ground up to give users peace of mind about their privacy. Data collection is limited to the user’s name and email address, and Apple’s private email relay lets users receive email even if they prefer to keep their address private. Apple will not track users as they interact with your app.
Security built in.
Every account using Sign in with Apple is automatically protected with two-factor authentication. On Apple devices, users are persistently signed in and can re-authenticate anytime with Face ID or Touch ID.
Antifraud.
Sign in with Apple is designed to give you confidence in your new users. It uses on-device machine learning and other information to provide a new privacy-friendly signal that helps you determine if a new user is a real person or an account you might want to take another look at.
Works everywhere.
Sign in with Apple works natively on iOS, macOS, tvOS, and watchOS. And it works in any browser, which means you can deploy it on your website and in versions of your apps running on other platforms.
Get Started
Learn how to plan, implement, and test Sign in with Apple in your apps and websites.
Источник
Enrolling and Verifying Your Identity with the Apple Developer App
Developers in select regions 1 around the world can use the Apple Developer app to enroll in the Apple Developer Program and to verify their identity for other processes.
Enrolling in the Apple Developer Program as an individual
If you’re an individual or sole proprietor/single-person business, follow these steps to enroll in the Apple Developer Program on your iPhone or iPad. Before you begin, you’ll need:
- An iPhone or an iPad with Touch ID, Face ID, or a passcode enabled. You must use the same device for the entire enrollment process.
- An Apple ID with two-factor authentication turned on. Your Apple ID information must be valid and up to date — including, but not limited to, your first name (given name), last name (family name), address, phone number, trusted phone number, and trusted devices.
- The latest version of the Apple Developer app installed on your device.
- To sign in to iCloud on your device.
Start enrollment
- Launch the Apple Developer app on the device you want to use for enrollment.
- Tap the Account tab.
- Sign in with your Apple ID. This can be different than the Apple ID signed in to your device, but must have two-factor authentication turned on.
- If prompted, review the Apple Developer Agreement and tap Agree.
- Tap Enroll Now.
- Review the program benefits and requirements and tap Continue.
Enter your personal information
- Enter your first name, last name, and phone number. Your personal legal name will be listed as the seller on the App Store. Do not enter an alias, nickname, or company name as your first or last name, as entering your legal name incorrectly will cause a delay in the completion of your enrollment review.
- You’ll be asked to verify your identity using your driver’s license or government-issued photo ID: 2
- Capture the front of your photo ID and tap Confirm.
- Capture the back of your photo ID and tap Confirm.
- Follow the steps on the next few screens:
- Review your submitted information and tap Continue.
- Select Individual as your entity type.
- Review the terms of the Apple Developer Program License Agreement and tap Agree.
Complete purchase
Review your annual membership subscription details and tap the Subscribe button. Membership is provided on an annual basis as an auto-renewable subscription that renews until cancelled. Your purchase will use the payment methods associated with your App Store (iOS 14) or iTunes and App Store (iOS 13.7 or earlier) account. 3 A receipt will be emailed to you, and you can resend the receipt to yourself via email at any time from Purchase History in Settings. You can cancel your subscription in Settings up to one day before your annual renewal date. Membership fees paid for the year during which you cancel are nonrefundable.
Enrolling in the Apple Developer Program as an organization
If you’re an employee at a company, nonprofit organization, joint venture, partnership, or government organization, follow these steps to enroll in the Apple Developer Program on your iPhone or iPad. Note that as the person enrolling your organization in the Apple Developer Program, you must have the legal authority to bind your organization to legal agreements. You must be the organization’s owner/founder, executive team member, senior project lead, or an employee with legal authority granted to you by a senior employee. Before you begin, you’ll need:
- An iPhone or an iPad with Touch ID, Face ID, or a passcode enabled. You must use the same device for the entire enrollment process.
- An Apple ID with two-factor authentication turned on. Your Apple ID information must be valid and up to date — including, but not limited to, your first name (given name), last name (family name), address, phone number, trusted phone number, and trusted devices.
- The latest version of the Apple Developer app installed on your device.
- To sign in to iCloud on your device.
Start enrollment
- Launch the Apple Developer app on the device you want to use for enrollment.
- Tap the Account tab.
- Sign in with your Apple ID. This can be different than the Apple ID signed in to your device, but must have two-factor authentication turned on.
- If prompted, review the Apple Developer Agreement and tap Agree.
- Tap Enroll Now.
- Review the program benefits and requirements and tap Continue.
Enter your information as the Account Holder
- Enter your legal first name, legal last name, and phone number. Do not enter an alias, nickname, or company name as your legal name, as doing so will cause a delay in the completion of your enrollment review.
- You’ll be asked to verify your identity using your driver’s license or government-issued photo ID: 2
- Capture the front of your photo ID and tap Confirm.
- Capture the back of your photo ID and tap Confirm.
- Review the information you submitted and tap Continue Enrollment.
Enter your organization’s information
Follow the steps on the next few screens to provide the following information:
- Entity type.
- Legal entity name. We do not accept DBAs, fictitious businesses, trade names, or branches. The legal entity name will appear as the “seller” for apps you distribute. Example: Seller: ABC Company, Inc.
- D‑U‑N‑S® Number. Your organization must have a D‑U‑N‑S Number so that we can verify its identity and legal entity status. These unique nine-digit numbers are assigned by Dun & Bradstreet and are widely used as standard business identifiers. You can look yours up and request one for free.
- Headquarters address and phone number.
- Website. Your organization’s website must be publicly available and the domain name must be associated with your organization.
- Signing authority confirmation. Confirm that you have the authority to bind your organization to legal agreements and provide the contact information of an employee who can verify your signature authority.
- Optionally, if your organization is a nonprofit, educational, or government organization, you can request a fee waiver.
After you’ve submitted your information, it will be reviewed by Apple. You’ll then receive an email with next steps.
Complete enrollment and purchase
Once your enrollment information has been verified and approved, you’ll receive an email letting you know that you can complete your enrollment.
- Launch the Apple Developer app on the device you used for enrollment.
- Tap the Account tab.
- Sign in with the Apple ID you used for enrollment.
- Tap Continue Your Enrollment.
- Review the terms of the Apple Developer Program License Agreement and tap Agree.
- Review your annual membership subscription details and tap the Subscribe button.
Membership is provided on an annual basis as an auto-renewable subscription that renews until cancelled. Your purchase will use the payment methods associated with your App Store (iOS 14) or iTunes and App Store (iOS 13.7 or earlier) account. 3 If you need to use your organization’s credit card, add it to the Apple ID that’s signed in to your device’s settings in the Media & Purchases section (iOS 14) or the iTunes & App Store section (iOS 13.7 or earlier). This can be a different Apple ID than the one you use to enroll. A receipt will be emailed to you, and you can resend the receipt to yourself via email at any time from Purchase History in Settings. You can cancel your subscription in Settings up to one day before your annual renewal date. Membership fees paid for the year during which you cancel are nonrefundable.
Verifying your identity
Identity verification in the app is required for certain processes, including those that are started and completed on the web (for example, accepting an Account Holder transfer or applying for the Apple Developer Enterprise Program). Once your identity has been verified, it’s associated with your Apple ID and can’t be verified again by signing in with other Apple IDs. Before you begin, you’ll need:
- An iPhone or an iPad with Touch ID, Face ID, or a passcode enabled. You must use the same device for the entire enrollment process.
- An Apple ID with two-factor authentication turned on. Your Apple ID information must be valid and up to date — including, but not limited to, your first name (given name), last name (family name), address, phone number, trusted phone number, and trusted devices.
- The latest version of the Apple Developer app installed on your device.
- To sign in to iCloud on your device.
Verify your identity
- Launch the Apple Developer app.
- Tap the Account tab.
- Sign in with your Apple ID associated with your application or Apple Developer account.
- Tap Verify Your Identity.
- Enter your legal first name, legal last name, and phone number. Do not enter an alias, nickname, or company name as your legal name, as doing so will cause a delay in verification.
- Capture your driver’s license or government-issued photo ID: 2
- Capture the front of your photo ID and tap Confirm.
- Capture the back of your photo ID and tap Confirm.
- Review the information you submitted and tap Continue.
Complete the process
When your identity has been verified, you’ll see a confirmation screen. You can then return to the web to complete the process if needed.
Renewing your annual membership subscription
If you enrolled through the Apple Developer app, your membership will renew as an auto-renewable subscription. The default payment method associated with your App Store account (iOS 14) or iTunes and App Store account (iOS 13.7 and earlier) will be used. 3 If you need to use your organization’s credit card, add it to the Apple ID that’s signed in to your device’s settings in the Media & Purchases section (iOS 14) or the iTunes & App Store section (iOS 13.7 or earlier). This can be a different Apple ID than the one used to enroll.
Cancelling and resubscribing
You can cancel your subscription at any time and retain access to membership benefits until your membership’s expiration date, which you can view in the Account tab in the Apple Developer app. If you cancel your subscription and want to resubscribe, you can do so at any time for up to one year after your membership expiration date.
If you enrolled through the Apple Developer website, renewing your membership through the Apple Developer app is not currently supported.
1 Enrollment through the Apple Developer app is available in all regions supported by the App Store, except India and Kosovo. For information about using the Apple Developer app in China mainland, view this page in Simplified Chinese.
2 Photo ID: Apple will only use this information to verify your identity and prevent fraud. Apple may securely share this information with a third-party identity verification service provider that is prohibited from using this information for purposes other than identity verification and fraud prevention. Apple requires the third-party service provider to delete this information, and any information they obtained from it, as soon as it is no longer needed and retention is not required by law. If you provide an image of your photo ID, Apple will check its authenticity and pull your name and address from the photo, but will not keep the image. If you do not want to provide a photo of your government ID, and it is not required by law, you may contact Apple for an alternative method of identity verification. For details on how your information is used for enrollment and identity verification, read Apple’s Developer Programs and Your Privacy.
3 Store credit is not accepted as a form of payment for Apple Developer Program memberships.
If you experience an issue while using the app, please contact us.
Feedback Assistant
Submit bug reports and request enhancements to APIs and developer tools.
Send us feedback
Developer Forums
Ask questions and find answers by Apple engineers and other developers.
Contact Us
Tell us how we can help and we’ll find a solution by phone or email.
Источник


