- Контекстное меню и подменю
- Программное создание контекстного меню
- Контекстное меню через ресурсы
- Tek Eye
- Take Your First Steps in Implementing Context Menus in Android
- Define Menu Captions
- Define the Menu XML
- Set an ImageView
- Tell Android a View Has a Context Menu
- Show the Context Menu When Requested
- Act on the Selected Item
- Full Java Code for the ContextMenu Demo
- See Also
- Archived Comments
- Do you have a question or comment about this article?
- Context Menu in Android with Example
- Example
- Android SDK: Context Menus
- Step 1: Open or Create a Project
- Step 2: Import the Android Resources
- Step 3: Add a UI Element to Long-Press
- Step 4: Create a Menu Resource
- Step 5: Register for the Context Menu
- Step 6: Use Your Menu Resource
- Step 7: Implement Long-Presses
- Step 8: Add Context Option Methods
- Conclusion
Контекстное меню и подменю
Кроме стандартного меню в Android используется также контекстное меню, вызываемое при нажатии на объект в течение двух-трёх секунд (событие long-press). Также на некоторых моделях устройств контекстное меню можно вызвать при нажатии трекбола или средней кнопки манипулятора D-pad. В отличие от обычного меню, в контекстном меню не поддерживаются значки и быстрые клавиши. Второе важно отличие — контекстное меню применимо к компоненту, а меню к активности. Поэтому в приложении может быть одно меню и несколько контекстных меню, например, у каждого элемента TextView.
Программное создание контекстного меню
Для создания контекстного меню используется метод обратного вызова onCreateContextMenu(). В данный метод можно добавлять пункты меню при помощи методов add(). C помощью метода onContextItemSelected() можно обрабатывать выбор пункта. Но сначала надо зарегистрировать контекстное меню для нужного объекта, например, для TextView при помощи метода registerForContextMenu().
Если запустить проект, то уже сейчас можно увидеть контекстное меню, которое пока не будет реагировать на выбранные пункты меню.

Допишем код для выбранного пункта меню.
Контекстное меню через ресурсы
Если вам нужно создать локализованный продукт, то программное добавление пунктов контекстного меню не подойдёт. В таких случаях используется традиционный способ через файл ресурсов, рекомендованный Google.
Создадим XML-файл res/menu/context_menu.xml для меню, а также добавим в разметку ещё один TextView:
Добавляем код к существующему.
Мы используем похожий код, как и при создании стандартного меню. В результате получим контекстное меню, созданное из ресурсов. При выборе нужного пункта изменится либо цвет, либо размер шрифта в TextView.
Источник
Tek Eye
This tutorial provides an Android context menu example, using the aptly named ContextMenu class. On a Windows PC system the context menu is sometimes referred to as the right-click menu. (Though using this term is not recommended in case the user is left handed and has switched the mouse, in which case the context menu requires the left-click!)
(This Android context menu tutorial assumes that Android Studio is installed, a basic App can be created and run, and the code in this article can be correctly copied into Android Studio. The example code can be changed to meet your own requirements. When entering code in Studio add import statements when prompted by pressing Alt-Enter.)
Take Your First Steps in Implementing Context Menus in Android
A context menu is a menu of options that apply to the item immediately under the pointer (mouse or finger). The parts required to implement a simple context menu are:
- Define the menu captions, usually in a string resource file.
- Define the menu layout in an XML file.
- Tell Android a View is using a context menu.
- When the context menu is requested show it.
- React to the selected menu item.
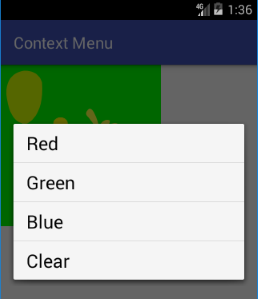
The example code presented here is going to call the setColorFilter method of an ImageView using a context menu. This will be used to add a basic image effect to a bitmap graphic by applying a red, blue or green filter. Start by creating a new project in Android Studio, here called Context Menu.
Define Menu Captions
The menu captions are simple string resources. In Android Studio use the File menu (or Studio’s Project explorer context menu) then New and Android resource file (or Values resource file). Call the file something meaningful, such as color menu_captions.xml, and click OK.
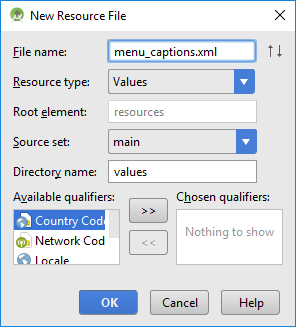
Add four strings with the values Red, Blue, Green and Clear. You will have a file similar to this (alternatively the values can added to the existing strings.xml file):
Define the Menu XML
In a similar way to the first step create a new resource file. This time the Resource type is set to Menu. Name the new menu file appropriately, such as color_menu.xml, click OK. (The file is creared in a res/menu folder.)

Add Menu Item four times from the Palette, setting the title to each caption string and giving each item an id. The menu file has a menu element at the root and an item element for each menu option required. Each item has an id and title (the title points to the captions created above). The file will look similar to this:
Set an ImageView
See the Tek Eye article Displaying a Bitmap in Android to add an ImageView to the app. The clown graphic used here is in the Zipped Simple Clown graphic resources to be added to the res folder.

Tell Android a View Has a Context Menu
This is easy, one line of code calling the Activity’s registerForContextMenu method, passing in the View that needs the menu. Many Views can use the same context menu or different context menus, which menu to use is determined when it is requested to be created. Place this line of code at the bottom of the onCreate method in the MainActivity.java, if your ImageView has a different id change it appropriately :
Show the Context Menu When Requested
The Activity handling the View that needs the context menu uses onCreateContextMenu. The View id (using the method getId) can be tested if it is needed to display different context menus. Here just the one is being used, notice how the call to inflate takes the name of the menu file:
Act on the Selected Item
For onContextItemSelected the menu item selected is passed in, this is tested to perform the correct action:
True is returned when the menu has been correctly handled. Now when you hold down on the image a menu appears and you can select an option to apply a simple filter:
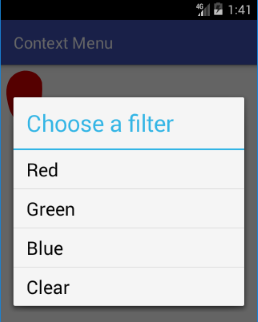
Adding a title to the menu is straightforward. Before the menu is inflated call the setHeaderTitle method:
(The setHeaderTitle method has a version that supports getting the string from a resource file.)
Full Java Code for the ContextMenu Demo
Here is the full class code used:
See Also
- Download the code for this example, available in context-menu.zip
- Android Example Projects
- Free Launcher Icons, Menu Icons and Android Graphics
Archived Comments
Pawan on May 6, 2013 at 11:33 am said: Very nice tutorial.
Author: Daniel S. Fowler Published: 2012-11-19 Updated: 2017-06-02


Do you have a question or comment about this article?
(Alternatively, use the email address at the bottom of the web page.)
↓markdown↓ CMS is fast and simple. Build websites quickly and publish easily. For beginner to expert.
Free Android Projects and Samples:
Источник
Context Menu in Android with Example
In Android, there are three types of menus available to define a set of options and actions in the Android apps. The lists of menus in Android applications are the following:
- Android options menu
- Android context menu
- Android popup menu
Here in this article let’s discuss the detail of Context Menu. In Android, the context menu is like a floating menu and arises when the user has long pressed or clicks on an item and is beneficial for implementing functions that define the specific content or reference frame effect. The Android context menu is alike to the right-click menu in Windows or Linux. In the Android system, the context menu provides actions that change a specific element or context frame in the user interface and one can provide a context menu for any view. The context menu will not support any object shortcuts and object icons. Note that we are going to implement this project using the Java language. A sample GIF is given below to get an idea about what we are going to do in this article.

Example
Step 1: Create a New Project
To create a new project in Android Studio please refer to How to Create/Start a New Project in Android Studio. Note that select Java as the programming language.
Источник
Android SDK: Context Menus
Learn about context menus and long-press user interaction on Android in this Android SDK quick tip!
The Android platform provides a few standard menus you can use in your apps. The context menu appears when users long-press user interface items, pressing the item and holding it until the menu appears. Android users are typically accustomed to this type of interaction, as it is standard for system functions such as altering home screen icons. The Android developer guide compares the context menu to right-clicking on a computer. Implementing the context menu is straightforward, and is a key ingredient in many applications.
Step 1: Open or Create a Project
If you have an existing app you want to implement a context menu with, open the Activity class you want to add it to. Otherwise, create a new project and add an Activity class to it. The source code includes all necessary processing so if you’re unsure, refer to that. If you are creating a new Activity to your application, remember to add it to your Manifest file as follows:
Alter the name to suit your own class.
Step 2: Import the Android Resources
Add the import statements necessary for the context menu processing. You may not need all of these imported resources depending on how you choose to implement the context menu, and your IDE may add some of them automatically. To use the technique as demonstrated in this tutorial, your Activity class will need the following imports:
Step 3: Add a UI Element to Long-Press
Within the layout for your Activity, include the user interface view element you want users to be able to long-press for the context menu. The following sample layout XML content demonstrates how to do this, so use it if you’re building a new project and could use some help:
You can instruct your Activity class to use this layout as follows:
Alter the name to suit your own class. In this case, the XML layout file is saved as «lovely_layout.xml» in the application’s «res/layout» folder.


Step 4: Create a Menu Resource
If your application package does not have a «menu» folder inside the «res» resources directory, create one. Inside the menu folder, create a new XML file for your menu and save it with a name of your choosing. In this file, you define the items that will appear in the context menu. You can use the following code:
Alter the items to suit your own app and add more if you need to.
Step 5: Register for the Context Menu
You need to instruct Android to listen for long-presses on the user interface item you want to provide the context menu for. Inside your Activity’s «onCreate» method, add the following code, making alterations to suit the details of your own app:
Specify the ID attribute you used for your own view element in the XML layout file where this example uses «press». This instructs your app to detect users long-pressing the view item specified. When that happens, the app will call the «onCreateContextMenu» method in which you can instruct it to use your context menu resource.
Step 6: Use Your Menu Resource
You need to let Android know you want it to use the XML menu resource you created as the context menu for the view item registered. Add the following method in your Activity class:
Alter this if necessary to reflect the file-name you chose for your own context menu XML file. This example uses a menu file named «lovely_context.xml» for demonstration.


Step 7: Implement Long-Presses
Your Activity class now detects long-presses on your view item, but you still need to define what should happen when each item in your menu is selected. Add the following method to your class:
Alter the case statements to reflect the ID attributes you gave your menu items in the XML file. The switch statement uses the passed menu item parameter to check which menu option the user has selected. You can include an additional case statement for each option in your context menu if you added more yourself. Within each statement, the code specifies a method to call when the user chooses that item. You now need to implement the methods specified in this statement.


Step 8: Add Context Option Methods
Defining dedicated methods for each context menu option keeps your Activity class well organized, so add each one you included in your switch statement. The following sample methods demonstrate the principle:
These methods simply write a short message to the interface for demonstration. In your own classes you can implement whatever processing you need.


Conclusion
Your app now has the processing code necessary to provide the context menu on users pressing and holding your chosen view item. The complete Activity code follows, and you can download the attached source folder which also contains the XML files for the layout and menu items.
If your application includes a help section or instructions of any kind, you may wish to mention the item with the context menu, as your users may not realise that this functionality has been provided.
Источник


