- Assets Folder in Android Studio
- How the asset folder is different from the Resource Raw folder?
- But when to use which folder?
- How to Create Assets Folder in Android Studio?
- How to create file/folder picker with a storage chooser in Android +4.4 using the Storage Chooser library
- 1. Add library as dependency
- 2. Migrate to AndroidX
- 3. Using the Storage Chooser
- File picker
- Folder/Directory picker
- 4. Full examples
- A. Filepicker example
- B. Folder picker example
- Split layouts into subfolders in Android Studio
- Step 1: create layouts container
- Step 2: create feature Res Folders
- Step 3: Add resources to each subfolder
- Step 4: Resync
- Access the resources
- Other solutions?
- In Conclusion
- Folder and File Structure
- 1. Manifests folder
- 2. Java folder
- 3. Res folder
- 3.1. Drawable folder
- 3.2. Layout folder
- 3.3. Mipmap folder
- 3.4. Values folder
- 3.5. Other folders
- Gradle Scripts
Assets Folder in Android Studio
It can be noticed that unlike Eclipse ADT (App Development Tools), Android Studio doesn’t contain an Assets folder in which we usually use to keep the web files like HTML. Assets provide a way to add arbitrary files like text, XML, HTML, fonts, music, and video in the application. If one tries to add these files as “resources“, Android will treat them into its resource system and you will be unable to get the raw data. If one wants to access data untouched, Assets are one way to do it. But the question arises is why in the asset folder? We can do the same things by creating a Resource Raw Folder. So let discuss how the assets folder is different from the Resource Raw folder?
How the asset folder is different from the Resource Raw folder?
In Android one can store the raw asset file like JSON, Text, mp3, HTML, pdf, etc in two possible locations:
- assets
- res/raw folder

Both of them appears to be the same, as they can read the file and generate InputStream as below
But when to use which folder?
Below is some guidance that might be helpful to choose
1. Flexible File Name: (assets is better)
- assets: The developer can name the file name in any way, like having capital letters (fileName) or having space (file name).
- res/raw: In this case, the name of the file is restricted. File-based resource names must contain only lowercase a-z, 0-9, or underscore.
2. Store in subdirectory: (possible in assets)
- assets: If the developer wants to categories the files into subfolders, then he/she can do it in assets like below.

3. Compile-time checking: (possible in res/raw)
- assets: Here, the way to read it into InputStream is given below. If the filename doesn’t exist, then we need to catch it.
- res/raw folder: Here, the way to read it into InputStream is:
So putting a file in the res/raw folder will provide ensure the correct file-name during compile time check.
4. List filenames at runtime: (possible in assets)
- assets: If the developer wants to list all the files in the assets folder, he/she has used the list() function and provide the folder name or ” “ on the root folder as given below.
- res/raw: This is not possible in this folder. The developer has to know the filename during development, and not runtime.
So, in assets, one can read the filename during runtime, list them, and use them dynamically. In res/raw, one needs to code them ready, perhaps in the string resources file.
5. Filename accessible from XML: (possible in res/raw)
So if you need to access your file in any XML, put it in the res/raw folder. Let’s make a table to remember the whole scenario easily.
| Res/Raw Folder |
|---|
| Flexible File Name NO |
| Store in subdirectory NO |
| Compile-time checking YES |
| List filenames at runtime NO |
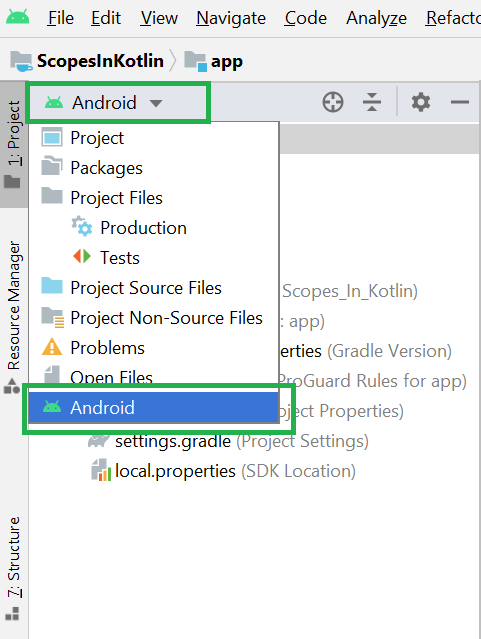
Filename accessible from XML How to Create Assets Folder in Android Studio?Now let’s discuss how to create an assets folder in the android studio. Below is the step-by-step process to create an assets folder in Android studio. Step 1: To create an asset folder in Android studio open your project in Android mode first as shown in the below image.
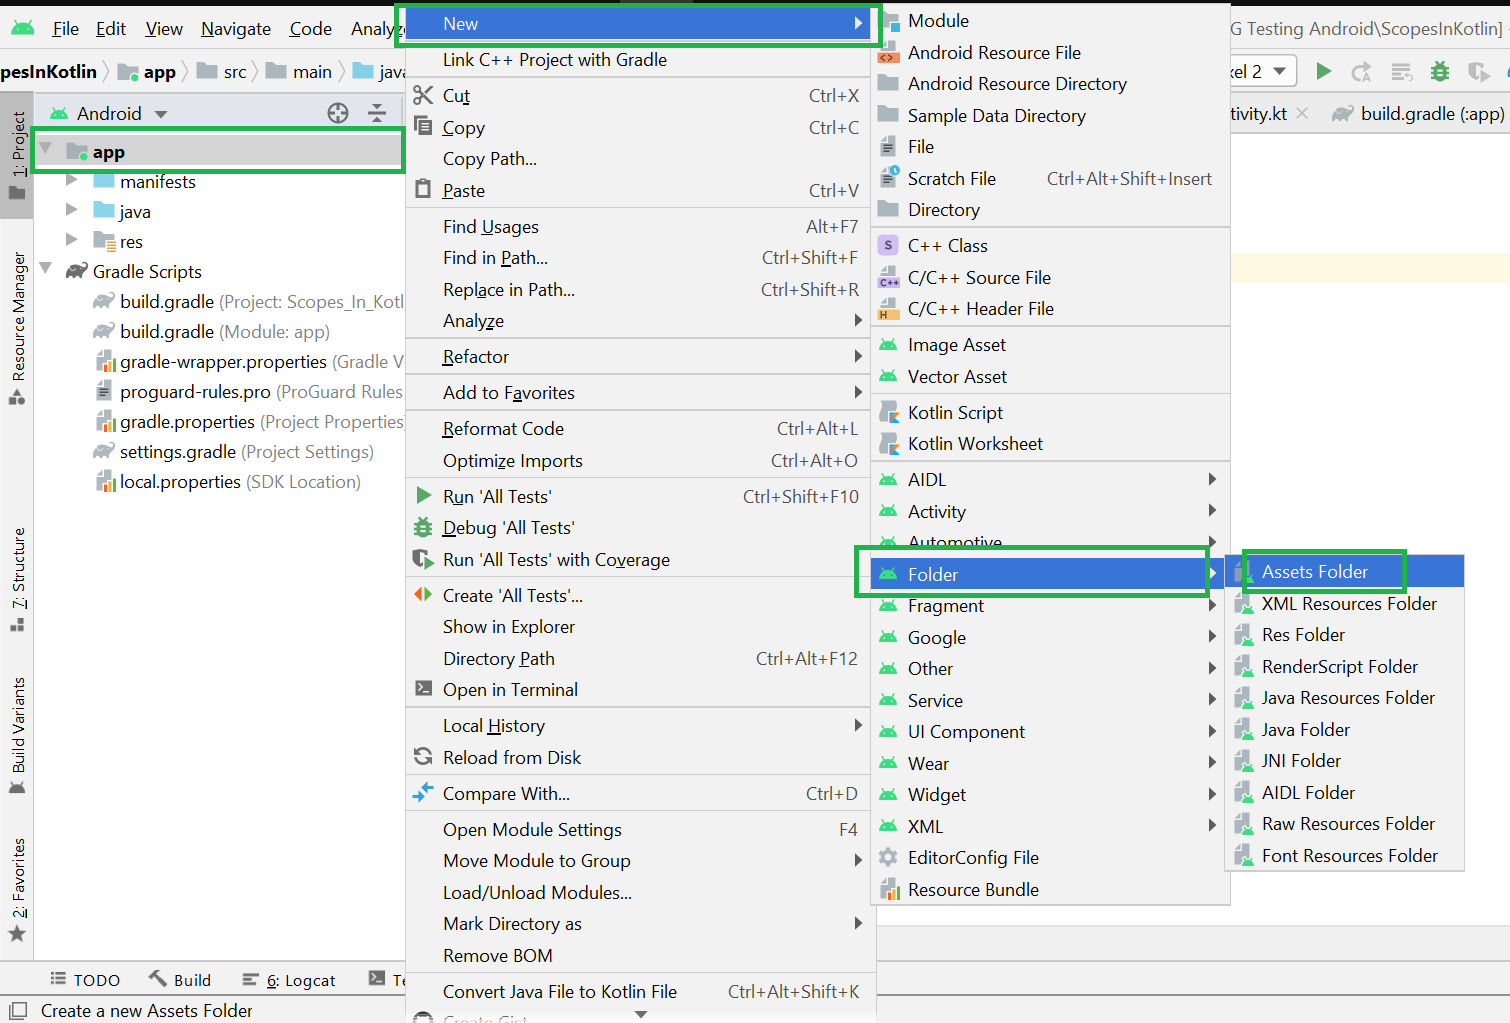
Step 2: Go to the app > right-click > New > Folder > Asset Folder and create the asset folder.
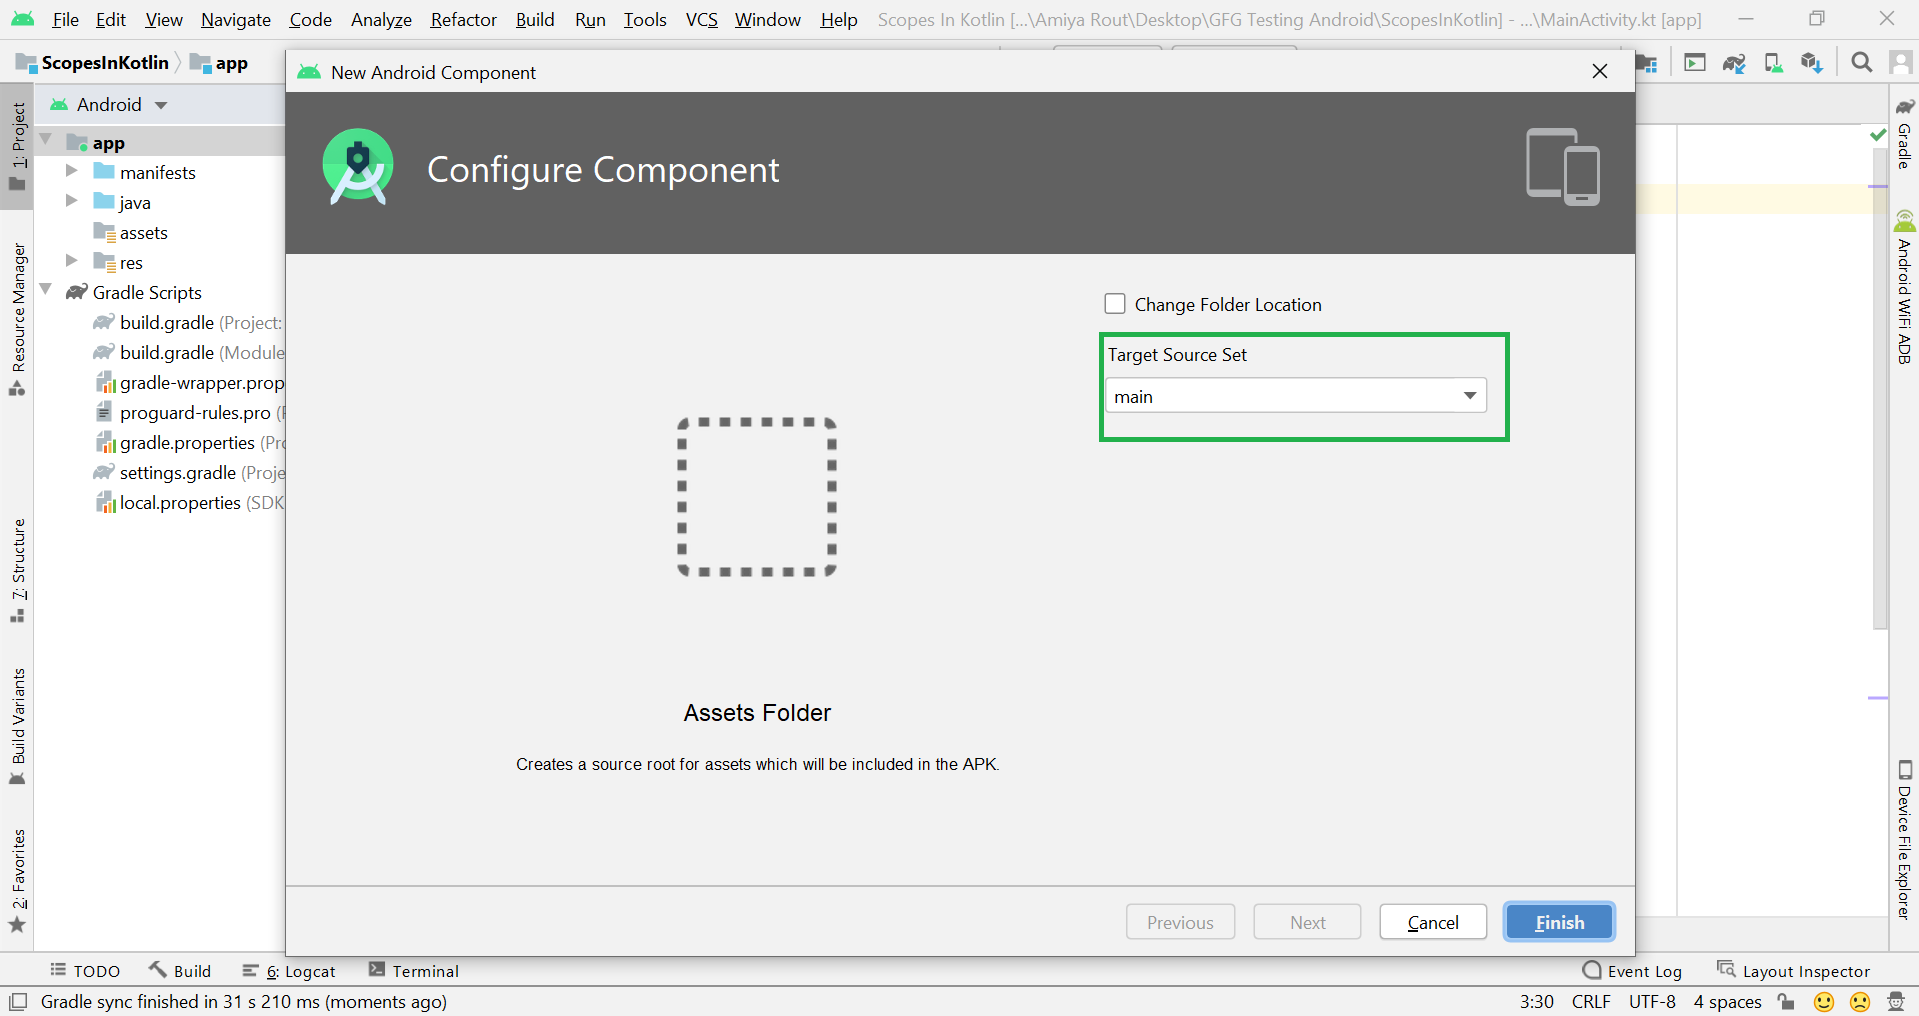
Step 3: Android Studio will open a dialog box. Keep all the settings default. Under the target source set, option main should be selected. and click on the finish button.
Step 4: Now open the app folder and you will find the assets folder by the name of “assets” as shown in the below image. Источник How to create file/folder picker with a storage chooser in Android +4.4 using the Storage Chooser library
Carlos DelgadoLearn how to implement the Storage Chooser library in Android to create a File/Folder picker easily. Willing to implement a file/folder picker for your Android application? Surely you don’t want to create one by yourself, instead you would like to rely on a third party library for this. Although there are a lot of libraries that allow you to implement such feature, Storage Chooser is without a doubt a pretty nice option if you want to give your users the option to pick, from which storage of your device he would like to pick a file/directory. Storage Chooser is a pretty and simple directory chooser and file picker library for 4.4+ (Kitkat or newer) devices. There are too many storage chooser out there but this one is too materially. Easy to implement and does not take a lot of your valueable time in setting-up all the other necessary things that every developer seeks, like:
There are also some really nice features that I thought would come in handy:
In this article, we will show you how to implement this Storage Chooser/File chooser/ Folder chooser easily in your Android application. 1. Add library as dependencyTo install this library in your project, add the JitPack repository to your project and add the dependency in your build.gradle file like this and synchronize your project: 2. Migrate to AndroidXIf you have any Maven dependencies that have not been migrated to the AndroidX namespace, the Android Studio build system also migrates those dependencies for you when you set the following two flags to true in your gradle.properties file . You will need to add the following properties to the gradle.properties file and synchronize your project: 3. Using the Storage ChooserAfter installing the library, you will only need create an instance of the StorageChooser.Builder class and customize it according to your needs: File pickerThe following code initializes a Storage Chooser that allows you to pick from where you want to select a file in your device: The filepicker supports multipick without any extra code, the user just will need to select longer the first item and that’s it. Folder/Directory pickerThe following code initializes a Storage Chooser that allows you to pick from where you want to select a directory/folder in your device: For detailed information about more options of the library, don’t forget to check the documentation in the official repository at Github. Don’t forget that you will need the READ_EXTERNAL_STORAGE and WRITE_EXTERNAL_STORAGE permissions granted in your application. 4. Full examplesOur example will include the management of the permissions, specifically the READ_EXTERNAL_STORAGE and WRITE_EXTERNAL_STORAGE permissions of Android. If you don’t request the permissions, you will see the following exception through a Toast in your application: The Storage you have chosen is not accessible. Basically caused by the lack of permissions in your app, so that’s why we’ll include an example of how to request the permissions in Android 6+. You will need as well to add the following attribute: To the activity where you want to implement the Storage Chooser, for example in the AndroidManifest.xml file: Having said that, let’s show the full examples for every case: A. Filepicker exampleIn this example we will have a main activity, whose layout in the activity_main.xml file will have the following content: And the Main Activity code will the following: B. Folder picker exampleIn this example we will have a main activity, whose layout in the activity_main.xml file will have the following content: And the Main Activity code will the following: Источник Split layouts into subfolders in Android Studio
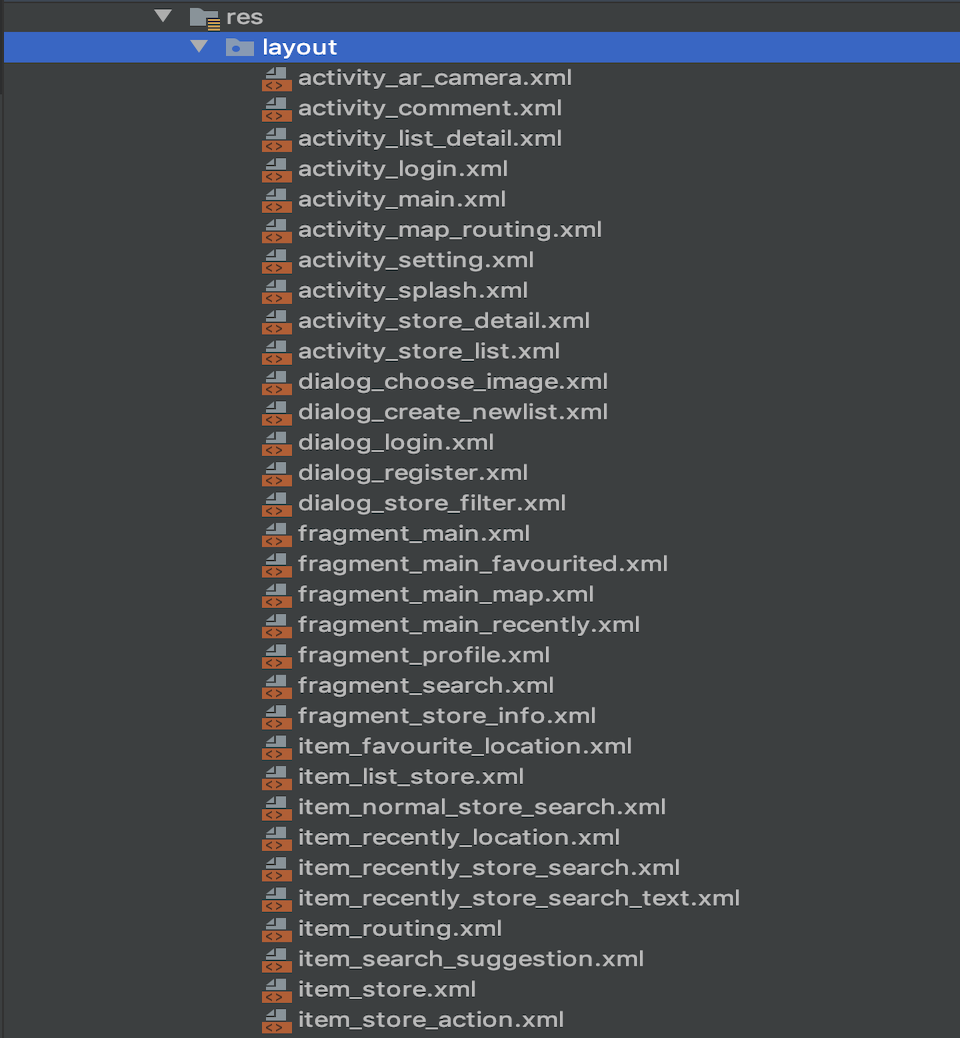
Today when optimizing the codebase of my school project, I saw this:
Look at the list of XML files inside my res/layout folder. Now, look at yours. Is your res/layout too big, hard to control? Your project has too many features, too many screens? Let imagine while confusing running for the deadline, and you can’t find the XML layout that needs to be fixed just because you cannot remember the file name! Wandering search online, I find out that many developers have the same problem. So I decided to write an article to share some tips about how to manage the resources folder in Android Studio.
Step 1: create layouts containerCreate a parent folder that contains all the layouts of our project. Switch project tree explorer to Project view. Right-click in res , select New → Directory, type layouts (remember the ‘s’ or it will be duplicated).
This step is a must-have at the moment. When changing the project tree to Android view, you cannot see the separated subfolders. They are actually NOT merged into one, but Android Studio shows them in the same folder. Step 2: create feature Res FoldersSelect layouts , right-click and select New → Folder → Res Folder. This resource folder will represent a “feature category” that you want.
If you have N vertical features, you need to create N folders. For example, you are developing a Chat app that has 3 categories “home”, “profile” and “chat” corresponding to vertical groups of features. First, I will add chat as new Res Folder, wait a while for Gradle syncing to re-structure the codebase. After that, you will see a yellow chat folder in the res but not inside the layouts . Actually it’s still in layouts , however, because we’ve just added only one folder chat so it only shows chat . Continue to create two more Res Folder for home & profile . Then the project tree will appear exactly as what you expect:
At this point, you’ve successfully divided the layouts into 3 separate categories. Step 3: Add resources to each subfolderAdd a layout folder (without ‘s’) to each subfolder corresponding to each category — like the traditional res/layout . Now you can add any XML layout file that belongs to the current feature into that layout folder. You can also add other types of resources: menu , drawable , anim . Step 4: ResyncTry re-sync Gradle and rebuild the project, you will see the following code was added inside the android tag of app/build.gradle file. This code corresponds to adding 3 categories: 3 resource folder chat , home & profile . If it does not exist, you can add it manually. Access the resourcesAfter resync, you can access these resources normally in Java/Kotlin code using R.layout.chat_activity.xml , R.drawable.chat_send_button.xml ,… Whenever you need to find any XML file, just go to the subfolder of that feature to look for it! Other solutions?Another way is to modularize your project: moving code and resources into a separate feature module. It’s much cleaner and follows SRP principle. In ConclusionYou can organize your resources XML files (layout, drawable. ) into separate subfolders corresponding to the app’s features. I hope these tips above will help you manage your project better, saving your precious time — especially when you need to maintain a huge codebase with many vertical groups of features.
Источник Folder and File StructureThe Project tool window has several views, including the Android view, the Project view, and the Packages view. Each view shows the same stuff, but each view organizes this stuff a bit differently. The button just at above the left pane (shown by the arrow) is used to open the selection box for choosing the preferred method of viewing the file hierarchy. Android and Project are the most useful views, though the Android view may hide certain folders from you. By default, Android Studio will set the view to Android . The Project tool window provides a simple tree interface with files and nested folders that you can toggle. When you create an application in Android Studio, you find that the project is divided into an App folder and Gradle scripts. The App folder contains three subfolders ( manifests , java and res ) that make up your application. They are divided so that it should be fairly easy to determine which resources go in which folder. If you expand all of the folders in the project explorer you will see a vast array of files and folders. Most of them are managed by Android Studio. We will focus on the key folders and file types that we will be using as Android developers. 1. Manifests folderThis is where you would put your manifest files. Most Android apps have single manifest file. But an app may have several manifest files due to application versioning, or for supporting specific hardware. A AndroidManifest.xml file is generated inside manifest folder by Android Studio when you create a project. This file contains the configuration parameters of the project such as permissions, services and additional libraries. A manifest file also provides information to the OS and Google Play store about your app. 2. Java folderLet’s take a look at what is in the java folder. This is the folder in your project where you will be storing all of the source code files written in Java programming language. A MainActivity.java is automatically created in this folder by Android Studio. All of your classes will be available here, and Android Studio will even bundle together the package path so that you can work with the files without having to drill down through the folders that make up your package. 3. Res folderIt contains folders that help you separate and sort the resources of your application. Resources basically mean all the needed files except the source code. For example, while developing an app, you need to include resource files such as the app-logo, photos, sounds, videos or animations. Each file type should be added to its own folder to comply with the Android development standards. When you use Android Studio to create a new application, some folders will be automatically generated for you. However, these folders are not the only ones you can use in your project. The following are the folders that can be used inside of the res folder: 3.1. Drawable folderThe drawable folder contains graphics that can be drawn to the screen. e.g. images files (png, jpg and gif), various XML (clip drawable, insert drawable, layer list, level list, scale drawable, shape draggable, state list, transition drawable), and predetermined frame animations can be placed here: Bitmap file Nine-Patch file Layer list State list Level list Transition drawable Inset drawable Clip drawable Scale drawable Shape drawable 3.2. Layout folderThe layout folder contains XML files used for your layouts. These file are used to set up the layout for your Activity and is used for basic alignment of your layouts, components, widgets, and similar resources that are used for the UI of your application. activity_main.xml is automatically created in this folder by Android Studio. Layout folder may have multiple layout folders to handle different devices. This can be helpful when working with layouts that need to be adjusted for devices with more or less screen space available. 3.3. Mipmap folderThe mipmap folder contains the launcher icon files for the app. A launcher icon is a graphic that represents your app to users. The mipmap folder was introduced in Android 4.3. 3.4. Values folderThe values folder contains XML files that contain simple values, such as strings, integers, and colors. The values folder is used to keep track of the values you will be using in your application. To create applications with an easier maintenance cycle, it is highly recommended to no longer hard-code values into your code. Instead, place values in XML files inside of the values folder. When you create a new project with Android Studio, the following XML files will be generated automatically:
3.5. Other foldersNot all folders may be shown for your resources but you can create other folders for other resources in your application. Following list describes each folder name as well as what should be stored in that folder. animator anim color menu raw xml font Gradle ScriptsApk files are built using the gradle build system, which is integrated in the Android Studio. When we start an app, the gradle build scripts are automatically created. If you have special requirements for your project, you can specify these requirements here. The gradle scripts folder contains the scripts used to build the app are: configuration files, properties files, and setting files. Источник  Когда к мобильному устройству присоединены наушники  ОС Google Android развивается, и по всему видимому |